


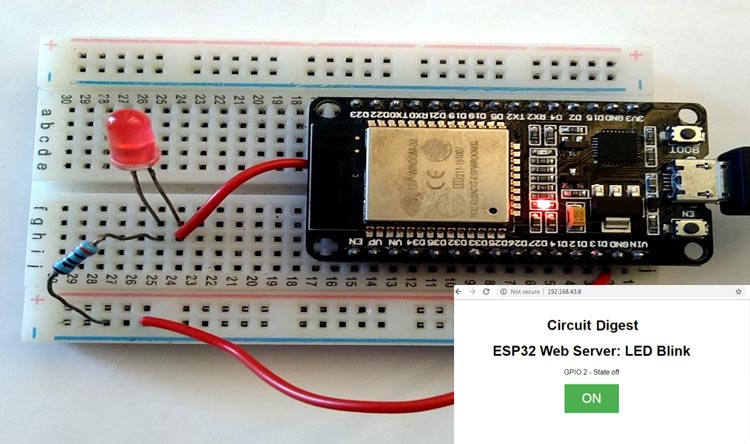
ESP series WiFi modules have become very popular among hobbyists and industries for IoT based projects. ESP32 is one of the popular board among ESP series modules as it has Dual core 32-bit CPU with built in Wi-Fi, bluetooth and sufficient amount of I/O pins. It is a small and cost effective device which can be used to make any project communicate with the internet. In this project I will create a web server with ESP32 that controls LED using Arduino IDE environment. Web server is a place where we can store the web pages, process them and deliver them to the web clients. Web server can be accessed with any device on the local network. We previously built the same webserver using Raspberry pi in one of the previous tutorials.
Requirements
- ESP32 module
- USB Cable
- Breadboard
- LED
- Jumper wires
- Resistor 1K
Circuit Diagram

Programming Part
Complete ESP32 web server code is given at the end of this project. In this section I will tell you how the code actually works.
The first thing you need to do is include the WiFi library.
#include <WiFi.h>
Now enter your network credentials i.e. SSID and password of your WiFi Network inside the double inverted comma.
const char* ssid     = "         ";
const char* password = "        ";
Next, declare an object of WiFi Server library, so we can access its functions. The argument of the instance formed will be the port number, since the default port for HTTP is 80, so I will use this value.
WiFiServer server(80);
The below line creates a variable to store the header of HTTP request:
String header;
Now, you have to make auxiliary variable to store the current state of your output.
String output2State= “off”;
Now, assign GPIO to your output, here I am using GPIO2 pin as my output you can change it according to the output you are using.
Const in output2= 2;
In void setup() function, we will initialize the baud rate, LED output, and will connect the module with the Wi-Fi using WiFi.begin(ssid,password); function. This function begins the Wi-Fi connection, wait for a successful connection and print the ESP IP address in the serial monitor.
void setup() {
  Serial.begin(115200);
    pinMode(output2, OUTPUT);
  digitalWrite(output2, LOW);
  Serial.print("Connecting to ");
  Serial.println(ssid);
  WiFi.begin(ssid, password);
  while (WiFi.status() != WL_CONNECTED) {
    delay(500);
    Serial.print(".");
  }
  Serial.println("");
  Serial.println("WiFi connected.");
  Serial.println("IP address: ");
  Serial.println(WiFi.localIP());
  server.begin();
}
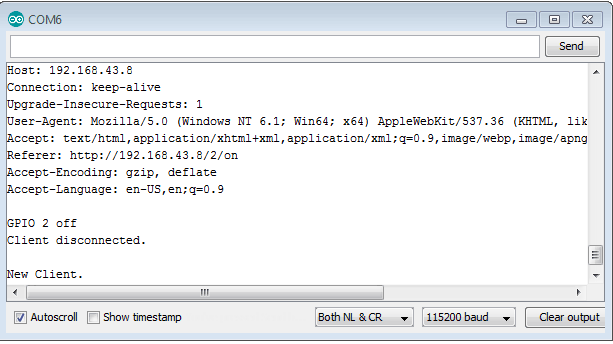
In loop() function you will have to program what happens when a new client establishes a connection with the web server. The ESP32 is always listening to the incoming clients using server.available(); and store the incoming data to a string variable and print the data on serial monitor.
void loop(){
 WiFiClient client = server.available();
if (client) {
   Serial.println("New Client.");
    String currentLine = "";
    while (client.connected()) {
      if (client.available()) {
        char c = client.read();
        Serial.write(c);
        header += c;
        if (c == '\n') {
         if (currentLine.length() == 0) {
          client.println("HTTP/1.1 200 OK");
            client.println("Content-type:text/html");
            client.println("Connection: close");
            client.println();
Now, if and else statements checks which button was pressed in your webpage, and controls the output accordingly. For example, if you press GPIO2 ON button then ESP32 receives a request on the /2/ON URL and the ESP32 turns the LED ON.
if (header.indexOf("GET /2/on") >= 0) {
Serial.println("GPIO 2 on");
output2State = "on";
digitalWrite(output2, HIGH);
} else if (header.indexOf("GET /2/off") >= 0) {
      Serial.println("GPIO 2 off");
      output2State = "off";
      digitalWrite(output2, LOW);
       }
HTML code for ESP32 Webserver
Creating the web page in HTML which is most important for this project, The ESP32 will send a response to your browser with some HTML code to build the web page. – Here we have embedded the complete HTML code in Arduino code using client.println. Complete code is given at the end.
Below line indicates that we are sending HTML.
<!DOCTYPE html><html>
The following lines make the web page responsive in any web browser.
client.println("<head><meta name=\"viewport\" content=\"width=device-width, initial-scale=1\">");
Now we have to style our web page, to decorate your page you can use CSS to style the buttons and background. You can change the properties according to you.
client.println("<style>html { font-family: Helvetica; display: inline-block; margin: 0px auto; text-align: center;}");
client.println(".button { background-color: #4CAF50; border: none; color: white; padding: 16px 40px;");
 client.println("text-decoration: none; font-size: 30px; margin: 2px; cursor: pointer;}");
 client.println(".button2 {background-color: #555555;}</style></head>");
Now set the heading of your web page. Here you can give any name or whatever you like.
client.println("<body><h1> Circuit digest</h1>");
client.println("<body><h1>ESP32 Web Server: LED Blink</h1>");
Now you have to write code to display the GPIO 2 current state. Use output2state variable, so that the state updates instantly when the variable changes.
client.println("<p>GPIO 2 - State " + output2State + "</p>");
Now, display the on or off button, depending on the current state of the GPIO. If the current state is off the you have to show ON button and vice- versa.
if (output2State=="off") {
 client.println("<p><a href=\"/2/on\"><button
class=\"button\">ON</button></a></p>");
            } else {
  client.println("<p><a href=\"/2/off\"><button class=\"button button2\">OFF</button></a></p>");
            }
At last, when the response ends, you have to clear the header variable, and stop the connection with the client with client.stop().
header = "";
client.stop();
Serial.println("Client disconnected.");
Serial.println("");
This is the whole programming procedure of the project; the complete code of this project is given at last of this article you can check.
Programming your ESP32 with Arduino IDE
Now you are in a stage to upload the code in your ESP32, we will upload the code in ESP32 using Arduino IDE by following the steps below:
- Connect your ESP32 to your PC via USB cable and make circuit as given above, here I am using GPIO2 you can use according to you.
- Open your Arduino IDE and copy this code to your IDE window but make sure that you provide correct WiFi credentials of your network.
- Now go to Tools--> Board--> ESP32 Dev module.
- Now go to Tools-->Port and select port to which your ESP32 is connected.
- Now click on upload to upload the code.
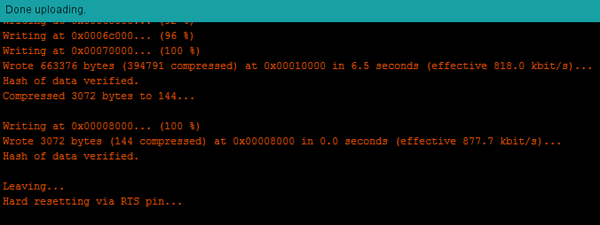
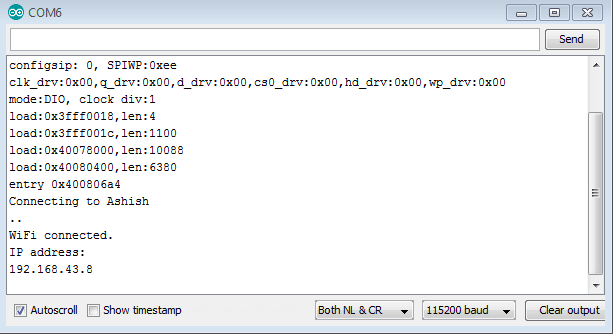
- After complete uploading you will find message like this in your output console.
- Now open your serial monitor and press reset button of your ESP32 and now your ESP starts connecting to your network, once connected it will give you IP of this ESP.
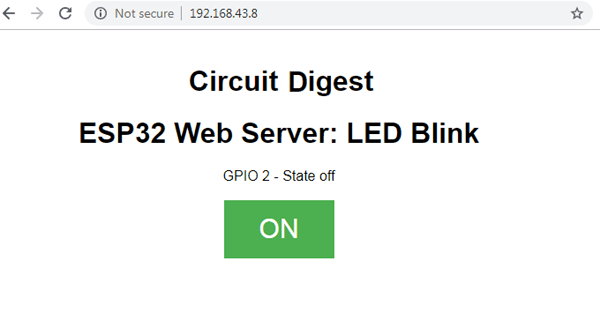
- Now open the browser and type this IP address and you will find following webpage.
- From this webpage you can control your LED and you can see on serial monitor as well what happening on background.
This is how you are successfully able to create a webserver and control LED from webpage. Like this you can also control Home appliances from anywhere in the world using ESP32 webserver.
#include <WiFi.h>
// Replace with your network credentials
const char* ssid = "Ashish";
const char* password = "12345678";
WiFiServer server(80); // Set web server port number to 80
String header; // Variable to store the HTTP request
String output2State = "off"; // Auxiliar variables to store the current output state
const int output2 = 2; // Assign output variables to GPIO pins
void setup() {
Serial.begin(115200);
pinMode(output2, OUTPUT); // Initialize the output variables as outputs
digitalWrite(output2, LOW); // Set outputs to LOW
// Connect to Wi-Fi network with SSID and password
Serial.print("Connecting to ");
Serial.println(ssid);
WiFi.begin(ssid, password);
while (WiFi.status() != WL_CONNECTED) {
delay(500);
Serial.print(".");
}
// Print local IP address and start web server
Serial.println("");
Serial.println("WiFi connected.");
Serial.println("IP address: ");
Serial.println(WiFi.localIP());
server.begin();
}
void loop(){
WiFiClient client = server.available(); // Listen for incoming clients
if (client) { // If a new client connects,
Serial.println("New Client."); // print a message out in the serial port
String currentLine = ""; // make a String to hold incoming data from the client
while (client.connected()) { // loop while the client's connected
if (client.available()) { // if there's bytes to read from the client,
char c = client.read(); // read a byte, then
Serial.write(c); // print it out the serial monitor
header += c;
if (c == '\n') { // if the byte is a newline character
// if the current line is blank, you got two newline characters in a row.
// that's the end of the client HTTP request, so send a response:
if (currentLine.length() == 0) {
// HTTP headers always start with a response code (e.g. HTTP/1.1 200 OK)
// and a content-type so the client knows what's coming, then a blank line:
client.println("HTTP/1.1 200 OK");
client.println("Content-type:text/html");
client.println("Connection: close");
client.println();
// turns the GPIOs on and off
if (header.indexOf("GET /2/on") >= 0) {
Serial.println("GPIO 2 on");
output2State = "on";
digitalWrite(output2, HIGH);
} else if (header.indexOf("GET /2/off") >= 0) {
Serial.println("GPIO 2 off");
output2State = "off";
digitalWrite(output2, LOW);
}
// Display the HTML web page
client.println("<!DOCTYPE html><html>");
client.println("<head><meta name=\"viewport\" content=\"width=device-width, initial-scale=1\">");
client.println("<link rel=\"icon\" href=\"data:,\">");
// CSS to style the on/off buttons
// Feel free to change the background-color and font-size attributes to fit your preferences
client.println("<style>html { font-family: Helvetica; display: inline-block; margin: 0px auto; text-align: center;}");
client.println(".button { background-color: #4CAF50; border: none; color: white; padding: 16px 40px;");
client.println("text-decoration: none; font-size: 30px; margin: 2px; cursor: pointer;}");
client.println(".button2 {background-color: #555555;}</style></head>");
// Web Page Heading
client.println("<body><h1> Circuit digest</h1>");
client.println("<body><h1>ESP32 Web Server: LED Blink</h1>");
// Display current state, and ON/OFF buttons for GPIO 2
client.println("<p>GPIO 2 - State " + output2State + "</p>");
// If the output2 State is off, it displays the ON button
if (output2State=="off") {
client.println("<p><a href=\"/2/on\"><button class=\"button\">ON</button></a></p>");
} else {
client.println("<p><a href=\"/2/off\"><button class=\"button button2\">OFF</button></a></p>");
}
client.println("</body></html>


