Web Controlled Notice Board using NodeMCU ESP8266

Web Controlled Notice Board using NodeMCU ESP8266

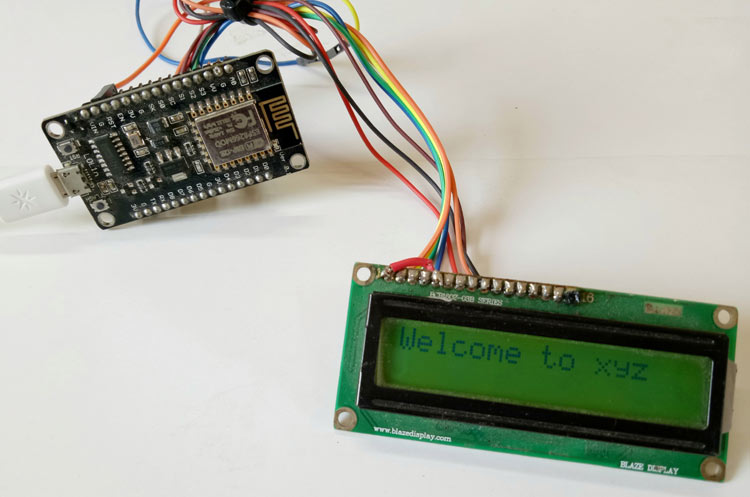
Advertisements and notices are very important for any organization to display and sell their products. You can see many digital advertisement boards in public places like railway stations, bus stations, airports etc. But with Internet of Things (IoT), there is a great shift in technology and we can also revolutionize this kind of notice board by making it wireless and controlled from a webserver.


Notice boards can be used anywhere and are very useful in Hotels, Malls, colleges, offices to display messages, alerts, offers etc. But it is very tedious task to change the notice everyday. So, in this project we will make a IoT based Smart notice board using NodeMCU where you can remotely change the notice using web browser.


Components Required:

  1. NodeMCU (ESP-12e)
  2. 16*2 LCD
  3. Working Wi-Fi Connection

NodeMCU is the most popular and easy to use Wi-Fi module used in IoT based projects. We have previously used NodeMCU in many IoT based projects.


Circuit Diagram:

Circuit diagram for this Smart Notice Board is given below

IoT Based Smart Notice Board Circuit DiagramPin connections for LCD and NodeMCU is given below

RS pin of LCD -> D2 pin of NodeMCU

R/W pin of LCD -> GND pin of NodeMCU

EN pin of LCD -> D3 pin of NodeMCU

D4 pin of LCD -> D5 pin of NodeMCU

D5 pin of LCD -> D6 pin of NodeMCU

D6 pin of LCD -> D7 pin of NodeMCU

D7 pin of LCD -> D8 pin of NodeMCU

Also connect potentiometer to LCD backlight pin to adjust the contrast of LCD.

Note that 16*2 LCD works on 5v so you have to use 5v power supply to turn on the LCD. Arduino Uno board can be used to give 5v to LCD.

Hardware Setup of IOT Based Notice Board using NodeMCU ESP8266


Code and Explanation

Here we will use Arduino IDE to code NodeMCU.

To program NodeMCU with Arduino IDE go to File–>Perferences–>Settings.

Programing NodeMCU with Arduino IDE for IoT based Temperature and Humidity Monitor


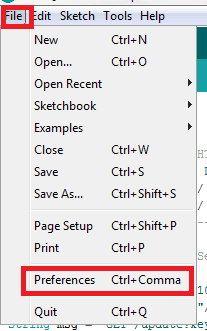
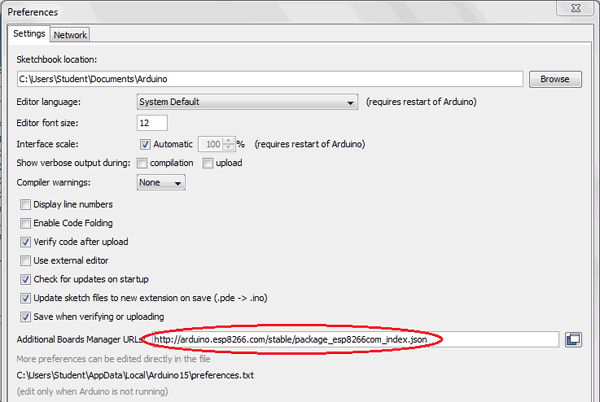
Enter http:// arduino.esp8266.com/stable/package_esp8266com_index.json into ‘Additional Board Manager URL’ field and click ‘Ok’.

 Add URL to Arduino IDE for IoT based Temperature and Humidity Monitor


Now go to Tools > Board > Boards Manager.

Manage Board in Arduino IDE for IoT based Temperature and Humidity Monitor


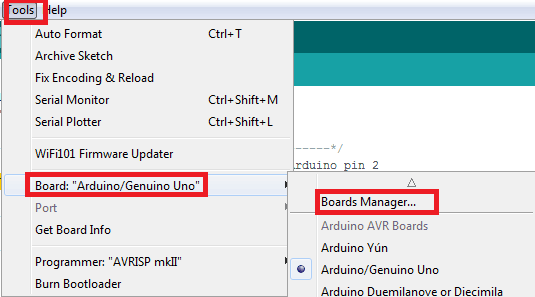
In Boards Manager window, Type esp in the search box, esp8266 will be listed there below. Now select latest version of board and click on install.

Install ESP8266 Library to Arduino IDE for IoT based Temperature and Humidity Monitor


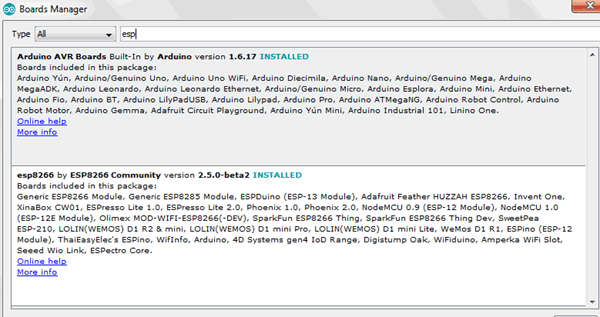
After installation is complete, go to Tools >Board >and select NodeMCU 1.0(ESP-12E Module). Now you can program NodeMCU with Arduino IDE.


We need two libraries to make the local web server. Download these libraries from the given links

  1. ESPAsyncTCP
  2. ESPAsycnWebServer

After downloading the .zip files, add the libraries in Arduino IDE by clicking on

Sketch->Include library -> Add .zip Libarary 

and then restart the Arduino IDE

Now, we are ready to write the code for this IOT notice board.


  1. First include all the required libraries using #include<>
#include <ESP8266WiFi.h>
#include <ESPAsyncTCP.h>
#include <ESPAsyncWebServer.h>
#include <LiquidCrystal.h>


  1. Then declare all the required pins for LCD and make an instance to use in the program. Also enter SSID and password of your Wi-Fi network as shown below.
const int RS = D2, EN = D3, d4 = D5, d5 = D6, d6 = D7, d7 = D8;   
LiquidCrystal lcd(RS, EN, d4, d5, d6, d7);
const char* ssid = "*********";
const char* password = "************";

  1. Now, make a simple a HTML page to enter and send the message to LCD. For this we have to create a get type Form to enter the message and a HTML button to send. This HTML Program is stored in memory using PROGMEM keyword.
const char html_page[] PROGMEM = R"rawliteral(
<!DOCTYPE HTML><html><head>
  <title>Smart Notice Board</title>
..
..
  <form action="/get">
    Enter Text to Display: <input type="text" name="input1">
    <input type="submit" value="Send">
..


  1. In void setup function, connect the NodeMCU module with Wi-Fi and also check for the incoming message from the server. Initialize the LCD and serial communication with 115200 baud rate and check for the given Wi-Fi and print the IP address.
void setup() {
  Serial.begin(115200);
   lcd.begin(16, 2);
..
  WiFi.mode(WIFI_STA);
  WiFi.begin(ssid, password);
  if (WiFi.waitForConnectResult() != WL_CONNECTED) {
    Serial.println("WiFi Failed!");
..


Now, send the webpage with input fields to the client computer.

 
 server.on("/", HTTP_GET, [](AsyncWebServerRequest *request){
    request->send_P(200, "text/html", html_page);
  });


Send a GET request to

<ESP_IP>/get?input1=<Message>

and print the received message on the LCD.

  server.on("/get", HTTP_GET, [] (AsyncWebServerRequest *request) {
..
    if (request->hasParam(input1)) {
      message = request->getParam(input1)->value();
      inputParam = input1;      
      lcd.print(message);


  1. Now, to scroll the message on the LCD, use
lcd.scrolldisplay()

function in void loop function.

void loop() {
    for (int positionCounter = 0; positionCounter < 29; positionCounter++) {
    lcd.scrollDisplayLeft();
    delay(500);
  }


That’s it, we have done with the coding part. Complete code with a demonstration video for this Web Controlled Notice Board is given at the end of this article.

Connect the NodeMCU with the laptop/PC using the USB cable and choose the board from the tools menu and upload the code.

Make sure your module and laptop/PC are connected with the same Wi-Fi network. Now, open the serial monitor and here you will see the IP address of your NodeMCU. Copy this IP and paste in the address field of browser.


Browser Setup for IoT based Digital Notice Board


After entering the IP address in the browser, you will see the page as shown below.


working Setup of IoT based Digital Notice Board

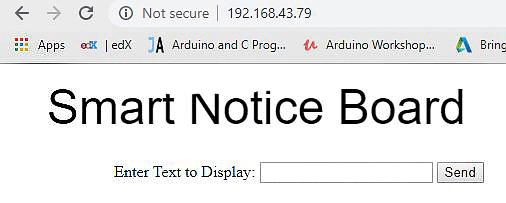
Now, enter the message and hit Send button. You will see the message in serial monitor as well as on the LCD. So this is how this IOT based Digital Notice Board works, and now you can change the message on notice board from anywhere in world using this webpage, all you have to set the port forwarding in your router.

Code

#include <ESP8266WiFi.h>
#include <ESPAsyncTCP.h>
#include <ESPAsyncWebServer.h>
#include <LiquidCrystal.h>
const int RS = D2, EN = D3, d4 = D5, d5 = D6, d6 = D7, d7 = D8;   
LiquidCrystal lcd(RS, EN, d4, d5, d6, d7);

AsyncWebServer server(80);

const char* ssid = "*******";  //replace ssid and password with your wifi network credentials
const char* password = "********";

const char* PARAM_INPUT_1 = "input1";

const char index_html[] PROGMEM = R"rawliteral(
<!DOCTYPE HTML><html><head>
  <title>Smart Notice Board</title>
  <meta name="viewport" content="width=device-width, initial-scale=5">
<p> <font size="9" face="sans-serif"> <marquee> Smart Notice Board </marquee> </font> </p>
  </head><body><center>
  <form action="/get">
    Enter Text to Display: <input type="text" name="input1">
    <input type="submit" value="Send">
  </form><br>
 
</center></body></html>rawliteral";

void notFound(AsyncWebServerRequest *request) {
  request->send(404, "text/plain", "Not found");
}

void setup() {
  Serial.begin(115200);
   lcd.begin(16, 2);
   lcd.clear();
   lcd.setCursor(0, 0);
   lcd.print("Smart Notice Dis");
  WiFi.mode(WIFI_STA);
  WiFi.begin(ssid, password);
  if (WiFi.waitForConnectResult() != WL_CONNECTED) {
    Serial.println("WiFi Failed!");
    return;
  }
  Serial.println();
  Serial.print("IP Address: ");
  Serial.println(WiFi.localIP());

  server.on("/", HTTP_GET, [](AsyncWebServerRequest *request){
    request->send_P(200, "text/html", index_html);
  });

  server.on("/get", HTTP_GET, [] (AsyncWebServerRequest *request) {
    String message;
    String inputParam;
    if (request->hasParam(PARAM_INPUT_1)) {
      message = request->getParam(PARAM_INPUT_1)->value();
      inputParam = PARAM_INPUT_1;
       lcd.clear();
       lcd.setCursor(0,0);
      
      lcd.print(message);
    }
    else {
      message = "No message sent";
      inputParam = "none";
    }
    Serial.println(message);
   
  request->send(200, "text/html", index_html);
  });
  server.onNotFound(notFound);
  server.begin();
}

void loop() {
    for (int positionCounter = 0; positionCounter < 29; positionCounter++) {
    lcd.scrollDisplayLeft();
    delay(500);
  }
}

Video

22 Comments

Hi there!

I'm trying to upload the code using Arduino IDE but I get some errors while uploading.

1- "wivi_i2c:15:35: error: unterminated raw string

exit status 1
unterminated raw string"

at this line==> const char index_html[] PROGMEM = R"rawliteral(

I removed --R"-- and tried again, I get the following error now


2- 

wivi_i2c:80:1: error: expected ',' or ';' at end of input

exit status 1
missing terminating " character

at this line==> </center></body></html>rawliteral";

So, I am stuck there. Is there a way of getting an ino file ?

I'm trying to upload the code using Arduino IDE but I get some errors while uploading.

1- "wivi_i2c:15:35: error: unterminated raw string

exit status 1
unterminated raw string"

at this line==> const char index_html[] PROGMEM = R"rawliteral(

I removed --R"-- and tried again, I get the following error now

First of all, let's take a look at Jordan's basketball shoes. Although the spy photos of the AJ37 generation have leaked, their main model is still the AJ36. These shoes have a good appearance and super performance. Several new color schemes have been exposed. The first is a joint model, which is a collaboration between Bal and AJ36 Low. The upper is made of black with some dark patterns on it. The lines on the neckline are more obvious. The outer edge of the shoelace hole is added with yellow lines. The tongue is made of suede material, and the inner lining is made of white outsole and black pattern combination. The midsole is also made of black, and the same is true for the outsole. The lines that were originally used as embellishments have become black and white patterns. The joint model has a tribal style and a high appearance. The second AJ36 LOW is more conventional, with a low-top shape, the upper is filled with light yellow, and black details are added to the tongue position. The Jumpman logo is expressed in lotus color, and there are raised dot patterns on the tongue. , is also filled with light yellow, with pink lines embellished, and the outsole is marbled. The overall feeling is relatively plain and pretty. The third pair is more powerful. It is a special model created by Jordan for NBA shooting coach Chris Matthews. The name is AJ36 Low "Lethal Shooter". It can get the exclusive PE made by the brand, and the card surface is full. The texture and details of these shoes are perfect. Very in place, the upper is filled with black, and it becomes a suede material with dark patterns on it. There is a golden rose on the tongue, a golden splash of ink is added to the midsole, and a golden translucent crystal sole on the outsole. , the appearance is very high. The following pair of Air Jordan 36s are limited color matching. Can you see the relationship between him and Chinese culture? Brother Gou didn't see it too much, but the shoes are pretty good-looking. The vamp is presented in a tie-dye style. It is composed of orange, blue, pink and other color transitions. The color blocks are more obvious, and the outsole is colorful and translucent crystal bottom, which is really too fancy. In the end, this pair of AJ36 is very strong. He is related to Anthony. Although the signature shoes have been discontinued, the brand is still very interested in him, and various PE styles are super attentive. Recently, a special model of AJ36 has been exposed on the Internet, which is related to a pair of shoes he wore in his early years. There are many details and he is very attentive. This pair of shoes is a special model made by Guage for its AAU League team (Team Melo). The full name is AJ36 Air Bakin PE Nike air bakin. His design inspiration is the sneakers NIKE worn by Guage when he participated in the AAU League in high school. Bakin, black and red, with a special texture on the upper, a very handsome color scheme, very meaningful, I believe the boys who get the shoes will be very happy.

Full release涓ˋir Jordan 4 "Amethyst Wave" Air Jordan 4 from Nike legendary designer Tinker Hatfield (Tinker Hatfield) debuted in 1989 and has been highly regarded since its inception. The upper of this AJ4 "Amethyst Wave" is presented in a canvas material with a tie-dye effect. The galaxy-like pattern is paired with black and cement gray decoration, which cleverly balances the mysterious mood and street fashion; translucent plastic is integrated into the eyelets, side and heel. Designed to make you look dynamic on and off the field. On June 9th, it will be fully landed on SNKRS and designated stores for sale! Upcoming Release涓ˋir Jordan 1 High hG "Visionaire"

NO.1Gucci GG Marmont mini ¥6900 This GG Marmont series mini handbag is the maximum capacity among all minis. The body of the bag is made of quilted leather, the version is soft and firm, and there are the iconic double G elements of this series, not only the high usage rate of going out, but also the unique white is also very fashionable.

Nicolas Ghesquiere said: "I hope that this collaboration will demonstrate Fornasetti's consistent modern artistic temperament. Fornasetti's works are enduring, showing superb hand-painting techniques, and casting a magical brilliance for the world. I especially love Fornasetti. The re-exploration and interpretation of classicism and ancient Roman heritage has given new connotations to historical imagery."

The laser texture rendering Air Jordan 4 "Carmelo Anthony" PE is also quite rare. During born in 2008 Beijing Olympic Games, the US team this melon PE color rendering, Air Jordan 4 on four generations of shoe uppers to CD brings stunning visual experience. In addition to the overall body of the shoe injection navy red decorative details, the inside of the tongue but also with the US team tag, as well as the opening of the Beijing Olympic Games date 8/8/08 words. Followed by a white places dotted red Jumpman, no matter from which point of view, regardless of which view the details are very fine!

Ophidia series Gucci's double G presbyopia plus the iconic red and green webbing make the whole series full of Gucci flavor. Among them, the shell bag, envelope bag, camera bag, and round cake bag are all classics among the classics. .

And on Xiaohongshu, there are also user feedbacks that Neverfull handbags bought for thousands of dollars in 2016 have almost doubled now鈥斺€擫ouis Vuitton Outlet official website shows that the current official price of Neverfull medium-sized handbags is 14,400 yuan.

Add new comment

The content of this field is kept private and will not be shown publicly.

Plain text

  • No HTML tags allowed.
  • Lines and paragraphs break automatically.
  • Web page addresses and email addresses turn into links automatically.