


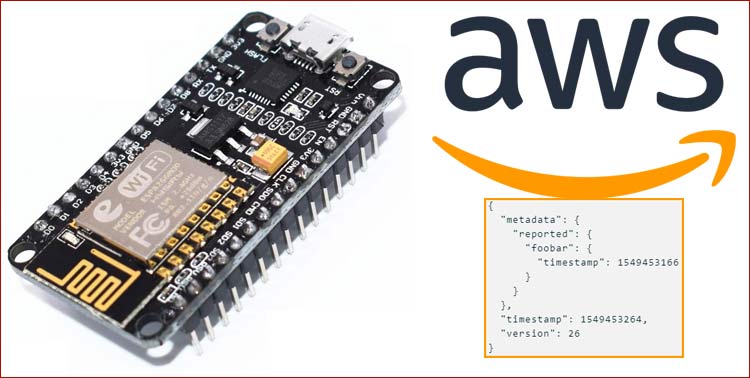
Internet of Things (IoT) is being integrated in almost every device nowadays. There are number of hardware and software IoT platforms are available in market for building IoT based application. We have used few of hardware IoT devices like ESP32, Raspberry Pi, and ESP8266 to build simple LED projects to complex applications. Also, Software platform for IoT like Adafruit, IFTTT, Blynk App, Artik cloud, Google Firebase etc.
Not only in Ecommerce but Amazon is also focusing in IoT and providing cloud based service named as AWS IoT. Here, AWS IOT stands for Amazon Web Service Internet of Things. This service allows us to connect our devices to the internet for processing, operating and exchanging data securely. Along with AWS IOT the Amazon Web Services also provides tons of other features like virtual machine deployment, web-hosting, etc.
In our last tutorial of getting started with Amazon AWS IoT we have covered how to make Amazon AWS IoT Cloud account and how to access its features. Now, we will show that how you can connect ESP8266 NodeMCU with Amazon AWS IoT Cloud.
Prerequisite
- Account on Amazon AWS cloud service (for this you can visit last article)
- ESP8266 nodemcu library installed in your Arduino IDE.
- ESP8266 nodemcu module and USB cable.
To perform this project you have to follow the below steps in sequential manner:
Creating AWS thing with Certificate and policy
Step 1:- After creating account, search for “iot core” under AWS service, click on it to open the console.

Step 2:- Now, a dialog box will appear; just click on “get started”, as shown below.

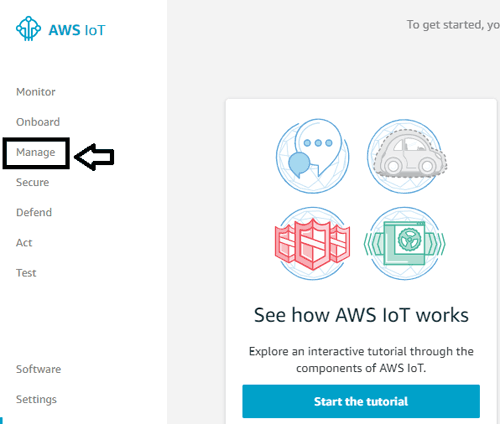
Step 3:- The main page of AWS IoT will open, where you will find some documents for getting started with AWS IoT.
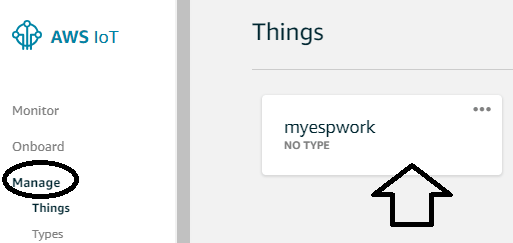
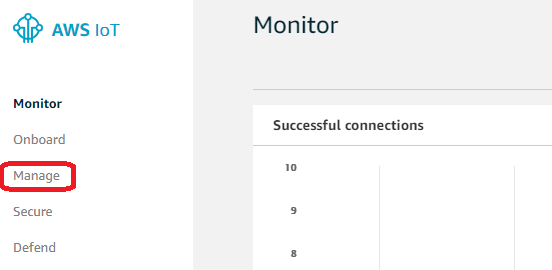
Now, on the left side Click on the “Manage” option.
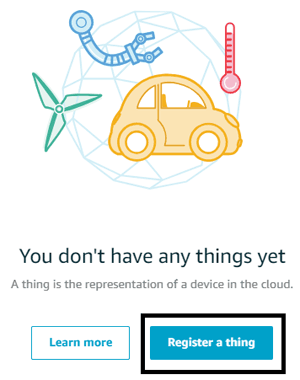
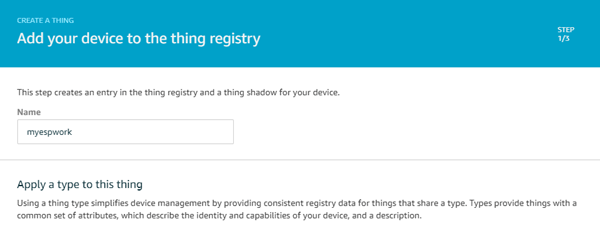
Step 4:- Now, register a thing to proceed. A thing is a device which can connect to the internet, so we will create a thing on this console through which our device can communicate.
Click on “Register a thing” button, as shown in the below-mentioned image:
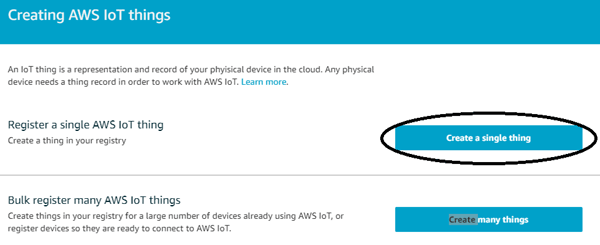
Step 5:- It on you that how much things you needed. As you can create multiple things or even a single. For getting started with AWS IoT we are creating a single things, so click on “create a single thing”.
Step 6:- Name your thing, like I am giving myespwork. After naming, scroll down and click on next.
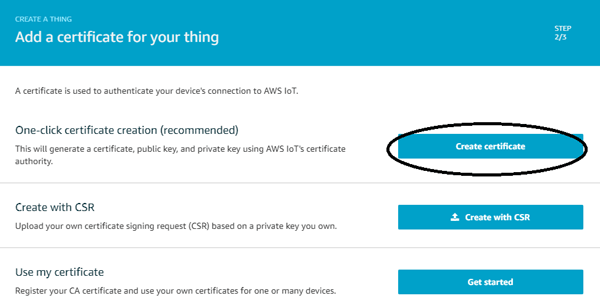
Step 7:- Now click on “Create Certificate”.
Step 8:- Now, AWS will provide the keys for the thing you created earlier. You can access this thing through these keys only. First, click on Activate button and download the three key files and save it on your PC.
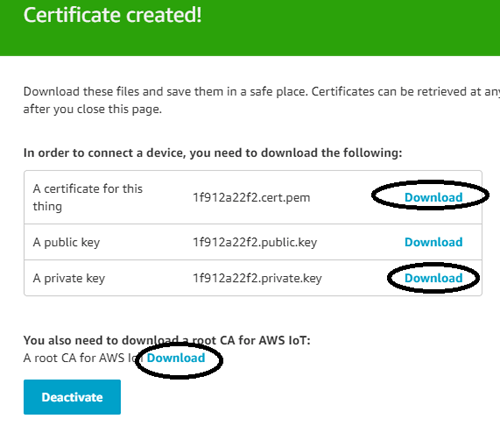
The three files shown in above figure should be downloaded in a folder on you system.
Note: For some users the CA file downloaded in some other format, it might open as a stream of code. So, to get rid of this problem, just right click on the code and save as it in ‘.pem’ extension file.
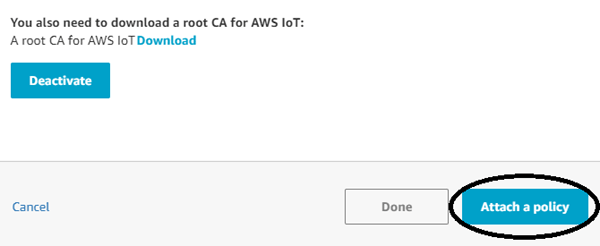
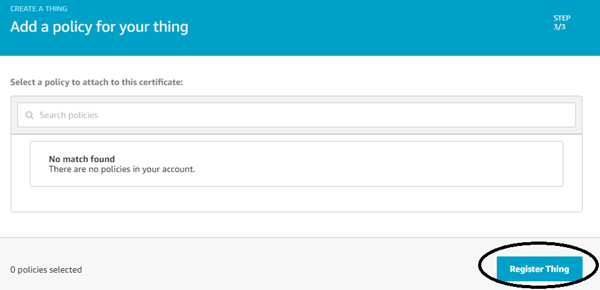
Step 9:- After creating the certificate we need to create a policy for the thing. For this click on “Attach a policy”.
Step 10:- At this time there will be no policies in your account, since you haven’t created one, so for now click on “Register Thing”.
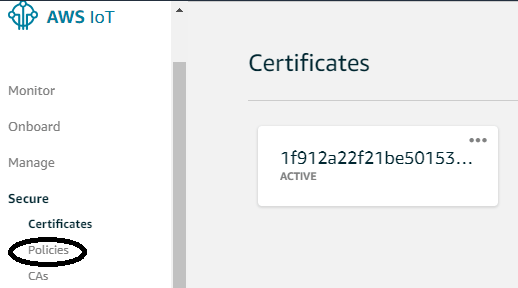
Step 11:- Now, a window will open, here you can create policy by clicking on “secure” and then “policies” in the left side menu.
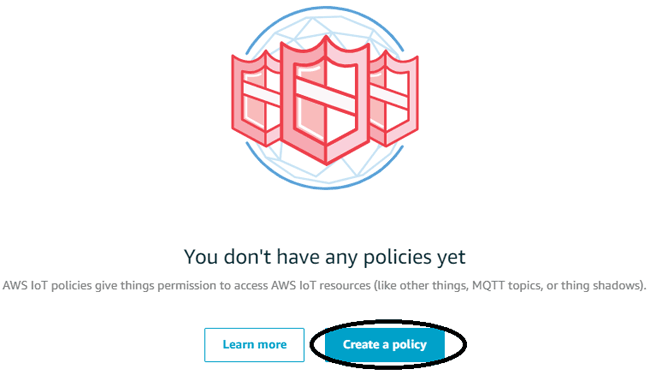
Step 12:- Now click on “Create a policy”.
Step 13:- Here, name your policy according to you. And, in the action box type iot:* and in Resources ARN type *. Allow button should also be checked in it. Finally press the “Create” button on the end of the page to create a policy.

Step 14:- Now, a window will open, here click on ‘secure’ and then ‘certificates’. Therefore, you have policy now, attach it by clicking on ‘certificates’ and then ‘Attach policy’.
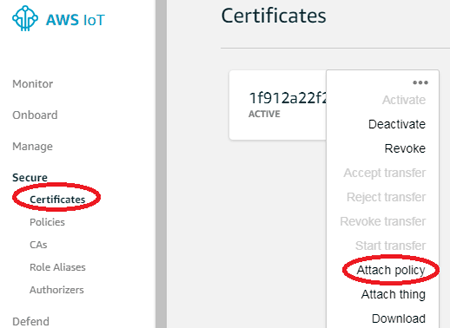
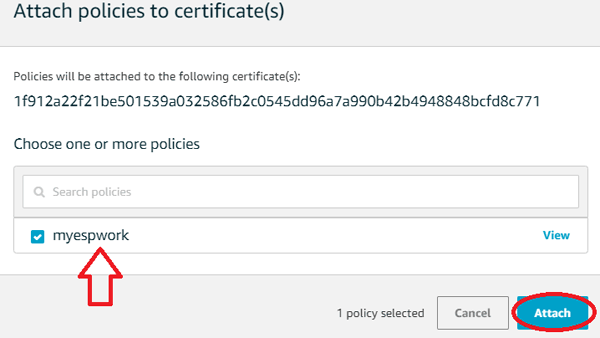
Step 15:- Now, select the name of the policy you have created and then click on “Attach” button.
We have successfully created and attached a certificate and a policy with the thing. Now we can check if the thing is working by using the “test” option in the AWS IOT console. But before this we will need Broker address of our thing.
Getting AWS Thing details
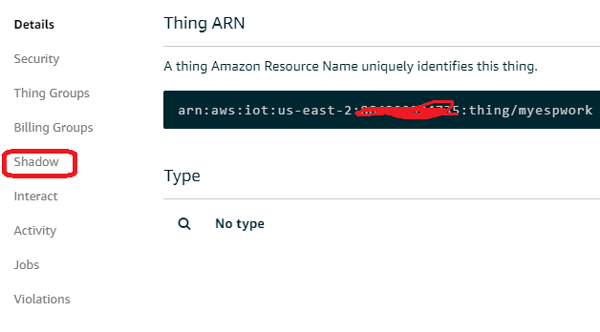
After creating a thing we need to get the details of the thing like its broker address, update link, etc. to access the thing from anywhere. For this click on “Manage” option and then click on the name of the thing.
Now a window will open, in this navigate to “interact” and you will be provided all the links to access your things.
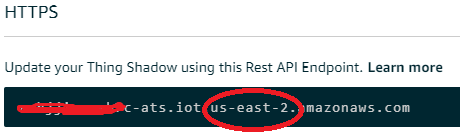
The circled information is your AWS region which you will required later during programming and the whole HTTPS link is your AWS Domain, it will also required in your code so just copy this in your notepad.
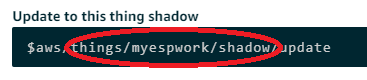
This circled information is your AWS path which also you will be required in code.
That’s it for this service, now we will be required AWS ID and AWS secret key.
Getting AWS ID and AWS Secret key for AWS IoT
To get AWS ID and AWS secret key, navigate to services at top of this menu, and search for IAM.
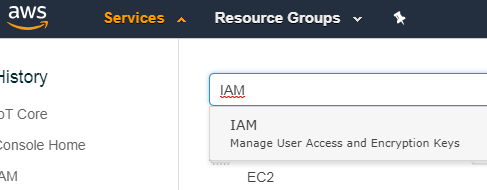
Click on it and a welcome window will appear.
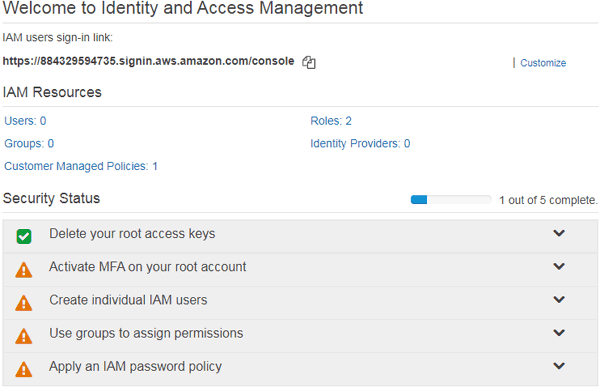
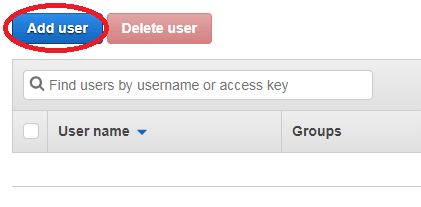
Here, click on “Users” and then add a user by clicking on “Add user”.
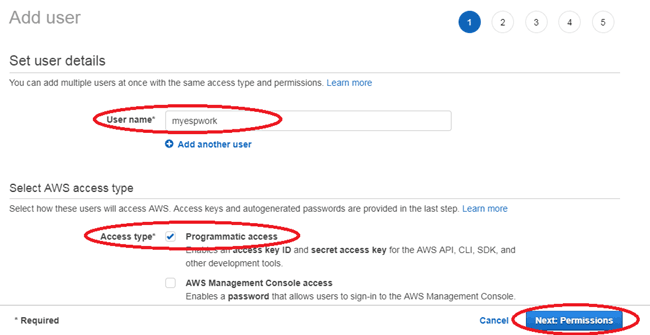
Now, give a user name and in Access type click on “Programmatic Access” and then click on “Next”.
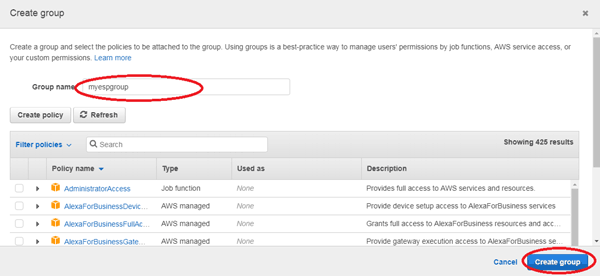
Again a window will pop-up, in this click on “create group”.
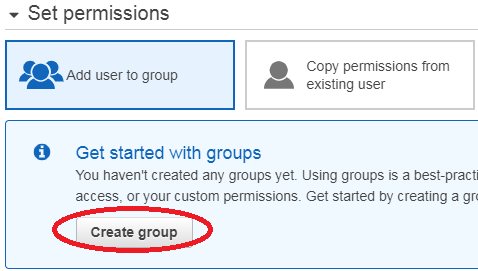
Name the group and click on “Create group”.
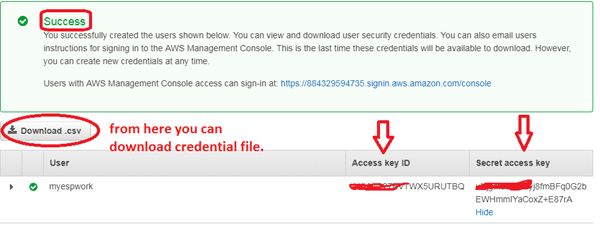
Now, click on “Next” two times and after that a user will be created and you will be get your Access ID and secret access key. Also, you can download this credential file.
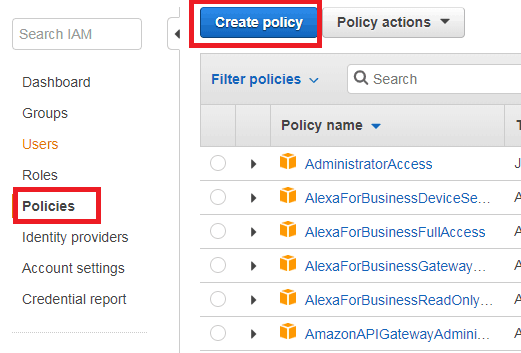
Now, go back to the main window, and on the left hand side click on “Policies” and then “create policy”.
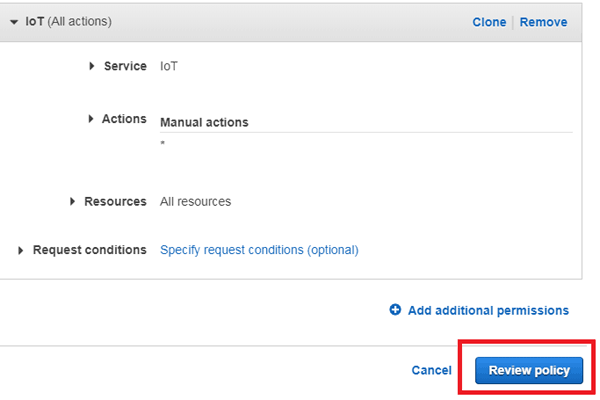
After that, search for “IoT”, and in actions go for “All IoT Actions” and in Resources go for “All resources” and then click on Review policy.
Name your policy and click on “Create Policy” to create a policy for your things.
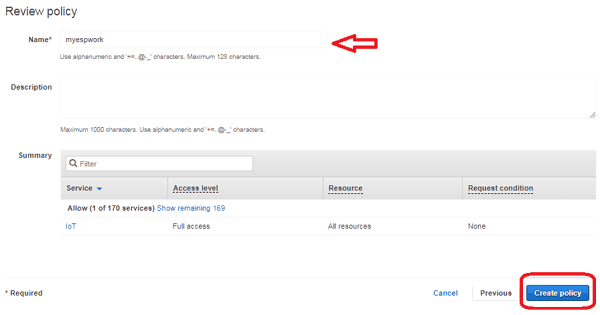
Yippee! Your policy is created.
Now, we need to code our ESP8266 using Arduino IDE for Amazon AWS IoT Cloud.
Preparing ESP8266 NodeMCU with Arduino IDE for Amazon AWS IoT cloud
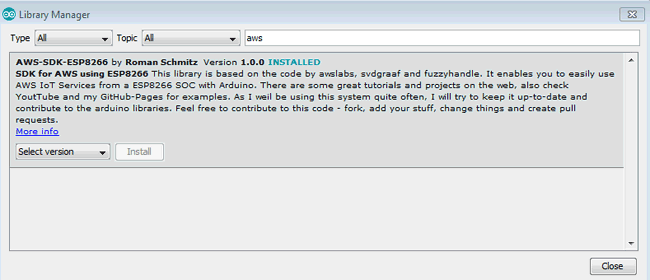
To work with AWS IoT cloud services we will be requiring its library so for this open your Arduino IDE and go to Sketch---->include library----->manage library and search for AWS library and there will be an AWS library for ESP8266, install it.
The Complete code for this project is given at the end, but before uploading in your NodeMCU you have to edit some parameters in code. Like, in the below code enter WiFi credentials of your network.
char *ssid="XXXXXXXXX";
char *password="XXXXXXX";
Now, in the below code, enter your parameters which you have got in the earlier steps. Now, after editing the code upload it in your ESP8266 NodeMCU.
  iotClient.setAWSRegion("us-east-2");
  iotClient.setAWSEndpoint("amazonaws.com");
  iotClient.setAWSDomain("XXXXXXXXXXXc-ats.iot.us-east-2.amazonaws.com");
  iotClient.setAWSPath("/things/myespwork/shadow");
  iotClient.setAWSKeyID("AKIAJQ27BVXXXXXXXX");
  iotClient.setAWSSecretKey("uNjgmdJWFSyj8fmBFq0GXXXXXXXXXXXXXX");
Testing Esp8266 NodeMCU with Amazon AWS IoT
After uploading the code open AWS console in your browser and go to services and then go to IoT Core services again, in this click on “Manage” at left side of this menu.
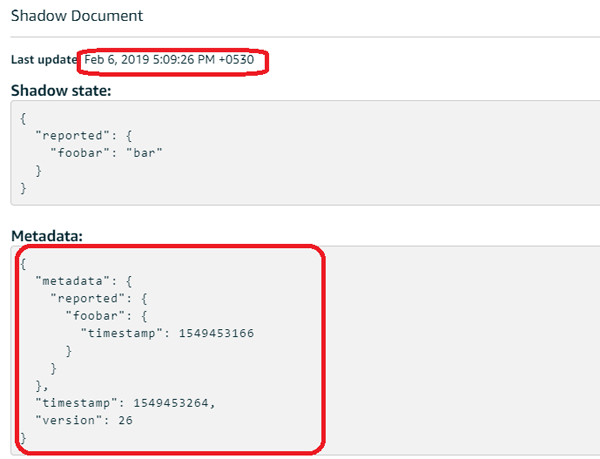
Now select the thing you have created earlier and in this click on “Shadow” at left side of this menu.
After that, in the shadow document window you will be observing a message sent by your ESP and real time also.
Now open serial monitor of your Arduino IDE and see the output message, as shown in the below image.
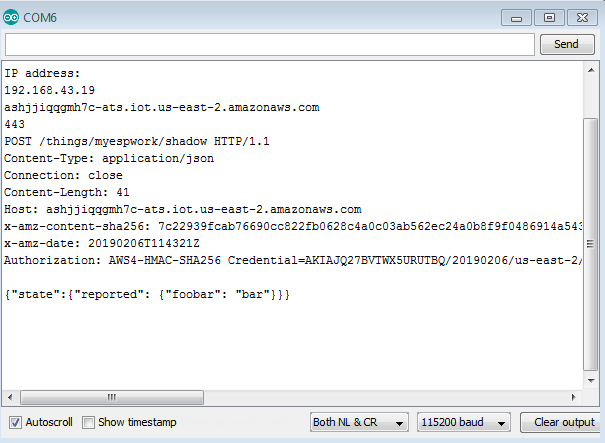
This is how you can send data or message to AWS IoT cloud using ESP8266 NodeMCU.
#include <ESP8266WiFi.h>
#include <AmazonIOTClient.h>
#include "ESP8266AWSImplementations.h"
Esp8266HttpClient httpClient;
Esp8266DateTimeProvider dateTimeProvider;
AmazonIOTClient iotClient;
ActionError actionError;
char *ssid="Ashish";
char *password="XXXXXXXXXX";
void setup() {
Serial.begin(115200);
delay(10);
// Connect to WAP
Serial.print("Connecting to ");
Serial.println(ssid);
WiFi.begin(ssid, password);
while (WiFi.status() != WL_CONNECTED) {
delay(500);
Serial.print(".");
}
Serial.println("");
Serial.println("WiFi connected");
Serial.println("IP address: ");
Serial.println(WiFi.localIP());
iotClient.setAWSRegion("us-east-2");
iotClient.setAWSEndpoint("amazonaws.com");
iotClient.setAWSDomain("XXXXXXXh7c-ats.iot.us-east-2.amazonaws.com");
iotClient.setAWSPath("/things/myespwork/shadow");
iotClient.setAWSKeyID("AKIAJQ27BXXXXXXXX");
iotClient.setAWSSecretKey("uNjgmdJWFSyj8fmBFq0G2bXXXXXXXXXXXXX");
iotClient.setHttpClient(&httpClient);
iotClient.setDateTimeProvider(&dateTimeProvider);
}
void loop(){
char* shadow = "{\"state\":{\"reported\": {\"foobar\": \"bar\"}}}";
char* result = iotClient.update_shadow(shadow, actionError);
Serial.print(result);
delay(60000);
}


