


In this tutorial, we are going to build a Bitcoin Predictor Application with an attractive Graphical User Interface (GUI). At the end of this tutorial, you will be able to build a GUI application that will show the price of the Bitcoin of tomorrow. We will be using Google colaboratory to train our model. We will use QT Designer to design our GUI application and then we will reprogram the output layout of the QT Designer to attach our algorithm.
Here, I am going to use a Long Short Term Memory (LSTM) model that is based on a Recurrent Neural Network. But, before we proceed further, let’s try to understand the concept behind this project.
Understanding Recurrent Neural Network and LSTM
A Recurrent Neural Network (RNN) is a powerful class of Neural Network. The RNN is the only one that consists of internal memory. In 1980’s, the RNNs were created but we have seen their actual potential in recent years. Recurrent neural networks are helpful in modeling sequence data. They are derived from a feedforward networks and exhibit similar behavior to how human brains function.
Now the question arises as to where the RNNs can be used? The simple answer will be whenever there are some sequential data, we will use the RNNs. The RNNs are being used in the software behind Siri and Google Translate. So, now you can understand the importance of RNNs in everyday life.
The Long Short Term Memory (LSTM) model is a form of recurrent neural network capable of learning long-term dependencies. The LSTM can improve the large-vocabulary speech recognition and text-to-speech synthesis, etc. Google’s speech recognition reportedly experienced a dramatic performance jump of 49% through the CTC-trained LSTM. We are going to use this LSTM to train our custom model.

The above picture shows an unrolled recurrent neural network. As you can see in the picture, it takes the X(0) from the input sequence and then it gives the output h(0). Then both the X(0) and h(0) are used as an input with the x(1) in the next block. Similarly, h(1) and x(1) is the input for the next block with the x(2) and so on. This way, it keeps remembering the context while training.
Predicting Bitcoin Price using Deep Learning
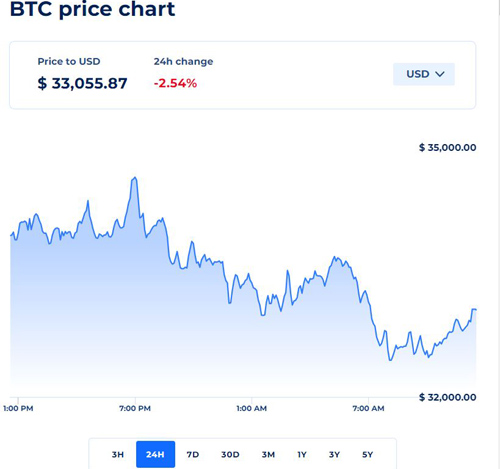
Bitcoin is a cryptocurrency and it is a trending topic in the market. Some marketplaces like “bitcoin exchanges” allow people to buy or sell bitcoins using different currencies. The prediction of the price of such kind of cryptocurrency is not an easy task. We are going to collect the record history of the bitcoin prices and we will use our LSTM model to predict what will be the price of the bitcoin on the next day. The following image is a graphical view of the bitcoin prices in USD.
Installation of the Required Libraries
We need to install some special libraries to build this project in Python.
- Tensorflow (v2.3.0)
- Keras (v4.3)
- Numpy (v1.18.1 or < 1.20.0)
- PyQt5 (v5.15.4)
- Requests (2.23.0)
- Pandas (v1.0.1)
Note: You need to be careful with the versions of the libraries that I have mentioned here. I have already tried this program with the latest versions, but there were some errors that I have faced especially with the numpy library.
Steps to Predict Bitcoin Price with LSTM using Python
We will go through the following four simple steps to build this project. i.e.
- Collecting, Preparing and Normalizing the dataset.
- Building and Training the RNN and Saving the Trained model.
- Testing the model and Denormalizing it.
- Preparing the GUI of the project.
- Running the GUI.
Let’s discuss the above mentioned steps.
Collecting, Preparing, and Normalizing the Data:
We need to collect the latest data of the history of the bitcoin prices. There are several resources available on the Internet. Some of them allow the users to download the historical data of the bitcoin prices. I have searched some APIs and then I have decided to use the API from coinranking. If you want to use some other APIs then we can use these freely. But make sure that you have accurate dataset. I defined a function named collectingLatestBTC(). We can provide the timePeriod as a parameter of this function, but by default it is set to 5years. For more timePeriod you can refer to the API documentation. The collectingLatestBTC() function will return a dataframe of the historical prices of the Bitcoin with proper Date and Time.
def collectingLatestBTC(timePeriod="5y")
    r = requests.get("https://api.coinranking.com/v2/coin/Qwsogvtv82FCd/history?timePeriod=" + timePeriod)
    latest_coin = json.loads(r.text)["data"]["history"]  # Reading the JSON and cleaning the irrelevant parts
    df = pd.DataFrame(latest_coin) #Creating the dataframe
    # print(df.head(10))  # uncomment this line to see the old 10 days data
    # print(df.tail(10)) # uncomment this line to see the latest data of past 10 days.
    df['price'] = pd.to_numeric(df['price'])
    df['timestamp'] = pd.to_datetime(df['timestamp'], unit='s').dt.date
    return df.groupby('timestamp').mean()['price']
Explanation:
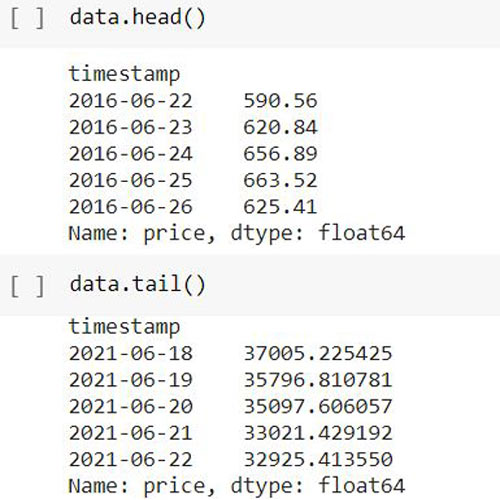
In the collectingLatestBTC() function uncomment the “print(df.head(10))” and “print(df.tail(10))” to see the top 10 days data and the bottom 10 days data from the table. In my case, I used df.head() and df.tail() to get the top 5 days data and the bottom 5 days data of the table. I have shared the output in the below image. In your case the bottom data of the table will be different.
Now, we need to create some functions for preparing our dataset and normalizing it. The following functions defined as preparing_prices(data) and normalize_prices(windows_data). We are going to use these functions one by one for preparing and normalizing the data that is returned by the collectingLatestBTC() function.
def preparing_prices(data, seq_len=30):
    # # storing the 30days prices in evry i
    price_matrix = []
    for index in range(len(data)-seq_len+1):
        price_matrix.append(data[index:index+seq_len])
    return price_matrix
def normalize_prices(window_data):
    normalised_data = []
    for window in window_data:
        normalised_window = [((float(p) / float(window[0])) - 1) for p in window]
        normalised_data.append(normalised_window)
    return normalised_data
We are going to use these three functions while training our data and while making the prediction. So, I have decided to make a separate python file for these functions. You can find the functions.py file in the downloaded project directory.
Building and Training the RNN and Saving the Trained Model:
When we have the normalized data, we will use the following TrainTestSplit() function on that data to prepare the training data and testing data for our model.
def TrainTestSplit(price_matrix, train_size=0.9, shuffle=False, return_row=True):
    price_matrix = np.array(price_matrix)
    row = int(round(train_size * len(price_matrix)))
    train = price_matrix[:row, :]
    if shuffle==True:
        np.random.shuffle(train)
    X_train, y_train = train[:row,:-1], train[:row,-1]
    X_test, y_test = price_matrix[row:,:-1], price_matrix[row:,-1]
    X_train = np.reshape(X_train, (X_train.shape[0], X_train.shape[1], 1))
    X_test = np.reshape(X_test, (X_test.shape[0], X_test.shape[1], 1))
    if return_row:
        return row, X_train, y_train, X_test, y_test
    else:
        X_train, y_train, X_test, y_test
Now, we have the training and testing data for our LSTM model. The following code snippet is to build the model and train the model with 100 epochs. An epoch refers to one cycle through the full training dataset. So, we are doing 100 cycles through our training dataset.
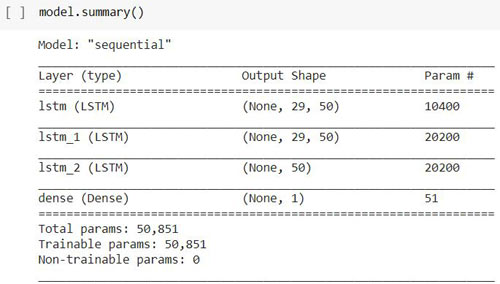
model=Sequential()
model.add(LSTM(50,return_sequences=True,input_shape=(29,1)))
model.add(LSTM(50,return_sequences=True))
model.add(LSTM(50))
model.add(Dense(1))
model.compile(loss='mean_squared_error', optimizer='adam')
Explanation:
The above code is to create our model architecture. Here, we are using a Sequential() model. I have added three Layers of LSTM followed by a dense layer. The following image is the summary of our sequential model.
The following code is to use the training and testing data into our model by using model.fit(). I used time library to calculate the processing time of the training.
start_time = time.time()
model.fit(X_train, y_train,validation_data=(X_test,y_test),epochs=100,batch_size=64,verbose=1)
end_time = time.time()
processing_time = end_time - start_time
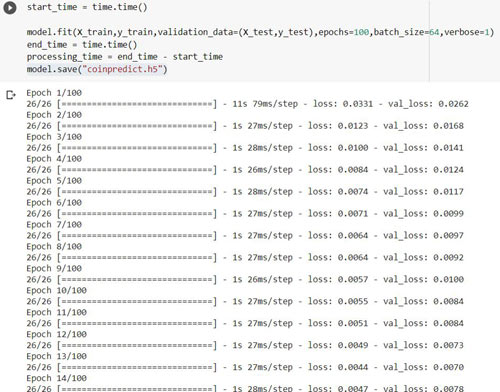
The above image shows the training process of our model. It will take some time to train the model on our dataset. In my case, It took around 10 minutes to 15 minutes as I have used GPU in google’s colaboratory. I am suggesting you to use the same if you don’t have any GPU in your PC. Now time to save the model. To save the model, We have inbuilt function defined as save() in the Keras library.
model.save("model/coinpredict.h5")
So, we have trained our custom model with LSTM and save it as a file named “coinpredict.h5” in the “model” folder. You can find this folder in the downloaded zip file.
Testing the Model and Denormalizing it:
Now, we can predict the Bitcoin value for tomorrow. But just one more step is left before making the prediction and that is we need to get some past price values of the BTC to make the prediction. So we are going to use the collectingLatestBTC() function again. But this time we will pass the timePeriod parameter with “30d”. It will give us the BTC prices for the past 30days. Then we need to prepare the testing data by using the preparing_prices() and normalize_prices() functions. Now, we can load our model and test our model with the testing data of past 30days.
Let’s do the prediction on our testing data. In the following code you can see that I am importing load_model from the tensorflow api. Then I used load_model() functions to save our own custom model. The model.predict() function is used to predict the price value on our testing data that is X_test.
from tensorflow.keras.models import load_model
model = load_model('coinpredict.h5') #loading the model
preds = model.predict(X_test, batch_size=2) #predicting the price value on our testing data
The predicted result is in normalized form. So, we need to build a denormalizer() function which will return the actual price value. The following denormalizer function will take the predicted values and then it will convert that predicted value into an original value.
def denormalizer(preds, data, train_size=0.9, train_phase=False:
    price_matrix = np.array(preparing_prices(data))
    if train_phase:
        row = int(round(train_size * len(price_matrix)))
    else:
        row = 0
    date = data.index[row + 29:]
    date = np.reshape(date, (date.shape[0]))
    X_test = price_matrix[row:, :-1]
    y_test = price_matrix[row:, -1]
    preds_original = []
    preds = np.reshape(preds, (preds.shape[0]))
    for index in range(0, len(preds)):
        pred = (preds[index] + 1) * X_test[index][0]
        preds_original.append(pred)
    preds_original = np.array(preds_original)
    if train_phase:
        return [date, y_test, preds_original]
    else:
        import datetime
        return [date + datetime.timedelta(days=1), y_test]
To get the predicted BTC price for the next day we need to use the denormalizer() function. This function will return the predicted value in a denormalized form so that we could understand the predicted value of the bitcoin.
final_pred = denormalizer(preds, ser, train_size=0.5, train_phase=False)
final_pred[1][0]
Preparing the GUI of the project:
So, we have done with our prediction of the BTC prices for tomorrow. Now, we need to build an attractive GUI. We are going to use QT Designer to make our custom GUI. You can follow some simple drag and drop method to design your own layout, but I am not going to explain in detail about the QT Designer software. I have given the layout file and the python file in the project directory. You need to run the main_window_ui.py file. But before running this file, make sure that you have the functions.py file and the model folder in the same directory. If you have a good understanding in Object-oriented concepts in python3 then I am suggesting you to change the code of the main_window_ui.py file according to your need.
Let’s discuss some important function that I have used in the main_window_ui.py file.
You will find setupUi() under the class of Ui_MainWindow(). The setupUi() is auto generated code by the pyqt5 library. It was generated when I convert the layout file of the QT Designer into a python3 file. I have added the functionality of the buttons that is defined as cancel_button() and predict_button(). I have also added another prediction_result() which will return the predicted price in the labeled text.
def cancel_button(self):
    sys.exit(app.exec_())
def predict_button(self):
    self.result = self.prediction_result()
    self.result = str(self.result)
    print(self.result)
    self.label_4.setText(self.result)
def prediction_result(self):
    price_matrix = preparing_prices(self.data2)
    X_test = normalize_prices(price_matrix)
    X_test = np.array(X_test)
    if X_test.shape[1] >= 30:
        X_test = X_test[0][-29:]
    X_test = np.array(X_test)
    X_test = np.reshape(X_test, (1, X_test.shape[0], 1))
    # Loading the model
    model = load_model('model/coinpredict.h5')
    preds = model.predict(X_test, batch_size=2)
    final_pred = denormalizer(preds, self.data2, train_size=0.7, train_phase=False)
    next_day_value = final_pred[1][0] + 100.3423
    return next_day_value
Running the GUI:
Now, let’s run the GUI application of our Bitcoin price prediction project.
When you run this GUI, we will see an attractive window is popup.
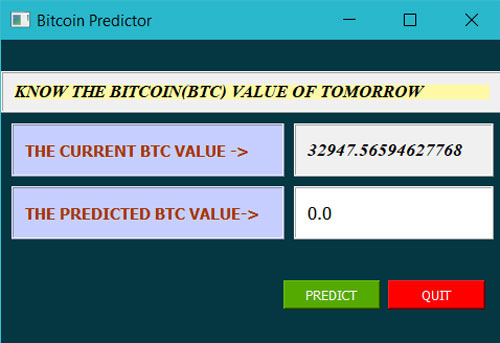
You need to click on the predict button to make the prediction.
It will take some to make the prediction as we have Tensorflow running in the backend. The result will be displayed alongside of the Label “THE PREDICTED BTC VALUE ->”.
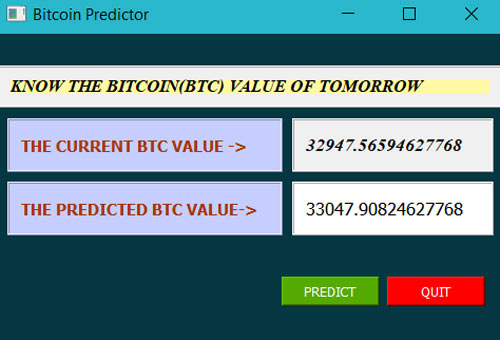
So, we have successfully built our GUI application to predict the Bitcoin price of tomorrow. To test the prediction you can note down the predicted value which is displayed alongside “THE PREDICTED BTC VALUE” section in the GUI. Then you can match this predicted price on next day with the actual one. In my case the actual value was 34425.90417323143 on the next day.
Will this Project Work on Raspberry Pi?
Well I have tried to implement this project on the Raspberry Pi 3 and Raspberry Pi 4 having python3.7. But, I have found some following issues. When I ran the project on my Raspberry Pi, no matter which version of the Pi it was, I got some “NotImplementedError” statement on the output terminal. The error is stating that “cannot convert a symbolic Tensor (lstm/stribed_slice:0) to a numpy array.”
After some research on the Internet, I have found that the numpy version (i.e. v1.20.0) is creating this trouble. I have tried to downgrade the numpy version to v1.18.1 (The numpy version that I have in my laptop) in the Raspberry Pi but then I got some other error that is “the numpy version is not appropriate”.

If you want to implement this project on Raspberry Pi, then make sure that you have python3.6 and the above mentioned libraries with appropriate versions. Leave your comments below to let us know if you have any progress on it.
Code to training the model:
import tensorflow
from tensorflow.keras.models import Sequential
from tensorflow.keras.layers import LSTM, Dense, Activation
import time
data = collectingLatestBTC() # Not passing any argument since they are set by default
prices = preparing_prices (data) # Creating a matrix using the dataframe
prices = normalize_prices (prices) # Normalizing its values to fit to RNN
row, X_train, y_train, X_test, y_test = TrainTestSplit(prices)
model=Sequential()
model.add(LSTM(50,return_sequences=True,input_shape=(29,1)))
model.add(LSTM(50,return_sequences=True))
model.add(LSTM(50))
model.add(Dense(1))
model.compile(loss='mean_squared_error',optimizer='adam')
start_time = time.time()
model.fit(X_train,y_train,validation_data=(X_test,y_test),epochs=100,batch_size=64,verbose=1)
end_time = time.time()
processing_time = end_time - start_time
model.save("coinpredict.h5")
Code to predict the BTC Price:
import requests,json,numpy as np,pandas as pd
#We need ser, preds, row
data_in = collectingLatestBTC(timeframe='30d')[1:31]
pricesin = preparing_prices (data_in)
X_test = normalize_windows(pricesin )
X_test = np.array(X_test)
if X_test.shape[1]>=30:
X_test=X_test[0][-29:]
X_test = np.array(X_test)
X_test = np.reshape(X_test, (1, X_test.shape[0], 1))
from tensorflow.keras.models import load_model
model = load_model('coinpredict.h5')
preds = model.predict(X_test, batch_size=2)
final_pred = denormalizer(preds, data_in, train_size=0.5, train_phase=False)
final_pred[1][0]
Code in Functions.py:
import requests,json,numpy as np,pandas as pd
def collectingLatestBTC(timePeriod="5y"):
r = requests.get("https://api.coinranking.com/v2/coin/Qwsogvtv82FCd/history?timePeriod=" + timePeriod)
latest_coin = json.loads(r.text)["data"]["history"] # Reading in json and cleaning the irrelevant parts
df = pd.DataFrame(latest_coin)
df['price'] = pd.to_numeric(df['price'])
df['timestamp'] = pd.to_datetime(df['timestamp'], unit='s').dt.date
return df.groupby('timestamp').mean()['price']
def preparing_prices(data, seq_len=30):
# # storing the 30days prices in evry i
price_matrix = []
for index in range(len(data)-seq_len+1):
price_matrix.append(data[index:index+seq_len])
return price_matrix
def normalize_prices(window_data):
# normalize the values and calculating the percentage changes from starting point.
normalised_data = []
for window in window_data:
# if(window[0]!=0.0):
normalised_window = [((float(p) / float(window[0])) - 1) for p in window]
normalised_data.append(normalised_window)
return normalised_data
def denormalizer(preds, data, train_size=0.9, train_phase=False):
price_matrix = np.array(preparing_prices(data))
if train_phase:
row = int(round(train_size * len(price_matrix)))
else:
row = 0
date = data.index[row + 29:]
date = np.reshape(date, (date.shape[0]))
X_test = price_matrix[row:, :-1]
y_test = price_matrix[row:, -1]
preds_original = []
preds = np.reshape(preds, (preds.shape[0]))
for index in range(0, len(preds)):
pred = (preds[index] + 1) * X_test[index][0]
preds_original.append(pred)
preds_original = np.array(preds_original)
if train_phase:
return [date, y_test, preds_original]
else:
import datetime
return [date + datetime.timedelta(days=1), y_test]
Code in main_window_ui.py file:
from PyQt5 import QtCore, QtGui, QtWidgets
from PyQt5.QtWidgets import QApplication
from keras.models import load_model
from NextDaybitcoinPredictor.functions import *
class Ui_MainWindow(object):
data2 = collectingLatestBTC(timePeriod='30d')[1:31]
todaysvalue = str(data2[-1:][0])
result = "0.0"
def setupUi(self, MainWindow):
MainWindow.setObjectName("MainWindow")
MainWindow.resize(480, 320)
font = QtGui.QFont()
font.setFamily("Times New Roman")
font.setPointSize(9)
font.setBold(True)
font.setItalic(True)
font.setWeight(75)
MainWindow.setFont(font)
MainWindow.setStyleSheet("")
self.centralwidget = QtWidgets.QWidget(MainWindow)
self.centralwidget.setObjectName("centralwidget")
self.title_label_frame = QtWidgets.QFrame(self.centralwidget)
self.title_label_frame.setGeometry(QtCore.QRect(0, 30, 480, 40))
self.title_label_frame.setCursor(QtGui.QCursor(QtCore.Qt.ArrowCursor))
self.title_label_frame.setAutoFillBackground(True)
self.title_label_frame.setFrameShape(QtWidgets.QFrame.Box)
self.title_label_frame.setFrameShadow(QtWidgets.QFrame.Raised)
self.title_label_frame.setObjectName("title_label_frame")
self.horizontalLayout = QtWidgets.QHBoxLayout(self.title_label_frame)
self.horizontalLayout.setObjectName("horizontalLayout")
self.label_5 = QtWidgets.QLabel(self.title_label_frame)
font = QtGui.QFont()
font.setPointSize(10)
font.setBold(True)
font.setWeight(75)
self.label_5.setFont(font)
self.label_5.setStyleSheet("background-color: rgb(255, 249, 165);")
self.label_5.setTextFormat(QtCore.Qt.PlainText)
self.label_5.setScaledContents(True)
self.label_5.setIndent(-1)
self.label_5.setObjectName("label_5")
self.horizontalLayout.addWidget(self.label_5)
self.current_label_frame = QtWidgets.QFrame(self.centralwidget)
self.current_label_frame.setGeometry(QtCore.QRect(10, 80, 261, 51))
self.current_label_frame.setCursor(QtGui.QCursor(QtCore.Qt.ArrowCursor))
self.current_label_frame.setAutoFillBackground(False)
self.current_label_frame.setStyleSheet("background-color: rgb(198, 206, 255);")
self.current_label_frame.setFrameShape(QtWidgets.QFrame.Box)
self.current_label_frame.setFrameShadow(QtWidgets.QFrame.Raised)
self.current_label_frame.setObjectName("current_label_frame")
self.horizontalLayout_2 = QtWidgets.QHBoxLayout(self.current_label_frame)
self.horizontalLayout_2.setObjectName("horizontalLayout_2")
self.label = QtWidgets.QLabel(self.current_label_frame)
font = QtGui.QFont()
font.setFamily("MS Shell Dlg 2")
font.setPointSize(9)
font.setBold(True)
font.setItalic(False)
font.setWeight(75)
self.label.setFont(font)
self.label.setStyleSheet("color: rgb(167, 55, 0);\n"
"alternate-background-color: rgb(255, 255, 0);")
self.label.setTextFormat(QtCore.Qt.PlainText)
self.label.setIndent(-1)
self.label.setObjectName("label")
self.horizontalLayout_2.addWidget(self.label)
self.tomorrow_label_frame = QtWidgets.QFrame(self.centralwidget)
self.tomorrow_label_frame.setGeometry(QtCore.QRect(10, 140, 261, 51))
self.tomorrow_label_frame.setCursor(QtGui.QCursor(QtCore.Qt.ArrowCursor))
self.tomorrow_label_frame.setAutoFillBackground(False)
self.tomorrow_label_frame.setStyleSheet("background-color: rgb(198, 206, 255);")
self.tomorrow_label_frame.setFrameShape(QtWidgets.QFrame.Box)
self.tomorrow_label_frame.setFrameShadow(QtWidgets.QFrame.Raised)
self.tomorrow_label_frame.setObjectName("tomorrow_label_frame")
self.horizontalLayout_3 = QtWidgets.QHBoxLayout(self.tomorrow_label_frame)
self.horizontalLayout_3.setObjectName("horizontalLayout_3")
self.label_2 = QtWidgets.QLabel(self.tomorrow_label_frame)
font = QtGui.QFont()
font.setPointSize(9)
font.setBold(True)
font.setWeight(75)
self.label_2.setFont(font)
self.label_2.setStyleSheet("color: rgb(167, 55, 0);\n"
"alternate-background-color: rgb(255, 255, 0);")
self.label_2.setTextFormat(QtCore.Qt.PlainText)
self.label_2.setIndent(-1)
self.label_2.setObjectName("label_2")
self.horizontalLayout_3.addWidget(self.label_2)
self.current_value_frame = QtWidgets.QFrame(self.centralwidget)
self.current_value_frame.setGeometry(QtCore.QRect(280, 80, 191, 51))
self.current_value_frame.setCursor(QtGui.QCursor(QtCore.Qt.ArrowCursor))
self.current_value_frame.setAutoFillBackground(True)
self.current_value_frame.setFrameShape(QtWidgets.QFrame.Box)
self.current_value_frame.setFrameShadow(QtWidgets.QFrame.Raised)
self.current_value_frame.setObjectName("current_value_frame")
self.horizontalLayout_4 = QtWidgets.QHBoxLayout(self.current_value_frame)
self.horizontalLayout_4.setObjectName("horizontalLayout_4")
self.label_3 = QtWidgets.QLabel(self.current_value_frame)
font = QtGui.QFont()
font.setPointSize(10)
self.label_3.setFont(font)
self.label_3.setTextFormat(QtCore.Qt.PlainText)
self.label_3.setIndent(-1)
self.label_3.setObjectName("label_3")
self.horizontalLayout_4.addWidget(self.label_3)
self.tomorrow_value_frame = QtWidgets.QFrame(self.centralwidget)
self.tomorrow_value_frame.setGeometry(QtCore.QRect(280, 140, 191, 51))
self.tomorrow_value_frame.setCursor(QtGui.QCursor(QtCore.Qt.ArrowCursor))
self.tomorrow_value_frame.setAutoFillBackground(False)
self.tomorrow_value_frame.setStyleSheet("background-color: rgb(255, 255, 255);")
self.tomorrow_value_frame.setFrameShape(QtWidgets.QFrame.Box)
self.tomorrow_value_frame.setFrameShadow(QtWidgets.QFrame.Raised)
self.tomorrow_value_frame.setObjectName("tomorrow_value_frame")
self.horizontalLayout_5 = QtWidgets.QHBoxLayout(self.tomorrow_value_frame)
self.horizontalLayout_5.setObjectName("horizontalLayout_5")
self.label_4 = QtWidgets.QLabel(self.tomorrow_value_frame)
font = QtGui.QFont()
font.setPointSize(10)
self.label_4.setFont(font)
self.label_4.setTextFormat(QtCore.Qt.PlainText)
self.label_4.setIndent(-1)
self.label_4.setObjectName("label_4")
self.horizontalLayout_5.addWidget(self.label_4)
self.frame = QtWidgets.QFrame(self.centralwidget)
self.frame.setGeometry(QtCore.QRect(0, 0, 480, 291))
self.frame.setStyleSheet("background-color: #053742;")
self.frame.setFrameShape(QtWidgets.QFrame.StyledPanel)
self.frame.setFrameShadow(QtWidgets.QFrame.Raised)
self.frame.setObjectName("frame")
# PUSH BUTTON 1
# Function: Quit the application
# Calling Function: cancel_button
self.pushButton = QtWidgets.QPushButton(self.frame)
self.pushButton.setGeometry(QtCore.QRect(370, 230, 93, 28))
self.pushButton.setStyleSheet("color: rgb(255, 255, 255);\n"
"background-color: rgb(255, 0, 0);")
self.pushButton.setObjectName("pushButton")
self.pushButton.clicked.connect(self.cancel_button)
# PUSH BUTTON_2
# Function: Predict the BTC On next day
# Calling Function: predict_button
self.pushButton_2 = QtWidgets.QPushButton(self.frame)
self.pushButton_2.setGeometry(QtCore.QRect(270, 230, 93, 28))
self.pushButton_2.setStyleSheet("background-color: rgb(85, 170, 0);\n"
"color: rgb(255, 255, 255);")
self.pushButton_2.setObjectName("pushButton_2")
self.pushButton_2.clicked.connect(self.predict_button)
self.frame.raise_()
self.title_label_frame.raise_()
self.current_value_frame.raise_()
self.tomorrow_value_frame.raise_()
self.tomorrow_label_frame.raise_()
self.current_label_frame.raise_()
MainWindow.setCentralWidget(self.centralwidget)
self.statusbar = QtWidgets.QStatusBar(MainWindow)
self.statusbar.setObjectName("statusbar")
MainWindow.setStatusBar(self.statusbar)
self.retranslateUi(MainWindow)
QtCore.QMetaObject.connectSlotsByName(MainWindow)
def cancel_button(self):
sys.exit(app.exec_())
def predict_button(self):
self.result = self.prediction_result()
self.result = str(self.result)
print(self.result)
self.label_4.setText(self.result)
def prediction_result(self):
price_matrix = preparing_prices(self.data2)
X_test = normalize_prices(price_matrix)
X_test = np.array(X_test)
if X_test.shape[1] >= 30:
X_test = X_test[0][-29:]
X_test = np.array(X_test)
X_test = np.reshape(X_test, (1, X_test.shape[0], 1))
# Loading the model
model = load_model('model/coinpredict.h5')
preds = model.predict(X_test, batch_size=2)
final_pred = denormalizer(preds, self.data2, train_size=0.7, train_phase=False)
next_day_value = final_pred[1][0]
return next_day_value
def retranslateUi(self, MainWindow):
_translate = QtCore.QCoreApplication.translate
MainWindow.setWindowTitle(_translate("MainWindow", "Bitcoin Predictor"))
self.label_5.setText(_translate("MainWindow", "KNOW THE BITCOIN(BTC) VALUE OF TOMORROW"))
self.label.setText(_translate("MainWindow", "THE CURRENT BTC VALUE ->"))
self.label_2.setText(_translate("MainWindow", "THE PREDICTED BTC VALUE->"))
self.label_3.setText(_translate("MainWindow", self.todaysvalue))
self.label_4.setText(_translate("MainWindow", self.result))
self.pushButton.setText(_translate("MainWindow", "QUIT"))
self.pushButton_2.setText(_translate("MainWindow", "PREDICT"))
if __name__ == '__main__':
import sys
app = QApplication(sys.argv)
window = QtWidgets.QMainWindow()
ui = Ui_MainWindow()
ui.setupUi(window)
window.show()
sys.exit(app.exec_())


