


In recent years, Arduino and ESP32 based webserver projects have become very popular and useful for various applications. But one of the major drawbacks of such a web server is its static nature. Meaning to update the webpage over HTTP, you need to update the total webpage before you can update any data. There are many workarounds of this problem, like refreshing the webpage automatically after few seconds, and so on.
But the most efficient one is to use a WebSocket connection to get the updated data in real-time. This method is not only efficient but saves up a lot of clock cycles for resource-heavy applications.
In one of our previous articles, we have built such an ESP32 based WebSocket server that can host a webpage and send updates without completely refreshing the page. Doing so made us wonder if there is any way for us to configure the ESP32 as a client that can connect to the server over Wi-Fi.
To answer this query, we are going to build an ESP32 based WebSocket client that will be able to connect to the ESP32 Websocket server.
In this way, we will be using the fastest and efficient way of establishing communication between ESP devices. So, without further delay, let’s get right into it.
In our previous projects, we have built many ESP32 based projects and projects with IoT-related applications, you can check them out if you are interested in the topic.
How does an ESP32 WebSocket Client Work?
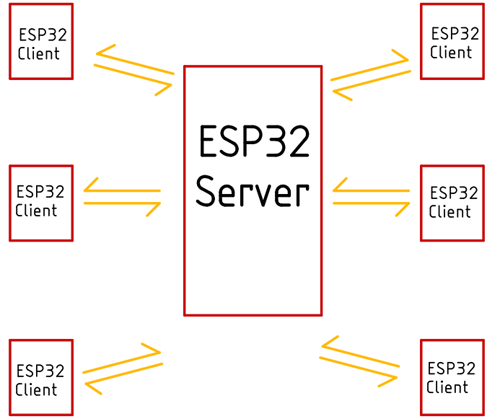
The objective of this project is to configure the ESP32 as a WebSocket client, doing so will enable us to establish faster and stable communication between two ESP32 devices.
First, the client establishes a WebSocket connection through a WebSocket handshake. The handshake starts with an HTTP request that allows all the required services to handle HTTP connections and WebSocket connections.
Once the connection is established, both the ESP32s can send and receive data in full-duplex mode. Using the WebSocket protocol, the clients (The Web Browser and the ESP32 board) can send and receive information to the server without a request, and if configured correctly, the server can request the client to send or receive data. As we have said earlier, this process stays true if the client is a web browser.
Components Required to Build ESP32 WebSocket Client
The components required to build the ESP32 based WebSocket client are shown below. We designed this circuit with very generic components, which makes the replication process very easy.
- ESP32 Dev Board - 2
- 128 X 64 OLED Display - 1
- Breadboard - 2
- DHT22 Sensor - 1
- LED Red - 1
- 330R Resistor - 1
- Jumper Wires
- USB Cable
ESP32 WebSocket Server, Client - Schematic Diagram
The complete schematic diagram for the ESP32 Based WebSocket Client test circuit is shown below.
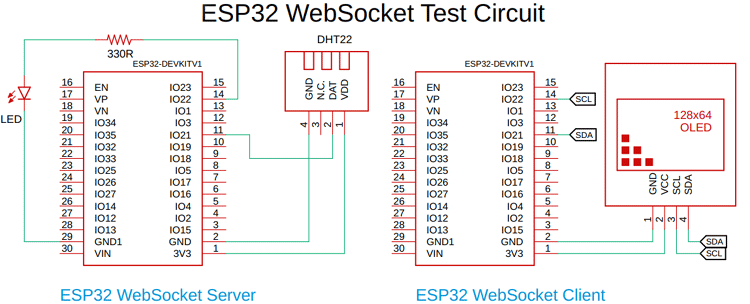
As you can see in the above diagram, we have two circuits; one is for the ESP32 WebSocket server, which we have discussed in a previous article, and another one is for the ESP32 based WebSocket client. In this project, we will discuss the client-side.
The demonstration circuit on the client is nothing much, a simple 128x64 OLED display is connected to an ESP32 module.
When powered on, the client can connect to the server through a WebSocket connection and get data in real-time from the server.
ESP32 Websocket Client Arduino Code
The complete code used to configure the esp32 as a WebSocket client can be found at the bottom of this page. After adding the required header files and source files, you should be able to directly compile the Arduino code without any errors. If you do not have ESP32 Websocket libraries, you can download them from the links given below.
- Download Adafruit SSD1396 OLED Display Library
- Download Arduino Websockets Library by Links2004
- Download Arduino JSON Library by bblanchon
We start our code by including all the required libraries. As we are working with the WebSocket client and OLED, we need to include the WebSocketsClient.h library as well as the Adafruit_SSD1306.h and ArduinoJson.h library alongside the WiFi.h and WebServer.h libraries.
#include <WiFi.h> // ESP32 WiFi Library
#include <WebServer.h> // WebServer Library for ESP32
#include <WebSocketsClient.h> // WebSocket Client Library for WebSocket
#include <ArduinoJson.h> // Arduino JSON Library
#include <Adafruit_SSD1306.h> // OLED Display Library
Next, we define the screen width and screen height for the OLED display.
Thereafter, we define the SSID and Password for Wi-Fi, next we define the WebSocketsClient instance and allocate a static JSON document in which we will hold the incoming JSON string.
Finally, we make an SSD1306 instance for the LED display and we pass the screen height and screen width as an argument.
#define SCREEN_WIDTH 128 // OLED display width, in pixels
#define SCREEN_HEIGHT 64 // OLED display height, in pixels
// Wifi Credentials
const char* ssid = "deba_2.4"; // Wifi SSID
const char* password = "il2ww*ee"; //Wi-FI Password
WebSocketsClient webSocket; // websocket client class instance
StaticJsonDocument<100> doc; // Allocate a static JSON document
Adafruit_SSD1306 display(SCREEN_WIDTH, SCREEN_HEIGHT, &Wire, -1); //SSD1306 instance
Next, we have our setup function, in which we call the WiFi.begin(SSID, password) to begin the method of the Wi-Fi instance, and pass the previously defined SSID and password as an argument.
Next, we initialize the serial with 115200 baud for debugging. Once the Wi-Fi has initialized, we initialize the display and check to see if it’s connected or not.
Next, we begin a WebSocket connection, and we also initialize an event handlebar for the WebSocket. The invent handler calls the webSocketEvent() function when a WebSocket event occurs.
void setup() {
  // Connect to local WiFi
  WiFi.begin(ssid, password);
  Serial.begin(115200);
  while (WiFi.status() != WL_CONNECTED) {
    Serial.print(".");
    delay(500);
  }
  Serial.println();
  Serial.print("IP Address: ");
  Serial.println(WiFi.localIP()); // Print local IP address
  if (!display.begin(SSD1306_SWITCHCAPVCC, 0x3C)) { // Address 0x3D for 128x64
    Serial.println(F("SSD1306 allocation failed")); // OLED display not found
    for (;;);
  }
  delay(2000); // wait for 2s
  display.clearDisplay(); // clear the display
  display.setTextSize(2); // set Test size to 2
  display.setTextColor(WHITE); //set display colour to "WHITE"
  //address, port, and URL path
  webSocket.begin("192.168.154.128", 81, "/");
  // WebSocket event handler
  webSocket.onEvent(webSocketEvent);
  // if connection failed retry every 5s
  webSocket.setReconnectInterval(5000);
}
Next, we have our loop() function. In the loop function, we keep the WebSocket alive by calling the WebSocket.loop() function.
void loop() { webSocket.loop(); // Keep the socket alive }
Next, we have the WebSocket event function. This function is called automatically when a WebSocket event occurs. In this function, we first check and see if there is an incoming payload, and we also verify if it a string or not.
We are expecting a JSON string from the server. If it’s a string, then we deserialize it with the deserializeJSON function and we pass the payload and the Static JSON Document, which we have declared earlier.
Once the JSON string is deserialized, we have declared three variables to hold three parameters that are sent by the server, which is the LED_STATUS the Temperature and Humidity data from the DHT22 sensor.
Once we do that, we set up the display and print all the information to the OLED display.
void webSocketEvent(WStype_t type, uint8_t * payload, size_t length) {
  if (type == WStype_TEXT)
  {
    // deserialize incoming Json String
    DeserializationError error = deserializeJson(doc, payload);
    if (error) { // Print erro msg if incomig String is not JSON formated
      Serial.print(F("deserializeJson() failed: "));
      Serial.println(error.c_str());
      return;
    }
    const String pin_stat = doc["PIN_Status"]; // String variable tha holds LED status
    const float t = doc["Temp"]; // Float variable that holds temperature
    const float h = doc["Hum"]; // Float variable that holds Humidity
    Serial.print(String(pin_stat)); // Print the received data for debugging
    Serial.print(String(t));
    Serial.println(String(h));
    // webSocket.sendTXT("OK"); // Send acknowledgement
    /* LED: OFF
       TMP: Temperature
       Hum: Humidity
    */
    display.clearDisplay(); // Clear the display
    display.setCursor(0, 0); // Set the cursor position to (0,0)
    display.println("LED:"); // Print LED: on the display
    display.setCursor(45, 0); // Set the cursor
    display.print(pin_stat); // print LED Status to the display
    display.setCursor(0, 20); // Set the cursor position (0, 20)
    display.println("TMP:"); // Print TMP: on the display
    display.setCursor(45, 20); // Set the cursor position (45, 20)
    display.print(t); // Print temperature value
    display.setCursor(0, 40); // Set the cursor position (0, 40)
    display.println("HUM:");// Print HUM: on the display
    display.setCursor(45, 40); // Set the cursor position (45, 40)
    display.print(h); // Print Humidity vsalue
    display.display(); // Show all the information on the display
  }
}
Testing the ESP32 Wireless Client
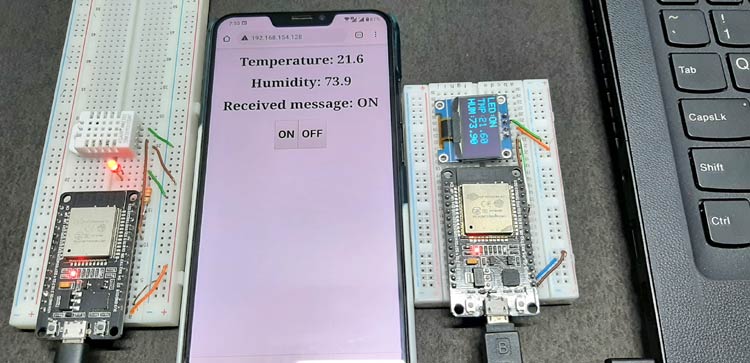
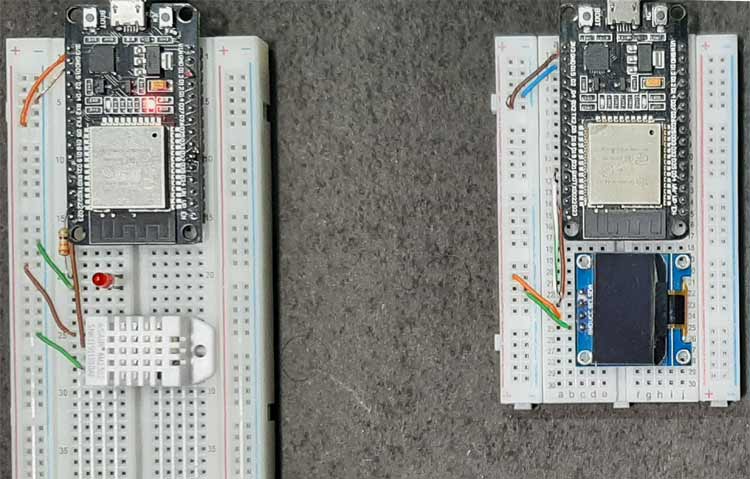
The test circuit for the ESP32 based WebSocket client is shown above. As you can see, on the left-hand side, we have our ESP32 based server that has a DHT22 sensor and a LED attached, and on the right-hand side, we have our Android phone which is acting as a WebSocket client, and on the right of that, we have another ESP32 board that is acting as another WebSocket client.
Now, as we have connected through a WebSocket connection, if the DHT sensor data or the LED status changes, the changes will be reflected on the phone, also we can observe the changes on the OLED display.

And sure enough, when we click the 'on and off' button, the data on the OLED display also change and we also get a constant flow of data from the DHT22 sensor, which means our WebSocket connection is working smoothly.
This marks the end of the ESP32 WebSocket tutorial. If you liked the article, let me know in the comment section below.
#include <WiFi.h>
#include <WebServer.h>
#include <WebSocketsClient.h>
#include <ArduinoJson.h>
#include <Adafruit_SSD1306.h>
#define SCREEN_WIDTH 128 // OLED display width, in pixels
#define SCREEN_HEIGHT 64 // OLED display height, in pixels
// Wifi Credentials
const char* ssid = "YourSSID"; // Wifi SSID
const char* password = "YourPASS"; //Wi-FI Password
WebSocketsClient webSocket; // websocket client class instance
StaticJsonDocument<100> doc; // Allocate a static JSON document
Adafruit_SSD1306 display(SCREEN_WIDTH, SCREEN_HEIGHT, &Wire, -1); //SSD1306 instance
void setup() {
// Connect to local WiFi
WiFi.begin(ssid, password);
Serial.begin(115200);
while (WiFi.status() != WL_CONNECTED) {
Serial.print(".");
delay(500);
}
Serial.println();
Serial.print("IP Address: ");
Serial.println(WiFi.localIP()); // Print local IP address
if (!display.begin(SSD1306_SWITCHCAPVCC, 0x3C)) { // Address 0x3D for 128x64
Serial.println(F("SSD1306 allocation failed")); // OLED display not found
for (;;);
}
delay(2000); // wait for 2s
display.clearDisplay(); // clear the display
display.setTextSize(2); // set Test size to 2
display.setTextColor(WHITE); //set display colour to "WHITE"
//address, port, and URL path
webSocket.begin("192.xxx.xxx.xxx", 81, "/");
// webSocket event handler
webSocket.onEvent(webSocketEvent);
// if connection failed retry every 5s
webSocket.setReconnectInterval(5000);
}
void loop() {
webSocket.loop(); // Keep the socket alive
}
void webSocketEvent(WStype_t type, uint8_t * payload, size_t length) {
// Make sure the screen is clear
// u8g2.clearBuffer();
if (type == WStype_TEXT)
{
DeserializationError error = deserializeJson(doc, payload); // deserialize incoming Json String
if (error) { // Print erro msg if incomig String is not JSON formated
Serial.print(F("deserializeJson() failed: "));
Serial.println(error.c_str());
return;
}
const String pin_stat = doc["PIN_Status"]; // String variable tha holds LED status
const float t = doc["Temp"]; // Float variable that holds temperature
const float h = doc["Hum"]; // Float variable that holds Humidity
// Print the received data for debugging
Serial.print(String(pin_stat));
Serial.print(String(t));
Serial.println(String(h));
// Send acknowledgement
// webSocket.sendTXT("OK");
/* LED: OFF
TMP: Temperature
Hum: Humidity
*/
display.clearDisplay(); // Clear the display
display.setCursor(0, 0); // Set the cursor position to (0,0)
display.println("LED:"); // Print LED: on the display
display.setCursor(45, 0); // Set the cursor
display.print(pin_stat); // print LED Status to the display
display.setCursor(0, 20); // Set the cursor position (0, 20)
display.println("TMP:"); // Print TMP: on the display
display.setCursor(45, 20); // Set the cursor position (45, 20)
display.print(t); // Print temperature value
display.setCursor(0, 40); // Set the cursor position (0, 40)
display.println("HUM:");// Print HUM: on the display
display.setCursor(45, 40); // Set the cursor position (45, 40)
display.print(h); // Print Humidity vsalue
display.display(); // Show all the information on the display
}
}


