


Raspberry Pi Pico W is a low-cost RP2040 microcontroller-based development board. It has inbuilt 2.4 GHZ WIFI capabilities which provide a feature of wireless connectivity to this board. The board uses an Infineon CYW43439 WIFI+ BLE chip which adds an onboard single-band 2.4 GHZ wireless interface (802.11n). Hence It enables users to build wireless control and remote monitoring devices based on all types of AIoT solutions. The Microcontroller can be programmed using both Micropython and C/C++.
In this project, we will be going to control a led connected to Pico W using a webpage over the Internet. Pico W board and smartphone both need to connect to steady internet for smooth working without lagging. This LED can be controlled using smart phone or any computer from anywhere in the world. Also, we will learn about the board Raspberry Pi and its features, specifications, and programming using Arduino IDE. We previously built many webserver based IoT projects, where you can control appliances from anywhere.
Mostly, we saw that Micropython is used to program the Raspberry Pi Pico W using Micropython IDEs like Thonny. But, for most people, programming in Python is not that much comfortable as programming in C/C++ using Arduino IDE. Hence, we will learn about configuring and programming Pico W in Arduino IDE.
Raspberry Pi Pico W

The Raspberry Pi Pico W board provides necessary external circuitry, such as flash memory, a crystal, power supplies, decoupling, and a USB connector, for the RP2040 chip. The RP2040 microcontroller offers a majority of its pins as user I/O pins on both the left and right edges of the board. However, four of its I/O pins are exclusively reserved for internal functions like controlling an LED, managing onboard SMPS power, and sensing system voltages. Pico W also features an onboard 2.4GHz wireless interface using an Infineon CYW43439, connected via SPI to the RP2040. The board comes equipped with a licensed onboard antenna from ABRACON.
Raspberry Pi Pico W itself capable to generate the required 3.3volt power using an internal buck-boost converter from a wide range of input voltages (1.8v to 5.5v).
Key Features:
- The board has a total of 40-pin (21mm×51mm) 1mm thick PCB with 0.1" through-hole pins
- There are 26 I/o pins with voltage level of 3.3v.
- 23 GPIO are digital-only, and three others being ADC capable
- 1.8-3.3V I/O voltage
- 3 Arm SWD (serial wire debug) pin port
- Dual-core cortex M0 processor at up to 133MHz frequency
- On-chip PLL allows variable core frequency
- 264kB high-performance SRAM
- 12-bit 500kbps analog to digital converter (ADC)
- There are various I/O digital peripherals options
- 2 × UART, 2 × I2C, 2 × SPI, 16 × PWM channels
- 1 × timer with 4 alarms, 1 × real time clock
- 2 × programmable Input-output (PIO) blocks, 8 state machines in total
- Flexible, user-programmable high-speed I/O
Raspberry Pi Pico W Pinout
There are a total of 40 pins on the sides of the board. The key functionality of the pins is explained below.
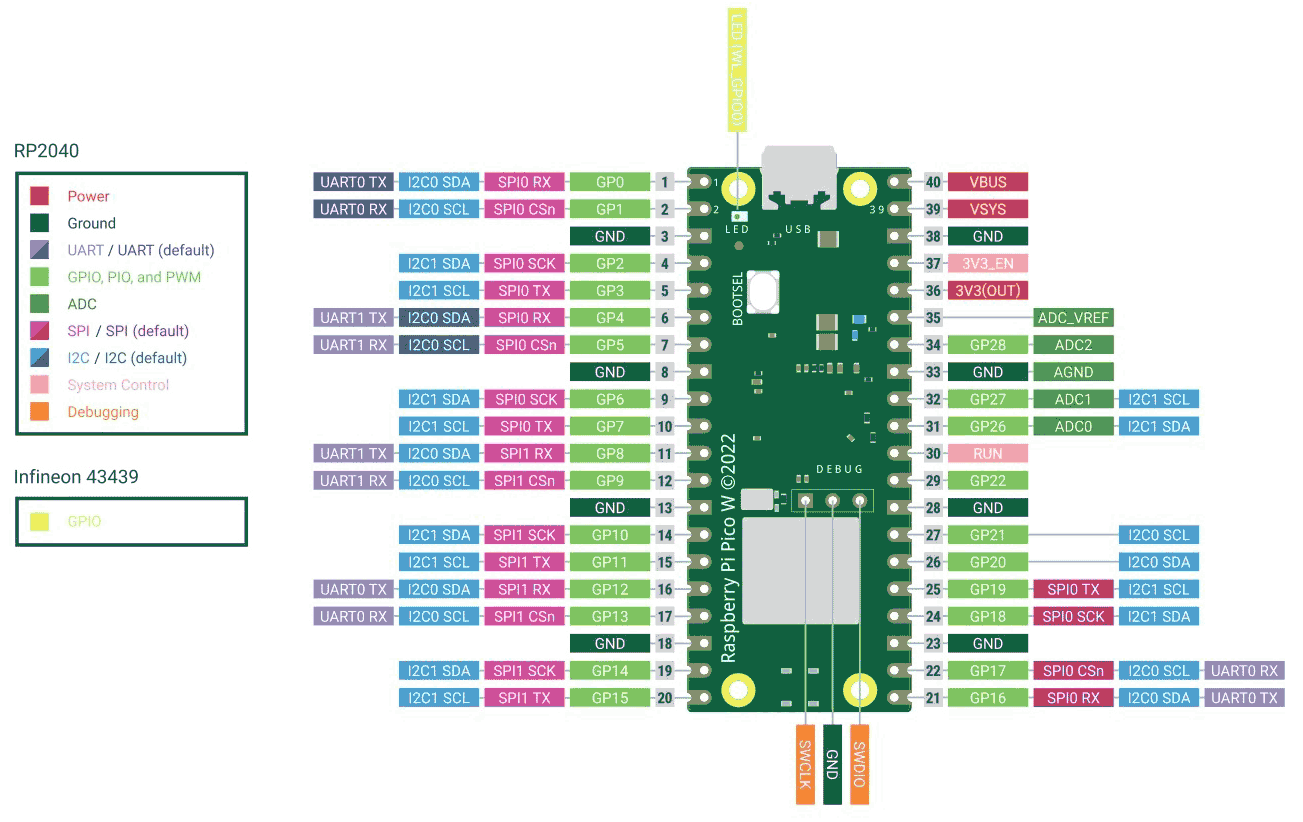
- GP0-GP28: These are the General-Purpose Input Output pins that can be interfaced with I/O devices to transmit and receive data. These can work for both Input and output functionality.
- GP26-GP28: These three pins can also be used for connecting Analog sensors or devices.
- GP0: The inbuilt led is connected.
- GND: This pin is used to provide a ground connection to I/O devices. There are several ground pins provided to ease the connection.
- RUN: This pin enables or disables the RP2040 microcontroller which means to start or stop the Pico W. Shorting pin makes it low which resets RP2040.
- AGND: This pin is used to ground Analog devices. This ground connection is for use with the ADC_VREF pin.
- ADC_VREF: The ADC voltage reference is an input pin that sets the reference voltage for analog inputs.
- 3V3(OUT): This pin supplies 3.3v to RP2040 and I/O Pins, which is generated by the onboard SMPS. Hence, it can able to supply 3.3v to external I/O devices, but the maximum output current depends on the RP2040 load and Input voltage at the VSYS pin, and it is recommended to not exceed the current limit of approx. 300mA.
- 3V3_EN: It is an Onboard SMPS enable pin. And it is pulled high via a 100k Ω resistor. Shorting the pin makes it low which disables the 3.3v supply and leads to de-powers RP 2040.
- VSYS: Pin used to provide input voltage to the system, whose allowed range is 1.8V to 5.5V, and is used to generate 3.3v to power RP2040 and GPIO by onboard power converters.
- VBUS: Pin is fully connected to power pin 1 of micro-USB which is generally 5v if USB is powered.
Components Required for Raspberry Pi Pico W
- Raspberry Pi Pico W
- Led bulb (5v)
- Breadboard
Circuit Diagram for interfacing Raspberry Pi Pico W
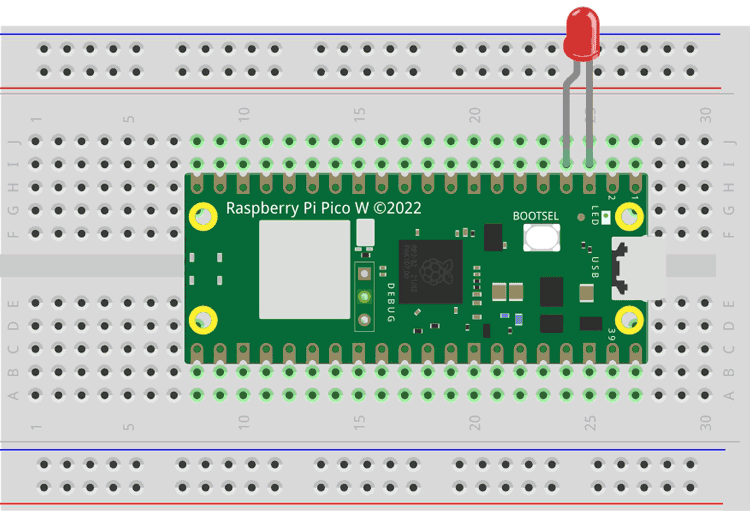
Now let’s start with interfacing a Led with Pico W board. The positive terminal of Led connected to GP2 and another to the Ground of the board. The power to the board is supplied by a USB connector.
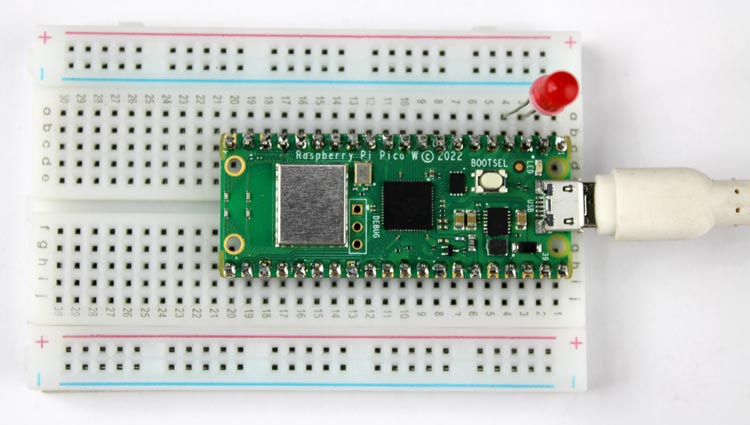
The real-life circuit looks like the below Image.
Programming Raspberry Pi Pico W with Arduino IDE
Let’s look at how can we use Arduino IDE to program the Raspberry Pi Pico W board. For that, we need to install the Raspberry Pi RP2040 board package which has support for Raspberry Pi Pico W. If it is already installed leave the installation process.
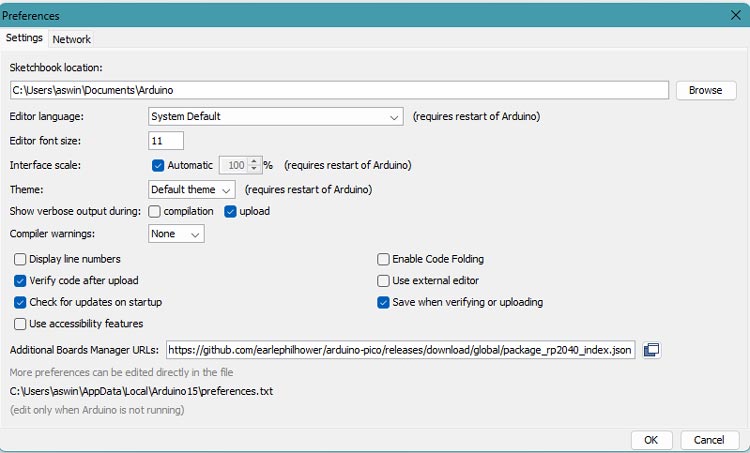
- Open Arduino IDE, and go to File > Preferences. Now paste the given link in the Additional Boards Manager URLs and save by pressing Ok.
https://github.com/earlephilhower/arduino-pico/releases/download/global/package_rp2040_index.json
- Open the Arduino IDE, navigate to Boards Manager, and search “Pico”. You will find the package with the board name, install it.
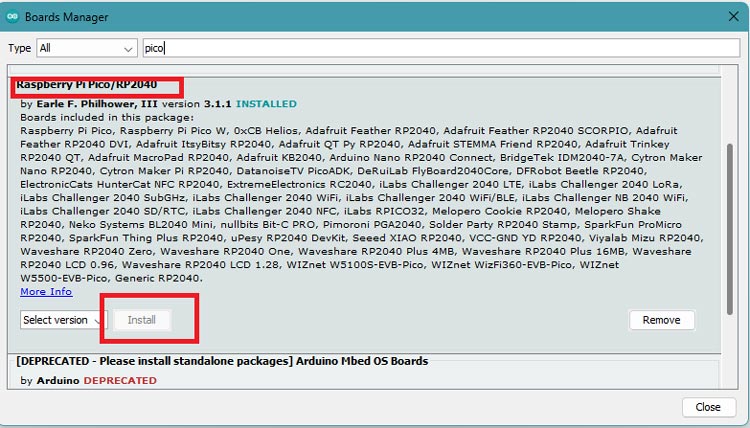
- Now, select the board as Raspberry Pi Pico W and leave the remaining things as it is.
- Copy and compile the example code provided below at last.
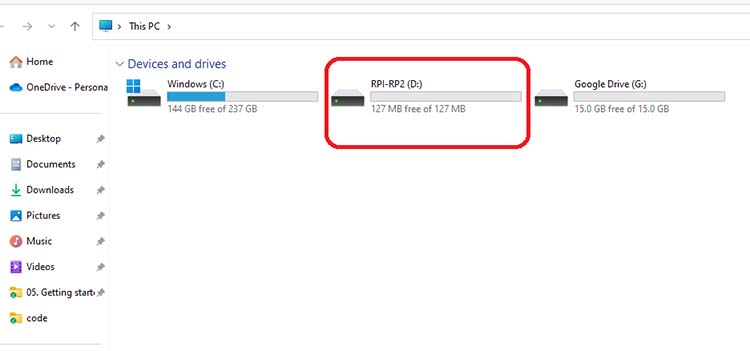
- To upload the code, you have to connect the Pico W board to the computer which shows in any COM Port. For that, while pressing and holding the BOOTSEL button on the Pico W, immediately connect Board to your computer using a micro-USB cable. Release the BOOTSEL button the if RPI-RP2 drive notification appears on your computer.
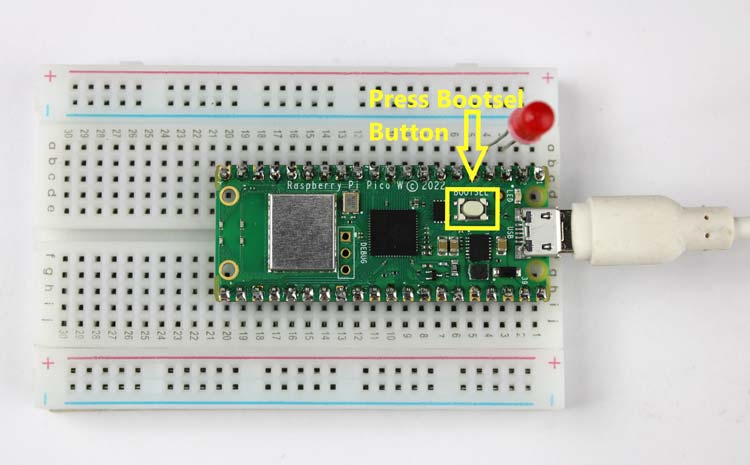
- File Manager which means the drive-in boot mode. Hence the device is ready to take code/firmware.
- Upload the compiled code to the Pico W board by choosing the correct port.
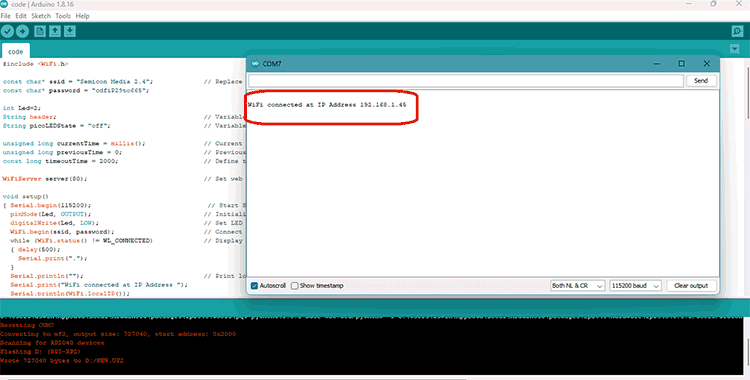
- After successfully uploading the code, open the serial monitor and set the baud rate to 115200.
Arduino Code Explanation
The program reads the data from a remote server after a successful connection to the Internet. According to the data received the output response will be generated.
Firstly, we need to know how to connect the Pico W to a WiFi network, use web data, and build web interfaces. For, that we have to connect Pico W to a WiFi network as a client. we must include all necessary Libraries for a successful connection to the network. Hence Libraries include Wifi.h only. Also, we have defined the necessary variables and objects for further programming.
#include <WiFi.h>
const char* ssid = "Semicon Media 2.4";             // Replace with your network credentials
const char* password = "cdfiP29to665";
int Led=2;
String header;                                      // Variable to store the HTTP request
String picoLEDState = "off";                        // Variable to store onboard LED state
unsigned long currentTime = millis();               // Current time
unsigned long previousTime = 0;                     // Previous time
const long timeoutTime = 2000;
WiFiServer server(80);                              // Set web server port number to 80
The included WiFi Library in the Arduino IDE provides all the necessary functions for connecting and communicating over a WiFi network. We need to pass our login credentials including SSID and Password to join an encrypted network.
Next, we define the required character constants to store the SSID and password of the network to which we want to connect. And you’ll have to pass your network parameters.
String variables are defined to store both the HTTP request from the browser and the state of the onboard LED. This is necessary because by utilizing string variables, we can display the LED status on our web page.
Defining variables to hold Time is crucial as it allows for a timeout on our web page. Without it, we would risk never disconnecting and eventually using up connections.
Then, we create a WiFiServer object named “server”. And we pass the HTTP port no. 80 as a parameter.
void setup() { Serial.begin(115200);                             // Start Serial Monitor
  pinMode(Led, OUTPUT);                             // Initialize the LED as an output
  digitalWrite(Led, LOW);                           // Set LED off
  WiFi.begin(ssid, password);                       // Connect to Wi-Fi network with SSID and password
  while (WiFi.status() != WL_CONNECTED)             // Display progress on Serial monitor
  {
    delay(500);
    Serial.print(".");
  }
  Serial.println("");                               // Print local IP address and start web server
  Serial.print("WiFi connected at IP Address ");
  Serial.println(WiFi.localIP());
  server.begin();                                   // Start Server
}
In Setup, we start the serial monitor. Then we set the onboard LED pin as an output and LOW to keep the LED off using the command pinmode().
We then use a WiFi.begin to initiate the network connection where we pass the SSID and password in this command.
Then we will monitor the connection status of the WL_CONNECTED constant. If the while condition is true then we are not connected and the loop will run continuously. While waiting, we print periods to the serial monitor as a progress indicator by a delay of a half second. Finally, the IP Address will print on the serial monitor after a successful connection. Also, we start the WiFiServer object we created by using the command server.begin().
void loop() { WiFiClient client = server.available();   // Listen for incoming clients
  if (client)
    {   // If a new client connects,
        currentTime = millis();
        previousTime = currentTime;
        Serial.println("New Client.");                                                                                            // print a message out in the serial port
        String currentLine = "";                                                                                                  // make a String to hold incoming data from the client
        while (client.connected() && currentTime - previousTime <= timeoutTime)
            { // loop while the client's connected
              currentTime = millis();
              if (client.available())
                {   // if there's bytes to read from the client,
                    char c = client.read();                                                                                           // read a byte, then
                    Serial.write(c);                                                                                                  // print it out the serial monitor
                    header += c;
                    if (c == '\n')
                      {   // if the byte is a newline character
                          // if the current line is blank, you got two newline characters in a row.
                          // that's the end of the client HTTP request, so send a response:
                          if (currentLine.length() == 0)
                              { // HTTP headers always start with a response code (e.g. HTTP/1.1 200 OK)
                                // and a content-type so the client knows what's coming, then a blank line:
                                client.println("HTTP/1.1 200 OK");
                                client.println("Content-type:text/html");
                                client.println("Connection: close");
                                client.println();
                                // Switch the LED on and off
                                if (header.indexOf("GET /led/on") >= 0)
                                  { Serial.println("LED on");
                                    picoLEDState = "on";
                                    digitalWrite(Led, HIGH);}
                                else if (header.indexOf("GET /led/off") >= 0)
                                  { Serial.println("LED off");
                                    picoLEDState = "off";
                                    digitalWrite(Led, LOW);}
                                // Display the HTML web page
                                client.println("<!DOCTYPE html><html>");
                                client.println("<head><meta name=\"viewport\" content=\"width=device-width, initial-scale=1\">");
                                client.println("<link rel=\"icon\" href=\"data:,\">");
                                // CSS to style the on/off buttons
                                client.println("<style>html { font-family: Helvetica; display: inline-block; margin: 0px auto; text-align: center;}");
                                client.println(".button { background-color: #4CAF50; border: none; color: white; padding: 16px 40px;");
                                client.println("text-decoration: none; font-size: 30px; margin: 2px; cursor: pointer;}");
                                client.println(".button2 {background-color: #F23A3A;}</style></head>");
                                // Web Page Heading
                                client.println("<body><h1>Pico W LED Control</h1>");
                                // Display current state, and ON/OFF buttons for Onboard LED
                                client.println("<p>Onboard LED is " + picoLEDState + "</p>");
                                // Set buttons
                                if (picoLEDState == "off")
                                  { client.println("<p><a href=\"/led/on\"><button class=\"button\">ON</button></a></p>");}            //picoLEDState is off, display the ON button
                                else
                                  { client.println("<p><a href=\"/led/off\"><button class=\"button button2\">OFF</button></a></p>");}  //picoLEDState is on, display the OFF button
                                client.println("</body></html>");
                                client.println();                                                                                     // The HTTP response ends with another blank line
                                break;                                                                                                // Break out of the while loop
                             }
                          else
                              { currentLine = "";}                                                                                   // if you got a newline, then clear currentLine
                      }
                    else if (c != '\r')
                      { // if you got anything else but a carriage return character,
                        currentLine += c; }                                                                                            // add it to the end of the currentLine
                }
           }
          header = "";                                                    // Clear the header variable
          client.stop();                                                  // Close the connection
          Serial.println("Client disconnected.");
          Serial.println("");
      }
}
In the loop, we wait for incoming client connections and start a timeout when a connection is established. If the client sends information to control the LED, we break down the HTTP request to extract the value in the URL string. Based on the value, we turn the LED on or off and style the on-screen pushbutton accordingly. If desired, the button shape or colors can be modified in the HTML style sheet settings.
At last, you will find the complete code.
Workflow of Raspberry Pi Pico W
The task we will perform is to control an LED using a web-based Interface.
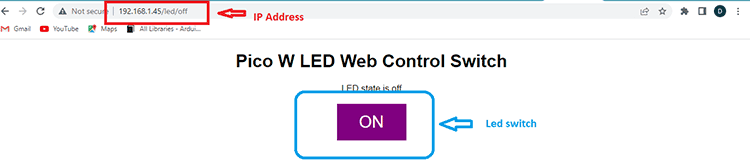
A straightforward web page will be displayed, featuring a single toggle button and indicating the current state of the onboard LED.
Upload the code by following the steps already discussed above and give it a try. Open the serial monitor set the correct baud rate and wait until it shows an IP Address.
Copy the IP address and open Google Chrome on any device connected to the same WiFi network. Type the address in the search bar, and then click search to access the web page for controlling the LED using a web switch.
Shows the ON state of the LED whereas the below image has the LED in the OFF state while we are controlling through the web page.
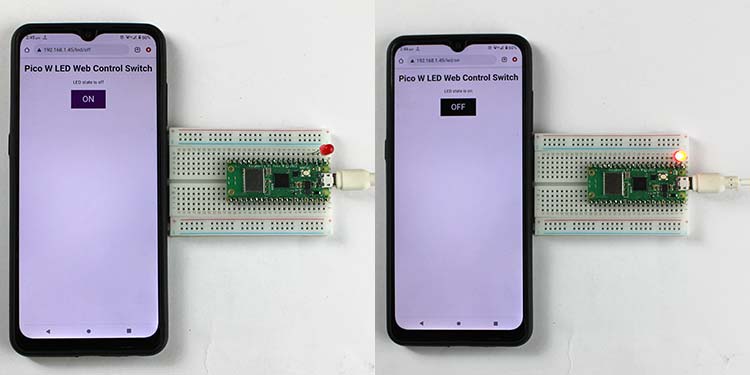
You can now control the LED ON/OFF by clicking the switch repeatedly. Each time the switch is toggled, the LED state and switch color will change.
Hope you enjoyed the article and learned something useful from it. If you have any questions, you can leave them in the comment section below.
#include <WiFi.h>
const char* ssid = "Semicon Media 2.4"; // Replace with your network credentials
const char* password = "cdfiP29to665";
int Led=2;
String header; // Variable to store the HTTP request
String picoLEDState = "off"; // Variable to store onboard LED state
unsigned long currentTime = millis(); // Current time
unsigned long previousTime = 0; // Previous time
const long timeoutTime = 2000;
WiFiServer server(80); // Set web server port number to 80
void setup()
{ Serial.begin(115200); // Start Serial Monitor
pinMode(Led, OUTPUT); // Initialize the LED as an output
digitalWrite(Led, LOW); // Set LED off
WiFi.begin(ssid, password); // Connect to Wi-Fi network with SSID and password
while (WiFi.status() != WL_CONNECTED) // Display progress on Serial monitor
{ delay(500);
Serial.print(".");
}
Serial.println(""); // Print local IP address and start web server
Serial.print("WiFi connected at IP Address ");
Serial.println(WiFi.localIP());
server.begin(); // Start Server
}
void loop()
{ WiFiClient client = server.available(); // Listen for incoming clients
if (client)
{ // If a new client connects,
currentTime = millis();
previousTime = currentTime;
Serial.println("New Client."); // print a message out in the serial port
String currentLine = ""; // make a String to hold incoming data from the client
while (client.connected() && currentTime - previousTime <= timeoutTime)
{ // loop while the client's connected
currentTime = millis();
if (client.available())
{ // if there's bytes to read from the client,
char c = client.read(); // read a byte, then
Serial.write(c); // print it out the serial monitor
header += c;
if (c == '\n')
{ // if the byte is a newline character
// if the current line is blank, you got two newline characters in a row.
// that's the end of the client HTTP request, so send a response:
if (currentLine.length() == 0)
{ // HTTP headers always start with a response code (e.g. HTTP/1.1 200 OK)
// and a content-type so the client knows what's coming, then a blank line:
client.println("HTTP/1.1 200 OK");
client.println("Content-type:text/html");
client.println("Connection: close");
client.println();
// Switch the LED on and off
if (header.indexOf("GET /led/on") >= 0)
{ Serial.println("LED on");
picoLEDState = "on";
digitalWrite(Led, HIGH);}
else if (header.indexOf("GET /led/off") >= 0)
{ Serial.println("LED off");
picoLEDState = "off";
digitalWrite(Led, LOW);}
// Display the HTML web page
client.println("<!DOCTYPE html><html>");
client.println("<head><meta name=\"viewport\" content=\"width=device-width, initial-scale=1\">");
client.println("<link rel=\"icon\" href=\"data:,\">");
// CSS to style the on/off buttons
client.println("<style>html { font-family: Arial; display: inline-block; margin: 0px auto; text-align: center;}");
client.println(".button { background-color: #800080; border: none; color: white; padding: 16px 40px;");
client.println("text-decoration: none; font-size: 30px; margin: 2px; cursor: pointer;}");
client.println(".button2 {background-color: #000000;}</style></head>");
// Web Page Heading
client.println("<body><h1>Pico W LED Web Control Switch</h1>");
// Display current state, and ON/OFF buttons for Onboard LED
client.println("<p>LED state is " + picoLEDState + "</p>");
// Set buttons
if (picoLEDState == "off")
{ client.println("<p><a href=\"/led/on\"><button class=\"button\">ON</button></a></p>");} //picoLEDState is off, display the ON button
else
{ client.println("<p><a href=\"/led/off\"><button class=\"button button2\">OFF</button></a></p>");} //picoLEDState is on, display the OFF button
client.println("</body></html>");
client.println(); // The HTTP response ends with another blank line
break; // Break out of the while loop
}
else
{ currentLine = "";} // if you got a newline, then clear currentLine
}
else if (c != '\r')
{ // if you got anything else but a carriage return character,
currentLine += c; } // add it to the end of the currentLine
}
}
header = ""; // Clear the header variable
client.stop(); // Close the connection
Serial.println("Client disconnected.");
Serial.println("");
}
}


