


Hello guys, in this project, we will learn about controlling a Robot Arm wirelessly by using a microcontroller ESP32 which has inbuilt capabilities to connect with a WiFi network. We will control our robot arm movements using a webpage that doesn’t require any Internet connection.
We will see about designing the webpage and also take a deep dive into the connection and working of the Arm.
It’s a revolutionary & interesting project for a hobbyist, a researcher, or an industry professional, this project offers an innovative solution for remote and automated control of a robotic arm, opening up new possibilities for various applications.
We have previously built many robotics projects including IoT-based Robotic Arm using NodeMCU.
Components Required
- Esp32 Module
- Zero PCB
- Female & Male Header Pins
- Jumper Wires
- Micro-USB Female Jack
Getting 3D Printed Robo Arm & Assembly
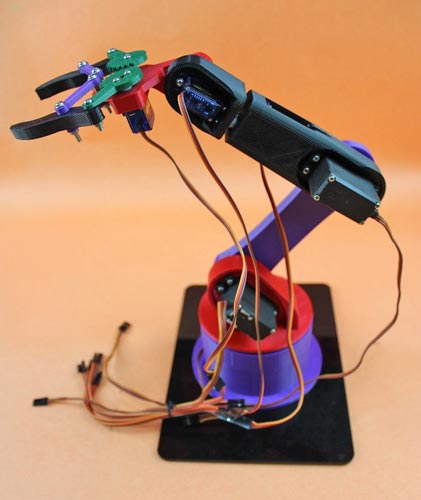
Assembling the Robo Arm is a straightforward process as it is entirely 3D printed in small parts. With a few components and simple instructions, the entire arm can be easily put together. The required components are:
- 3* MG995 Servos (180-degree rotation)
- Few Nuts and Bolts of different Sizes.
The screws and horns for installing Servos are available in the servos kit, and the rest part can be assembled easily by Nuts and Bolts, which you will get easily inside the whole Robotic Arm Kit from your vendor.
The Assembly process requires a little bit more attention for the perfect fitting of the servo’s arms with their correct rotational angle of 180 degrees. You can refer to the blog and YouTube videos of How To Mechatronics by using the Link.
You will find the easy and simplest way to assemble the whole Arm there. Also, you will get the link for the STL files for your 3d design model, if you wish to design it from Scratch.
The below image gives an idea about the looks of the final assembled product.
Circuit Diagram for ESP32 based Robotic Arm
The circuit connections are pretty simple, just connect each servo +ve & -ve terminal to the power supply. For powering our Servos, I am using a Micro-USB female connector which works on 5 volts and can able to draw the sufficient current required for servos. Micro-Usb female jack can be connected to any USB generic Adaptor.
We are using the same outer power source to power the ESP32, in which the +ve is connected to Vin and the -ve terminal to the GND of the ESP32.
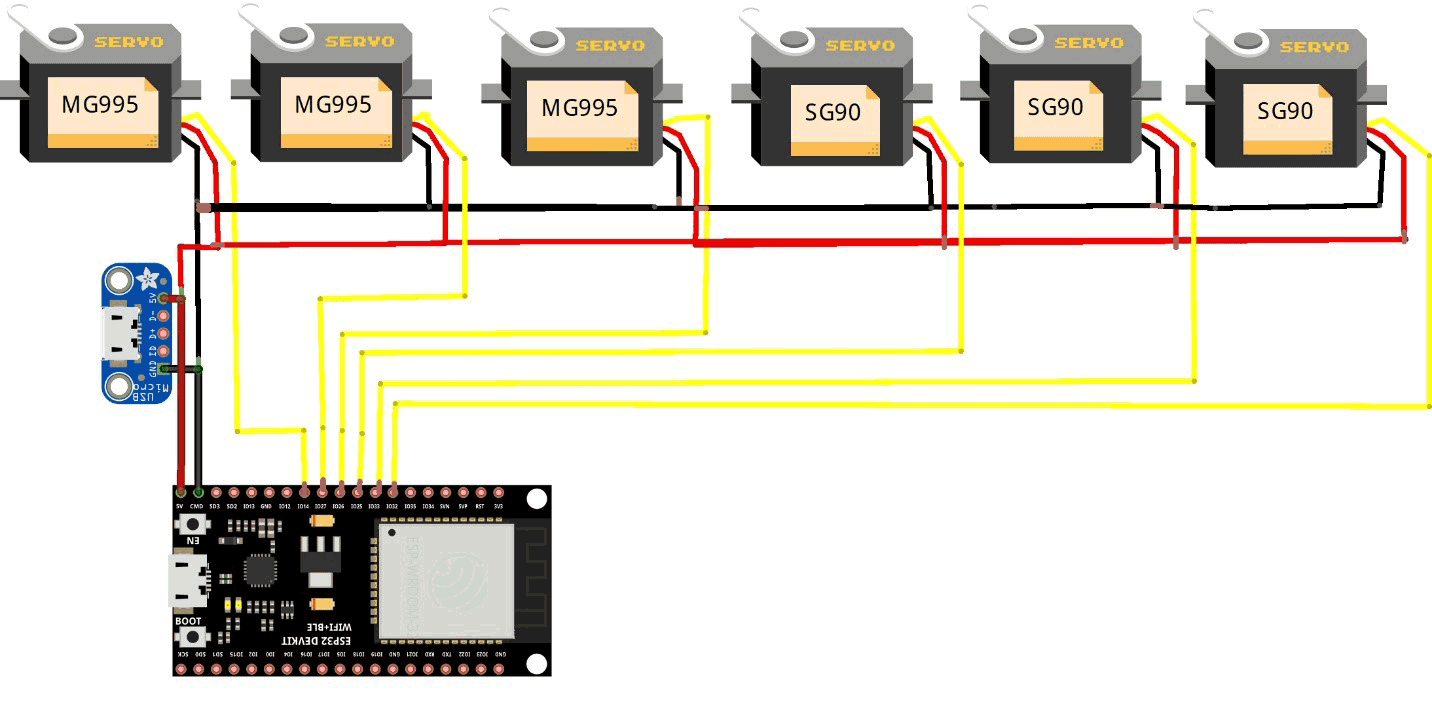
Each control Signal pin of the Servo is connected to the Digital PWM pins of the ESP32. We are using Six Servos of which three of them are MG995 high torque and rest three are SG90 servos. I have connected signal pins to 14,27,26,25,33,32 digital pins of the board. You can also use other pins, but make sure that it supports PWM (Pulse width Modulation) and that it is properly assigned inside the code.
Note: Do not power the Servos directly from ESP32, doing so will results in damaging the board.
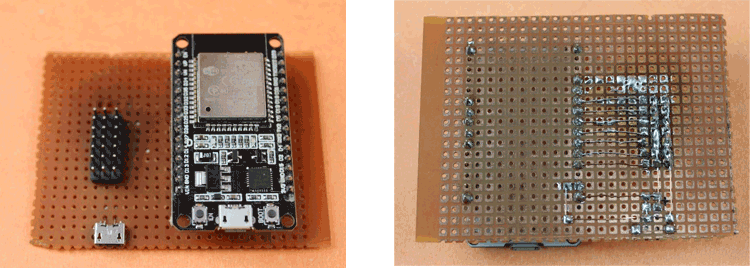
Make All the connections to the perf board by using Male/Female headers for attaching separately Microcontroller board & jumper wires without direct soldering. Also, be careful about short-circuiting while soldering.
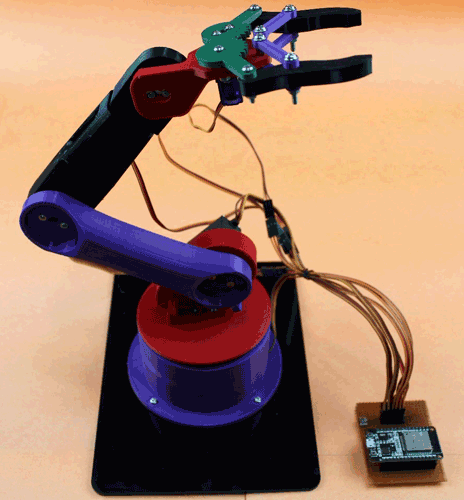
After all the setup and connections of the servos to the controller board, the final RoboArm is ready to proceed with the programming section.
Programming the ESP32 for Robotic Arm
The program uses the WiFi capabilities of the Esp to connect with a WIFI connection through which we can further able to control the RoboArm using our webpage. We will also learn about creating the webpage and controlling all the motions of the Arm.
To ensure successful program execution, we first include the necessary libraries: Servo.h and WiFi.h. The Servo.h library is utilized to control servo motors by providing the appropriate PWM signal based on the desired angle.
We create six different objects of the Servo class, each with a unique name, as we are using six distinct servos.
Furthermore, we define six additional variables to assign the control pins of the microcontroller. It is essential to verify the hardware connections before assigning PINs to avoid incorrect servo functionality.
The Wi-Fi credentials are defined using a pointer variable named "ssid" and “password”. These credentials are necessary for establishing a successful connection to a wireless network.
Following that, an instance of the WiFiServer object is created, named "server", with the HTTP port number 80 passed as an argument.
Additionally, the code declares variables to store the positions of sliders, which will be utilized for controlling the servo motors.
#include <WiFi.h>
#include <Servo.h>
Servo ObjServo1; // Make object of Servo motor from Servo library
Servo ObjServo2;
Servo ObjServo3;
Servo ObjServo4;
Servo ObjServo5;
Servo ObjServo6;
// Objects are made for every servo motor we want to control through this library
static const int ServoGPIO1 = 33; // define the GPIO pin with which servo 1 is connected
static const int ServoGPIO2 = 25;
static const int ServoGPIO3 = 26;
static const int ServoGPIO4 = 27;
static const int ServoGPIO5 = 14;
static const int ServoGPIO6 = 12;
// Variables to store network name and password
const char* ssid = "IN1b"; // Enter your network name
const char* password = "in@india"; // Enter your network password
// Set the server port number to default 80
WiFiServer server(80);
// Variables to store slider positions
String valueString1 = String(0);
String valueString2 = String(0);
String valueString3 = String(0);
String valueString4 = String(0);
String valueString5 = String(0);
String valueString6 = String(0);
Inside Setup() function, we initialize the serial communication with a baud rate of 115200. Then, we attached each servo motor with the respective digital PWM pins of the Esp32 board. This sets up the communication between the servo motors and the microcontroller, allowing you to control the servo motors' positions.
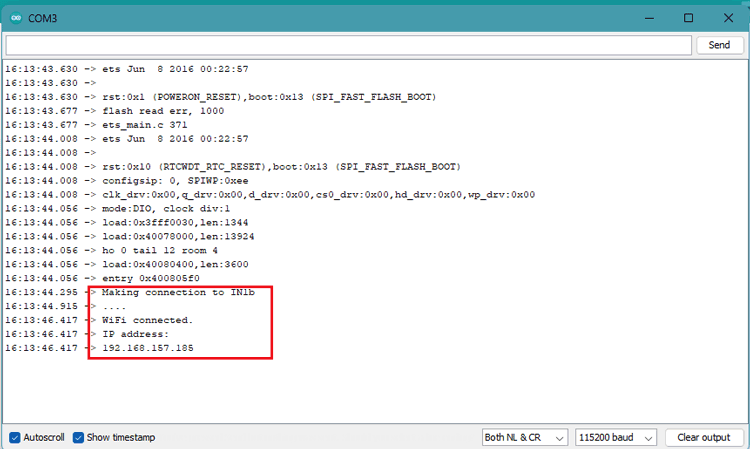
We initiate the WiFi connection using the function WiFi.begin() by providing SSID and Password as an Argument. After a Successful connection, it will print the IP Address on the Serial Monitor. Consequently, the WiFi server started using the command server.begin().
void setup() {
  Serial.begin(115200); // Define serial communication with baud rate of 115200
  ObjServo1.attach(ServoGPIO1); // Attach ObjServo1 to ServoGPIO1 pin
  ObjServo2.attach(ServoGPIO2);
  ObjServo3.attach(ServoGPIO3);
  ObjServo4.attach(ServoGPIO4);
  ObjServo5.attach(ServoGPIO5);
  ObjServo6.attach(ServoGPIO6);
  Serial.print("Making connection to "); // Display message on serial monitor
  Serial.println(ssid);
  WiFi.begin(ssid, password);
    while (WiFi.status() != WL_CONNECTED) {
    delay(500);
    Serial.print(".");
  }
  // Print the IP address value on serial monitor
  Serial.println("");
  Serial.println("WiFi connected.");
  Serial.println("IP address: ");
  Serial.println(WiFi.localIP());
  server.begin(); // Start the server
}
Inside Loop() function, the code listens for incoming client connections by calling server.available(). If a client connects, a WiFiClient object named “client” is created to handle the communication with that client.
Inside the if (client) block, the code sets up the HTTP response headers and starts constructing the HTML web page to be sent to the client.
void loop() {
  WiFiClient client = server.available();                                    // Listen for incoming clients
  if (client) {                                                                                    // If a new client connects
    String header = client.readStringUntil('\r');
    client.println("HTTP/1.1 200 OK");
    client.println("Content-type:text/html");
    client.println("Connection: close");
    client.println();
    // Display the HTML web page
    client.println("<!DOCTYPE html><html>");
    client.println("<head><meta name=\"viewport\" content=\"width=device-width, initial-scale=1\">");
    client.println("<link rel=\"icon\" href=\"data:,\">");
    client.println("<style>body { text-align: center; font-family: \"Trebuchet MS\", Arial; margin-left:auto; margin-right:auto;}");
    client.println(".slider { width: 300px; }");
    client.println(".button { font-size: 24px; padding: 10px 20px; }</style>");
    client.println("<script src=\"https://ajax.googleapis.com/ajax/libs/jquery/3.3.1/jquery.min.js\"></script>");
    client.println("</head><body>");
The HTML web page includes six sets of elements: a heading (‘h1’), a position display (‘span’), a range input (‘input’), and two buttons (‘button’). Each set corresponds to one servo motor. The position display shows the current position of the servo motor, and the range input allows the user to adjust the position. The buttons allow the user to increment or decrement the position by 5 units.
    // Slider 1
    client.println("<h1>ESP32 RoboArm Conrol</h1>");
    client.println("<p>Position 1: <span id=\"servoPos1\"></span></p>");
    client.println("<input type=\"range\" min=\"0\" max=\"180\" class=\"slider\" id=\"servoSlider1\" onchange=\"servo(this.value, 1)\" value=\"" + valueString1 + "\"/>");
    client.println("<button class=\"button\" onclick=\"decrementValue(1)\"style=\"font-size: 24px; padding: 10px 20px;\">-</button>");
    client.println("<button class=\"button\" onclick=\"incrementValue(1)\"style=\"font-size: 24px; padding: 10px 20px;\">+</button>");
    // Slider 2
    client.println("<p>Position 2: <span id=\"servoPos2\"></span></p>");
    client.println("<input type=\"range\" min=\"0\" max=\"180\" class=\"slider\" id=\"servoSlider2\" onchange=\"servo(this.value, 2)\" value=\"" + valueString2 + "\"/>");
    client.println("<button class=\"button\" onclick=\"decrementValue(2)\"style=\"font-size: 24px; padding: 10px 20px;\">-</button>");
    client.println("<button class=\"button\" onclick=\"incrementValue(2)\"style=\"font-size: 24px; padding: 10px 20px;\">+</button>");
    // Slider 3
    client.println("<p>Position 3: <span id=\"servoPos3\"></span></p>");
    client.println("<input type=\"range\" min=\"0\" max=\"180\" class=\"slider\" id=\"servoSlider3\" onchange=\"servo(this.value, 3)\" value=\"" + valueString3 + "\"/>");
    client.println("<button class=\"button\" onclick=\"incrementValue(3)\"style=\"font-size: 24px; padding: 10px 20px;\">-</button>");
    client.println("<button class=\"button\" onclick=\"decrementValue(3)\"style=\"font-size: 24px; padding: 10px 20px;\">+</button>");
    // Slider 4
    client.println("<p>Position 4: <span id=\"servoPos4\"></span></p>");
    client.println("<input type=\"range\" min=\"0\" max=\"180\" class=\"slider\" id=\"servoSlider4\" onchange=\"servo(this.value, 4)\" value=\"" + valueString4 + "\"/>");
    client.println("<button class=\"button\" onclick=\"incrementValue(4)\"style=\"font-size: 24px; padding: 10px 20px;\">-</button>");
    client.println("<button class=\"button\" onclick=\"decrementValue(4)\"style=\"font-size: 24px; padding: 10px 20px;\">+</button>");
    // Slider 5
    client.println("<p>Position 5: <span id=\"servoPos5\"></span></p>");
    client.println("<input type=\"range\" min=\"0\" max=\"180\" class=\"slider\" id=\"servoSlider5\" onchange=\"servo(this.value, 5)\" value=\"" + valueString5 + "\"/>");
    client.println("<button class=\"button\" onclick=\"decrementValue(5)\"style=\"font-size: 24px; padding: 10px 20px;\">-</button>");
    client.println("<button class=\"button\" onclick=\"incrementValue(5)\"style=\"font-size: 24px; padding: 10px 20px;\">+</button>");
    // Slider 6
    client.println("<p>Position 6: <span id=\"servoPos6\"></span></p>");
    client.println("<input type=\"range\" min=\"0\" max=\"180\" class=\"slider\" id=\"servoSlider6\" onchange=\"servo(this.value, 6)\" value=\"" + valueString6 + "\"/>");
    client.println("<button class=\"button\" onclick=\"decrementValue(6)\"style=\"font-size: 24px; padding: 10px 20px;\">-</button>");
    client.println("<button class=\"button\" onclick=\"incrementValue(6)\"style=\"font-size: 24px; padding: 10px 20px;\">+</button>");
JavaScript code is included within the HTML to handle the user interactions with the sliders and buttons. It updates the position display when the slider value changes and makes AJAX requests to the server when the sliders or buttons are interacted with.
    client.println("<script>");
    client.println("var slider1 = document.getElementById(\"servoSlider1\");");
    client.println("var servoP1 = document.getElementById(\"servoPos1\");");
    client.println("slider1.oninput = function() { servoP1.innerHTML = this.value; }");
    client.println("var slider2 = document.getElementById(\"servoSlider2\");");
    client.println("var servoP2 = document.getElementById(\"servoPos2\");");
    client.println("slider2.oninput = function() { servoP2.innerHTML = this.value; }");
    client.println("var slider3 = document.getElementById(\"servoSlider3\");");
    client.println("var servoP3 = document.getElementById(\"servoPos3\");");
    client.println("slider3.oninput = function() { servoP3.innerHTML = this.value; }");
    client.println("var slider4 = document.getElementById(\"servoSlider4\");");
    client.println("var servoP4 = document.getElementById(\"servoPos4\");");
    client.println("slider4.oninput = function() { servoP4.innerHTML = this.value; }");
    client.println("var slider5 = document.getElementById(\"servoSlider5\");");
    client.println("var servoP5 = document.getElementById(\"servoPos5\");");
    client.println("slider5.oninput = function() { servoP5.innerHTML = this.value; }");
    client.println("var slider6 = document.getElementById(\"servoSlider6\");");
    client.println("var servoP6 = document.getElementById(\"servoPos6\");");
    client.println("slider6.oninput = function() { servoP6.innerHTML = this.value; }");
    client.println("$.ajaxSetup({timeout: 1000});");
    client.println("function servo(pos, servoNum) {");
    client.println("$.get(\"/?servo=\" + servoNum + \"&value=\" + pos + \"&\");");
    client.println("}");
    client.println("function incrementValue(servoNum) {");
    client.println("var slider = document.getElementById(\"servoSlider\" + servoNum);");
    client.println("slider.value = parseInt(slider.value) + 5;");
    client.println("servo(slider.value, servoNum);");
    client.println("}");
    client.println("function decrementValue(servoNum) {");
    client.println("var slider = document.getElementById(\"servoSlider\" + servoNum);");
    client.println("slider.value = parseInt(slider.value) - 5;");
    client.println("servo(slider.value, servoNum);");
    client.println("}");
    client.println("</script>");
    client.println("</body></html>");
If the HTTP request received from the client contains the string "GET /?servo=", it means that the client is sending a request to change the position of a servo motor. The code extracts the servo number and value from the request headers, converts them to integers, and calls the setServoPosition() function to set the corresponding servo motor to the specified value.
After processing the client request, the code disconnects the client using client.stop() and prints a message on the serial monitor to indicate that the client has been disconnected.
    if (header.indexOf("GET /?servo=") >= 0) {
      int servoPosition = header.indexOf("servo=") + 6;
      int valuePosition = header.indexOf("&value=");
      int servoNum = header.substring(servoPosition, valuePosition).toInt();
      int value = header.substring(valuePosition + 7).toInt();
      // Set the servo position
      setServoPosition(servoNum, value);
    }
    client.stop(); // Disconnect the client
    Serial.println("Client disconnected.");
    Serial.println("");
  }
}
The setServoPosition() function is a helper function that takes in the servo number and value as parameters. It uses a switch statement to identify the servo number and sets the corresponding servo motor to the specified value. It also updates the corresponding valueString variable to keep track of the current position of each servo motor.
void setServoPosition(int servoNum, int value) {
  switch (servoNum) {
    case 1:
      ObjServo1.write(value);
      valueString1 = String(value);
      break;
    case 2:
      ObjServo2.write(value);
      valueString2 = String(value);
      break;
    case 3:
      ObjServo3.write(value);
      valueString3 = String(value);
      break;
    case 4:
      ObjServo4.write(value);
      valueString4 = String(value);
      break;
    case 5:
      ObjServo5.write(value);
      valueString5 = String(value);
      break;
    case 6:
      ObjServo6.write(value);
      valueString6 = String(value);
      break;
  }
}
Working of Web-based controlled Robotic Arm
The maximum voltage to withstand both types of Servos (MG995 & SG90) is about 7.2 volts. And by using Micro-USB, you can use any generic 5-volt adaptor with a minimum output current of 2 Amps which is enough to provide sufficient power to all servos.
Once Check the sorting between External +ve and -ve power terminals before powering the board.
Also, check for WiFi credentials SSID, and Password for establishing a successful connection with a network.
Upload the code by selecting the correct board and COM port. Open the Serial monitor in Arduino IDE and set the baud rate as 115200. An IP address will get printed if it is successfully connected to a network.
Go to that IP Address in any browser either in Windows or Android by searching the IP Address in Search Bar. You will see an attractive web-interface with sliders and buttons for controlling the Arm.
Note: Make sure the browser device is also connected to the same WiFi Network else no page will be open.
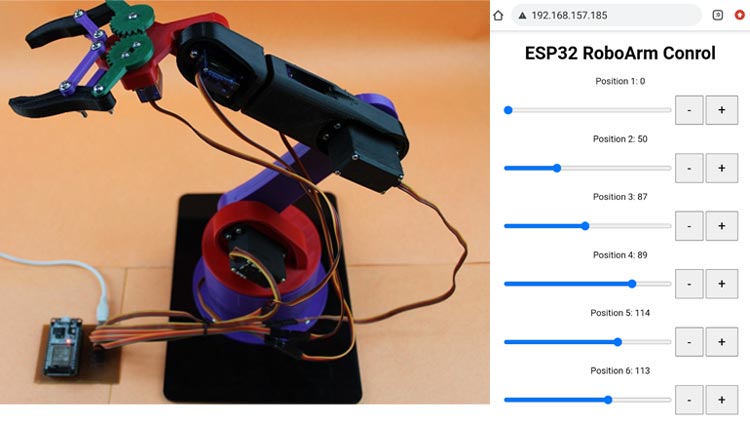
Now, the users can adjust the servo positions using sliders and buttons on the web page, and the changes will be reflected in the physical servo motors.
Hope you enjoyed the Project and learned something useful from it. If you have any questions, you can leave them in the comment section below.
#include <WiFi.h>
#include <Servo.h>
Servo ObjServo1; // Make object of Servo motor from Servo library
Servo ObjServo2;
Servo ObjServo3;
Servo ObjServo4;
Servo ObjServo5;
Servo ObjServo6;
// Objects are made for every servo motor we want to control through this library
static const int ServoGPIO1 = 33; // define the GPIO pin with which servo 1 is connected
static const int ServoGPIO2 = 25;
static const int ServoGPIO3 = 26;
static const int ServoGPIO4 = 27;
static const int ServoGPIO5 = 14;
static const int ServoGPIO6 = 12;
// Variables to store network name and password
const char* ssid = "IN1b"; // Enter your network name
const char* password = "in@india"; // Enter your network password
// Set the server port number to default 80
WiFiServer server(80);
// Variables to store slider positions
String valueString1 = String(0);
String valueString2 = String(0);
String valueString3 = String(0);
String valueString4 = String(0);
String valueString5 = String(0);
String valueString6 = String(0);
void setup() {
Serial.begin(115200); // Define serial communication with baud rate of 115200
ObjServo1.attach(ServoGPIO1); // Attach ObjServo1 to ServoGPIO1 pin
ObjServo2.attach(ServoGPIO2);
ObjServo3.attach(ServoGPIO3);
ObjServo4.attach(ServoGPIO4);
ObjServo5.attach(ServoGPIO5);
ObjServo6.attach(ServoGPIO6);
Serial.print("Making connection to "); // Display message on serial monitor
Serial.println(ssid);
WiFi.begin(ssid, password);
while (WiFi.status() != WL_CONNECTED) {
delay(500);
Serial.print(".");
}
// Print the IP address value on serial monitor
Serial.println("");
Serial.println("WiFi connected.");
Serial.println("IP address: ");
Serial.println(WiFi.localIP());
server.begin(); // Start the server
}
void loop() {
WiFiClient client = server.available(); // Listen for incoming clients
if (client) { // If a new client connects
String header = client.readStringUntil('\r');
client.println("HTTP/1.1 200 OK");
client.println("Content-type:text/html");
client.println("Connection: close");
client.println();
// Display the HTML web page
client.println("<!DOCTYPE html><html>");
client.println("<head><meta name=\"viewport\" content=\"width=device-width, initial-scale=1\">");
client.println("<link rel=\"icon\" href=\"data:,\">");
client.println("<style>body { text-align: center; font-family: \"Trebuchet MS\", Arial; margin-left:auto; margin-right:auto;}");
client.println(".slider { width: 300px; }");
client.println(".button { font-size: 24px; padding: 10px 20px; }</style>");
client.println("<script src=\"https://ajax.googleapis.com/ajax/libs/jquery/3.3.1/jquery.min.js\"></script>");
client.println("</head><body>");
// Slider 1
client.println("<h1>ESP32 RoboArm Conrol</h1>");
client.println("<p>Position 1: <span id=\"servoPos1\"></span></p>");
client.println("<input type=\"range\" min=\"0\" max=\"180\" class=\"slider\" id=\"servoSlider1\" onchange=\"servo(this.value, 1)\" value=\"" + valueString1 + "\"/>");
client.println("<button class=\"button\" onclick=\"decrementValue(1)\"style=\"font-size: 24px; padding: 10px 20px;\">-</button>");
client.println("<button class=\"button\" onclick=\"incrementValue(1)\"style=\"font-size: 24px; padding: 10px 20px;\">+</button>");
// Slider 2
client.println("<p>Position 2: <span id=\"servoPos2\"></span></p>");
client.println("<input type=\"range\" min=\"0\" max=\"180\" class=\"slider\" id=\"servoSlider2\" onchange=\"servo(this.value, 2)\" value=\"" + valueString2 + "\"/>");
client.println("<button class=\"button\" onclick=\"decrementValue(2)\"style=\"font-size: 24px; padding: 10px 20px;\">-</button>");
client.println("<button class=\"button\" onclick=\"incrementValue(2)\"style=\"font-size: 24px; padding: 10px 20px;\">+</button>");
// Slider 3
client.println("<p>Position 3: <span id=\"servoPos3\"></span></p>");
client.println("<input type=\"range\" min=\"0\" max=\"180\" class=\"slider\" id=\"servoSlider3\" onchange=\"servo(this.value, 3)\" value=\"" + valueString3 + "\"/>");
client.println("<button class=\"button\" onclick=\"incrementValue(3)\"style=\"font-size: 24px; padding: 10px 20px;\">-</button>");
client.println("<button class=\"button\" onclick=\"decrementValue(3)\"style=\"font-size: 24px; padding: 10px 20px;\">+</button>");
// Slider 4
client.println("<p>Position 4: <span id=\"servoPos4\"></span></p>");
client.println("<input type=\"range\" min=\"0\" max=\"180\" class=\"slider\" id=\"servoSlider4\" onchange=\"servo(this.value, 4)\" value=\"" + valueString4 + "\"/>");
client.println("<button class=\"button\" onclick=\"incrementValue(4)\"style=\"font-size: 24px; padding: 10px 20px;\">-</button>");
client.println("<button class=\"button\" onclick=\"decrementValue(4)\"style=\"font-size: 24px; padding: 10px 20px;\">+</button>");
// Slider 5
client.println("<p>Position 5: <span id=\"servoPos5\"></span></p>");
client.println("<input type=\"range\" min=\"0\" max=\"180\" class=\"slider\" id=\"servoSlider5\" onchange=\"servo(this.value, 5)\" value=\"" + valueString5 + "\"/>");
client.println("<button class=\"button\" onclick=\"decrementValue(5)\"style=\"font-size: 24px; padding: 10px 20px;\">-</button>");
client.println("<button class=\"button\" onclick=\"incrementValue(5)\"style=\"font-size: 24px; padding: 10px 20px;\">+</button>");
// Slider 6
client.println("<p>Position 6: <span id=\"servoPos6\"></span></p>");
client.println("<input type=\"range\" min=\"0\" max=\"180\" class=\"slider\" id=\"servoSlider6\" onchange=\"servo(this.value, 6)\" value=\"" + valueString6 + "\"/>");
client.println("<button class=\"button\" onclick=\"decrementValue(6)\"style=\"font-size: 24px; padding: 10px 20px;\">-</button>");
client.println("<button class=\"button\" onclick=\"incrementValue(6)\"style=\"font-size: 24px; padding: 10px 20px;\">+</button>");
client.println("<script>");
client.println("var slider1 = document.getElementById(\"servoSlider1\");");
client.println("var servoP1 = document.getElementById(\"servoPos1\");");
client.println("slider1.oninput = function() { servoP1.innerHTML = this.value; }");
client.println("var slider2 = document.getElementById(\"servoSlider2\");");
client.println("var servoP2 = document.getElementById(\"servoPos2\");");
client.println("slider2.oninput = function() { servoP2.innerHTML = this.value; }");
client.println("var slider3 = document.getElementById(\"servoSlider3\");");
client.println("var servoP3 = document.getElementById(\"servoPos3\");");
client.println("slider3.oninput = function() { servoP3.innerHTML = this.value; }");
client.println("var slider4 = document.getElementById(\"servoSlider4\");");
client.println("var servoP4 = document.getElementById(\"servoPos4\");");
client.println("slider4.oninput = function() { servoP4.innerHTML = this.value; }");
client.println("var slider5 = document.getElementById(\"servoSlider5\");");
client.println("var servoP5 = document.getElementById(\"servoPos5\");");
client.println("slider5.oninput = function() { servoP5.innerHTML = this.value; }");
client.println("var slider6 = document.getElementById(\"servoSlider6\");");
client.println("var servoP6 = document.getElementById(\"servoPos6\");");
client.println("slider6.oninput = function() { servoP6.innerHTML = this.value; }");
client.println("$.ajaxSetup({timeout: 1000});");
client.println("function servo(pos, servoNum) {");
client.println("$.get(\"/?servo=\" + servoNum + \"&value=\" + pos + \"&\");");
client.println("}");
client.println("function incrementValue(servoNum) {");
client.println("var slider = document.getElementById(\"servoSlider\" + servoNum);");
client.println("slider.value = parseInt(slider.value) + 5;");
client.println("servo(slider.value, servoNum);");
client.println("}");
client.println("function decrementValue(servoNum) {");
client.println("var slider = document.getElementById(\"servoSlider\" + servoNum);");
client.println("slider.value = parseInt(slider.value) - 5;");
client.println("servo(slider.value, servoNum);");
client.println("}");
client.println("</script>");
client.println("</body></html>");
if (header.indexOf("GET /?servo=") >= 0) {
int servoPosition = header.indexOf("servo=") + 6;
int valuePosition = header.indexOf("&value=");
int servoNum = header.substring(servoPosition, valuePosition).toInt();
int value = header.substring(valuePosition + 7).toInt();
// Set the servo position
setServoPosition(servoNum, value);
}
client.stop(); // Disconnect the client
Serial.println("Client disconnected.");
Serial.println("");
}
}
void setServoPosition(int servoNum, int value) {
switch (servoNum) {
case 1:
ObjServo1.write(value);
valueString1 = String(value);
break;
case 2:
ObjServo2.write(value);
valueString2 = String(value);
break;
case 3:
ObjServo3.write(value);
valueString3 = String(value);
break;
case 4:
ObjServo4.write(value);
valueString4 = String(value);
break;
case 5:
ObjServo5.write(value);
valueString5 = String(value);
break;
case 6:
ObjServo6.write(value);
valueString6 = String(value);
break;
}
}


