


Data is a crucial resource for any kind of analysis and forecasting. It is always needed to create any information or stats. There are a lot of online and offline platforms available to log data and we have used many IoT based platforms and webservers to store and visualize data. Here we use the most popular offline way to store data, which is SD card.
We previously used Arduino Uno to log data on the SD card, today we will use ESP32 to log the temperature and humidity data on the SD card. Here ESP32 collects the temperature and humidity values from the DHT11 sensor and stores these values on SD Card. The data file saved in the SD card can be easily opened as a text file for further analyses.
Components Required
- ESP32
- DHT11 Temperature and Humidity Sensor
- SD Card Module
- SD Card Reader
- Jumper Wires
SD Card Adapter
The MicroSD Card Adapter is a Micro SD card reader module that is used to read and write data on SD Card. The pinout of the MicroSD Card Adapter is directly compatible with Arduino or any other microcontroller. This Module has an SPI interface that is compatible with any SD card and it uses a 5V or 3.3V power supply.
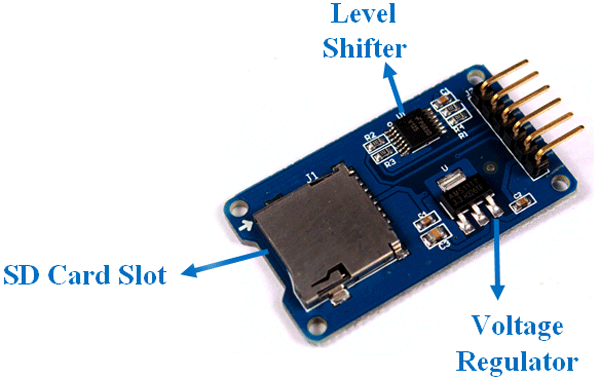
Features
- Support Micro SD Card (<=2G), Micro SDHC card (<=32G)
- The level conversion circuit board that can interface level is 5V or 3.3V
- Power supply is 4.5V ~ 5.5V, 3.3V voltage regulator circuit board
- Communication interface is a standard SPI interface.
Circuit Diagram
Circuit Diagram for ESP32 SD card data logging is given below:
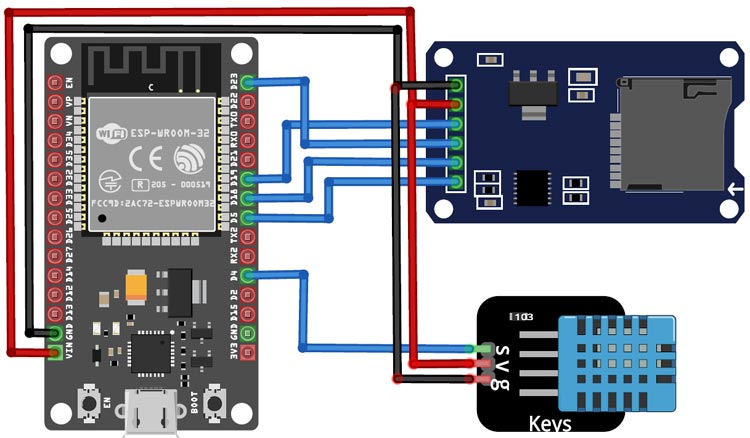
As shown in the circuit diagram, the connections are very simple since all the components are used as modules, we can directly build them on a breadboard. The SD card module is connected to the ESP32 through SPI communication. The SPI pins on the ESP32 are pins 5, 18, 19, and 23. The connections are further classified in the table below:
|
SD Card Module Pin |
ESP32 Pin |
|
Vcc |
VIN |
|
GND |
GND |
|
CS |
GPIO5 |
|
SCK |
GPIO18 |
|
MISO |
GPIO19 |
|
MOSI |
GPIO23 |
|
DHT11 Pin |
ESP32 Pin |
|
Vcc |
VIN |
|
GND |
GND |
|
Data |
GPIO4 |

We previously used the DHT11 sensor to build a weather station using different microcontrollers.
Code Explanation
The complete code for ESP32 SD Card Logger is given at the end of the page. Here we are explaining some important parts of the code.
Before programming the ESP32, you need to install the SPI.h, SD.h, NTPClient.h, and DHT.h libraries that will be used in this code. These libraries can be downloaded from below links:
After downloading the libraries, start the code by including the needed libraries for the microSD card module, DHT11, and NTP Server.
#include "DHT.h"
#include "SD.h"
#include <SPI.h>
#include <WiFi.h>
#include <NTPClient.h>
#include <WiFiUdp.h>
In the next lines, define the type of DHT sensor and the ESP32 pin where the DHT11 sensor is connected. If you are using DHT22, then change the DHT type to DHT22. In my case, the DHT sensor is connected to the GPIO4 of ESP32.
#define DHTTYPE DHT11 // DHT 11
uint8_t DHTPin = 4;
DHT dht(DHTPin, DHTTYPE);
Then Create string and float variables to store the Time, Date, and DHT11 sensor data. Data stored in these variables will be saved on the microSD card.
float Temperature;
float Humidity;
String formattedDate;
String dayStamp;
String timeStamp;
Then enter the network credentials in the SSID and password variables so that the ESP32 can establish a connection with your local network.
const char* ssid = "Wi-Fi Name";
const char* password = "Password";
In the next line, define the SD card CS pin which is connected to GPIO 5.
#define SD_CS 5
In the next two lines, create an instance for NTPClient to request date and time from an NTP server.
WiFiUDP ntpUDP;
NTPClient timeClient(ntpUDP);
Inside the setup() function, initialize the serial communication, DHT11 sensor, and Connect the ESP32 to the Wi-Fi network using the credentials defined earlier.
  Serial.begin(115200);
  dht.begin();
  Serial.print("Connecting to ");
  Serial.println(ssid);
  WiFi.begin(ssid, password);
  while (WiFi.status() != WL_CONNECTED) {
        Serial.print(".");
  }
    Serial.println("WiFi connected.");
In the next lines, initialize the NTP client to get date and time from an NTP server. Change the ‘time’ value inside the timeClient.setTimeOffset(time) function according to your time zone. Follow the given link to get the List of GMT offset time zones.
timeClient.begin();
timeClient.setTimeOffset(19800);
After that, initialize the SD card. The ‘if’ condition checks if the microSD card is properly working or not.
SD.begin(SD_CS);
 if(!SD.begin(SD_CS))
{
  Serial.println("Card Mount Failed");
  return;
If the SD card is working, then create a new text file and write the names of the data.
writeFile(SD, "/data.txt", "Date, Time, Temperature, Humidity \r\n");
Inside the loop() function, call the Read_TempHum(), logSDCard(), and getTimeStamp() functions to get the DH11 sensor, time and date values and then send these values to SD card.
void loop()
 {
   Read_TempHum();
   getTimeStamp();
   logSDCard();
   delay(5000);
 }
The Read_TempHum() function is used to get the temperature and humidity values from the DHT11 sensor and the dht.read function reads these values from the sensor.
void Read_TempHum()
{
  Temperature = dht.readTemperature();
  Humidity = dht.readHumidity();
  Serial.println(Temperature);
  Serial.println(Humidity);
}
The getTimeStamp() function is used to get the date and time values from the NTP server. The raw date and time values are converted to a readable format using the getFormattedDate() method. After that, both the time and date values are stored in two separate string variables.
void getTimeStamp() {
  while(!timeClient.update()) {
    timeClient.forceUpdate();
  }
   formattedDate = timeClient.getFormattedDate();
   int splitT = formattedDate.indexOf("T");
   dayStamp = formattedDate.substring(0, splitT);
   timeStamp = formattedDate.substring(splitT+1, formattedDate.length()-1);
}
The logSDCard() function is used to log all the information to the data.txt file in the SD card.
void logSDCard()
 {
  dataMessage =
  String(dayStamp) + "," + String(timeStamp) + "," +
  String(Temperature) + "," + String(Humidity)+ "\r\n";
  Serial.print("Save data: ");
  Serial.println(dataMessage);
  appendFile(SD, "/data.txt", dataMessage.c_str());
 }
Testing the ESP32 Data Logging Project
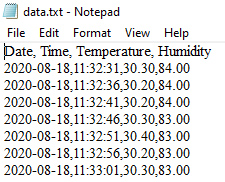
Once the hardware and the code are ready, connect the ESP32 board to your laptop and upload the code. As soon as the program gets uploaded, temperature and humidity values with date and time stamp will start to get stored in the SD card in a file named ‘data.txt’. To check if this is working, remove the SD card from the module and open it in the phone or laptop and open the ‘data.txt’ file. It would look something like this:
This is how you can store the data from ESP32 to SD Card. A working video and complete code are given below.
#include "DHT.h"
#include "FS.h"
#include "SD.h"
#include <SPI.h>
#include <WiFi.h>
#include <NTPClient.h>
#include <WiFiUdp.h>
#define DHTTYPE DHT11 // DHT 11
uint8_t DHTPin = 4;
DHT dht(DHTPin, DHTTYPE);
float Temperature;
float Humidity;
String formattedDate;
String dayStamp;
String timeStamp;
// Replace with your network credentials
const char* ssid = "Galaxy-M20";
const char* password = "ac312124";
// Define CS pin for the SD card module
#define SD_CS 5
String dataMessage;
// Define NTP Client to get time
WiFiUDP ntpUDP;
NTPClient timeClient(ntpUDP);
void setup() {
Serial.begin(115200);
pinMode(DHTPin, INPUT);
dht.begin();
Serial.print("Connecting to ");
Serial.println(ssid);
WiFi.begin(ssid, password);
while (WiFi.status() != WL_CONNECTED) {
delay(500);
Serial.print(".");
}
Serial.println("");
Serial.println("WiFi connected.");
// Initialize a NTPClient to get time
timeClient.begin();
timeClient.setTimeOffset(19800);
// Initialize SD card
SD.begin(SD_CS);
if(!SD.begin(SD_CS)) {
Serial.println("Card Mount Failed");
return;
}
uint8_t cardType = SD.cardType();
if(cardType == CARD_NONE) {
Serial.println("No SD card attached");
return;
}
Serial.println("Initializing SD card...");
if (!SD.begin(SD_CS)) {
Serial.println("ERROR - SD card initialization failed!");
return; // init failed
}
File file = SD.open("/data.txt");
if(!file) {
Serial.println("File doens't exist");
Serial.println("Creating file...");
writeFile(SD, "/data.txt", "Date, Time, Temperature, Humidity \r\n");
}
else {
Serial.println("File already exists");
}
file.close();
}
void loop() {
Read_TempHum();
getTimeStamp();
logSDCard();
delay(5000); //Wait for 5 seconds before writing the next data
}
// Function to get temperature
void Read_TempHum()
{
Temperature = dht.readTemperature();
Humidity = dht.readHumidity();
Serial.print("Temperature = ");
Serial.println(Temperature);
Serial.print("Humidity = ");
Serial.println(Humidity);
}
// Function to get date and time from NTPClient
void getTimeStamp() {
while(!timeClient.update()) {
timeClient.forceUpdate();
}
formattedDate = timeClient.getFormattedDate();
Serial.println(formattedDate);
int splitT = formattedDate.indexOf("T");
dayStamp = formattedDate.substring(0, splitT);
Serial.println(dayStamp);
// Extract time
timeStamp = formattedDate.substring(splitT+1, formattedDate.length()-1);
Serial.println(timeStamp);
}
// Write the sensor readings on the SD card
void logSDCard() {
dataMessage = String(dayStamp) + "," + String(timeStamp) + "," +
String(Temperature) + "," + String(Humidity)+ "\r\n";
Serial.print("Save data: ");
Serial.println(dataMessage);
appendFile(SD, "/data.txt", dataMessage.c_str());
}
// Write to the SD card (DON'T MODIFY THIS FUNCTION)
void writeFile(fs::FS &fs, const char * path, const char * message) {
Serial.printf("Writing file: %s\n", path);
File file = fs.open(path, FILE_WRITE);
if(!file) {
Serial.println("Failed to open file for writing");
return;
}
if(file.print(message)) {
Serial.println("File written");
} else {
Serial.println("Write failed");
}
file.close();
}
// Append data to the SD card (DON'T MODIFY THIS FUNCTION)
void appendFile(fs::FS &fs, const char * path, const char * message) {
Serial.printf("Appending to file: %s\n", path);
File file = fs.open(path, FILE_APPEND);
if(!file) {
Serial.println("Failed to open file for appending");
return;
}
if(file.print(message)) {
Serial.println("Message appended");
} else {
Serial.println("Append failed");
}
file.close();
}


