


In this project, we will learn how to create a weather station, which will display reading from a BME280 module and live weather data from OpenWeatherMap API in a webserver. The device will get temperature, humidity, barometric pressure, and altitude from the BME280 sensor and external temperature, humidity, weather condition, and sunrise and sunset from OpenWeatherMap API. We can see those reading in a web browser.
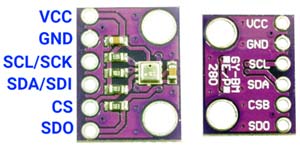
BME280 Temperature, Humidity & Pressure Sensor
The BME280 is an integrated environmental sensor developed specifically for mobile applications and wearables where size and low power consumption are key design parameters. The unit combines high linearity and high accuracy sensors and is perfectly feasible for low current consumption and long-term stability. The BME280 sensor offers an extremely fast response time and therefore supports performance requirements for emerging applications such as context awareness, and high accuracy over a wide temperature range.
This sensor can measure relative humidity from 0 to 100% with ±3% accuracy, barometric pressure from 300Pa to 1100 hPa with ±1 hPa absolute accuracy, and temperature from -40°C to 85°C with ±1.0°C accuracy.
The BME280 supports I2C and SPI interfaces. The module we are using supports a voltage range of 1.7 – 3.3V. The BME280 has an average current consumption of 3.6µA when measuring all the parameters at a refresh rate of 1Hz. The sensor can be operated in three power modes: Sleep, normal, and forced mode.
One thing to keep in mind while buying a BME280 module is that a similar-looking module also comes with a BMP280 sensor which lacks the humidity measurement capability, which makes it way cheaper than the BME280. The best way to identify between BME280 and BMP280 sensors is to look at the product code. BME280 sensor will have a product code starting with ‘U’, e.g., UP, UN, etc. While the BMP280 will have a product code starting with “K”, e.g., KN, KP, etc. Another visual difference is that BME280 is somewhat square while BMP280 is rectangular.

OpenWeatherMap API
OpenWeatherMap is an online service, that provides global weather data via API, including current weather data, forecasts, nowcasts, and historical weather data for any geographical location. Through their API we can access current weather data for any location on Earth including over 200,000 cities! They collect and process weather data from different sources such as global and local weather models, satellites, radars, and a vast network of weather stations. Data is available in JSON, XML, or HTML format. We will be using HTTP GET to request the JSON data for this project.
Weather Station Circuit Diagram
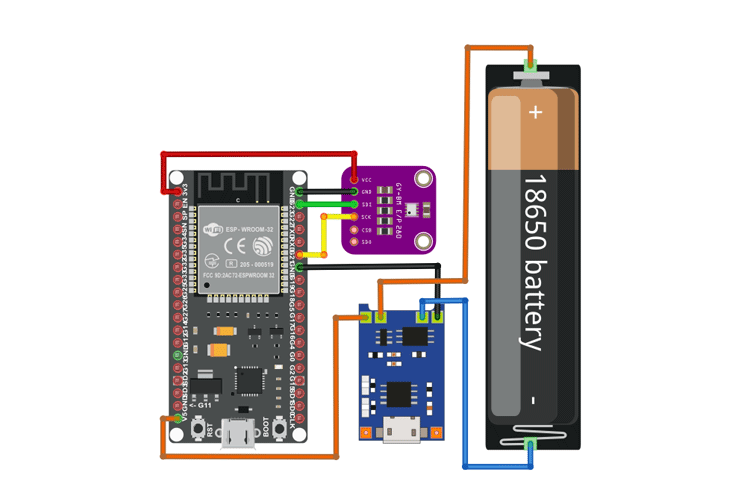
Connections are fairly simple. Follow the connection diagram above. We have added a 18650 battery and TP4056 charging module with protection for the backup. Start by connecting the negative of the battery to the B- pin of the TP4056 module and the positive to the B+ pin of the module. Now connect the OUT+ of the module to the VIN pin of ESP32 Devkit and B- to the GND pin. The TP4056 module also contains the DW01 protection chip which will protect the battery from over-discharge and short circuits.
Now let’s connect the BME280 module to the ESP32 Devkit. Connect the VCC pin of BME280 to the 3.3V pin and GND to the GND pin. The module supports both SPI and I2C. We will be using the I2C interface for communication. For that connect the SDA pin to D22 and the SCL pin to D21 of the ESP32 Devkit.
Code Explanation and Arduino IDE Installing Libraries
For this project, we will need to install several Arduino libraries and it can be done directly via the library manager. To install the libraries, navigate to the Arduino IDE > Sketch > Include Library > Manage Libraries… Wait for the Library Manager to download the libraries index and update the list of installed libraries. Then search and install the following libraries.
- Adafruit BME280 Library
- Adafruit Unified Sensor
- Arduino_JSON Library
Install the following libraries using the zip file.
Installing ESP32 Filesystem Uploader in Arduino IDE
We are using SPIFFS for hosting the webserver files. WE can use the ESP32 flash storage like a normal file system just like in an SD card or USB mass storage with the help of SPIFFS To upload these files to the filesystem we will need a tool called ESP32 filesystem uploader. To install this tool to your Arduino IDE please follow the following steps
- Go to the GitHub releases page and download the ESP32FS-1.0.zip.
- Extract the zip file to the Tools folder in the Arduino IDE directory. After extracting the path would look like this “C:\Users\Username\Documents\Arduino\tools\ESP32FS\tool\ esp32fs.jar”
- Restart the Arduino IDE and you can use this tool by clicking on the Tools Menu.
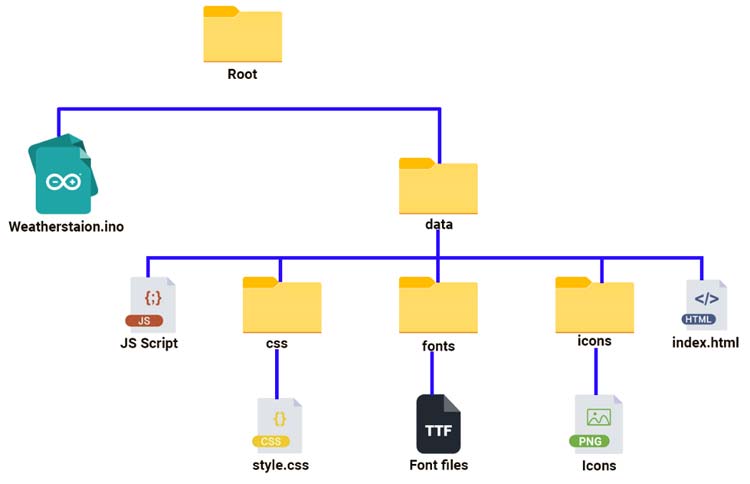
Webserver File Structure
As we already said we will be hosting the webserver using the ESP32 file system. The file system structure will look like this. All the data that needed to be loaded to the filesystem are stored in a folder called data, within the sketch folder.
HTML File
The index.html file is the main file loaded when the server gets a request. It contains all the structural programming for the webpage. Here is the code for the HTML file.
<!DOCTYPE html> <html> <head> <meta name="viewport" content="width=device-width, initial-scale=1"> <link rel="icon" type="image/png" href="icons/favicon.png"> <link rel="stylesheet" href="https://cdnjs.cloudflare.com/ajax/libs/font-awesome/4.7.0/css/font-awesome.min.css"> <link rel="stylesheet" href="css/style.css"> <link rel="stylesheet" href="fonts/quartz.ttf"> <script src="https://cdnjs.cloudflare.com/ajax/libs/three.js/107/three.min.js"></script> </head> <body> <div id="bg_mob"> <div class="mob_inner"> <div class="sec1"> <div class="weather_img"> <img id= "weather_icon" src="icons/unknown.png" /> </div> <div class="weather_text"> <p>Sunrise <span class="font_fam"id="Sunrise"></span></p> <p>Sunset  <span class="font_fam"id="Sunset"></span></p> </div> <div class="clr"></div> </div> <article class="sec2"> <div class="fancy"> <p class="subtitle"> <span>Outdoor<br>Temperature</span> </p> <div class="temp_num"> <div> <span class="wob_t" id="out_temperature"></span><span class="point_para">. </span><span class="point_para" id="out_temperatureD"></span><span class="celsius"> ℃</span> <!-- <span class="wob_per" aria-disabled="true" role="button">°F</span> --> </div> </div> </div> <div class="fancy"> <p class="subtitle"> <span>Outdoor<br>Humidty</span> </p> <div class="temp_num"> <div> <span class="wob_t" id="out_humidity"></span><span class="wob_per" aria-label="" aria-disabled="true" role="button">%</span> <!-- <span class="wob_per" aria-label="°Celsius" aria-disabled="true" role="button">%</span> --> </div> </div> </div> <div class="clr"></div> </article> <article class="sec3"> <div class="fancy fancy2_sec"> <p class="subtitle"> <span>Indoor</span> </p> <div class="temp_num temp_num2"> <div> <span class="wob_t" id="in_temperature"></span><span class="point_para">. </span><span class="point_para" id="in_temperatureD"></span><span class="celsius"> ℃</span> <!-- <span class="wob_per" aria-disabled="true" role="button">°F</span> --> </div> </div> </div> <div class="fancy fancy2_sec"> <p class="subtitle"> <span>Humidity</span> </p> <div class="temp_num temp_num2"> <div> <span class="wob_t" id="in_humidity"></span><span class="wob_per" aria-label="" aria-disabled="true" role="button">%</span> <!-- <span class="wob_per" aria-label="°Celsius" aria-disabled="true" role="button">%</span> --> </div> </div> </div> <div class="clr"></div> </article> <article class="sec4"> <div class="fancy fancy2_sec"> <p class="subtitle"> <span>Pressure</span> </p> <div class="temp_num temp_num3"> <div> <span class="wob_t" id="in_presssure"></span> <!-- <span class="wob_per" aria-disabled="true" role="button">°F</span> --> </div> <div class="pre_alt"><span>Pa</span></div> </div> </div> <div class="fancy fancy2_sec"> <p class="subtitle"> <span>Altitude</span> </p> <div class="temp_num temp_num3"> <div> <span class="wob_t" id="in_altitude"></span> <!-- <span class="wob_per" aria-disabled="true" role="button">°F</span> --> </div> <div class="pre_alt"><span>m</span></div> </div> </div> <div class="clr"></div> </article> </div> </div> <script src="script.js"></script> </body> </html>
CSS File
The style.css file is used to define a style for the HTML page. With CSS, we can control the colour, font, text size, spacing between elements, how elements are positioned and laid out, what background images or background colours are to be used, different displays for different devices and screen sizes, and much more!
body{
    margin:0;
    padding: 0;
    color:white;
    font-family: roboto;
    position: relative;
}
p{margin:0;padding:0;}

@font-face {
  font-family: quartz;
  src: url(fonts/quartz.ttf);
}

#bg_mob{
    background-color: black;
    max-width: 540px;
    margin:0 auto;
    height:100vh;
}

.mob_inner{
    padding: 15px;
}
.sec1,.sec2,.sec3,.sec4{
  width: 100%;margin: 15px 0 0;
}
.weather_img,.weather_text{
    float: left;
}
.weather_img{
  width: 36%;
}
.weather_img img{
  width: 100%;
  max-width: 120px;
}
.weather_text{
    text-align: right;
    width: 64%;
    font-size: 22px;
    margin-top: 19px;
    line-height: 26px;
}
.clr{
    clear:both;
}
.fancy {
    text-align: center;
    width: 50%;
    float: left;
}
.fancy2_sec .subtitle{
    line-height: 32px;
}
.fancy p span {
    display: inline-block;
    position: relative;
    color: #ababab;
}
.fancy p span:before {
    right: 100%;
    margin-right: 15px;
}
.fancy p span:after {
    left: 100%;
    margin-left: 15px;
}
.fancy p span:before, .fancy p span:after {
    content: "";
    position: absolute;
    height: 15px;
    border-bottom: 2px solid #ababab;
    top: 0;
    width: 35px;
}
.wob_t{
    font-family: quartz;
    font-size:100px;
}
.pre_alt{
    color: #ababab;
}
.pre_alt span{
    font-family: roboto;
    font-size: 15px;
}
.font_fam{
    font-family: quartz;
    margin-left: 8px;
    text-align: left;
}
.temp_num,.temp_num2,.temp_num3{margin-top:0px;}

.temp_num3 .wob_t{font-size: 32px;}

.point_para{font-size: 32px;letter-spacing: -4px;font-family: quartz;}

.wob_per{font-size: 22px;font-family: roboto;}

.celsius{
    vertical-align: top;
    margin-left: -16px;
    margin-top: 22px;
    display: inline-block;
}
JavaScript File
The Scirpt.js file is responsible for image manipulation, JSON decoding, and dynamic changes in content. This helps us to update the values on the webpage. It controls the event listeners for data updates.
// Create events for the sensor readings
if (!!window.EventSource) {
  var source = new EventSource('/events');

  source.addEventListener('open', function(e) {
    console.log("Events Connected");
  }, false);

  source.addEventListener('error', function(e) {
    if (e.target.readyState != EventSource.OPEN) {
      console.log("Events Disconnected");
    }
  }, false);

  source.addEventListener('BME_readings', function(e) {
    //console.log("gyro_readings", e.data);
    var obj = JSON.parse(e.data);
    document.getElementById("in_temperature").innerHTML = obj.in_temperature;
    document.getElementById("in_temperatureD").innerHTML = obj.in_temperatureD;
    document.getElementById("in_humidity").innerHTML = obj.in_humidity;
    document.getElementById("in_presssure").innerHTML = obj.in_presssure;
    document.getElementById("in_altitude").innerHTML = obj.in_altitude;

  }, false);
  source.addEventListener('OWM_readings', function(e) {
    //console.log("gyro_readings", e.data);
    var obj = JSON.parse(e.data);
    document.getElementById("out_temperature").innerHTML = obj.out_temperature;
    document.getElementById("out_temperatureD").innerHTML = obj.out_temperatureD;
    document.getElementById("out_humidity").innerHTML = obj.out_humidity;
    document.getElementById("weather_icon").src = obj.weather_icon;
    document.getElementById("Sunset").innerHTML = timeConverter(obj.Sunset);
    document.getElementById("Sunrise").innerHTML = timeConverter1(obj.Sunrise);

  }, false);
}

    //block.setAttribute("style", "text-align:center");
function resetPosition(element){
  var xhr = new XMLHttpRequest();
  xhr.open("GET", "/"+element.id, true);
  console.log(element.id);
  xhr.send();
}

function timeConverter(UNIX_timestamp){
  var a = new Date(UNIX_timestamp * 1000);
  var hour = a.getHours();
  var min = a.getMinutes();
  var time = hour + ':' + min;
  return time;
}
function timeConverter1(UNIX_timestamp){
  var a = new Date(UNIX_timestamp * 1000);
  var hour = a.getHours();
  var min = a.getMinutes();
  var time = '0'+hour + ':' + min;
  return time;
}
Arduino Sketch
Here is the Sketch for the ESP32 weather station.
#include <Arduino.h>
#include <WiFi.h>
#include <HTTPClient.h>
#include <AsyncTCP.h>
#include <ESPAsyncWebServer.h>
#include <ESPmDNS.h>
#include <Arduino_JSON.h>
#include "SPIFFS.h"
#include <Adafruit_Sensor.h>
#include <Adafruit_BME80.h>
// Create a sensor object
Adafruit_BME280 bme; // use I2C interface
// Replace with your network credentials
const char* ssid = "SKYNET 4G";
const char* password = "jobitjos";
// OPENWEATHER API CONFIGURATION
String openWeatherMapApiKey = "02f3dcd78793160081a1667f73ffcc4d";
String temperature_unit = "metric";
// Replace with your country code and city
String city = "Kannur";
String endpoint;
float OutTemperature ;
int OutHumidity;
String Icon_;
int Sun_rise;
int Sun_set;
String jsonBuffer;
// Create AsyncWebServer object on port 80
AsyncWebServer server(80);
// Create an Event Source on /events
AsyncEventSource events("/events");
// Json Variable to Hold Sensor Readings
JSONVar readings;
JSONVar owmreadings;
// Timer variables
unsigned long lastTime = 0;
unsigned long lastTimeTemperature = 0;
unsigned long lastTimeAcc = 0;
unsigned long SensorDelay = 10;
unsigned long OWMapDelay = 1000;
float in_temperature, in_presssure, in_altitude, in_humidity;
float out_temperature, out_humidity, out_weathe;
int in_temperatureD , out_temperatureD;
sensors_event_t a, g, temp;
// Initialize Sensor
void initSensor() {
  Serial.println(F("BME280 Sensor event test"));
  unsigned status;
  status = bme.begin(0x76);
  if (!status) {
    Serial.println(F("Could not find a valid BME280 sensor, check wiring or "
                     "try a different address!"));
    while (1) delay(10);
  }
}
void initSPIFFS() {
  if (!SPIFFS.begin()) {
    Serial.println("An error has occurred while mounting SPIFFS");
  }
  Serial.println("SPIFFS mounted successfully");
}
// Initialize WiFi
void initWiFi() {
  WiFi.mode(WIFI_STA);
  WiFi.begin(ssid, password);
  Serial.println("");
  Serial.print("Connecting to WiFi...");
  while (WiFi.status() != WL_CONNECTED) {
    Serial.print(".");
    delay(1000);
  }
  if (!MDNS.begin("esp32")) {
    Serial.println("Error starting mDNS");
    return;
  }
  MDNS.addService("http", "tcp", 80);
  Serial.println("");
  Serial.println(WiFi.localIP());
  Serial.print("Local Address");
  Serial.println("esp32.local");
}
String httpGETRequest(const char* serverName) {
  WiFiClient client;
  HTTPClient http;
  // Your Domain name with URL path or IP address with path
  http.begin(client, serverName);
  // Send HTTP POST request
  int httpResponseCode = http.GET();
  String payload = "{}";
  if (httpResponseCode > 0) {
    Serial.print("HTTP Response code: ");
    Serial.println(httpResponseCode);
    payload = http.getString();
  }
  else {
    Serial.print("Error code: ");
    Serial.println(httpResponseCode);
  }
  // Free resources
  http.end();
  return payload;
}
String getReadings() {
  int sensetemp;
  sensetemp = bme.readTemperature();
  readings["in_temperature"] = String(sensetemp);
  sensetemp = bme.readTemperature() * 10;
  readings["in_temperatureD"] = String(sensetemp % 10);
  sensetemp = bme.readHumidity();
  readings["in_humidity"] = String(sensetemp);
  readings["in_presssure"] = String(bme.readPressure());
  readings["in_altitude"] = String(bme.readAltitude(1013.25));
  String jsonString = JSON.stringify(readings);
  return jsonString;
}
String getOWMReadings() {
  if (WiFi.status() == WL_CONNECTED) {
    endpoint = "http://api.openweathermap.org/data/2.5/weather?q=" + city + "&units=" + temperature_unit  + "&appid=" + openWeatherMapApiKey;
    jsonBuffer = httpGETRequest(endpoint.c_str());
    JSONVar myObject = JSON.parse(jsonBuffer);
    // JSON.typeof(jsonVar) can be used to get the type of the var
    if (JSON.typeof(myObject) == "undefined") {
      Serial.println("Parsing input failed!");
    }
    Icon_ = myObject["weather"][0]["icon"];
    OutTemperature = double(myObject["main"]["temp"]);
    OutHumidity    = int(myObject["main"]["humidity"]);
    Sun_rise     = int(myObject["sys"]["sunrise"]);
    Sun_set      = int(myObject["sys"]["sunset"]);
  }
  else {
    Serial.println("WiFi Disconnected");
  }
  int sensetemp;
  sensetemp = OutTemperature;
  owmreadings["out_temperature"] = String(sensetemp);
  sensetemp = OutTemperature * 10;
  owmreadings["out_temperatureD"] = String(sensetemp % 10);
  owmreadings["out_humidity"] = String(OutHumidity);
  owmreadings["weather_icon"] = String("icons/" + Icon_ + ".png");
  owmreadings["Sunset"] = String(Sun_set);
  owmreadings["Sunrise"] = String(Sun_rise);
  owmreadings["City"] = String(city);
  owmreadings["Key"] = String(openWeatherMapApiKey);
  String jsonString = JSON.stringify(owmreadings);
  Serial.println(jsonString);
  return jsonString;
}
void setup() {
  Serial.begin(115200);
  initWiFi();
  initSPIFFS();
  initSensor();

  // Handle Web Server
  server.on("/", HTTP_GET, [](AsyncWebServerRequest * request) {
    request->send(SPIFFS, "/index.html", "text/html");
  });
  server.serveStatic("/", SPIFFS, "/");
  server.on("/reset", HTTP_GET, [](AsyncWebServerRequest * request) {
    in_temperature = 0;
    in_temperatureD = 0;
    in_humidity = 0;
    in_presssure = 0;
    in_altitude = 0;
    out_temperature = 0;
    out_temperatureD = 0;
    out_humidity = 0;
    request->send(200, "text/plain", "OK");
  });
  // Handle Web Server Events
  events.onConnect([](AsyncEventSourceClient * client) {
    if (client->lastId()) {
      Serial.printf("Client reconnected! Last message ID that it got is: %u\n", client->lastId());
    }
    // send event with message "CircuitDigest", id current millis
    // and set reconnect delay to 1 second
    client->send("CircuitDigest!", NULL, millis(), 10000);
  });
  server.addHandler(&events);
  server.begin();
}
void loop() {
  if ((millis() - lastTime) > SensorDelay) {
    // Send Events to the Web Server with the Sensor Readings
    events.send(getReadings().c_str(), "BME_readings", millis());
    lastTime = millis();
  }
  if ((millis() - lastTimeAcc) > OWMapDelay) {
    // Send Events to the Web Server with the Sensor Readings
    events.send(getOWMReadings().c_str(), "OWM_readings", millis());
    lastTimeAcc = millis();
  }
}
Let’s have a look at how the code is get reading from the sensor, gets weather data from the API, and sends it to the webserver.
Included Libraries
The WiFi, HTTPClient, AsyncTCP, and ESPAsyncWebServer libraries are used for the wifi communication and web server creation and maintenance.
#include <WiFi.h>
#include <HTTPClient.h>
#include <AsyncTCP.h>
#include <ESPAsyncWebServer.h>
The SPIFFS library is used for the file system management and the Arduino_JSON library is for handling the JSON strings.
#include <Arduino_JSON.h>
#include "SPIFFS.h"
And finally, the Adafruit Sensor library and Adafruit BME280 library are for handling the BME280 sensor.
#include <Adafruit_Sensor.h>
#include <Adafruit_BME280.h>
User Changeable Parameters
In the code, there are a few values you need to change to make it work. Replace "Your WiFi SSID" and "Your WiFi Password" with your WiFi SSID and password. Also, change the City code and temperature measurement unit as per yours.
// Replace with your network credentials
const char* ssid = "Your WiFi SSID";
const char* password = "Your WiFi Password";
// OPENWEATHER API CONFIGURATION
String temperature_unit = "metric";
// Replace with your city
String city = "Kannur";
// Replace with your OpenWeatherMap API KEY
String openWeatherMapApiKey = "02f3dcd78459680081a1477f73bbdd4d";
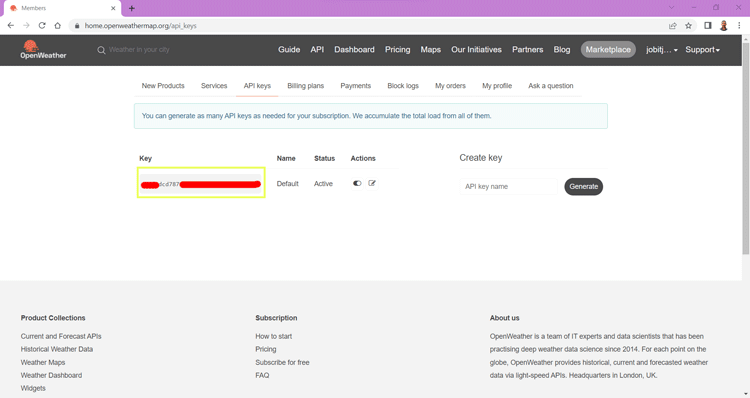
The next and most important parameter is the API key. This Key is unique and this is our authentication key to pull the data from OpenWeatherMap servers. The procedure to get your API key is very simple. Go to the OpenWeatherMap website, and create an account. If you already have an account login into it. And go to the following link https://home.openweathermap.org/api_keys. On that page, you can see your default API key. If you want you can create your keys later. Copy the API key and paste it into the code. That’s it you are ready to get the data from the OpenWeatherMap server.
Getting BME280 Readings
The following function is used to get the readings from the BME280.
String getReadings() {
  int sensetemp;
  sensetemp = bme.readTemperature();
  readings["in_temperature"] = String(sensetemp);
  sensetemp = bme.readTemperature() * 10;
  readings["in_temperatureD"] = String(sensetemp % 10);
  sensetemp = bme.readHumidity();
  readings["in_humidity"] = String(sensetemp);
  readings["in_presssure"] = String(bme.readPressure());
  readings["in_altitude"] = String(bme.readAltitude(1013.25));
  String jsonString = JSON.stringify(readings);
  return jsonString;
}
In this function, each reading is taken from the BME280 sensor encoded into a JSON string and, returns the JSON string to the event handler. The event handler will send this data to the web page when the event is triggered.
Getting Weather Data from OpenWeatherMap API
For this, we have created another function. Which will get the weather data from the API in the JSON format, decode it, arrange it into the format that we need. Then similar to the BME280 reading function, this function will code these into a JSON string and will send it to the server when the particular event is triggered. HTTP GET is used to get the data from the server.
String getOWMReadings() {

  if (WiFi.status() == WL_CONNECTED) {
    endpoint = "http://api.openweathermap.org/data/2.5/weather?q=" + city + "&units=" + temperature_unit  + "&appid=" + openWeatherMapApiKey;
    jsonBuffer = httpGETRequest(endpoint.c_str());
    JSONVar myObject = JSON.parse(jsonBuffer);
    // JSON.typeof(jsonVar) can be used to get the type of the var
    if (JSON.typeof(myObject) == "undefined") {
      Serial.println("Parsing input failed!");
    }
    Icon_ = myObject["weather"][0]["icon"];
    OutTemperature = double(myObject["main"]["temp"]);
    OutHumidity    = int(myObject["main"]["humidity"]);
    Sun_rise     = int(myObject["sys"]["sunrise"]);
    Sun_set      = int(myObject["sys"]["sunset"]);
  }
  else
{
    Serial.println("WiFi Disconnected");
  }
  int sensetemp;
  sensetemp = OutTemperature;
  owmreadings["out_temperature"] = String(sensetemp);
  sensetemp = OutTemperature * 10;
  owmreadings["out_temperatureD"] = String(sensetemp % 10);
  owmreadings["out_humidity"] = String(OutHumidity);
  owmreadings["weather_icon"] = String("icons/"+Icon_+".png");
  owmreadings["Sunset"] = String(Sun_set);
  owmreadings["Sunrise"] = String(Sun_rise);
  owmreadings["City"] = String(city);
  owmreadings["Key"] = String(openWeatherMapApiKey);
  String jsonString = JSON.stringify(owmreadings);
  Serial.println(jsonString);
  return jsonString;
}
Web Setup and Event request Handlings
The following section in the setup function will create and set up the web server and also handle the event request when a web page is loading. The first event handler will send the webpage data when a request to load the web page is received. The second event handler will listen for reset requests and will rest all the variables displayed on the page to zero. The third even handler is to check the client connectivity and if the client disconnects the server will try to re-establish the connection in a one-second interval.
// Handle Web Server
  server.on("/", HTTP_GET, [](AsyncWebServerRequest * request) {
    request->send(SPIFFS, "/index.html", "text/html");
  });
  server.serveStatic("/", SPIFFS, "/");
  server.on("/reset", HTTP_GET, [](AsyncWebServerRequest * request) {
    in_temperature = 0;
    in_temperatureD = 0;
    in_humidity = 0;
    in_presssure = 0;
    in_altitude = 0;
    out_temperature = 0;
    out_temperatureD = 0;
    out_humidity = 0;
    request->send(200, "text/plain", "OK");
  });
  // Handle Web Server Events
  events.onConnect([](AsyncEventSourceClient * client) {
    if (client->lastId()) {
      Serial.printf("Client reconnected! Last message ID that it got is: %u\n", client->lastId());
    }
    // send event with message "CircuitDigest", id current millis
    // and set reconnect delay to 1 second
    client->send("CircuitDigest!", NULL, millis(), 10000);
  });
  server.addHandler(&events);
  server.begin();
In the loop function, you can also see two other event handlers. These handlers will not listen to any requests. These will send the data periodically at a set time. This will refresh the data on the web page. The data from the BME280 is refreshed more rapidly than the Open Weather Map data.
void loop() {
  if ((millis() - lastTime) > SensorDelay) {
    // Send Events to the Web Server with the Sensor Readings
    events.send(getReadings().c_str(), "BME_readings", millis());
    lastTime = millis();
  }
  if ((millis() - lastTimeAcc) > OWMapDelay) {
    // Send Events to the Web Server with the Weather data
    events.send(getOWMReadings().c_str(), "OWM_readings", millis());
    lastTimeAcc = millis();
  }
}
Uploading the Code and Files
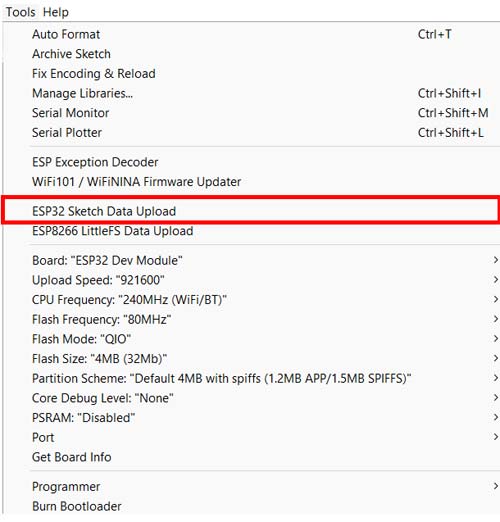
Uploading the code is straightforward. Just like any other Arduino board connect the ESP32 Devkit to the PC. Select the correct Board and Port, click upload. That’s it. To upload the Web Server files, make sure that all the files are in the folder named data, which is in the same folder as the .ino file. Go to Tools -> ESP32 Sketch Data Upload. The IDE will upload the files and reboot the ESP32. While uploading the files, make sure that the serial monitor is not opened. If it is opened you will get an error. If so, just close the serial monitor and upload the files again. You can download the sketch and webserver files from the following link.
Accessing Web Server
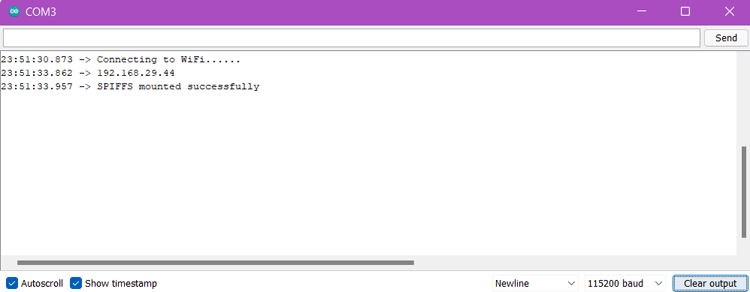
Now once the code is compiled and programmed into the ESP32, you can either check the serial monitor which will print out the IP address of ESP32 once it’s connected to the WiFi network.
Or you can check your router and what’s the IP, that’s allocated to the ESP32. This will vary depending on your router. Once you got the IP you can access the webserver by simply entering this address in the web browser and going to the page. And here is the result.
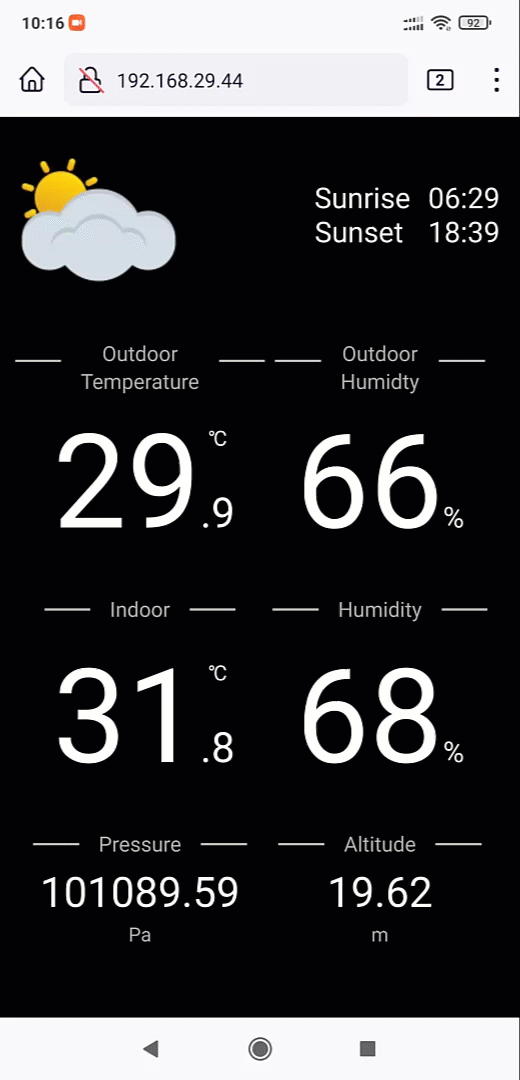
The weather condition icon will change according to the data received from the API. The sunrise and sunset time are also pulled from the OWM API.
Here is the Sketch for the ESP32 weather station.
#include <Arduino.h>
#include <WiFi.h>
#include <HTTPClient.h>
#include <AsyncTCP.h>
#include <ESPAsyncWebServer.h>
#include <ESPmDNS.h>
#include <Arduino_JSON.h>
#include "SPIFFS.h"
#include <Adafruit_Sensor.h>
#include <Adafruit_BME80.h>
// Create a sensor object
Adafruit_BME280 bme; // use I2C interface
// Replace with your network credentials
const char* ssid = "SKYNET 4G";
const char* password = "jobitjos";
// OPENWEATHER API CONFIGURATION
String openWeatherMapApiKey = "02f3dcd78793160081a1667f73ffcc4d";
String temperature_unit = "metric";
// Replace with your country code and city
String city = "Kannur";
String endpoint;
float OutTemperature ;
int OutHumidity;
String Icon_;
int Sun_rise;
int Sun_set;
String jsonBuffer;
// Create AsyncWebServer object on port 80
AsyncWebServer server(80);
// Create an Event Source on /events
AsyncEventSource events("/events");
// Json Variable to Hold Sensor Readings
JSONVar readings;
JSONVar owmreadings;
// Timer variables
unsigned long lastTime = 0;
unsigned long lastTimeTemperature = 0;
unsigned long lastTimeAcc = 0;
unsigned long SensorDelay = 10;
unsigned long OWMapDelay = 1000;
float in_temperature, in_presssure, in_altitude, in_humidity;
float out_temperature, out_humidity, out_weathe;
int in_temperatureD , out_temperatureD;
sensors_event_t a, g, temp;
// Initialize Sensor
void initSensor() {
Serial.println(F("BME280 Sensor event test"));
unsigned status;
status = bme.begin(0x76);
if (!status) {
Serial.println(F("Could not find a valid BME280 sensor, check wiring or "
"try a different address!"));
while (1) delay(10);
}
}
void initSPIFFS() {
if (!SPIFFS.begin()) {
Serial.println("An error has occurred while mounting SPIFFS");
}
Serial.println("SPIFFS mounted successfully");
}
// Initialize WiFi
void initWiFi() {
WiFi.mode(WIFI_STA);
WiFi.begin(ssid, password);
Serial.println("");
Serial.print("Connecting to WiFi...");
while (WiFi.status() != WL_CONNECTED) {
Serial.print(".");
delay(1000);
}
if (!MDNS.begin("esp32")) {
Serial.println("Error starting mDNS");
return;
}
MDNS.addService("http", "tcp", 80);
Serial.println("");
Serial.println(WiFi.localIP());
Serial.print("Local Address");
Serial.println("esp32.local");
}
String httpGETRequest(const char* serverName) {
WiFiClient client;
HTTPClient http;
// Your Domain name with URL path or IP address with path
http.begin(client, serverName);
// Send HTTP POST request
int httpResponseCode = http.GET();
String payload = "{}";
if (httpResponseCode > 0) {
Serial.print("HTTP Response code: ");
Serial.println(httpResponseCode);
payload = http.getString();
}
else {
Serial.print("Error code: ");
Serial.println(httpResponseCode);
}
// Free resources
http.end();
return payload;
}
String getReadings() {
int sensetemp;
sensetemp = bme.readTemperature();
readings["in_temperature"] = String(sensetemp);
sensetemp = bme.readTemperature() * 10;
readings["in_temperatureD"] = String(sensetemp % 10);
sensetemp = bme.readHumidity();
readings["in_humidity"] = String(sensetemp);
readings["in_presssure"] = String(bme.readPressure());
readings["in_altitude"] = String(bme.readAltitude(1013.25));
String jsonString = JSON.stringify(readings);
return jsonString;
}
String getOWMReadings() {
if (WiFi.status() == WL_CONNECTED) {
endpoint = "http://api.openweathermap.org/data/2.5/weather?q=" + city + "&units=" + temperature_unit + "&appid=" + openWeatherMapApiKey;
jsonBuffer = httpGETRequest(endpoint.c_str());
JSONVar myObject = JSON.parse(jsonBuffer);
// JSON.typeof(jsonVar) can be used to get the type of the var
if (JSON.typeof(myObject) == "undefined") {
Serial.println("Parsing input failed!");
}
Icon_ = myObject["weather"][0]["icon"];
OutTemperature = double(myObject["main"]["temp"]);
OutHumidity = int(myObject["main"]["humidity"]);
Sun_rise = int(myObject["sys"]["sunrise"]);
Sun_set = int(myObject["sys"]["sunset"]);
}
else {
Serial.println("WiFi Disconnected");
}
int sensetemp;
sensetemp = OutTemperature;
owmreadings["out_temperature"] = String(sensetemp);
sensetemp = OutTemperature * 10;
owmreadings["out_temperatureD"] = String(sensetemp % 10);
owmreadings["out_humidity"] = String(OutHumidity);
owmreadings["weather_icon"] = String("icons/" + Icon_ + ".png");
owmreadings["Sunset"] = String(Sun_set);
owmreadings["Sunrise"] = String(Sun_rise);
owmreadings["City"] = String(city);
owmreadings["Key"] = String(openWeatherMapApiKey);
String jsonString = JSON.stringify(owmreadings);
Serial.println(jsonString);
return jsonString;
}
void setup() {
Serial.begin(115200);
initWiFi();
initSPIFFS();
initSensor();
// Handle Web Server
server.on("/", HTTP_GET, [](AsyncWebServerRequest * request) {
request->send(SPIFFS, "/index.html", "text/html");
});
server.serveStatic("/", SPIFFS, "/");
server.on("/reset", HTTP_GET, [](AsyncWebServerRequest * request) {
in_temperature = 0;
in_temperatureD = 0;
in_humidity = 0;
in_presssure = 0;
in_altitude = 0;
out_temperature = 0;
out_temperatureD = 0;
out_humidity = 0;
request->send(200, "text/plain", "OK");
});
// Handle Web Server Events
events.onConnect([](AsyncEventSourceClient * client) {
if (client->lastId()) {
Serial.printf("Client reconnected! Last message ID that it got is: %u\n", client->lastId());
}
// send event with message "CircuitDigest", id current millis
// and set reconnect delay to 1 second
client->send("CircuitDigest!", NULL, millis(), 10000);
});
server.addHandler(&events);
server.begin();
}
void loop() {
if ((millis() - lastTime) > SensorDelay) {
// Send Events to the Web Server with the Sensor Readings
events.send(getReadings().c_str(), "BME_readings", millis());
lastTime = millis();
}
if ((millis() - lastTimeAcc) > OWMapDelay) {
// Send Events to the Web Server with the Sensor Readings
events.send(getOWMReadings().c_str(), "OWM_readings", millis());
lastTimeAcc = millis();
}
}


