


Many IoT cloud platforms have emerged in the last few years to cater to the increasing network of IoT devices. These IoT cloud platforms can be used to manage, process, and transfers the information from IoT devices to cloud or from cloud to the connected device with the help of the Internet. Apart from transferring the information, these platforms can also be used for controlling devices like for example, the Home automation system.
We have already used some of the popular IoT platforms like ThingSpeak, Adafruit IO, Blynk, Google Firebase, etc. to build many IoT projects.
Today we will explore another IoT cloud platform- Ubidots. Here we interface the NodeMCU ESP8266 with Ubidots IoT cloud to send Temperature, Pressure, and Altitude data from the BMP180 sensor. Uploaded data can also be visualized on Ubidots Dashboard with the help of Widgets.
Components Required
- NodeMCU ESP8266
- BMP180 Sensor
- Jumper Wires
Ubidots NodeMCU Circuit Diagram
Circuit Diagram for Ubidots NodeMCU is very simple and only the BMP180 sensor is connected with NodeMCU.
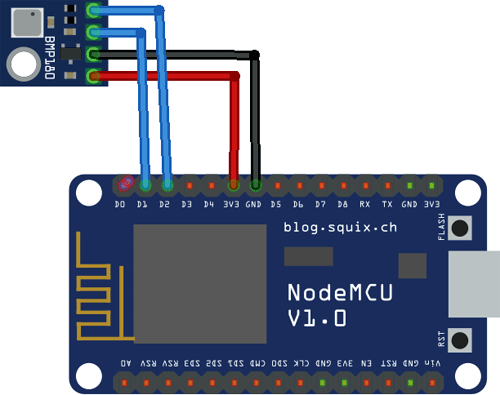
Connect the VIN and GND pin of BMP180 to 3.3V and GND of NodeMCU. Do not connect the Sensor directly to 5V because it can damage the Sensor permanently. Connect SCL and SDA pins of BMP180 to D1 and D2 pins of NodeMCU, respectively.
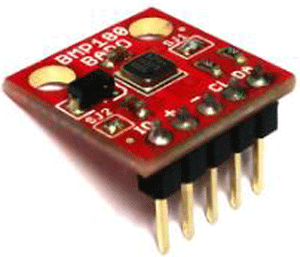
BMP180 Pressure Sensor
BMP180 is a Digital Barometric Sensor Module compatible with Arduino and primarily used to measure the absolute pressure, temperature using a digital barometer. It has measuring range from 300 to 1100hPa with an accuracy down to 0.02 hPa in advanced resolution mode. It is based on piezo-resistive technology for high efficiency, ruggedness, and long term stability. The BMP180 is a very small module with 1mm x 1.1mm (0.039in x 0.043in).
BMP sensor operates over the I2C protocol. The input voltage range for BMP180 is from 1.8V to 3.6V.
We previously used the BMP180 sensor with Raspberry Pi and with ESP32 to build weather stations.
Ubidots Account Setup
Born as an engineering services firm in 2012, Ubidots delivered end-to-end IoT solutions in tandem with its partner and co-founding company Netux, to remotely monitor, control, and automate processes for healthcare clients.
Now, Ubidots has become popular as an affordable, reliable, and most usable platform for building an IoT application enabled ecosystem within hardware, software, and embedded engineering industry.
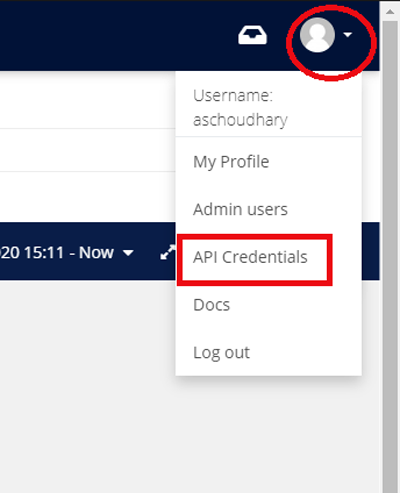
In this tutorial, we are sending the BMP sensor data to Ubidots over the HTTP protocol. To send the data, first create an account on Ubidots. After completing the account setup, click on the user dropdown menu and click API documentation. Make a note of your Default Token as it will be needed later.
Programming NodeMCU for Ubidots
Program for Sending data to Ubidots is very easy as it only needs to read the BMP sensor data and send it to Ubidots over HTTP protocol.
Complete code is given at the end of the page. Here we are explaining important parts of the code.
So start your code by including all the required libraries. Adafruit_BMP085.h library is used to read the BMP sensor data while Ubidots.h is used to send data to the Ubidots platform over HTTP protocol.
#include <ESP8266WiFi.h>
#include <Wire.h>
#include <Adafruit_BMP085.h>
#include "Ubidots.h"
After that, enter the token and Wi-Fi credentials to setup a connection between NodeMCU and Ubidots.
const char* UBIDOTS_TOKEN = "Your Ubidots Token";
const char* ssid     = "SSID Name"; // Your ssid
const char* password = "SSID Password"; // Your Password
Inside the void setup() function, initialize the baud rate and BMP180 using .begin() function, then connect the module with the Wi-Fi.
Serial.begin(115200);
  delay(100);
  if (!bmp.begin()) {
  Serial.println("Could not find a valid BMP085 sensor, check wiring!");
  while (1) {}
  }
Serial.println(ssid);
WiFi.begin(ssid, password);
while (WiFi.status() != WL_CONNECTED) {
delay(500);
}
Serial.println("WiFi is connected");
Now inside the void loop, read the temperature, pressure, and Altitude values from BMP180 Sensor and store these values in different variables. After that, send these readings to the Ubidots platform.
void loop() {
  float p = bmp.readPressure()/100;
  Serial.print("Pressure = ");
  Serial.print(p);
    float a = bmp.readAltitude();
  Serial.print("Altitude = ");
  Serial.print(a);
  float temperature = bmp.readTemperature();
  Serial.print("Temperature= ");
  Serial.print(temperature);
  ubidots.add("Temperature", temperature);// Change for your variable name
  ubidots.add("Pressure", p);
  ubidots.add("Altitude", a);
  bool bufferSent = false;
  bufferSent = ubidots.send();
Testing the Ubidots with NodeMCU for BMP180 Sensor readings
Once your code and Hardware are ready, connect the NodeMCU to your laptop and upload the code. Now open the serial monitor to check if NodeMCU is reading the data or not.

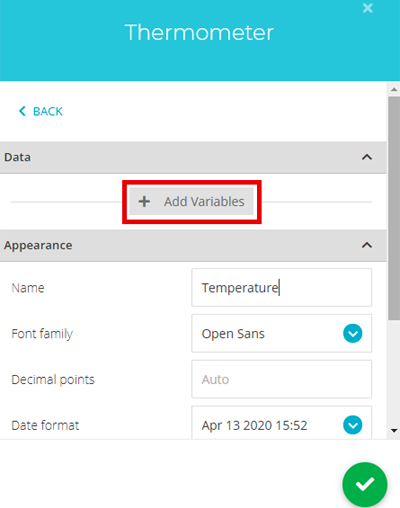
After this, navigate to your browser and open the Ubidots Dashboard and click on the ‘Create Widget’ button, scroll down, and select the ‘Thermometer’ Widget.
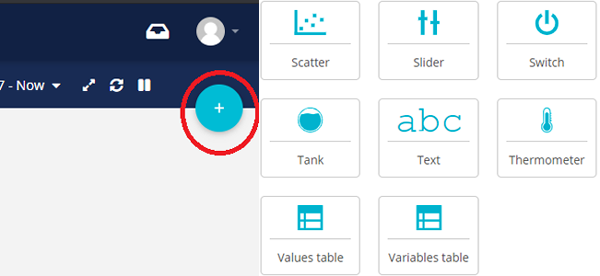
Now click on ‘Add Variables’ to select the device and variable.
Now select the device. Once you click on the device, you will see three variables, i.e. pressure, altitude, and temperature. Select the temperature variable.
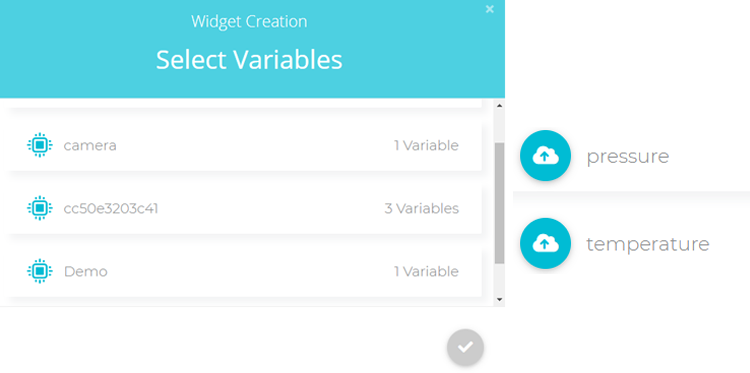
Then click on Finish. Repeat the same procedure for the Pressure and Altitude variables, but instead of selecting the Thermometer widget, select the ‘Gauge’ widget.
After finishing this process, your dashboard will look like this:
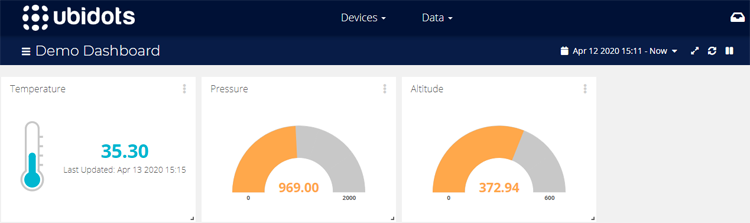
This is how NodeMCU can be easily connected with Ubidots to present any sensor values graphically on the dashboard. And it can be monitored from anywhere in the world over the internet.
Complete code and demonstration video is given below.
#include <ESP8266WiFi.h>
#include <Wire.h>
#include <Adafruit_BMP085.h>
#include "Ubidots.h"
Adafruit_BMP085 bmp;
//WiFiClient client;
const char* UBIDOTS_TOKEN = "BBFF-waVbWAf7iT5hzDyXhlUdwqkoFiaF2K";
const char* ssid = "....."; // Your ssid
const char* password = "......."; // Your Password
Ubidots ubidots(UBIDOTS_TOKEN, UBI_HTTP);
void setup() {
Serial.begin(115200);
delay(100);
if (!bmp.begin()) {
Serial.println("Could not find a valid BMP085 sensor, check wiring!");
while (1) {}
}
ubidots.wifiConnect(ssid, password);
Serial.print("Connecting to ");
Serial.println(ssid);
WiFi.begin(ssid, password);
while (WiFi.status() != WL_CONNECTED) {
delay(500);
Serial.print(".");
}
Serial.println("");
Serial.println("WiFi is connected");
}
void loop() {
float p = bmp.readPressure()/100;
Serial.print("Pressure = ");
Serial.print(p);
Serial.println(" mb");
float a = bmp.readAltitude();
Serial.print("Altitude = ");
Serial.println(a);
float temperature = bmp.readTemperature();
Serial.print("Temperature= ");
Serial.print(temperature);
ubidots.add("Temperature", temperature);// Change for your variable name
ubidots.add("Pressure", p);
ubidots.add("Altitude", a);
bool bufferSent = false;
bufferSent = ubidots.send(); // Will send data to a device label that matches the device Id
if (bufferSent) {
Serial.println("Values sent by the device");
}
delay(3000);
}


