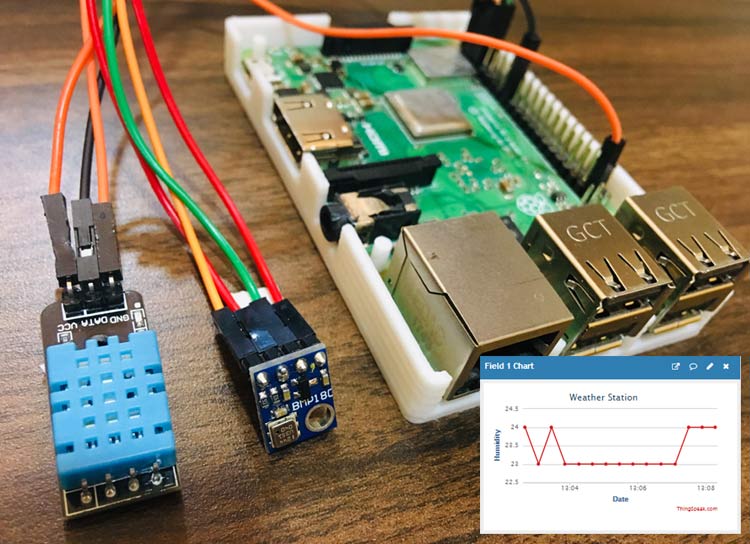
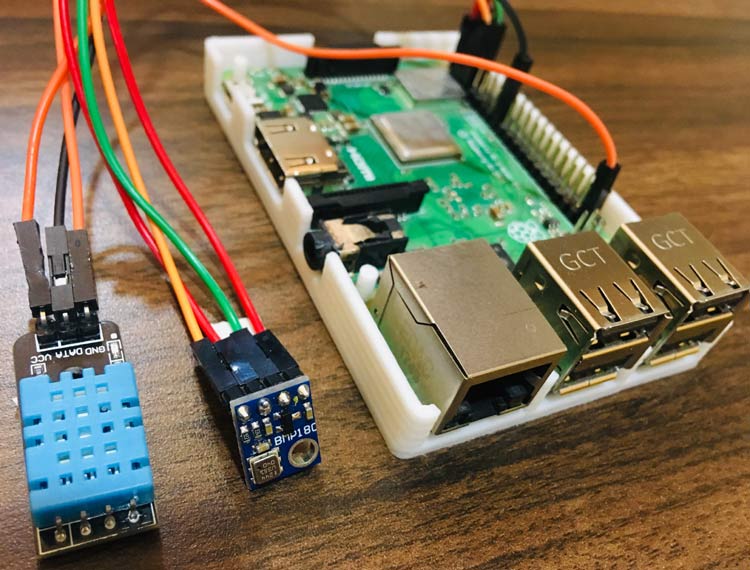
Humidity, Temperature and Pressure are three important environmental parameters to decide the weather conditions of a particular location. So in this DIY IoT project session, we are making a Raspberry Pi weather station using DHT11 and BMP180 sensors. Where the DHT11 sensor senses the temperature and humidity while BMP180 sensor calculates the pressure. In our previous project, we have used the DHT11 sensor to detect temperature and humidity, and now in this project, we are adding another sensor to make a complete weather station using Raspberry Pi.
Further, we are sending the weather station data to ThingSpeak for live monitoring from anywhere in the world, and we can view the logged data and graph over time on the website. You can also choose any other IoT platform to monitor the real-time data.
Components Required
- Raspberry Pi
- DHT11 Sensor
- BMP180 Sensor
- Jumper Wires
Circuit Diagram
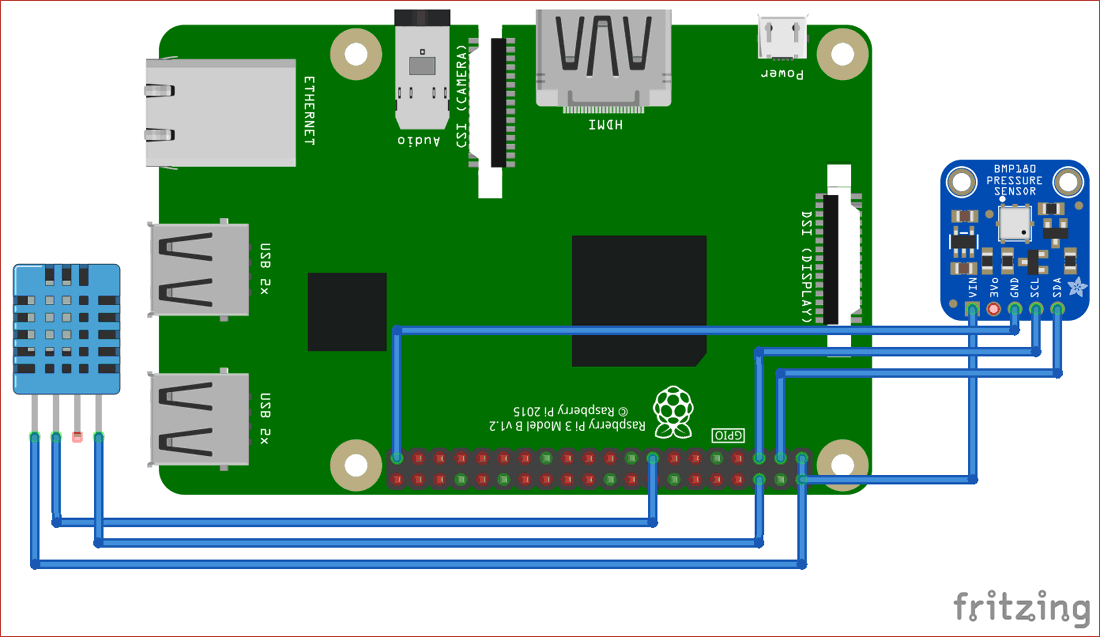
Connections are given in the below table:
|
S.NO. |
Pin Name |
Raspberry Pi Pin |
|
1 |
BMP180 VIN |
5V |
|
2 |
BMP180 GND |
GND |
|
3 |
BMP180 SCL |
GPIO3 |
|
4 |
BMP180 SDA |
GPIO2 |
|
7 |
DHT-11 Data |
GPIO22 |
|
8 |
DHT-11 VCC |
5V |
|
9 |
DHT-11 GND |
GND |
Thingspeak Setup for Pi Weather Station
Step 1: Thingspeak Account Setup
For creating your channel on Thingspeak you first need to Sign up on Thingspeak. In case if you already have an account on Thingspeak, sign in using your id and password.
Step 2: Create a Channel for Your Data
Once you Sign in, create a new channel by clicking “New Channel” button
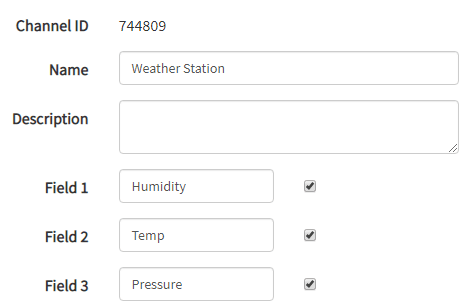
After clicking on “New Channel”, enter the Name and Description of the data you want to upload on this channel.
Enter the name of your data, ‘Humidity’ in Field1, ‘Temp’ in Field2 and ‘Pressure’ in Field3. If you want to use more Fields you can check the box next to Field option and enter the name and description of your data.
After this click on save channel button to save your details.
Step 3: API Key
To send data to Thingspeak, we need a unique API key, which we will use later in our code to upload our sensor data to Thingspeak Website.
Click on “API Keys” button to get your unique API key for uploading your sensor data.
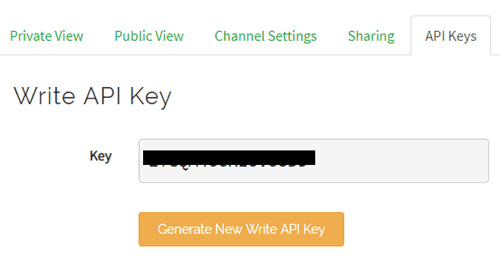
Now copy your “API Key” because we need to use this in our code.
Raspberry Pi Setup with DHT11 Sensor
To use DHT11 sensor with Raspberry Pi, we need to install Adafruit Python DHT Sensor Library files. We can download the same by using following commands:
sudo apt-get install git-core
git clone https://github.com/adafruit/Adafruit_Python_DHT.git
cd Adafruit_Python_DHT
sudo apt-get install build-essential python-dev
sudo python setup.py install
After this, enable Raspberry Pi I2C interfacing using Raspberry Pi’s Software Configuration:
sudo raspi-config
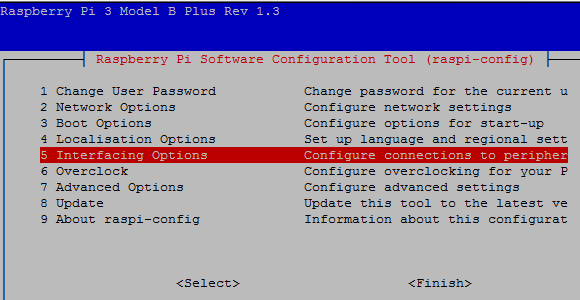
Now, click on ‘Interfacing Options.’
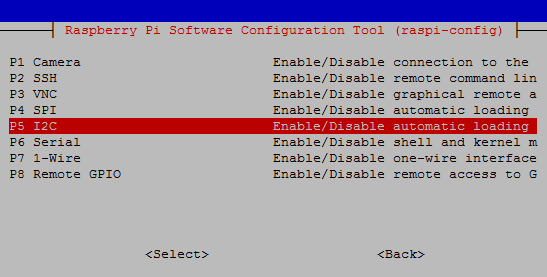
Then click on ‘I2C’ to enable it.
Programming Explanation for Pi Weather Station
The complete code for the Raspberry Pi weather station is given at the end of this article. Start with initializing all the required libraries, Variables and Pins for this project.
import sys
import RPi.GPIO as GPIO
import os
import Adafruit_DHT
import urllib2
import smbus
import time
from ctypes import c_short

#Register Address
regCall   = 0xAA
……….
……….

humidity=""
temp=""
i2cbus = smbus.SMBus(1)
DHTpin = 22
The def readBmp function reads the data from the BMP180 sensor and will convert data from bytes to word values.
def readBmp180(addr=deviceAdd):
value = i2cbus.read_i2c_block_data(addr, regCall, 22)  # Read calibration data
  # Convert byte data to word values
  AC1 = convert1(value, 0)
  AC2 = convert1(value, 2)
  AC3 = convert1(value, 4)
  AC4 = convert2(value, 6)
  AC5 = convert2(value, 8)
  AC6 = convert2(value, 10)
  B1  = convert1(value, 12)
……………….
…………….
While readDHT() function will read temperature and humidity data from DHT11 sensor.
def readDHT():
    humidity, temp = Adafruit_DHT.read_retry(Adafruit_DHT.DHT11, DHTpin)
    return (str(int(humidity)), str(int(temp)))
After getting data from BMP180 and DHT11 sensor, it’s time to send data to thingspeak. So, here def main() function is doing the same.
def main():
    print 'System Ready...'
    URL = 'https://api.thingspeak.com/update?api_key=%s' % key
    print "Wait...."
    while True:
            (humidity, temp)= readDHT()
            (pressure) =readBmp180()

            finalURL = URL +"&field1=%s&field2=%s"%(humi, temp)+"&field3=%s" %(pressure)
            print finalURL
            s=urllib2.urlopen(finalURL);
            print  humidity+ " " + temp + " " + pressure
            s.close()
            time.sleep(10)
Running Raspberry Pi Weather Station
Make a new file using the below command then paste the code given at the end for Raspberry Pi weather station.
Sudo nano weather.py
Now, paste the code into the above created file and run this file using the below command:
Python weather.py
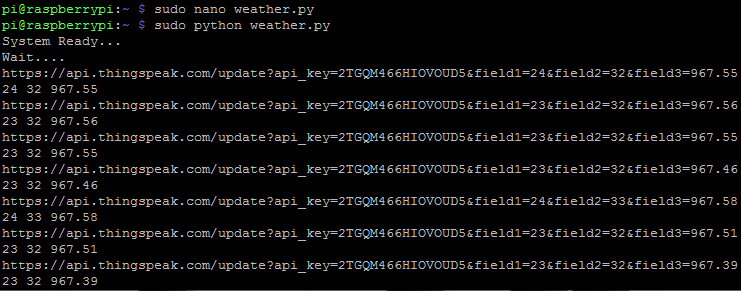
If it compiles successfully, your Raspberry Pi terminal will look like this:
Now navigate to Thingspeak using your browser and check your channel:
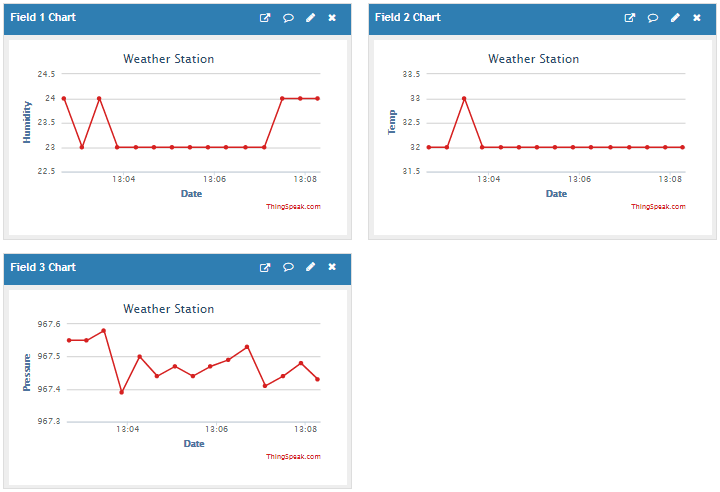
We have successfully setup the Raspberry Pi Weather Station to monitor temperature, humidity and pressure data using DHT11 and BMP180 sensor.
You can try few more IoT projects using ThingSpeak:
- IoT Based Temperature and Humidity Monitoring over ThingSpeak using Arduino UNO and ESP8266
- IoT based Temperature and Humidity Monitoring using ThingSpeak and ESP8266
- Raspberry Pi and LM35 based IoT Temperature Monitoring System using Thingspeak
- How to Send Data to ThingSpeak Cloud using Raspberry Pi
import sys
import RPi.GPIO as GPIO
import os
import Adafruit_DHT
import urllib2
import smbus
import time
from ctypes import c_short
#Register Address
regCall = 0xAA
regMean = 0xF4
regMSB = 0xF6
regLSB = 0xF7
regPres = 0x34
regTemp = 0x2e
DEBUG = 1
sample = 2
deviceAdd =0x77
humi=""
temp=""
i2cbus = smbus.SMBus(1) # for Pi2 uses 1
DHTpin = 22
key="2TGQM466HIOVOUD5" # Enter your Write API key from ThingSpeak
GPIO.setmode(GPIO.BCM)
GPIO.setwarnings(False)
GPIO.setmode(GPIO.BCM)
def convert1(data, i): # signed 16-bit value
return c_short((data[i]<< 8) + data[i + 1]).value
def convert2(data, i): # unsigned 16-bit value
return (data[i]<< 8) + data[i+1]
def readBmp180(addr=deviceAdd):
value = i2cbus.read_i2c_block_data(addr, regCall, 22) # Read calibration data
# Convert byte data to word values
AC1 = convert1(value, 0)
AC2 = convert1(value, 2)
AC3 = convert1(value, 4)
AC4 = convert2(value, 6)
AC5 = convert2(value, 8)
AC6 = convert2(value, 10)
B1 = convert1(value, 12)
B2 = convert1(value, 14)
MB = convert1(value, 16)
MC = convert1(value, 18)
MD = convert1(value, 20)
# Read temperature
i2cbus.write_byte_data(addr, regMean, regTemp)
time.sleep(0.005)
(msb, lsb) = i2cbus.read_i2c_block_data(addr, regMSB, 2)
P2 = (msb << 8) + lsb
# Read pressure
i2cbus.write_byte_data(addr, regMean, regPres + (sample << 6))
time.sleep(0.05)
(msb, lsb, xsb) = i2cbus.read_i2c_block_data(addr, regMSB, 3)
P1 = ((msb << 16) + (lsb << 8) + xsb) >> (8 - sample)
# Refine temperature
X1 = ((P2 - AC6) * AC5) >> 15
X2 = (MC << 11) / (X1 + MD)
B5 = X1 + X2
temperature = (B5 + 8) >> 4
# Refine pressure
B6 = B5 - 4000
B62 = B6 * B6 >> 12
X1 = (B2 * B62) >> 11
X2 = AC2 * B6 >> 11
X3 = X1 + X2
B3 = (((AC1 * 4 + X3) << sample) + 2) >> 2
X1 = AC3 * B6 >> 13
X2 = (B1 * B62) >> 16
X3 = ((X1 + X2) + 2) >> 2
B4 = (AC4 * (X3 + 32768)) >> 15
B7 = (P1 - B3) * (50000 >> sample)
P = (B7 * 2) / B4
X1 = (P >> 8) * (P >> 8)
X1 = (X1 * 3038) >> 16
X2 = (-7357 * P) >> 16
pressure = P + ((X1 + X2 + 3791) >> 4)
return (str(pressure/100.0))
def readDHT():
humi, temp = Adafruit_DHT.read_retry(Adafruit_DHT.DHT11, DHTpin)
return (str(int(humi)), str(int(temp)))
# main() function
def main():
print 'System Ready...'
URL = 'https://api.thingspeak.com/update?api_key=%s' % key
print "Wait...."
while True:
(humi, temp)= readDHT()
(pressure) =readBmp180()
finalURL = URL +"&field1=%s&field2=%s"%(humi, temp)+"&field3=%s" %(pressure)
print finalURL
s=urllib2.urlopen(finalURL);
print humi+ " " + temp + " " + pressure
s.close()
time.sleep(10)
if __name__=="__main__":
main()


