Create an Android App with Android Studio to control an LED over WiFi using NodeMCU

Create Android App with Android Studio

Hello everyone, welcome back to another part of our Android Studio for Internet of Things Series. In this tutorial, we are going to continue our android app. We have already developed the base of our application by adding an image of a light bulb, a button, and some features to establish a Bluetooth connection. But now we are going to add a Wi-Fi feature to control the built-in LED of the NodeMCU board.


What we are going to build?

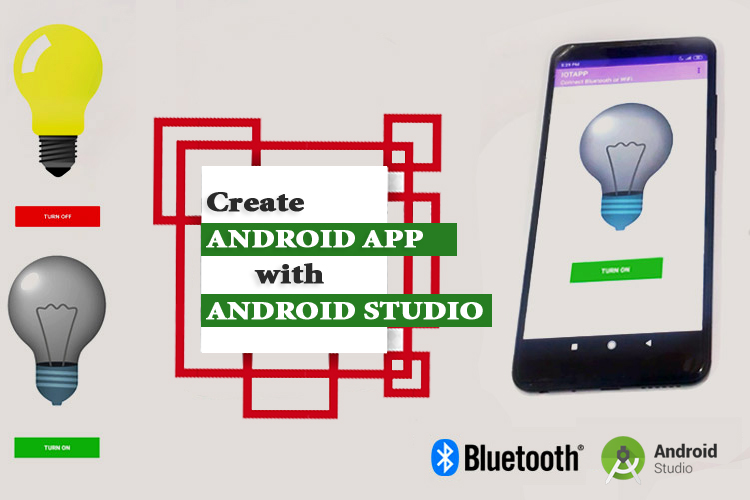
Let’s see what we are going to build in this tutorial. In the below image you can find that we have already added an image of a light bulb, a button, a toolbar, and the Bluetooth feature.
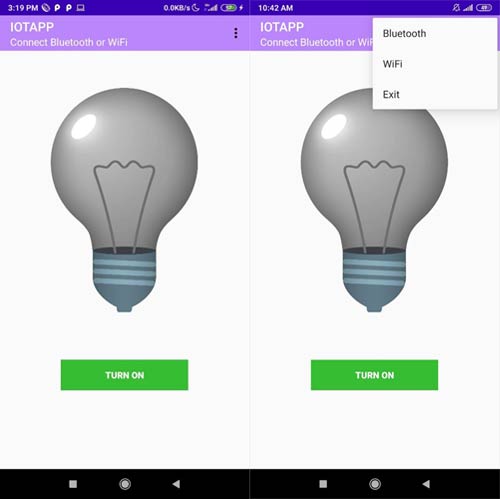
LED Control App

Now let’s have a look at the image below. The Wi-Fi feature is in the menu list. The user will be redirected to the Wi-Fi activity by clicking on the “WiFi”. If the WiFi is already turned off then the user will get a popup to turn on the WiFi, as you can see in the second image below.
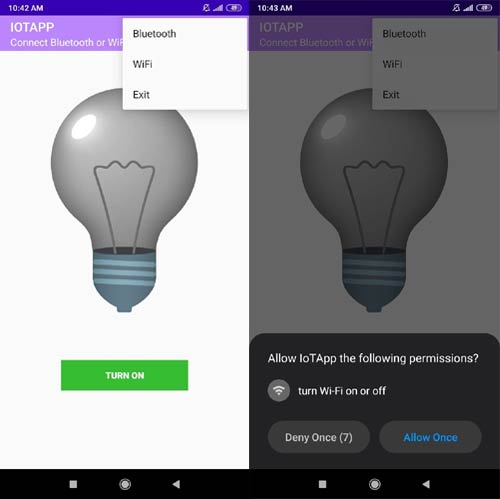
Control LED App over Wi-Fi

When the WiFi of the user will be turned on, the user will be redirected to the wifi activity where we will add some input section to get the IP address and a connect button. You can see the below image as a reference.
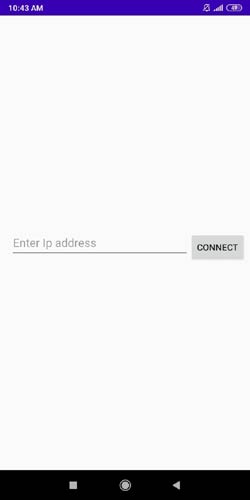
IoTApp IP Address

When the user will press the button after entering the IP address, it will be redirected to the main activity page and the wifi will get connected. In the below image, you can see in the toolbar section it is showing a message “Connected to the WiFi”.
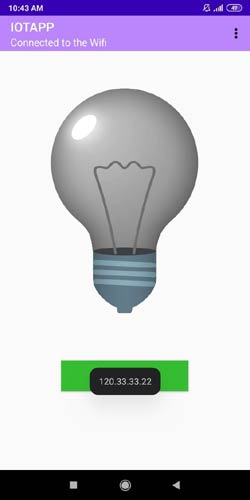
IoTApp LED Control

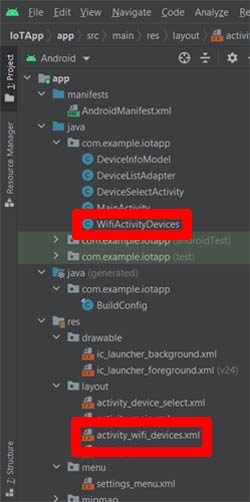
So far now, I have just given you an overview of the application. Now, let’s build the app. In the below image, you can see the folder structure that we have already discussed in our previous tutorials. We need to create some more classes, activities, and layouts in this tutorial. I have marked those files in red in the picture below.
Android Studio WifiActivityDevices

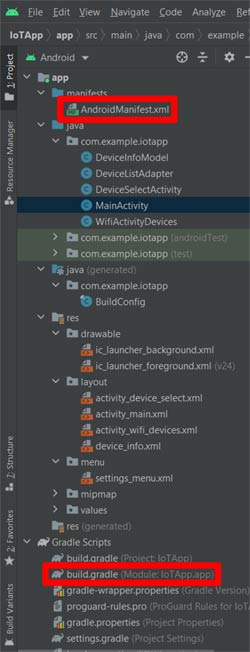
So we need to create an activity named “WifiActivityDevices”. The corresponding layout file that is “activity_wifi_devices.xml” file will be created with this activity as I have mentioned in the red circle in the above image. Before we will start the coding part of the android app, we need to add few lines of code in the AndroidMenifest.xml file. And we need to add a dependency in the “build.gradle” file. In the below images, you can see that I have marked the manifest file and the build.gradle file with a red square.
Android Studio AndroidManifest

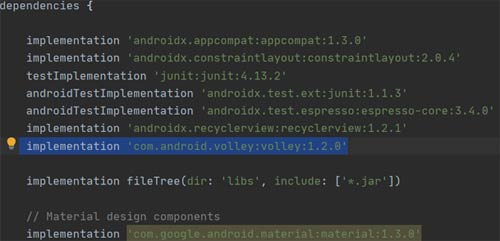
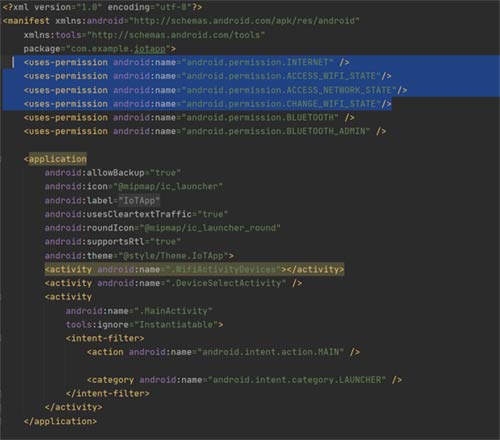
The highlighted code in the below image needs to be added to the Manifest file. This code is to give permission to the Wifi to the app. The second image is for dependency. The highlighted code needs to be added to the build.gradle file. You need to click on the “sync” which you can see on the top right corner after adding the dependency.
Android Studio Gradle Activity Code

Android Studio Dependencies Code


activity_wifi_devices.xml File

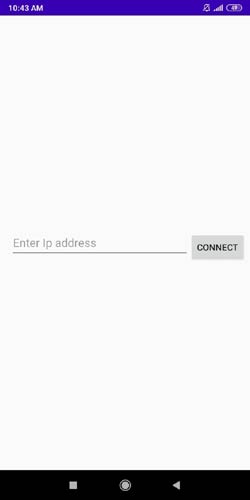
The activity_wifi_device.xml file is the layout of the WifiActivityDevices.java file. Here we need to add an EditText to take the input from the user. And we need to add a Button to get connected to the wifi and to redirect to the MainActivity file.
Control LED App EditText IP Address

In the above image, we have an EditText which is indicating to enter the IP address. The below code can be used to add an EditText in a layout.

Code for an EditText:

<EditText
    android:id="@+id/ip_input"
    android:layout_width="281dp"
    android:layout_height="48dp"
    android:layout_marginStart="16dp"
    android:hint="Enter Ip address"
    app:layout_constraintBottom_toBottomOf="parent"
    app:layout_constraintStart_toStartOf="parent"
    app:layout_constraintTop_toTopOf="parent" />

Code Explanation:

The above code is for EditText. I have given an ID to this section by using the “android:id="@+id/ip_input" attribute. You can find some height and width attributes which I have used to give a dimension to the EditText. The “android:hint” is used to give a hint to the user. It will be shown whenever the EditText will empty. Now, we need to add the code for the Button.

Code for the Button:

<Button
    android:id="@+id/ip_button"
    android:layout_width="wrap_content"
    android:layout_height="wrap_content"
    android:layout_marginTop="340dp"
    android:text="Connect"
    app:layout_constraintEnd_toEndOf="parent"
    app:layout_constraintHorizontal_bias="0.0"
    app:layout_constraintStart_toEndOf="@+id/ip_input"
    app:layout_constraintTop_toTopOf="parent" />

Code Explanation:

The id of the button is “ip_button” and the text of the button is “Connect”. I am not going to discuss about the button as I have already discussed the button in the previous tutorials.


WifiActivityDevices.java File

As we have discussed before the WifiActivityDevices.java file is for the wifi feature. We need to add the following code below in the “WifiActivityDevices.java” file. In the below code we have “ipAddress” to take the IP address of the NodeMCU by accessing the ID of the EditText from the layout file, but we are also going to apply an additional task to check if the input text is matched to the format of an IP address or not. The “InputFilter” is used to apply some pattern checker to check the entered string is an IP address or not. The “setFilters” function will apply the filter to the “ipAddress” which has entered the IP address. The “ipButton” is used to access the Button from the layout file by using the ID of the button. Then we need to add a “setOnClickListener” to the “ipButton”. In the “onClick()” method you can find the “intent2”. This is used to redirect the user to the MainActivity.java file.

public class WifiActivityDevices extends AppCompatActivity {
    EditText ipAddress;
    Button ipButton;
    @Override
    protected void onCreate(Bundle savedInstanceState) {
        super.onCreate(savedInstanceState);
        setContentView(R.layout.activity_wifi_devices);
        ipAddress = (EditText) findViewById(R.id.ip_input);
        InputFilter[] filters = new InputFilter[1];
        filters[0] = new InputFilter() {
            @Override
            public CharSequence filter(CharSequence source, int start, int end,
                                       android.text.Spanned dest, int dstart, int dend) {
                if (end > start) {
                    String destTxt = dest.toString();
                    String resultingTxt = destTxt.substring(0, dstart)
                            + source.subSequence(start, end)
                            + destTxt.substring(dend);
                    if (!resultingTxt
                            .matches("^\\d{1,3}(\\.(\\d{1,3}(\\.(\\d{1,3}(\\.(\\d{1,3})?)?)?)?)?)?")) {
                        return "";
                    } else {
                        String[] splits = resultingTxt.split("\\.");
                        for (int i = 0; i < splits.length; i++) {
                            if (Integer.valueOf(splits[i]) > 255) {
                                return "";
                            }
                        }
                    }
                }
                return null;
            }
        };
        ipAddress.setFilters(filters);
        ipButton = (Button) findViewById(R.id.ip_button);
        WifiManager wifi = (WifiManager)getApplicationContext().getSystemService(Context.WIFI_SERVICE);
        if (wifi.isWifiEnabled()){
            ipButton.setOnClickListener(new View.OnClickListener() {
                @Override
                public void onClick(View view) {
                    Intent intent2 = new Intent(WifiActivityDevices.this,MainActivity.class);
                    // Send device details to the MainActivity
                    intent2.putExtra("ipAddress", ipAddress.getText().toString());
                    // Call MainActivity
                    startActivity(intent2);
                }
            });
        }else{
            Toast.makeText(WifiActivityDevices.this, "Turned on your wifi",Toast.LENGTH_LONG).show();
            wifi.setWifiEnabled(true);
        }
    }
}


MainActivity.java File

We need to do some changes to the MainActivity.java file. You need to add the following code outside to the onCreate() method of the MainActivity.java file. The “CreateConnectThread2” class is used to create a “Thread”. The “run()” method is used to establish a connection with the IP address that we got in the “WifiActivityDevices.java” file.

public class CreateConnectThread2 extends Thread {
    public CreateConnectThread2(String ipaddress) {
        Log.e("Status", ipaddress);
    }
    public void run() {
        // Cancel discovery because it otherwise slows down the connection.
        BluetoothAdapter bluetoothAdapter = BluetoothAdapter.getDefaultAdapter();
        bluetoothAdapter.cancelDiscovery();
        Log.e("Status", "Device connected");
        handler.obtainMessage(CONNECTING_STATUS, 2, -2).sendToTarget();
        connectedThread2 = new ConnectedThread2(ipAddress);
        connectedThread2.run();
    }
    public void cancel() {
        try {
            mmSocket.close();
        } catch (IOException e) {
            Log.e(TAG, "Could not close the client socket", e);
        }
    }
}

The below “ConnectedThread2” class is used to manage the createConnected thread. We have a send() method under the “ConnectedThread2” class. This send() method can be called when the user will press the button in the layout file of the MainActivity. Inside the send() method you can see that we have an “url” which is used as an address of the NodeMcu board. We are using the “POST” method for this HTTP connection. Whenever the user will click on the button the state of the button will get changed and the commands for turning on or off the led will send as string data through the “StringRequest” method.
We are using “Volley” library to create the HTTP connection.

public class ConnectedThread2 extends Thread {
    public ConnectedThread2(String ipaddress) {
        Log.e("Status", "Device connected");
    }
    public void run() {
        Log.e("Status", "Device running");
        }
    public void send(int cmdText, String ipaddress) {
        Log.e("Status", "Sending data "+cmdText);
        String url = "http://"+ipaddress+"/post";
        StringRequest stringRequest = new StringRequest(Request.Method.POST, url,
                new Response.Listener<String>() {
                    @Override
                    public void onResponse(String response) {
                        Log.e("Status", response.trim());
                    }
                },
                new Response.ErrorListener() {
                    @Override
                    public void onErrorResponse(VolleyError error) {
                        Log.e("Status", error.toString());
                    }
                }){
            @Override
            protected Map<String, String> getParams() {
                Map<String, String> params= new HashMap<String, String>();
                String value = String.valueOf(cmdText);
                params.put("data",value);
                Log.e("Status", value);
                return params;
            }
        };
        RequestQueue requestQueue = Volley.newRequestQueue(MainActivity.this);
        requestQueue.add(stringRequest);
    }
}

Code for the NodeMCU

The below code is for the NodeMCU. You can see that we have included the ESP8266WebServer, WiFiClient, and ESP8266WiFI libraries. Here I am using the ESP8266 as a Wifi Access point. It will create a WiFi network with the “ESP8266” as SSID. In the setup function, I have defined the pin mode of the led (i.e. GPIO 2 for built-in LED of the NodeMCU). The mode of the WiFI is set to the “WIFI_AP” mode. The server.on() is used to start the HTTP server. The HTTP_handleRoot() function is created outside to setup() function. The HTTP_handleRoot() is used to get the data from the android app by using the “data” as an argument. Then the “command” variable is used to store the data as a String. If the data is “1” the built-in LED will turn on and else it will turn off.

#include <ESP8266WiFi.h>
#include <WiFiClient.h>
#include <ESP8266WebServer.h>
String command;                //String to store app command state.
const char* ssid = "ESP8266";
ESP8266WebServer server(80);
void setup() {
    pinMode(2, OUTPUT);
    digitalWrite(2,HIGH);
    Serial.begin(115200);
    // Connecting WiFi
    WiFi.mode(WIFI_AP);
    WiFi.softAP(ssid);
    IPAddress myIP = WiFi.softAPIP();
    Serial.print("AP IP address: ");
    Serial.println(myIP);
    // Starting WEB-server
    server.on ( "/", HTTP_handleRoot );
    server.onNotFound ( HTTP_handleRoot );
    server.begin(); 
}
void loop() {
    server.handleClient();
      command = server.arg("data");
      if(command!=""){
          if(command == "1"){
              digitalWrite(2, LOW);
              Serial.println("Led ON");
          } else{
              digitalWrite(2, HIGH);
              Serial.println("Led OFF");
          }
       }
    delay(5);
}
void HTTP_handleRoot(void) {
    if( server.hasArg("data") ){
        Serial.println(server.arg("data"));
    }
    server.send ( 200, "text/html", "" );
    delay(1);
}

Hope you enjoyed the project and learned something useful about creating an android app with android studio to control an LED over WiFi using NodeMCU.

Code

code_iotapp1.ino

#include <ESP8266WiFi.h>
#include <WiFiClient.h>
#include <ESP8266WebServer.h>
String command; //String to store app command state.
const char* ssid = "ESP8266";
ESP8266WebServer server(80);
void setup() { 
    pinMode(2, OUTPUT);
    digitalWrite(2,HIGH);
    Serial.begin(115200);
    // Connecting WiFi
    WiFi.mode(WIFI_AP);
    WiFi.softAP(ssid);
    IPAddress myIP = WiFi.softAPIP();
    Serial.print("AP IP address: ");
    Serial.println(myIP);
    // Starting WEB-server
    server.on ( "/", HTTP_handleRoot );
    server.onNotFound ( HTTP_handleRoot );
    server.begin();
}
void loop() {
    server.handleClient();
    command = server.arg("data");
    if(command!=""){
        if(command == "1"){
        digitalWrite(2, LOW);
        Serial.println("Led ON");
   } else{
        digitalWrite(2, HIGH);
        Serial.println("Led OFF");
   }
}
delay(5);
}
void HTTP_handleRoot(void) {
    if( server.hasArg("data") ){
        Serial.println(server.arg("data"));
    }
    server.send ( 200, "text/html", "" );
    delay(1);
}
27 Comments

I don't understand the statement "You need to add the following code outside to the onCreate() method of the MainActivity.java file."

Hi!
I don't understand the statement "You need to add the following code outside to the onCreate() method of the MainActivity.java file." Where am I supposed to place the two thread classes you created?
Nor do I understand where you got the "mmSocket.close()" function. You have no socket declared.

I truly wanted to compose a remark so as to appreciate you for the remarkable secrets you are giving out on this site. My extensive internet research has now been recognized with wonderful facts and strategies to talk about with my friends and family. I 'd declare that many of us readers actually are unequivocally lucky to be in a wonderful community with many special individuals with helpful points. I feel somewhat blessed to have used your website page and look forward to so many more amazing moments reading here. Thanks a lot once more for a lot of things.

I simply wanted to appreciate you all over again. I am not sure the things that I would have handled without these thoughts documented by you over such a area of interest. This has been an absolute frightening case in my circumstances, nevertheless understanding the skilled avenue you managed it took me to cry with happiness. I will be thankful for the guidance and trust you realize what a great job that you are getting into educating other individuals all through a site. I'm certain you've never got to know any of us.

My wife and i were so satisfied when Chris could round up his web research through your ideas he received through the web site. It is now and again perplexing just to choose to be making a gift of secrets and techniques that many others could have been making money from. And we all understand we have the website owner to appreciate because of that. All the illustrations you have made, the simple site navigation, the friendships you will aid to promote - it's got all extraordinary, and it's really aiding our son and the family believe that the theme is pleasurable, and that's truly pressing. Thank you for the whole thing!

I have to show some thanks to you for bailing me out of this particular difficulty. Just after surfing around throughout the online world and finding tips that were not powerful, I was thinking my life was gone. Being alive without the presence of answers to the issues you've solved by way of your entire guide is a serious case, and the kind that might have in a negative way affected my career if I hadn't noticed your website. Your good understanding and kindness in taking care of all the things was precious. I'm not sure what I would've done if I hadn't come across such a thing like this. It's possible to at this moment look ahead to my future. Thank you very much for the expert and effective guide. I won't hesitate to suggest your blog post to any person who should get guidance about this matter.

I together with my friends appeared to be digesting the nice helpful hints on the website and then instantly came up with a terrible suspicion I never expressed respect to the web blog owner for them. My women appeared to be for that reason glad to learn all of them and have unquestionably been taking advantage of them. Appreciate your turning out to be quite accommodating and then for picking out these kinds of wonderful guides millions of individuals are really wanting to learn about. My sincere apologies for not saying thanks to sooner.

I intended to write you the little bit of observation to be able to say thank you as before over the precious thoughts you've discussed on this site. It is quite extremely generous with people like you to provide unreservedly all many people might have offered for sale as an ebook to earn some dough for themselves, certainly since you might well have tried it if you considered necessary. The pointers as well acted to become a easy way to recognize that other people have the same dream just like my own to grasp more and more in terms of this problem. Certainly there are lots of more fun instances in the future for individuals that look into your site.

I must show some appreciation to this writer for bailing me out of such a circumstance. As a result of scouting throughout the the web and seeing opinions which were not productive, I thought my entire life was gone. Existing without the presence of approaches to the problems you have resolved by way of your main short post is a serious case, and ones which may have in a wrong way affected my career if I hadn't encountered your web site. Your own personal expertise and kindness in playing with almost everything was valuable. I don't know what I would have done if I hadn't come upon such a subject like this. I can also at this time look ahead to my future. Thanks for your time so much for the impressive and result oriented guide. I won't be reluctant to refer the website to anybody who needs and wants care on this subject matter.

I wish to show my admiration for your kindness in support of all those that should have assistance with the idea. Your special commitment to passing the solution all around was especially beneficial and has really allowed folks like me to get to their endeavors. Your interesting guideline denotes a great deal a person like me and somewhat more to my office workers. Thank you; from everyone of us.

After research a few of the blog posts in your web site now, and I really like your method of blogging. I bookmarked it to my bookmark website listing and might be checking back soon. Pls try my website online as nicely and let me know what you think.

Thanks a lot for giving everyone a very terrific chance to check tips from this blog. It is usually very useful plus jam-packed with a lot of fun for me and my office mates to search your web site the equivalent of three times in 7 days to read the fresh guides you will have. Of course, I'm also always motivated with your tremendous tricks you give. Some 2 points on this page are basically the finest I have had.

I intended to write you the little bit of observation to be able to say thanks a lot once again considering the striking principles you have discussed in this article. It's pretty open-handed with people like you to make unhampered just what most people could have distributed as an electronic book to get some cash for their own end, most importantly given that you could possibly have done it in the event you desired. These concepts also acted like the easy way to comprehend other people online have a similar dreams just as my personal own to realize more and more with regards to this matter. I believe there are thousands of more enjoyable sessions up front for those who read carefully your site.

I'm just commenting to make you be aware of of the fantastic encounter our girl went through reading yuor web blog. She figured out a wide variety of issues, with the inclusion of what it's like to possess an awesome teaching heart to let many more effortlessly learn about some hard to do matters. You truly exceeded our expected results. Thanks for offering the helpful, dependable, informative not to mention unique guidance on this topic to Gloria.

I want to convey my appreciation for your kindness for persons that have the need for help on this important concept. Your real commitment to getting the message across ended up being incredibly helpful and has consistently permitted associates just like me to achieve their aims. Your entire invaluable recommendations means much to me and far more to my fellow workers. Regards; from everyone of us.

I'm just commenting to make you know what a fantastic discovery my friend's girl experienced using your webblog. She even learned several pieces, with the inclusion of how it is like to possess an awesome coaching heart to let folks just grasp a number of impossible matters. You truly surpassed visitors' expectations. Thanks for producing these invaluable, healthy, educational not to mention cool tips on your topic to Lizeth.

I discovered your weblog web site on google and test a few of your early posts. Proceed to maintain up the very good operate. I just additional up your RSS feed to my MSN Information Reader. In search of ahead to reading extra from you in a while!?

A powerful share, I just given this onto a colleague who was doing a bit evaluation on this. And he in reality purchased me breakfast as a result of I found it for him.. smile. So let me reword that: Thnx for the deal with! But yeah Thnkx for spending the time to debate this, I really feel strongly about it and love studying more on this topic. If possible, as you become expertise, would you thoughts updating your weblog with extra particulars? It is extremely useful for me. Large thumb up for this blog post!

I must express appreciation to the writer just for bailing me out of this particular condition. As a result of searching throughout the online world and coming across ways which are not pleasant, I believed my life was gone. Existing minus the answers to the issues you have sorted out by way of your entire report is a critical case, and those which may have in a wrong way affected my entire career if I had not encountered the blog. Your main expertise and kindness in playing with the whole lot was crucial. I don't know what I would've done if I had not come across such a solution like this. I can at this time look ahead to my future. Thanks a lot very much for this professional and effective guide. I won't think twice to recommend your web site to anyone who would need guidance about this matter.

|White and black are always popular colors that you will want to wear. Models are sporting colorless looks at every fashion show. You can certainly fit these colors into many of your outfits. Black and white separates offer endless possibilities.

Add new comment

The content of this field is kept private and will not be shown publicly.

Plain text

  • No HTML tags allowed.
  • Lines and paragraphs break automatically.
  • Web page addresses and email addresses turn into links automatically.