


Hello everyone, welcome back to another part of our Android Studio for Internet of Things Series. In this tutorial, we are going to continue our android app. We have already developed the base of our application by adding an image of a light bulb, a button, and some features to establish a Bluetooth connection. But now we are going to add a Wi-Fi feature to control the built-in LED of the NodeMCU board.
What we are going to build?
Let’s see what we are going to build in this tutorial. In the below image you can find that we have already added an image of a light bulb, a button, a toolbar, and the Bluetooth feature.
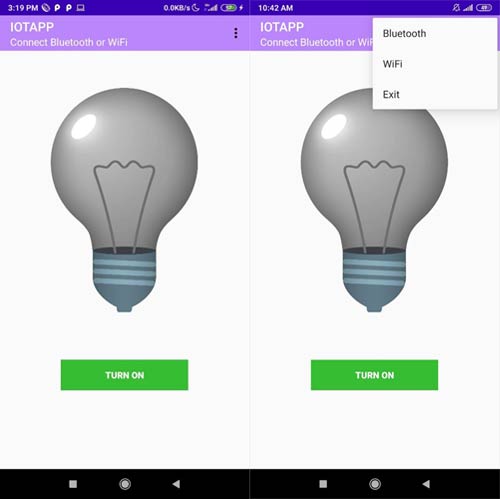
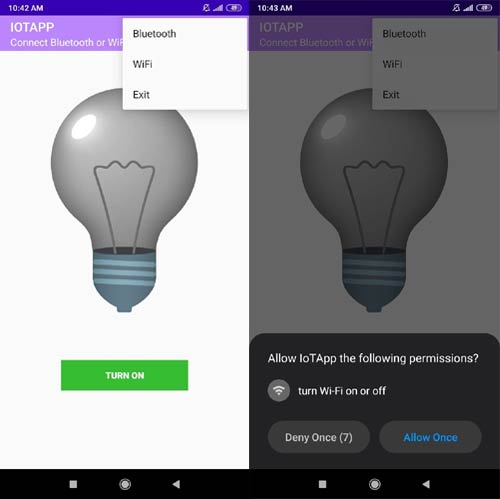
Now let’s have a look at the image below. The Wi-Fi feature is in the menu list. The user will be redirected to the Wi-Fi activity by clicking on the “WiFi”. If the WiFi is already turned off then the user will get a popup to turn on the WiFi, as you can see in the second image below.
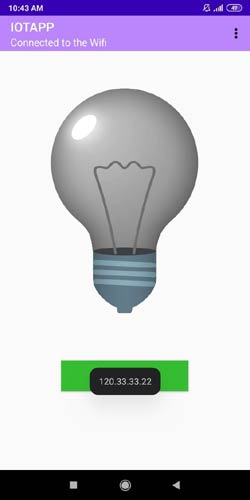
When the WiFi of the user will be turned on, the user will be redirected to the wifi activity where we will add some input section to get the IP address and a connect button. You can see the below image as a reference.

When the user will press the button after entering the IP address, it will be redirected to the main activity page and the wifi will get connected. In the below image, you can see in the toolbar section it is showing a message “Connected to the WiFi”.
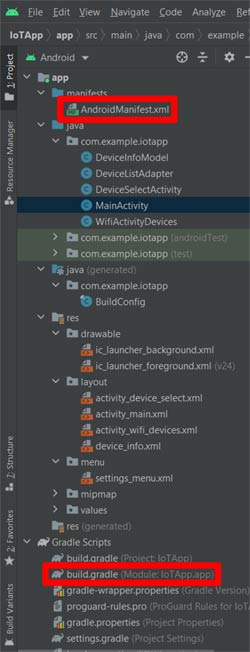
So far now, I have just given you an overview of the application. Now, let’s build the app. In the below image, you can see the folder structure that we have already discussed in our previous tutorials. We need to create some more classes, activities, and layouts in this tutorial. I have marked those files in red in the picture below.
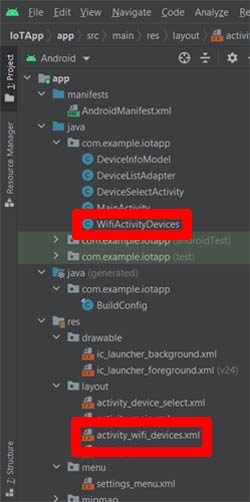
So we need to create an activity named “WifiActivityDevices”. The corresponding layout file that is “activity_wifi_devices.xml” file will be created with this activity as I have mentioned in the red circle in the above image. Before we will start the coding part of the android app, we need to add few lines of code in the AndroidMenifest.xml file. And we need to add a dependency in the “build.gradle” file. In the below images, you can see that I have marked the manifest file and the build.gradle file with a red square.
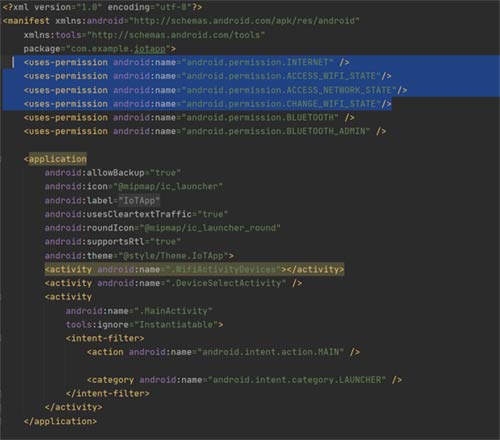
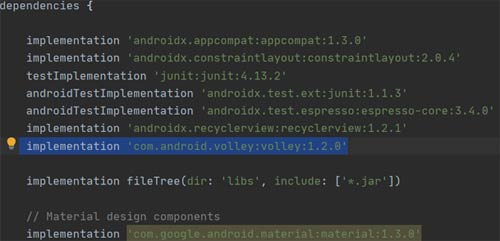
The highlighted code in the below image needs to be added to the Manifest file. This code is to give permission to the Wifi to the app. The second image is for dependency. The highlighted code needs to be added to the build.gradle file. You need to click on the “sync” which you can see on the top right corner after adding the dependency.
activity_wifi_devices.xml File
The activity_wifi_device.xml file is the layout of the WifiActivityDevices.java file. Here we need to add an EditText to take the input from the user. And we need to add a Button to get connected to the wifi and to redirect to the MainActivity file.
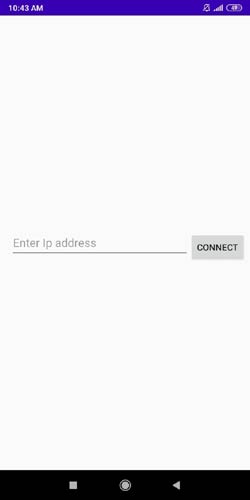
In the above image, we have an EditText which is indicating to enter the IP address. The below code can be used to add an EditText in a layout.
Code for an EditText:
<EditText
    android:id="@+id/ip_input"
    android:layout_width="281dp"
    android:layout_height="48dp"
    android:layout_marginStart="16dp"
    android:hint="Enter Ip address"
    app:layout_constraintBottom_toBottomOf="parent"
    app:layout_constraintStart_toStartOf="parent"
    app:layout_constraintTop_toTopOf="parent" />
Code Explanation:
The above code is for EditText. I have given an ID to this section by using the “android:id="@+id/ip_input" attribute. You can find some height and width attributes which I have used to give a dimension to the EditText. The “android:hint” is used to give a hint to the user. It will be shown whenever the EditText will empty. Now, we need to add the code for the Button.
Code for the Button:
<Button
    android:id="@+id/ip_button"
    android:layout_width="wrap_content"
    android:layout_height="wrap_content"
    android:layout_marginTop="340dp"
    android:text="Connect"
    app:layout_constraintEnd_toEndOf="parent"
    app:layout_constraintHorizontal_bias="0.0"
    app:layout_constraintStart_toEndOf="@+id/ip_input"
    app:layout_constraintTop_toTopOf="parent" />
Code Explanation:
The id of the button is “ip_button” and the text of the button is “Connect”. I am not going to discuss about the button as I have already discussed the button in the previous tutorials.
WifiActivityDevices.java File
As we have discussed before the WifiActivityDevices.java file is for the wifi feature. We need to add the following code below in the “WifiActivityDevices.java” file. In the below code we have “ipAddress” to take the IP address of the NodeMCU by accessing the ID of the EditText from the layout file, but we are also going to apply an additional task to check if the input text is matched to the format of an IP address or not. The “InputFilter” is used to apply some pattern checker to check the entered string is an IP address or not. The “setFilters” function will apply the filter to the “ipAddress” which has entered the IP address. The “ipButton” is used to access the Button from the layout file by using the ID of the button. Then we need to add a “setOnClickListener” to the “ipButton”. In the “onClick()” method you can find the “intent2”. This is used to redirect the user to the MainActivity.java file.
public class WifiActivityDevices extends AppCompatActivity {
    EditText ipAddress;
    Button ipButton;
    @Override
    protected void onCreate(Bundle savedInstanceState) {
        super.onCreate(savedInstanceState);
        setContentView(R.layout.activity_wifi_devices);
        ipAddress = (EditText) findViewById(R.id.ip_input);
        InputFilter[] filters = new InputFilter[1];
        filters[0] = new InputFilter() {
            @Override
            public CharSequence filter(CharSequence source, int start, int end,
                                       android.text.Spanned dest, int dstart, int dend) {
                if (end > start) {
                    String destTxt = dest.toString();
                    String resultingTxt = destTxt.substring(0, dstart)
                            + source.subSequence(start, end)
                            + destTxt.substring(dend);
                    if (!resultingTxt
                            .matches("^\\d{1,3}(\\.(\\d{1,3}(\\.(\\d{1,3}(\\.(\\d{1,3})?)?)?)?)?)?")) {
                        return "";
                    } else {
                        String[] splits = resultingTxt.split("\\.");
                        for (int i = 0; i < splits.length; i++) {
                            if (Integer.valueOf(splits[i]) > 255) {
                                return "";
                            }
                        }
                    }
                }
                return null;
            }
        };
        ipAddress.setFilters(filters);
        ipButton = (Button) findViewById(R.id.ip_button);
        WifiManager wifi = (WifiManager)getApplicationContext().getSystemService(Context.WIFI_SERVICE);
        if (wifi.isWifiEnabled()){
            ipButton.setOnClickListener(new View.OnClickListener() {
                @Override
                public void onClick(View view) {
                    Intent intent2 = new Intent(WifiActivityDevices.this,MainActivity.class);
                    // Send device details to the MainActivity
                    intent2.putExtra("ipAddress", ipAddress.getText().toString());
                    // Call MainActivity
                    startActivity(intent2);
                }
            });
        }else{
            Toast.makeText(WifiActivityDevices.this, "Turned on your wifi",Toast.LENGTH_LONG).show();
            wifi.setWifiEnabled(true);
        }
    }
}
MainActivity.java File
We need to do some changes to the MainActivity.java file. You need to add the following code outside to the onCreate() method of the MainActivity.java file. The “CreateConnectThread2” class is used to create a “Thread”. The “run()” method is used to establish a connection with the IP address that we got in the “WifiActivityDevices.java” file.
public class CreateConnectThread2 extends Thread {
    public CreateConnectThread2(String ipaddress) {
        Log.e("Status", ipaddress);
    }
    public void run() {
        // Cancel discovery because it otherwise slows down the connection.
        BluetoothAdapter bluetoothAdapter = BluetoothAdapter.getDefaultAdapter();
        bluetoothAdapter.cancelDiscovery();
        Log.e("Status", "Device connected");
        handler.obtainMessage(CONNECTING_STATUS, 2, -2).sendToTarget();
        connectedThread2 = new ConnectedThread2(ipAddress);
        connectedThread2.run();
    }
    public void cancel() {
        try {
            mmSocket.close();
        } catch (IOException e) {
            Log.e(TAG, "Could not close the client socket", e);
        }
    }
}
The below “ConnectedThread2” class is used to manage the createConnected thread. We have a send() method under the “ConnectedThread2” class. This send() method can be called when the user will press the button in the layout file of the MainActivity. Inside the send() method you can see that we have an “url” which is used as an address of the NodeMcu board. We are using the “POST” method for this HTTP connection. Whenever the user will click on the button the state of the button will get changed and the commands for turning on or off the led will send as string data through the “StringRequest” method.
We are using “Volley” library to create the HTTP connection.
public class ConnectedThread2 extends Thread {
    public ConnectedThread2(String ipaddress) {
        Log.e("Status", "Device connected");
    }
    public void run() {
        Log.e("Status", "Device running");
        }
    public void send(int cmdText, String ipaddress) {
        Log.e("Status", "Sending data "+cmdText);
        String url = "http://"+ipaddress+"/post";
        StringRequest stringRequest = new StringRequest(Request.Method.POST, url,
                new Response.Listener<String>() {
                    @Override
                    public void onResponse(String response) {
                        Log.e("Status", response.trim());
                    }
                },
                new Response.ErrorListener() {
                    @Override
                    public void onErrorResponse(VolleyError error) {
                        Log.e("Status", error.toString());
                    }
                }){
            @Override
            protected Map<String, String> getParams() {
                Map<String, String> params= new HashMap<String, String>();
                String value = String.valueOf(cmdText);
                params.put("data",value);
                Log.e("Status", value);
                return params;
            }
        };
        RequestQueue requestQueue = Volley.newRequestQueue(MainActivity.this);
        requestQueue.add(stringRequest);
    }
}
Code for the NodeMCU
The below code is for the NodeMCU. You can see that we have included the ESP8266WebServer, WiFiClient, and ESP8266WiFI libraries. Here I am using the ESP8266 as a Wifi Access point. It will create a WiFi network with the “ESP8266” as SSID. In the setup function, I have defined the pin mode of the led (i.e. GPIO 2 for built-in LED of the NodeMCU). The mode of the WiFI is set to the “WIFI_AP” mode. The server.on() is used to start the HTTP server. The HTTP_handleRoot() function is created outside to setup() function. The HTTP_handleRoot() is used to get the data from the android app by using the “data” as an argument. Then the “command” variable is used to store the data as a String. If the data is “1” the built-in LED will turn on and else it will turn off.
#include <ESP8266WiFi.h>
#include <WiFiClient.h>
#include <ESP8266WebServer.h>
String command;                //String to store app command state.
const char* ssid = "ESP8266";
ESP8266WebServer server(80);
void setup() {
    pinMode(2, OUTPUT);
    digitalWrite(2,HIGH);
    Serial.begin(115200);
    // Connecting WiFi
    WiFi.mode(WIFI_AP);
    WiFi.softAP(ssid);
    IPAddress myIP = WiFi.softAPIP();
    Serial.print("AP IP address: ");
    Serial.println(myIP);
    // Starting WEB-server
    server.on ( "/", HTTP_handleRoot );
    server.onNotFound ( HTTP_handleRoot );
    server.begin();
}
void loop() {
    server.handleClient();
      command = server.arg("data");
      if(command!=""){
          if(command == "1"){
              digitalWrite(2, LOW);
              Serial.println("Led ON");
          } else{
              digitalWrite(2, HIGH);
              Serial.println("Led OFF");
          }
       }
    delay(5);
}
void HTTP_handleRoot(void) {
    if( server.hasArg("data") ){
        Serial.println(server.arg("data"));
    }
    server.send ( 200, "text/html", "" );
    delay(1);
}
Hope you enjoyed the project and learned something useful about creating an android app with android studio to control an LED over WiFi using NodeMCU.
code_iotapp1.ino
#include <ESP8266WiFi.h>
#include <WiFiClient.h>
#include <ESP8266WebServer.h>
String command; //String to store app command state.
const char* ssid = "ESP8266";
ESP8266WebServer server(80);
void setup() {
    pinMode(2, OUTPUT);
    digitalWrite(2,HIGH);
    Serial.begin(115200);
    // Connecting WiFi
    WiFi.mode(WIFI_AP);
    WiFi.softAP(ssid);
    IPAddress myIP = WiFi.softAPIP();
    Serial.print("AP IP address: ");
    Serial.println(myIP);
    // Starting WEB-server
    server.on ( "/", HTTP_handleRoot );
    server.onNotFound ( HTTP_handleRoot );
    server.begin();
}
void loop() {
    server.handleClient();
    command = server.arg("data");
    if(command!=""){
        if(command == "1"){
        digitalWrite(2, LOW);
        Serial.println("Led ON");
   } else{
        digitalWrite(2, HIGH);
        Serial.println("Led OFF");
   }
}
delay(5);
}
void HTTP_handleRoot(void) {
    if( server.hasArg("data") ){
        Serial.println(server.arg("data"));
    }
    server.send ( 200, "text/html", "" );
    delay(1);
}


