


In this tutorial, we are going to build an Android application and we will be able to control the on board LED of the Arduino with our own android application using Bluetooth. But this tutorial is a continuation of our Android Studio for Internet of Things Series, where we made our first Android application having an image of a light bulb and a button. In this tutorial, you need to have some patience and please follow this tutorial step by step because I have got so many errors while implementing it for the first time.
What we are going to build?
We have already made a MainActivity in our previous tutorial. In the picture given below, you can see what we have already made in the previous tutorial. If you are interested, you can check out Getting started with the Android Studio for Internet of Things
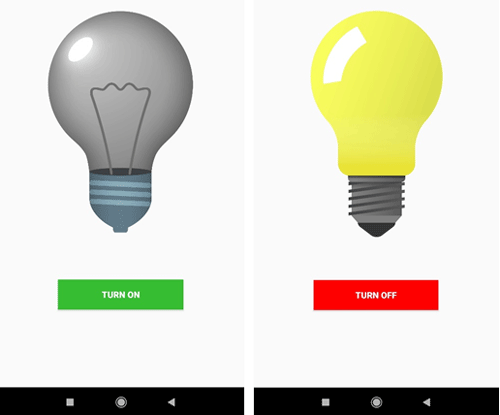
As you can see in the above pictures, we have added an image of a light bulb and a button. Whenever a user clicks on the button, the text on the button and the image will get change as per the second picture above. Now, let’s have a look at the below images to get an idea of what we are going to build in this tutorial.
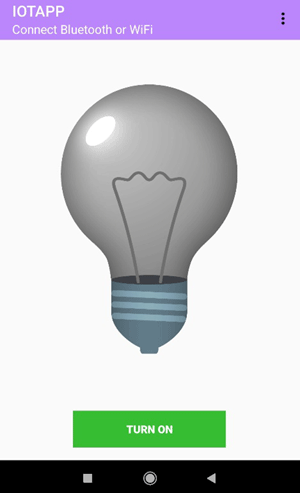
As you can see in the above image, we need to build a toolbar section that I have marked with a red rectangle. The “IOTAPP” is the title of the toolbar and the “Connect Bluetooth or WiFi” is the subtitle of the toolbar. We are going to change the subtitle according to the status of the Bluetooth Connection. And the menu section will pop up whenever the user will click on the three dots.
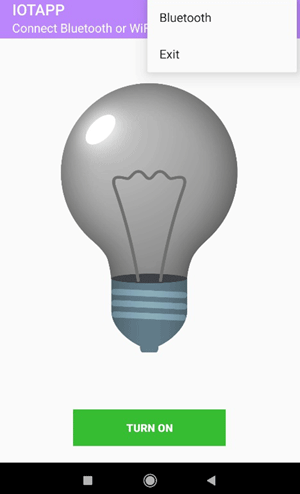
As you can see in the above image, we have a menu section with two items “Bluetooth” and “Exit”. In Bluetooth, we need to add the feature which can show the paired devices and we can connect any paired device with just a simple click. In the below image, you can find that it is displaying the paired devices. In my case, I have already paired it with the HC-06 Bluetooth module and my Desktop.
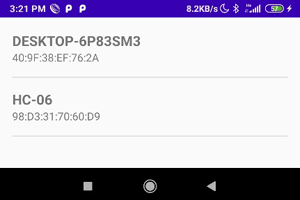
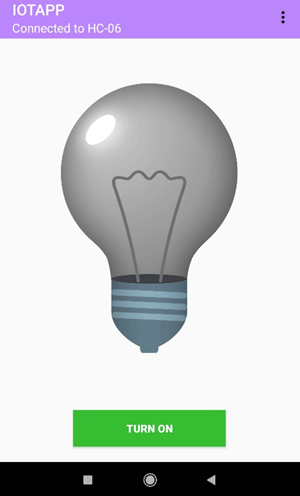
When I clicked on the HC-06, then it will go back to the Main Activity and it will change the subtitle of the toolbar. In the below image, you can see that the title of the toolbar has been changed to “Connected to HC-06” Then we will add a progress bar in the activity_main.xml file.
So far, I have just given you an overview of the application. Now, let’s build the app. In the below image, you can see the folder structure that we have already discussed in the tutorial. We need to create some more classes, activities, and layouts in this tutorial. I have marked those files in red in the picture below.
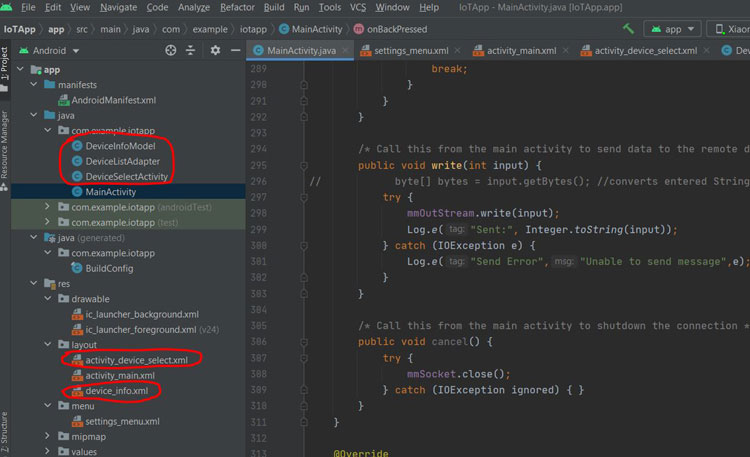
According to the above picture, you need to create two Java classes. One is the “DeviceInfoModel” and another one is “DeviceListAdapter”. To create these classes, just follow the simple steps shown in the images below.
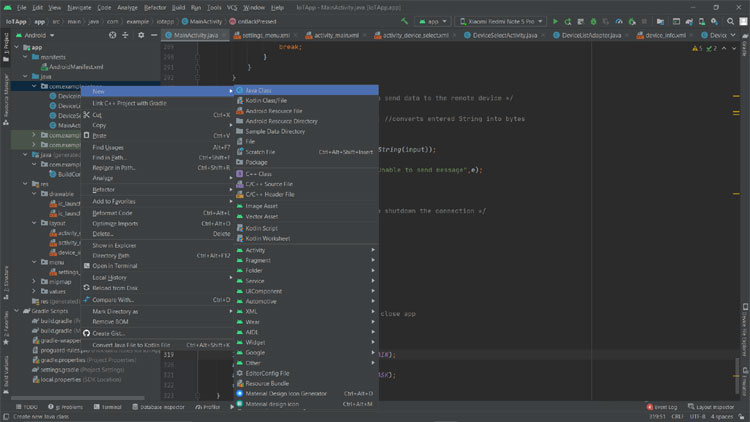
Step 1: Right click on the “com.example.yourappname” under the “java” folder. Then click “new > Java Class”. You can see a window popup on your screen.
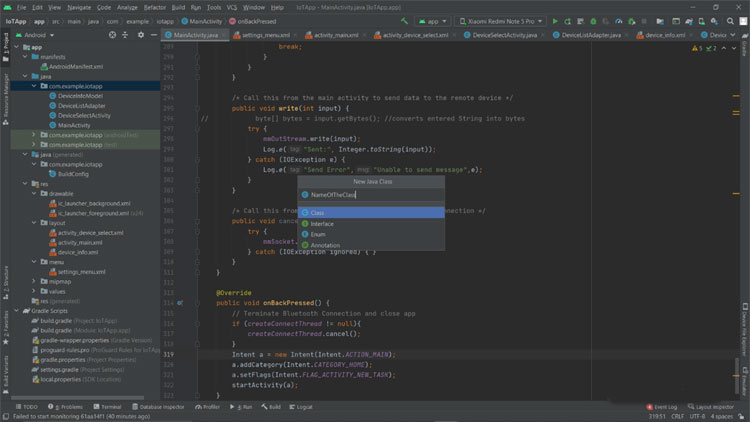
Step 2: Give a name to the class. You need to follow these two steps twice to create both “DeviceInfoModel” and “DeviceListAdapter” classes.
Now, we need to create the “DeviceSelectActivity.java” activity file and the “device_info.xml” layout file. I am not going to explain how to create an activity and a layout here, because I have already mentioned the procedures to create activities and layouts before in our first tutorial. When you will create the “DeviceSelectActivity.java” activity file, the “activity_device_select.xml” file will be created automatically. Now you can open the “activity_main.xml” file and follow the below code for the layout of the main activity.
The activity_main.xml file:
The activity_main.xml file is the layout of the MainActivity.java file that we have created in our previous tutorial. Now, we need to add some more items in the layout. The most important one is the toolbar that I have told you in the above section. You can use a toolbar on your layout by using the code below.
 <androidx.appcompat.widget.Toolbar
    android:id="@+id/toolbar"
    android:layout_width="match_parent"
    android:layout_height="wrap_content"
    android:background="?attr/colorPrimary"
    android:minHeight="?attr/actionBarSize"
    android:theme="?attr/actionBarTheme"
    app:layout_constraintEnd_toEndOf="parent"
    app:layout_constraintStart_toStartOf="parent"
    app:layout_constraintTop_toTopOf="parent"
    app:subtitleTextColor="@android:color/background_light"
    app:title="Bluetooth Connection"
    app:titleTextColor="@android:color/background_light" />
I have provided an Id “toolbar” to the item by using “android:id="@+id/toolbar"”.
The “android:layout_width="match_parent"" and the “android:layout_height="wrap_content"” is used to give the dimension to the toolbar.
Another component is the “Progress Bar”. Refer the code given below to add a progress bar to the layout. So, we have created the layout of the main activity that you can see in the image given below.
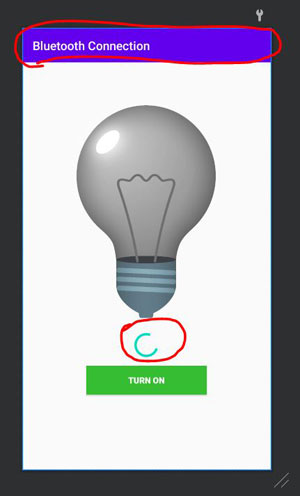
In the above image, you can see that we have added a progress bar that I have mentioned in the red circle just below the image of the bulb. At the top of the layout, you can find the toolbar. So, we have prepared the layout file of the main activity.
The “DeviceInfoModel” class and The “DeviceListAdapter” class:
Now, we need to prepare the two classes that we have created before. These classes are the “DeviceInfoModel” class and the “DeviceListAdapter” class. In the “DeviceInfoModel” class, we will hold our device data (i.e. the name of the device and the address of the hardware device). The “DeviceListAdapter” is a recycler view adapter which will help us to get the device data from the “DeviceInfoModel” class. You can visit this link to know more about ViewModel and RecyclerViewAdapter.
The “DeviceInfoModel” class:
public class DeviceInfoModel {
    private String deviceName, deviceHardwareAddress;
    public DeviceInfoModel(){}
  // Constructor
    public DeviceInfoModel(String deviceName, String deviceHardwareAddress){
        this.deviceName = deviceName;
        this.deviceHardwareAddress = deviceHardwareAddress;
    }
    public String getDeviceName(){return deviceName;}
    public String getDeviceHardwareAddress(){return deviceHardwareAddress;}
}
In the above code, inside the DeviceInfoModel public class, we have a DeviceInfoModel() constructor, which is a bridge between our model and adapter class.
And we have two getter getDeviceName() and getDeviceHardwareAddress(). These two getter methods are used to get the values from the device property which we are going to use in our main activity.
The “DeviceListAdapter” class:
public class DeviceListAdapter extends RecyclerView.Adapter<RecyclerView.ViewHolder> {
    private Context context;
    private List<Object> deviceList;
    public static class ViewHolder extends RecyclerView.ViewHolder {
        TextView textName, textAddress;
        LinearLayout linearLayout;
        public ViewHolder(View v) {
            super(v);
            textName = v.findViewById(R.id.textViewDeviceName);
            textAddress = v.findViewById(R.id.textViewDeviceAddress);
            linearLayout = v.findViewById(R.id.linearLayoutDeviceInfo);
        }
    }
    public DeviceListAdapter(Context context, List<Object> deviceList) {
        this.context = context;
        this.deviceList = deviceList;
    }
    public RecyclerView.ViewHolder onCreateViewHolder(ViewGroup parent, int viewType) {
        View v = LayoutInflater.from(parent.getContext()).inflate(R.layout.device_info_layout, parent, false);
        ViewHolder vh = new ViewHolder(v);
        return vh;
    }
    @Override
    public void onBindViewHolder(final RecyclerView.ViewHolder holder, final int position) {
        ViewHolder itemHolder = (ViewHolder) holder;
        final DeviceInfoModel deviceInfoModel = (DeviceInfoModel) deviceList.get(position);
        itemHolder.textName.setText(deviceInfoModel.getDeviceName());
        itemHolder.textAddress.setText(deviceInfoModel.getDeviceHardwareAddress());
        // When a device is selected
        itemHolder.linearLayout.setOnClickListener(new View.OnClickListener() {
            @Override
            public void onClick(View view) {
                Intent intent = new Intent(context,MainActivity.class);
                // Send device details to the MainActivity
                intent.putExtra("deviceName", deviceInfoModel.getDeviceName());
                intent.putExtra("deviceAddress",deviceInfoModel.getDeviceHardwareAddress());
                // Call MainActivity
                context.startActivity(intent);
            }
        });
    }
    @Override
    public int getItemCount() {
        int dataCount = deviceList.size();
        return dataCount;
    }
}
There are mainly two variables “context” and “deviceList” in the above code snippet. Context is used for access to application-specific resources and classes, as well as calls for application-level operations such as launching activities, broadcasting and receiving intents, etc. The deviceList provides resizable-array, which means that in our case, the device name and address of the device can be added and removed from the list. It implements the List interface. Then we create some Override methods
- ViewHolder (): In this method we define view and get text view or image view from XML by their Id.
- DeviceListAdapter() : Create a parameterized constructor ---> Constructor is the mediator between Adapter and Activity.
- onCreateViewHolder(): This method create a view for user.
- onBindViewHolder(): This method bind the data with list of the items.
- getItemCount(): This method indicates how many items (or rows) are in the data set that will be presented in the AdapterView.
So, we prepared our two classes that is model and the recycler adapter class. Now, we need to show the data that we have with our model class.
We are going to use the “DeviceSelectActivity.java” and the “activity_device_select.xml” file.
The activity_device_select.xml file:
In the activity_device_select.xml file, we need to add the recycler view which will helps us to show the list of the paired devices. The below code can be used to add the recycler view in your app.
 <androidx.recyclerview.widget.RecyclerView
    android:id="@+id/recyclerViewDevice"
    android:layout_width="0dp"
    android:layout_height="wrap_content"
    app:layout_constraintEnd_toEndOf="parent"
    app:layout_constraintStart_toStartOf="parent"
    app:layout_constraintTop_toTopOf="parent" />
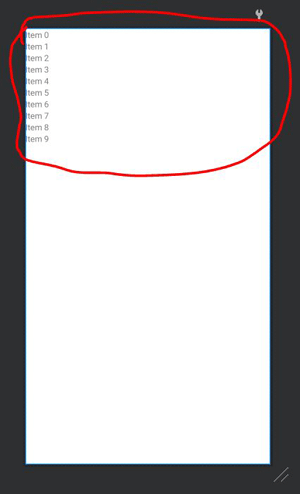
I have given an ID to the RecyclerView by using the android:id="@+id/recyclerViewDevice". The other attributes can be used to give a proper dimension of the RecyclerView in the layout. The below image is representing a Recycler View where you can see that the items are listed down vertically. In our case, these items are going to be the device name and the address of the device.
The “DeviceSelectActivity.java” file:
In the DeviceSelectActivity.java file, we need to show the device lists and we need to add a method show that it will keep a record of the details of the device when the user will click on a device. Then it will send us to the main activity. You can follow the below code to show a recycler view in the activity.
public class SelectDeviceActivity extends AppCompatActivity {
    @Override
    protected void onCreate(Bundle savedInstanceState) {
        super.onCreate(savedInstanceState);
        setContentView(R.layout.activity_select_device);
        // Bluetooth Setup
        BluetoothAdapter bluetoothAdapter = BluetoothAdapter.getDefaultAdapter();
        // Get List of Paired Bluetooth Device
        Set<BluetoothDevice> pairedDevices = bluetoothAdapter.getBondedDevices();
        List<Object> deviceList = new ArrayList<>();
        if (pairedDevices.size() > 0) {
            // There are paired devices. Get the name and address of each paired device.
            for (BluetoothDevice device : pairedDevices) {
                String deviceName = device.getName();
                String deviceHardwareAddress = device.getAddress(); // MAC address
                DeviceInfoModel deviceInfoModel = new DeviceInfoModel(deviceName,deviceHardwareAddress);
                deviceList.add(deviceInfoModel);
            }
            // Display paired device using recyclerView
            RecyclerView recyclerView = findViewById(R.id.recyclerViewDevice);
            recyclerView.setLayoutManager(new LinearLayoutManager(this));
            DeviceListAdapter deviceListAdapter = new DeviceListAdapter(this,deviceList);
            recyclerView.setAdapter(deviceListAdapter);
            recyclerView.setItemAnimator(new DefaultItemAnimator());
        } else {
            View view = findViewById(R.id.recyclerViewDevice);
            Snackbar snackbar = Snackbar.make(view, "Activate Bluetooth or pair a Bluetooth device", Snackbar.LENGTH_INDEFINITE);
            snackbar.setAction("OK", new View.OnClickListener() {
                @Override
                public void onClick(View view) { }
            });
            snackbar.show();
        }
    }
}
In the above code, the BluetoothAdapter allows us to perform the fundamental Bluetooth tasks. I used some methods which are available in the BluetoothAdapter.
The bluetoothAdapter.getBondedDevices() is used to get the list of the paired devices. Then I used the deviceList as an array and it will store the list of the paired devices that we got from the bluetoothAdapter.getBondedDevices() method. I used the RecyclerView from the activity_device_select.xml file in the following “RecyclerView recyclerView = findViewById(R.id.recyclerViewDevice” line.
Then I called the DeviceListAdapter() and set the adapter into the RecyclerView by using “recyclerView.setAdapter(deviceListAdapter)” method. So, we have prepared the DeviceSelectActivity.java file to show the lists of the paired Devices.
The MainActivity.java file:
I have already discussed the layout of the main activity file that is activity_main.xml. Now, we need to program the backend of the main activity in the MainActivity.java file. You can follow the code below as I there is no need to explain everything about the Android studio and java here. I have already given some comments inside the code below so that you could get an overview of the concepts.
public class MainActivity extends AppCompatActivity {
    private String deviceName = null;
    private String deviceAddress;
    public static Handler handler;
    public static BluetoothSocket mmSocket;
    public static ConnectedThread connectedThread;
    public static CreateConnectThread createConnectThread;
    private final static int CONNECTING_STATUS = 1; // used in bluetooth handler to identify message status
    private final static int MESSAGE_READ = 2; // used in bluetooth handler to identify message update
    @Override
    protected void onCreate(Bundle savedInstanceState) {
        super.onCreate(savedInstanceState);
        setContentView(R.layout.activity_main);
        // UI Initialization
        final Button buttonConnect = findViewById(R.id.buttonConnect);
        final Toolbar toolbar = findViewById(R.id.toolbar);
        final ProgressBar progressBar = findViewById(R.id.progressBar);
        progressBar.setVisibility(View.GONE);
        final TextView textViewInfo = findViewById(R.id.textViewInfo);
        final Button buttonToggle = findViewById(R.id.buttonToggle);
        buttonToggle.setEnabled(false);
        final ImageView imageView = findViewById(R.id.imageView);
        imageView.setBackgroundColor(getResources().getColor(R.color.colorOff));
        // If a bluetooth device has been selected from SelectDeviceActivity
        deviceName = getIntent().getStringExtra("deviceName");
        if (deviceName != null){
            // Get the device address to make BT Connection
            deviceAddress = getIntent().getStringExtra("deviceAddress");
            // Show progree and connection status
            toolbar.setSubtitle("Connecting to " + deviceName + "...");
            progressBar.setVisibility(View.VISIBLE);
            buttonConnect.setEnabled(false);
            BluetoothAdapter bluetoothAdapter = BluetoothAdapter.getDefaultAdapter();
            createConnectThread = new CreateConnectThread(bluetoothAdapter,deviceAddress);
            createConnectThread.start();
        }
        handler = new Handler(Looper.getMainLooper()) {
            @SuppressLint("SetTextI18n")
            @Override
            public void handleMessage(Message msg){
                switch (msg.what){
                    case CONNECTING_STATUS:
                        switch(msg.arg1){
                            case 1:
                                toolbar.setSubtitle("Connected to " + deviceName);
                                progressBar.setVisibility(View.GONE);
                                buttonConnect.setEnabled(true);
                                buttonToggle.setEnabled(true);
                                break;
                            case -1:
                                toolbar.setSubtitle("Device fails to connect");
                                progressBar.setVisibility(View.GONE);
                                buttonConnect.setEnabled(true);
                                break;
                        }
                        break;
                    case MESSAGE_READ:
                        String arduinoMsg = msg.obj.toString(); // Read message from Arduino
                        switch (arduinoMsg.toLowerCase()){
                            case "led is turned on":
                                imageView.setBackgroundColor(getResources().getColor(R.color.colorOn));
                                textViewInfo.setText("Arduino Message : " + arduinoMsg);
                                break;
                            case "led is turned off":
                                imageView.setBackgroundColor(getResources().getColor(R.color.colorOff));
                                textViewInfo.setText("Arduino Message : " + arduinoMsg);
                                break;
                        }
                        break;
                }
            }
        };
        // Select Bluetooth Device
        buttonConnect.setOnClickListener(new View.OnClickListener() {
            @Override
            public void onClick(View view) {
                // Move to adapter list
                Intent intent = new Intent(MainActivity.this, SelectDeviceActivity.class);
                startActivity(intent);
            }
        });
        // Button to ON/OFF LED on Arduino Board
        buttonToggle.setOnClickListener(new View.OnClickListener() {
            @Override
            public void onClick(View view) {
                String cmdText = null;
                String btnState = buttonToggle.getText().toString().toLowerCase();
                switch (btnState){
                    case "turn on":
                        buttonToggle.setText("Turn Off");
                        // Command to turn on LED on Arduino. Must match with the command in Arduino code
                        cmdText = "<turn on>";
                        break;
                    case "turn off":
                        buttonToggle.setText("Turn On");
                        // Command to turn off LED on Arduino. Must match with the command in Arduino code
                        cmdText = "<turn off>";
                        break;
                }
                // Send command to Arduino board
                assert cmdText != null;
                connectedThread.write(cmdText);
            }
        });
    }
    /* ============================ Thread to Create Bluetooth Connection =================================== */
    public static class CreateConnectThread extends Thread {
        public CreateConnectThread(BluetoothAdapter bluetoothAdapter, String address) {
            /*
            Use a temporary object that is later assigned to mmSocket
            because mmSocket is final.
             */
            BluetoothDevice bluetoothDevice = bluetoothAdapter.getRemoteDevice(address);
            BluetoothSocket tmp = null;
            UUID uuid = bluetoothDevice.getUuids()[0].getUuid();
            try {
                /*
                Get a BluetoothSocket to connect with the given BluetoothDevice.
                Due to Android device varieties,the method below may not work fo different devices.
                You should try using other methods i.e. :
                tmp = device.createRfcommSocketToServiceRecord(MY_UUID);
                 */
                tmp = bluetoothDevice.createInsecureRfcommSocketToServiceRecord(uuid);
            } catch (IOException e) {
                Log.e(TAG, "Socket's create() method failed", e);
            }
            mmSocket = tmp;
        }
        public void run() {
            // Cancel discovery because it otherwise slows down the connection.
            BluetoothAdapter bluetoothAdapter = BluetoothAdapter.getDefaultAdapter();
            bluetoothAdapter.cancelDiscovery();
            try {
                // Connect to the remote device through the socket. This call blocks
                // until it succeeds or throws an exception.
                mmSocket.connect();
                Log.e("Status", "Device connected");
                handler.obtainMessage(CONNECTING_STATUS, 1, -1).sendToTarget();
            } catch (IOException connectException) {
                // Unable to connect; close the socket and return.
                try {
                    mmSocket.close();
                    Log.e("Status", "Cannot connect to device");
                    handler.obtainMessage(CONNECTING_STATUS, -1, -1).sendToTarget();
                } catch (IOException closeException) {
                    Log.e(TAG, "Could not close the client socket", closeException);
                }
                return;
            }
            // The connection attempt succeeded. Perform work associated with
            // the connection in a separate thread.
            connectedThread = new ConnectedThread(mmSocket);
            connectedThread.run();
        }
        // Closes the client socket and causes the thread to finish.
        public void cancel() {
            try {
                mmSocket.close();
            } catch (IOException e) {
                Log.e(TAG, "Could not close the client socket", e);
            }
        }
    }
    /* =============================== Thread for Data Transfer =========================================== */
    public static class ConnectedThread extends Thread {
        private final BluetoothSocket mmSocket;
        private final InputStream mmInStream;
        private final OutputStream mmOutStream;
        public ConnectedThread(BluetoothSocket socket) {
            mmSocket = socket;
            InputStream tmpIn = null;
            OutputStream tmpOut = null;
            // Get the input and output streams, using temp objects because
            // member streams are final
            try {
                tmpIn = socket.getInputStream();
                tmpOut = socket.getOutputStream();
            } catch (IOException e) { }

            mmInStream = tmpIn;
            mmOutStream = tmpOut;
        }
        public void run() {
            byte[] buffer = new byte[1024];  // buffer store for the stream
            int bytes = 0; // bytes returned from read()
            // Keep listening to the InputStream until an exception occurs
            while (true) {
                try {
                    /*
                    Read from the InputStream from Arduino until termination character is reached.
                    Then send the whole String message to GUI Handler.
                     */
                    buffer[bytes] = (byte) mmInStream.read();
                    String readMessage;
                    if (buffer[bytes] == '\n'){
                        readMessage = new String(buffer,0,bytes);
                        Log.e("Arduino Message",readMessage);
                        handler.obtainMessage(MESSAGE_READ,readMessage).sendToTarget();
                        bytes = 0;
                    } else {
                        bytes++;
                    }
                } catch (IOException e) {
                    e.printStackTrace();
                    break;
                }
            }
        }
        /* Call this from the main activity to send data to the remote device */
        public void write(String input) {
            byte[] bytes = input.getBytes(); //converts entered String into bytes
            try {
                mmOutStream.write(bytes);
            } catch (IOException e) {
                Log.e("Send Error","Unable to send message",e);
            }
        }
        /* Call this from the main activity to shutdown the connection */
        public void cancel() {
            try {
                mmSocket.close();
            } catch (IOException e) { }
        }
    }
    /* ============================ Terminate Connection at BackPress ====================== */
    @Override
    public void onBackPressed() {
        // Terminate Bluetooth Connection and close app
        if (createConnectThread != null){
            createConnectThread.cancel();
        }
        Intent a = new Intent(Intent.ACTION_MAIN);
        a.addCategory(Intent.CATEGORY_HOME);
        a.setFlags(Intent.FLAG_ACTIVITY_NEW_TASK);
        startActivity(a);
    }
}
Schematic of the Bluetooth Module and the Arduino Uno
As I have discussed before, we need an Arduino Uno and an HC-06 Bluetooth module to make a Bluetooth connection between the Arduino Uno and our Android application.
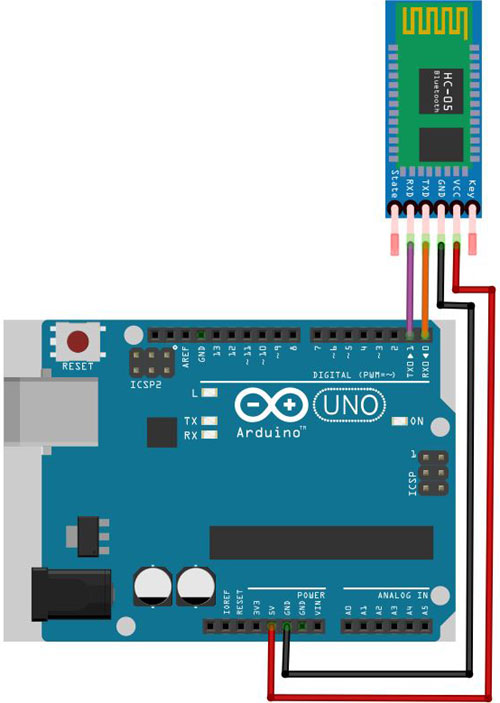
In the above image, you can see that the Receiver pin (RXD pin) of the Bluetooth module is connected to the Transmitter Pin (TX0 Pin) of the Arduino Uno with a purple wire and the Transmitter Pin (TX0 Pin) of the Bluetooth module is connected to the Receiver pin (RXD pin) of the Arduino UNO with an orange wire. The VCC pin of the Bluetooth Module is connected to the 5V pin of the Arduino Uno with a Red Wire. The Ground (GND) of both board has been connected via the black wire.
Code for the Arduino Uno
The below code is for the Arduino sketch. You can see that we defined the LED 13 as a pin to access the built-in LED of the Arduino Uno board. Then we used the Serial Library to use the UART communication in between the Bluetooth module and the Arduino Uno. Upload the below code on your Arduino and connect the Bluetooth module as per the above schematic.
int value1;
#define LED 13
void setup()
{
    Serial.begin(9600);
    pinMode(LED, OUTPUT);
    digitalWrite(LED, LOW);
}
void loop()
{
  while(Serial.available()==0);
  value1 = Serial.read();
  if (value1==1)
  {
    Serial.println("Led ON");
    digitalWrite(LED, HIGH);
  }
  if (value1==0)
  {
      digitalWrite(LED, LOW);
      Serial.println("Led Off");
}
}
In the video given below, I have demonstrated the entire project where I am controlling the built-in LED of the Arduino Uno using the Bluetooth module HC-06 through the Android App.


