How to Control an LED with Raspberry Pi Webserver using Apache

Controlling an LED with Raspberry Pi Webserver using Apache

In this tutorial, we will install Apache web server in Raspberry Pi to control the LED from a webpage that can be accessed from anywhere over the internet. This is a basic tutorial with minimum features and it can be further modified to use this method in IoT-based home automation, remote control automation, robotics, etc.

Here we control an LED connected to Raspberry Pi by using Apache web server. For this, we create an HTML/php web page which has two buttons - one for turning on the LED and the second for turning off the LED.


Components Required

  1. Raspberry pi board (With Raspbian operating system)
  2. LED
  3. 250-ohm resistor
  4. Jumper Wires


An SSH client (Putty) is used to connect the Raspberry pi using a Laptop or computer. For this, the raspberry pi needs to be connected to a network via LAN or Wi-Fi. If you have a separate monitor for your raspberry pi, then it's better to connect raspberry pi with the monitor and you don’t have to use any SSH client.


Controlling LED using Raspberry Pi Webserver

Step 1: Connections

Raspberry Pi LED Connection Circuit

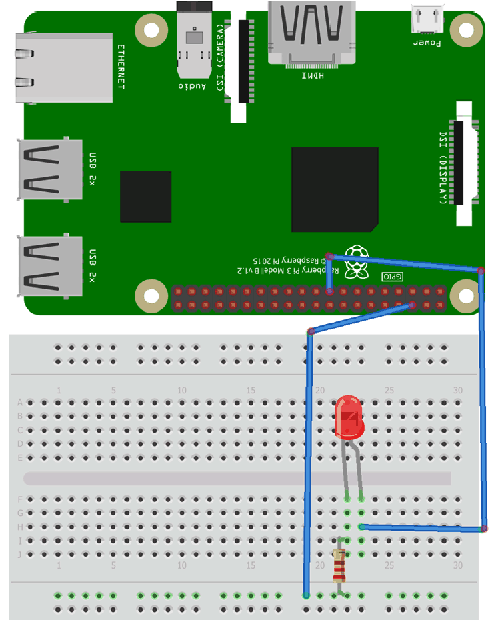
The connections in this project are quite simple - the positive pin of LED is connected to GPIO 27 pin and the negative pin to a 270 ohm resistor, the other side of which is connected to GND pin.


Step 2: Installing WiringPi Library

WiringPi is a PIN-based GPIO access library written in C for the BCM2835, BCM2836, and BCM2837 SoC devices used in all Raspberry Pi versions. It’s released under the GNU LGPLv3 license and is usable from C, C++, and RTB (BASIC) as well as many other languages with suitable wrappers.

1. First we will update our Pi with the latest versions of Raspbian using the command:

sudo apt-get update


2. Now we will install git by using this command:

sudo apt-get install git-core


3. Now obtain WiringPi using git by this command:

git clone git://git.drogon.net/wiringPi


4. Then install WiringPi library using:

cd wiringP./build


Step 3: Installing a Web Server

Apache is a very popular webserver, designed to create web servers that have the ability to host one or more HTTP-based websites. Apache Web Server can be enhanced by manipulating the code base or adding multiple extensions/add-ons. In our project, we are using an HTTP server and its PHP extension.

To Install Apache web server, we will use the following commands:

First, update the available packages:

sudo apt-get update


Now, install the apache2 package by using this command in the terminal:

sudo apt-get install apache2 -y


To test the web server whether it is working or not, go to your browser and type the Pi’s IP address in the tab.

To find the Pi's IP address, type ifconfig at the command line.

By default, Apache puts a test HTML file in the web folder. This default web page is served when you browse to http://192.168.1.31 (whatever the Pi's IP address is) from another computer on the network.

Browse to the default web page either on the Pi or from another computer on the network and you will see the following:

Apache2 Webserver

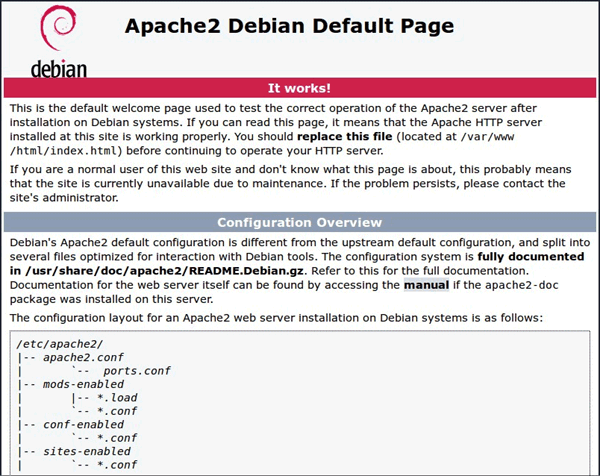
This means the Apache web server is working.


Now we will see how to change the default web page with your own HTML page

This default web page is just an HTML file on the filesystem. It is located at var/www/html/index.html.

Navigate to this directory in a terminal window and have a look at what's inside:

cd  var/www/html
ls -al
This will show you:
total 12
drwxr-xr-x  2 root root 4096 Jan  8 01:29 .
drwxr-xr-x 12 root root 4096 Jan  8 01:28 ..
-rw-r--r--  1 root root  177 Jan  8 01:29 index.html


This shows that by default there is one file in /var/www/html/ called index.html and it is owned by the root user. To edit the file, you need to change its ownership to your own username. Change the owner of the file using:

Sudo chown pi: index.html.


You can now try editing this file and then refresh the browser to see the web page change.


Install PHP in Raspberry Pi  

Now if we want to use PHP code along with HTML, then we have to further install the PHP extension in Raspberry pi. Using PHP code, we can create shell commands to control the LED from the PHP script.

To allow the Apache server to edit PHP files, we will install the latest version of PHP and the PHP module for Apache. Use the following command in terminal to install these:

sudo apt-get install php libapache2-mod-php -y


Now remove the default index.html file:

sudo rm index.html


And create your own index.php file:

sudo nano index.php


Now enter the below code in index.php to test the PHP installation.

<?php phpinfo(); ?>


Save it by pressing CTRL + X and the ‘y’ and enter. Now refresh the webpage in your browser, you will see a long page with lots of information about PHP. This shows that the PHP extension is installed properly. If you have any problem with the pages or if the pages do not appear, try reinstalling the apache server and its PHP extension.


Step 5: Start Coding for controlling GPIO pin using this Raspberry Pi Webserver

Now delete the previous code in index.php (<?php phpinfo(); ?>) file and insert below PHP code to control GPIO pins inside body of HTML code.

Below is the complete code for creating two buttons to turn on and off the LED connected to Raspberry Pi.

<html>
<head>
<meta name="viewport" content="width=device-width" />
<title>Raspberry Pi WiFi Controlled LED</title>
</head>
       <body>
       <center><h1>Control LED using Raspberry Pi Webserver</h1>      
         <form method="get" action="index.php">                
            <input type="submit" style = "font-size: 14 pt" value="OFF" name="off">
            <input type="submit" style = "font-size: 14 pt" value="ON" name="on">
         </form>​​​
                         </center>
<?php
    shell_exec("/usr/local/bin/gpio -g mode 27 out");
    if(isset($_GET['off']))
        {
                        echo "LED is off";
                        shell_exec("/usr/local/bin/gpio -g write 27 0");
        }
            else if(isset($_GET['on']))
            {
                        echo "LED is on";
                        shell_exec("/usr/local/bin/gpio -g write 27 1");
            }
?>
   </body>
</html>

Raspberry Pi Webserver

In the above code there is a PHP script which checks which button is pressed by using below code and then turns on and off the LED accordingly.

<?php
    shell_exec("/usr/local/bin/gpio -g mode 27 out");
    if(isset($_GET['off']))
        {
                        echo "LED is off";
                        shell_exec("/usr/local/bin/gpio -g write 27 0");
        }
            else if(isset($_GET['on']))
            {
                        echo "LED is on";
                        shell_exec("/usr/local/bin/gpio -g write 27 1");
            }
?>


Here we have used shell_exec() command in php code, this command is used to run the shell command from the PHP script. Learn more about shell_exec here. If you run the command inside shell_exec directly form the terminal of Raspberry pi, you can directly make GPIO pin 27 low or high. Below are two commands to test the LED directly from terminal.

/usr/local/bin/gpio -g write 27 0
/usr/local/bin/gpio -g write 27 1


After completing this, run the code in your browser by typing the IP address of raspberry pi in the browser. You will see 2 buttons - ON, OFF to control your LED by clicking these buttons.


I hope you liked this article. You can also check out our other Internet of Things projects.

3422 Comments

Do you mind if I quote a few of your posts as long as I provide credit
and sources back to your blog? My blog site is in the exact same area of interest as yours and my visitors would really
benefit from some of the information you provide here. Please let me
know if this ok with you. Thank you!

Have you ever thought about publishing an e-book or guest authoring on other
blogs? I have a blog based upon on the same topics you discuss and would really like to have you share some stories/information. I know my visitors would appreciate your work.
If you are even remotely interested, feel free to send me an e mail.

When I originally commented I clicked the "Notify me when new comments are added" checkbox and
now each time a comment is added I get several e-mails with the same comment.
Is there any way you can remove me from that service?
Bless you!

I really like your blog.. very nice colors & theme.
Did you make this website yourself or did you hire someone to do it
for you? Plz respond as I'm looking to create my own blog and would like to know where u got this from.
appreciate it

Somebody essentially help to make critically posts I
might state. This is the very first time I frequented your website page and thus far?
I surprised with the research you made to create this actual post
extraordinary. Excellent activity!

I just like the valuable information you supply to your articles.

I will bookmark your weblog and test once more right here regularly.
I am slightly sure I'll learn plenty of new stuff
right here! Best of luck for the following!

I have been exploring for a little bit for any high-quality articles or weblog posts on this
sort of house . Exploring in Yahoo I at last stumbled upon this website.
Reading this information So i'm satisfied to exhibit that I've an incredibly just right
uncanny feeling I discovered exactly what I needed.
I most unquestionably will make sure to do not fail to remember this web site and give it a glance on a continuing basis.

Hey there! I know this is kinda off topic but
I was wondering which blog platform are you using for this site?
I'm getting sick and tired of Wordpress because I've had problems with
hackers and I'm looking at alternatives for another
platform. I would be great if you could point me in the direction of a good platform.

I was recommended this blog via my cousin. I am now not sure whether this publish is written by means of him as
nobody else understand such particular approximately
my difficulty. You are amazing! Thank you!

Howdy would you mind sharing which blog platform you're working with?
I'm going to start my own blog in the near future but I'm having a difficult time choosing between BlogEngine/Wordpress/B2evolution and Drupal.

The reason I ask is because your design and style seems different then most blogs and
I'm looking for something completely unique.
P.S Sorry for being off-topic but I had to ask!

Hi, I think your web site may be having browser compatibility problems.
Whenever I take a look at your site in Safari, it looks fine however, if opening
in Internet Explorer, it's got some overlapping issues.
I just wanted to provide you with a quick heads up! Other than that, fantastic site!

Wonderful goods from you, man. I have understand your stuff previous
to and you're just extremely excellent. I really like what you've acquired here,
really like what you are stating and the way in which you say it.
You make it entertaining and you still take care of to keep it smart.
I cant wait to read much more from you. This is actually a
great website.

Hi there, i read your blog from time to time and i own a
similar one and i was just wondering if
you get a lot of spam comments? If so how do you reduce it, any plugin or anything you can advise?
I get so much lately it's driving me insane so
any support is very much appreciated.

I feel that is among the such a lot important information for me.
And i'm happy reading your article. But wanna statement on some
normal issues, The website taste is ideal, the articles is actually great :
D. Good job, cheers

I don't know if it's just me or if everyone else encountering problems with your
blog. It appears like some of the text in your posts are running off the screen. Can somebody else please comment and let
me know if this is happening to them too? This might be a issue with my internet browser because I've had this happen before.

Appreciate it

Hello there, I discovered your site by way of Google at the same time as searching for a comparable matter, your web site came up, it
appears great. I've bookmarked it in my google bookmarks.

Hello there, simply turned into aware of your weblog thru Google,
and located that it's really informative. I'm going to be careful for brussels.
I'll appreciate in the event you continue this in future.

Lots of folks can be benefited from your writing. Cheers!

It's a pity you don't have a donate button! I'd certainly donate to this fantastic
blog! I suppose for now i'll settle for book-marking and adding your RSS feed
to my Google account. I look forward to new updates and will
talk about this site with my Facebook group. Talk soon!

With havin so much content do you ever run into any issues of plagorism or copyright infringement?

My website has a lot of unique content I've either authored myself or outsourced but
it seems a lot of it is popping it up all over the internet without
my agreement. Do you know any ways to help prevent content
from being stolen? I'd certainly appreciate it.

Great blog you have here but I was wondering if you knew
of any user discussion forums that cover the same topics talked
about here? I'd really like to be a part of group where I can get advice from
other experienced individuals that share the same interest.
If you have any suggestions, please let me know.
Thank you!

Write more, thats all I have to say. Literally, it seems as though you
relied on the video to make your point. You obviously know what youre talking about, why waste your intelligence on just
posting videos to your site when you could be
giving us something informative to read?

Hmm it seems like your blog ate my first comment
(it was super long) so I guess I'll just sum it up what I submitted and say, I'm thoroughly enjoying your blog.

I too am an aspiring blog blogger but I'm still new to the whole thing.
Do you have any helpful hints for rookie blog writers? I'd really appreciate it.

Add new comment

The content of this field is kept private and will not be shown publicly.

Plain text

  • No HTML tags allowed.
  • Lines and paragraphs break automatically.
  • Web page addresses and email addresses turn into links automatically.