


Did you ever wish that Google Assistant, Alexa, or Siri could let you have a smart home instead of some smart devices? What if you wake up to fresh coffee, get news played on TV, temperature-regulation done automatically at the time you set the alarm? How about automatically changing the room lighting, turning on some backlight on a monitor or panel, and making it relaxed when you play a movie?
Instead of trying to open different applications and making changes separately, you can do all this and even more with the Home Assistant platform easily. Yes, you read that correctly! Here is a small tutorial on how you can install and setup Home Assistant on Raspberry Pi.
Home Assistant: What is it?
Home Assistant is an open-source operating system for the Smart Home. It operates like IFTTT or Samsung Smart Things but is different in the sense that it's online, open-source, and a completely local alternative to things like HomeBridge and SmartThings. This means that it gives you control of home automation without the cloud. This results in smoother service, reliability, and better protection. Home Assistant also helps you in building complicated Scripts and Automations that blow other Smart Home platforms out of the water. It allows products from hundreds of manufactures and protocols to integrate seamlessly with DIY projects and homemade solutions.
Components Required
Hardware
- Raspberry Pi
- Micro SD Card
- SD Card Reader
Software
- Home Assistant Image
- Balena Etcher
Installing Home Assistant on Raspberry Pi
Step 1: For installing Home Assistant on Raspberry Pi, first, download the appropriate Disk Image for Hass.io for your Raspberry Pi from the Home Assistant page. We will be using the Raspberry Pi 4B for this project.
Step 2: Then download balenaEtcher for flashing image file on Raspberry Pi. Etcher is a free and open-source utility that helps in burning image files such as .iso, .img files, and zipped folders to create live SD cards and USB flash drives.
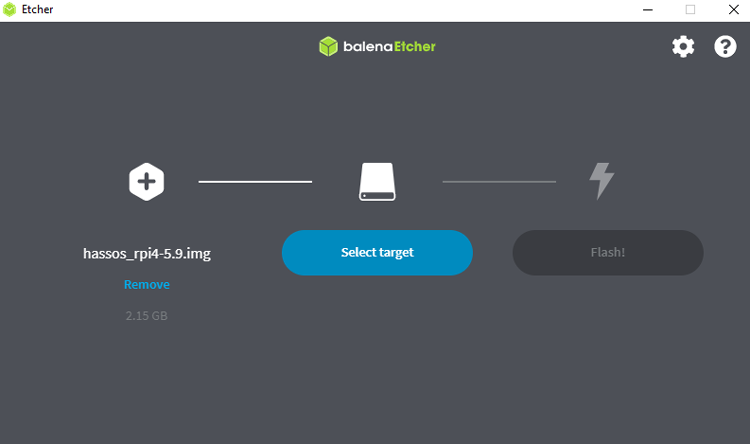
Step 3: Once the installation is done, open the Etcher app. Etcher installs the operating system in three steps, the first step is to select the image. To select an image file, click on Select Image in Etcher and select the hassos image file. Then select the right SD card and click Flash.
The most reliable networking setup for your Raspberry Pi is to connect it using an Ethernet cable; however, if you want to configure Wi-Fi, you can try this.
Navigate to your SD card i.e. hassos boot and create a new folder called ‘CONFIG’. Now, inside the CONFIG folder, create a new folder called ‘network.’ Within the network folder, create a file named ‘my-network’ without a file extension and paste the lines given. Don’t forget to change the Wi-Fi name and password.
[connection]
id=my-network
uuid=72111c67-4a5d-4d5c-925e-f8ee26efb3c3
type=802-11-wireless
[802-11-wireless]
mode=infrastructure
ssid=MY_SSID
# Uncomment below if your SSID is not broadcasted
#hidden=true
[802-11-wireless-security]
auth-alg=open
key-mgmt=wpa-psk
psk=MY_WLAN_SECRET_KEY
[ipv4]
method=auto
[ipv6]
addr-gen-mode=stable-privacy
method=auto
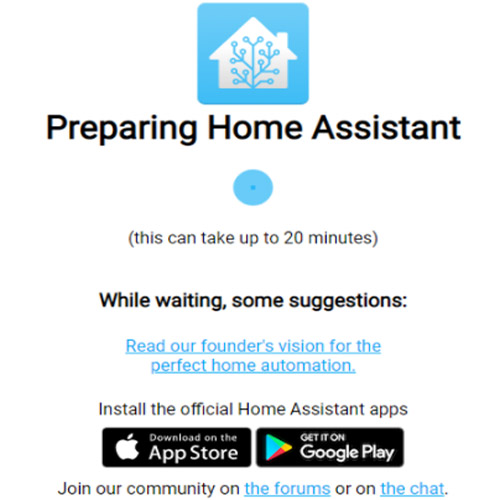
Step 4: Now unmount the SD card, remove it from your card reader and insert it into Raspberry Pi. Connect your power supply to the Raspberry Pi. After a few minutes, you should be able to access Home Assistant from any device on the same local network. To access the home Assistant page, navigate to the browser, and type http://your-pi-ip-address:8123. It can take up to 20 minutes to install all the Home Assistant dependencies.
Once the installation process is done, Raspberry Pi will auto reboot. After this, you will be asked to create a Home Assistant account. Enter a Name, User name, Password, and click on “Create Account”.

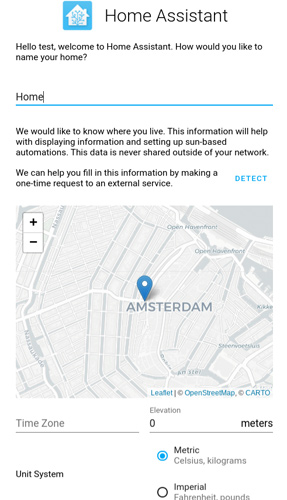
Now on the next screen, you can enter the name for your project, set your location and unit system.
Finally, click on Finish. Now, you’re brought to the Home Assistant Dashboard. This screen will show all of your devices.
Installing Add-On’s
Home Assistant has several add-ons that you can install to get home assistant even better. We are going to install File Editor and SSH add-ons. You can also install other add-ons that you find useful.
Installing File editor
The File editor add-on allows you to browse and modify the files on your Pi. We will be using this add-on to modify the configuration.yaml files.
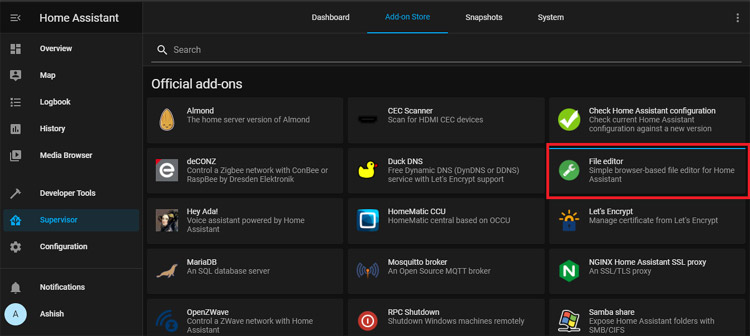
To install this add-on, click on Supervisor, and the go-to Add-on Store and install the File editor add-on.
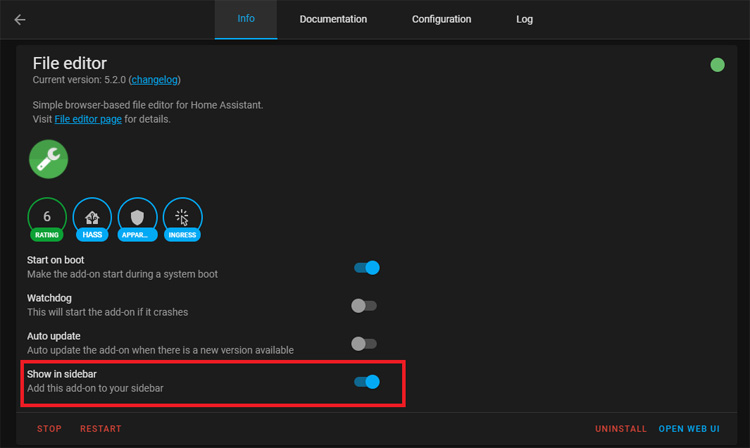
After the add-on has been installed, click start and enable the "Show in Sidebar" option.
Installing the Terminal & SSH add-on
Also, install the Terminal & SSH add-on. This add-on allows you to connect to your Raspberry Pi that is running Home Assistant over SSH. To install this add-on, go to the Supervisor tab, click on the upright corner icon, and search for Terminal & SSH. Click on the Install button and then Start the add-on.

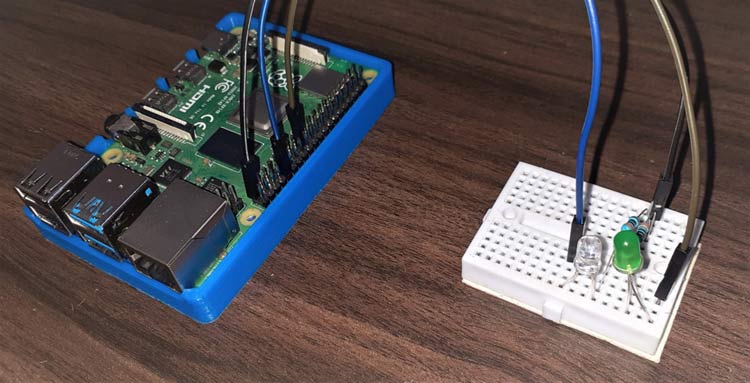
Controlling LED using Home Assistant
Now, we’re going to control an LED connected to Raspberry Pi GPIO through a home assistant to get familiar with adding components and building automation. We’re going to add switches to turn two LEDs on and off. Before we can connect LED, we need to configure the configuration.yaml file.
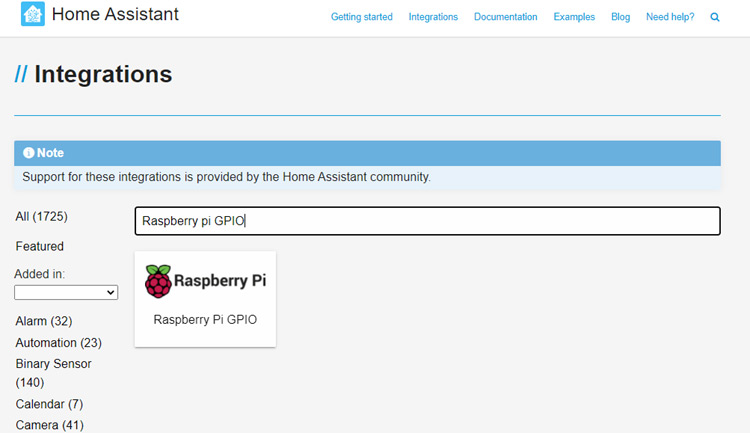
For that, go to https://home-assistant.io/components/ and search for ‘Raspberry Pi GPIO’.
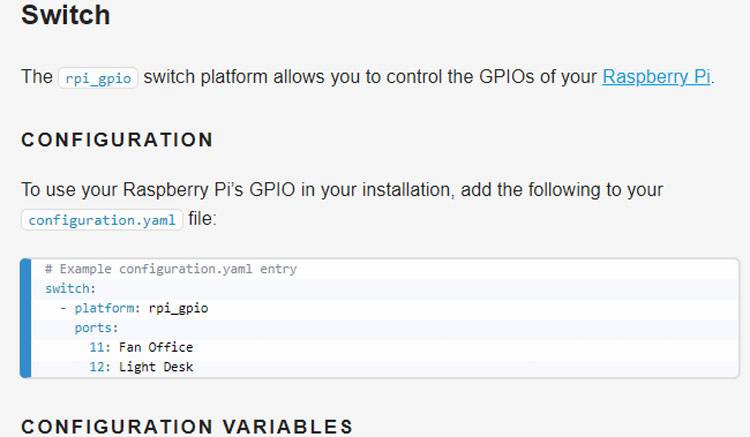
Now, on the Raspberry Pi GPIO page, copy the configuration code.
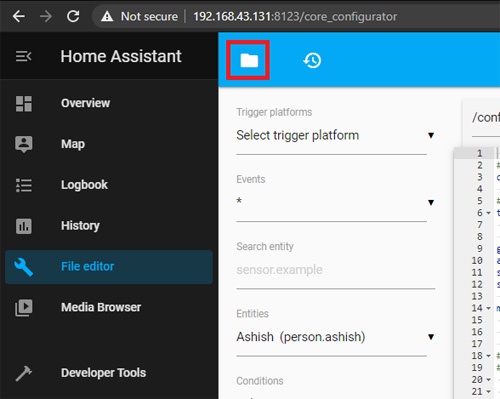
Now, go to the File editor tab and click on the folder icon to browse the file system.
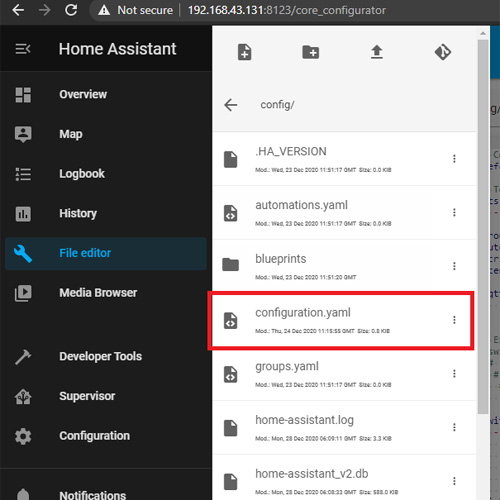
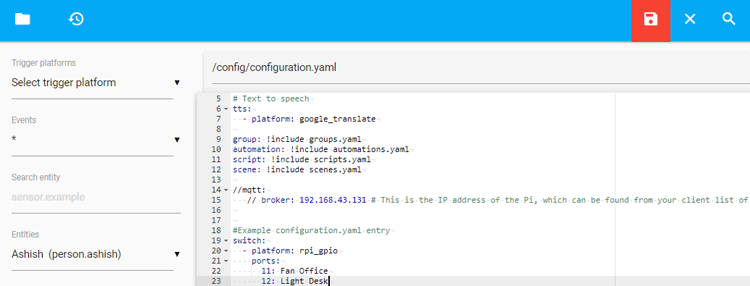
Navigate to the configuration file located at /config/configuration.yaml and paste the code that you copied from the GPIO page.
Once that's done, we can save changes by pressing the save icon.
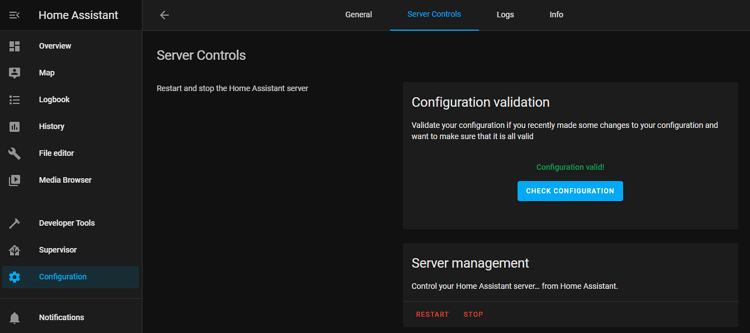
Every time after making a change to any of the files, first check that the configuration is valid, and then restart Home Assistant. To check the configuration, go to the tab Configuration, and select General, and click "CHECK CONFIG". If the syntax is correct, it will display a message "Configuration Valid". If not, it will show you a debug message showing where the error occurred that needs to be fixed. Once the configuration is valid, press "RESTART" under Server Management, and wait a minute for the changes to be applied.
After restarting, go to your Home Assistant User Interface and you should see two new buttons labeled Fan Office and Light Desk.
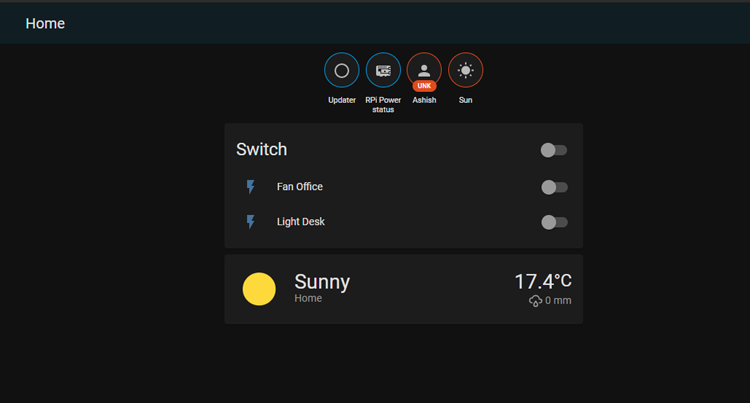
Now, connect two LEDs to GPIO 11 and GPIO 12 of Raspberry Pi and click on those buttons to turn the LEDs on and off.
This is how you can install and setup Home Assistant on Raspberry Pi. Hope you’ve found this tutorial useful.


