


Microsoft Windows is a prevalent operating system, and now with the increasing popularity of the Internet of Things Microsoft decided to design its operating systems exclusively for IoT. Windows 10 IoT Core is a version of Windows 10 that is designed for smaller devices with or without a display that runs on both ARM and x86/x64 devices. Windows 10 IoT core works only on Raspberry Pi 2 and 3; it doesn’t work on Raspberry Pi’s lower versions.
Here, we are going to demonstrate that how to install Windows 10 IoT core in Raspberry Pi. Earlier, we have explained How to Install Raspbian OS in Raspberry Pi.
Components Required
- Raspberry Pi 2 or 3
- 8GB or larger microSD card
- SD card reader
- HDMI cable
- 5V 2A micro USB power supply
- Mouse and USB keyboard
Difference between Windows 10 and Windows 10 IoT core
Windows 10 is a Microsoft operating system for personal computers, Laptops, and tablets while Windows 10 IoT core is a Microsoft operating system for embedded devices and internet of things devices like Raspberry Pi. Using Windows 10 IoT core, we can do exciting projects using Microsoft Azure, Cortona, and many other tools and IoT platforms. Windows 10 IoT core is specially designed for industry, and it has a very robust structure and proven security.
Installing Windows 10 IoT Core on Raspberry Pi
Start with installing windows 10 IoT core on your Raspberry Pi, for that we need to download Windows 10 IoT core dashboard in laptop. IoT core dashboard is used to flash the Windows 10 IoT core in the SD card.
You can download the setup.exe file for the Dashboard from the below link:
(http://go.microsoft.com/fwlink/?LinkID=708576)
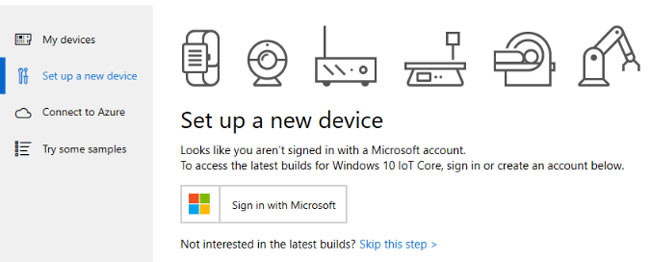
After downloading, install it and run the IoT core dashboard. Now, click on ‘Set up a New Device’. If you don’t have a Microsoft account, then click on ‘Skip this step’.
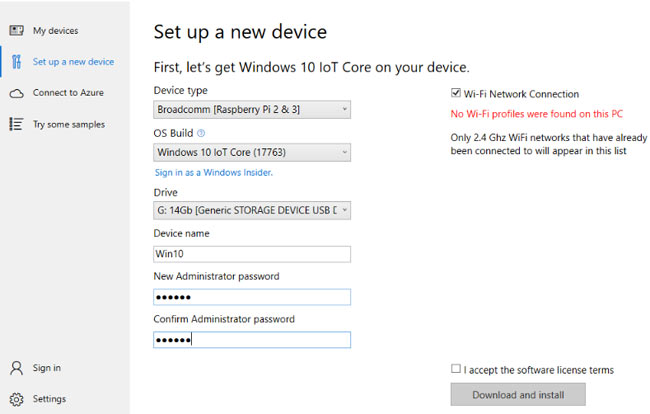
Now format the SD card using SD Card Formatter and plug-in into your laptop. In device setup window choose the Device type as Broadcomm and, OS build as Windows 10 Iot Core. In the drive menu, select your SD card and enter your device name and password.
Now accept the license terms and condition. Then, click on ‘Download and Install’.
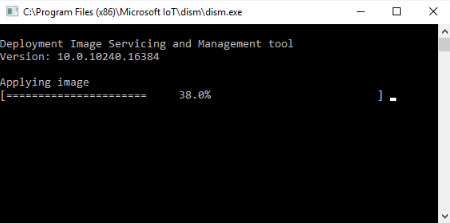
After this, a command window will appear with installation progress.
After flashing the installation, remove the SD card from laptop and plug it into Raspberry Pi. Now, connect the HDMI cable to monitor then connect the keyboard and mouse with Raspberry Pi. At last, connect the power supply to start the Raspberry Pi.
After some time it will ask for language and location setup, same as we install windows in the Laptops.
Hence, after the setup it will take you to the home page.
Therefore, we have successfully installed the Windows 10 IoT core is on Raspberry Pi. Also, check our previous tutorial for installing Raspbian OS in Raspberry Pi.


