


The Internet of Things or IoT refers to the network which is formed with billions of physical devices around the globe that are connected to the internet, all of which are collecting, processing, and sharing data. Thanks to advancements in IoT-based technology that nowadays, it’s possible to turn anything into IoT enabled Application. Though there is much IoT-enabled hardware available in the market, one of the most commonly used ones among professionals and hobbyists is the ESP8266-NodeMCU module or the ESP32 Module.
Speaking of ESP-based modules, one of the common configurations used is the simple ESP based webserver, but there is a problem with this simple ESP-based web server. It runs on Simple HTTP requests and requires you to completely refresh the webpage in order to get any updated data.
So, in this article, we are going to solve this issue by making a webserver with ESP32, which will be running WebSocket communication protocol, which will notify all the clients when changes occur and the webpage will be updated instantaneously. We can use ESP32 WebSocket Server for stable communication between two ESP32.
What is Websocket?
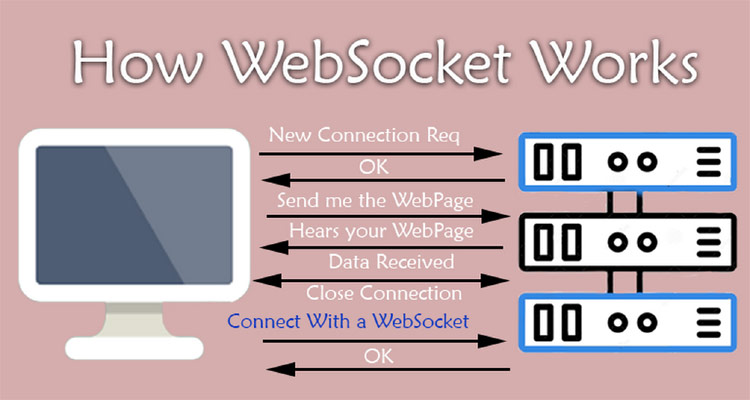
Back in the dark ages of WWW (World Wide Web), anytime you wanted to update anything on a webpage, you had to call the server and make a completely new webpage (even if it was just a dot). It was not like you go in and get a webpage! You had to make a whole new connection to the server, then the server used to respond with OK, after which you used to get connected.
Now, you have to send a request to the server, the server then sends back the data, and when it does, you have to close the connection to update your webpage. This is commonly known as an HTTP request. And this process is super slow. But, back then people used this method to communicate with the server.

Then, Microsoft had the idea of XMLHTTP started in 1999 request, the developers of Outlook Web Access for the Microsoft Exchange server created it. After that, they started shipping the second version of the library with internet explores 5.0. This is how AJAX worked. This is how Gmail was able to list your email and update them as they arrived. This is how Facebook can update your likes and comments without reloading your webpage and much more. Now, once you establish a connection and you have your webpage. You can update any part of it without closing the connection. This was how it was before W3C introduced WebSockets.

With WebSockets, you have to do the basic HTTP request thing again, but when you need to update your webpage, you just need to open a WebSocket port from the server, which takes very little time and makes the process very easy.
Now, we know the basics and we can move on to the actual part where we will make our WebSocket server with esp32.
Component Required to Build the ESP32 WebSocket Server Circuit
The circuit for the Arduino and ESP32 WebSocket Server consists of very basic components that you will be able to find in your local hobby store. When you have accrued all the components, it can be easily built at home without any complexity.
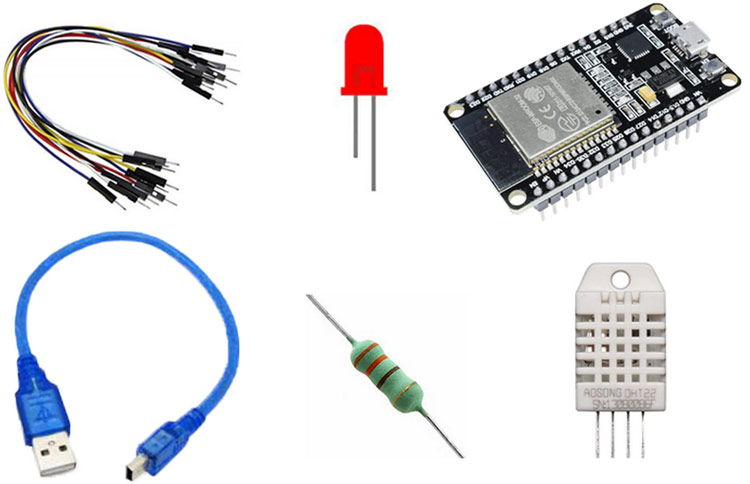
- ESP32-DevKit - 1
- DHT22 - 1
- LED - 1
- 33R Resistor - 1
- BreadBoard - 1
- Jumper Wires - 1
ESP32 WebSocket Server Schematic Diagram
The complete Schematic diagram for the Arduino and ESP32 Based WebSocket Server Test Circuit is shown below.
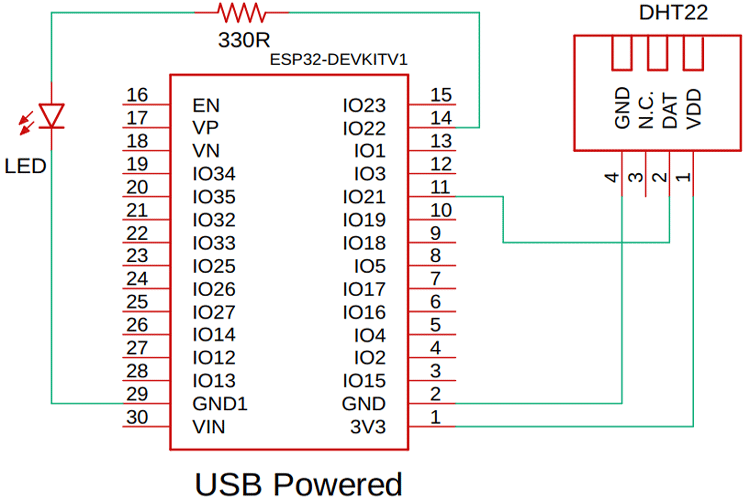
As you can see in the above diagram, the brain of this project is the ESP32 Dev Board. The circuit is as follows. We have connected an LED to pin 22 of the ESP32. We have also connected a DHT22 temperature and humidity sensor with pin 21 of the ESP32. To test the circuit, we will power it from the USB.
How does the ESP32 Based WebServer Work?
The following image shows what happens when the server needs to update the temperature and humidity data.
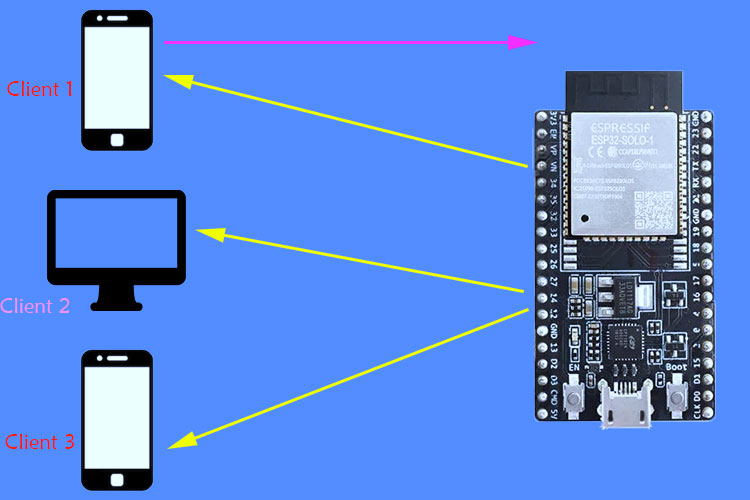
To access this web server, first, you need to type in the IP address of this server. In the webserver, you can see the temperature and humidity data from the DHT sensor and you can also see the toggle button for the LED.
Now, if you open the webpage to other devices, you can see the DHT sensor data updates automatically on your other devices. Now, if you click on the toggle button on any other device, you can observe on the other devices, the changes take place simultaneously. For better understanding, you can watch the video given at the end of the article.
Arduino Based Webserver Code
As this is a web and webserver-based project, the code is divided into two parts. The frontend part and the backend part. The frontend part is a simple HTML page that we will use for testing, and for the backend, we will be using the Arduino IDE for our code.
FrontEnd Code Explanation:
We start our code by <! DOCTYPE html> declaration, which is used to inform the browser that the document is an HTML document. Next, we define all the parameters for the head with <head> </head> tags. Inside the head tag, we give it a title and set the setting for viewpoint and scale. Next, to add some CSS, we add the <style> </style> tags inside the <head> tags.
<!DOCTYPE html>
<html>
<head>
  <title>Arduino and ESP32 Websocket</title>
  <meta name='viewport' content='width=device-width, initial-scale=1.0' />
  <meta charset='UTF-8'>
  <style>
    body {
      background-color: #E6D8D5;
      text-align: center;
    }
  </style>
</head>
Next, inside the <body> <\body> tags, we have created some heading with the help of <h1> </h1>. In these headings, we will show the temperature and humidity data from the DHT22 Sensor, we will also able to see the status of the LED in this section. To turn the LED on and off, we have added two buttons, one is named on and another one is named off.
<body>
  <h1>Temperature: <span id='temp'>-</span></h1>
  <h1>Humidity: <span id='hum'>-</span></h1>
  <h1>Received message: <span id='message'>-</span></h1><button type='button' id='BTN_1'>
    <h1>ON</h1>
  </button><button type='button' id='BTN_2'>
    <h1>OFF</h1>
  </button>
</body>
Next, we have to implement through which all the WebSocket action will happen. We start of our script with the help of the <script> </script> tags. In the script tags, we first declare a variable that will hold the socket object. Next, we add two addEventListener() that will be called when any of the two corresponding buttons are pressed. Next, we declare a function init(). This function will be called when the HTML page is loaded. Inside the function, we have defined the Socket.
As we have declared it as a new object, our socket is now a WebSocket that will be able to connect to our ESP32 server and can get the data. In WebSocket('ws://' + window.location.hostname + ':81/'), you can see, this line asks to connect to a web socket server with the IP address on port 81. With the help of an onmessage event, we create a function. Each time an update is received, the onmessage event occurs. This event will call our function processCommand(). Inside the processCommand() function, we parse the incoming JSON and we put its value in its respective places. The last two functions, button_1_pressed() and button_2_pressed() events occur, and when that happens, 1 or 0 is sent through the WebSocket.
<script>
  var Socket;
  document.getElementById('BTN_1').addEventListener('click', button_1_pressed);
  document.getElementById('BTN_2').addEventListener('click', button_2_pressed);
  function init() {
    Socket = new WebSocket('ws://' + window.location.hostname + ':81/');
    Socket.onmessage = function(event) {
      processCommand(event);
    };
  }
  function processCommand(event) {
    var obj = JSON.parse(event.data);
    document.getElementById('message').innerHTML = obj.PIN_Status;
    document.getElementById('temp').innerHTML = obj.Temp;
    document.getElementById('hum').innerHTML = obj.Hum;
    console.log(obj.PIN_Status);
    console.log(obj.Temp);
    console.log(obj.Hum);
  }
  function button_1_pressed() {
    Socket.send('1');
  }
  function button_2_pressed() {
    Socket.send('0');
  }
  window.onload = function(event) {
    init();
  }
</script>
</html>
That marks the end of the front-end code. Now, we can move on and understand the code in Arduino IDE.
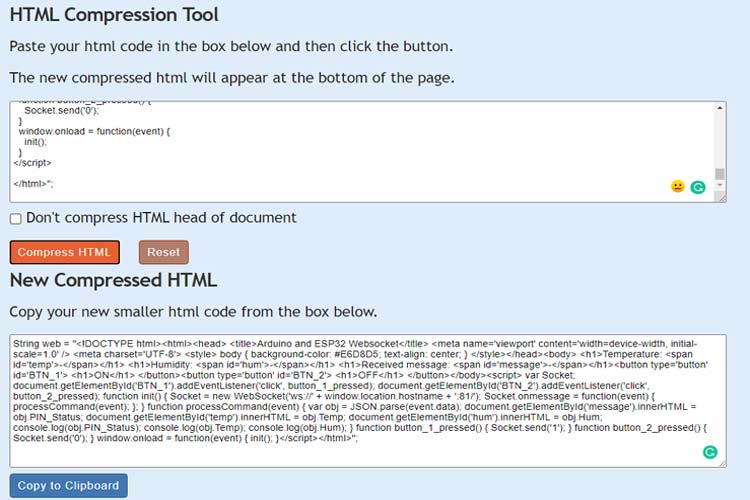
But before moving to the Arduino side of things, we need to convert the whole webpage to a string, because, in the Arduino IDE, we will be saving and uploading it as a string. For that, go to textfixer and compress the HTML. This will make it a string. The image below will give you a better idea of the process.
Arduino Code Explanation:
To compile the code in Arduino IDE, first, you need to download some WebSocket libraries with the help of the board manager method or you can use the links given below.
Once all the libraries are installed, we need to include them in our Arduino code.
#include <WiFi.h> // Include WIFi Library for ESP32
#include <WebServer.h> // Include WebSwever Library for ESP32
#include <ArduinoJson.h> // Include ArduinoJson Library
#include "DHT.h" // Include DHT Library
#include <WebSocketsServer.h>  // Include Websocket Library
Next, we define the type of DHT sensor and the pin we are using to connect to it.
#define DHTPIN 21 // DHT PIn
#define DHTTYPE DHT22 // DHT Type
Next, we define the SSID and Password for our network.
const char* ssid = "YourSSID";  // Your SSID
const char* password = "YourPASS"; // Your Password
We will be using the mills() function to update the temperature data in a certain period, so we need to declare some variables.
int interval = 1000; // virtual delay
unsigned long previousMillis = 0; // Tracks the time since last event fired
Next, we declare a String type Variable web in which we will store the whole webpage. The content of this string type variable is what you will be seeing on the webpage.
String web = "<!DOCTYPE html><html><head> <title>Websocket</title> <meta name='viewport' content='width=device-width, initial-scale=1.0' /> <meta charset='UTF-8'> <style> body { background-color: #F7F9FD; text-align: center; } </style></head><body> <h1>Temperature: <span id='temp'>-</span></h1> <h1>Humidity: <span id='hum'>-</span></h1> <h1>Received message: <span id='message'>-</span></h1><button type='button' id='btnA'> <h1>ON</h1> </button><button type='button' id='btnB'> <h1>OFF</h1> </button></body><script> var Socket; document.getElementById('btnA').addEventListener('click', buttonApressed); document.getElementById('btnB').addEventListener('click', buttonBpressed); function init() { Socket = new WebSocket('ws://' + window.location.hostname + ':81/'); Socket.onmessage = function(event) { processReceivedCommand(event); }; } function processReceivedCommand(event) { var obj = JSON.parse(event.data); document.getElementById('message').innerHTML = obj.PIN_Status;
Next, we again declare some String type variables to store some valuable data.
String jsonString; // Temporary storage for the JSON String
String pin_status = ""; // Holds the status of the pin
float t; // holds the temperature value
float h;// holds the Humidity value
Next, we create instances for our DHT sensor, webserver, and WebSocket server.
DHT dht(DHTPIN, DHTTYPE); // create instance for DHT sensor
WebServer server(80);  // create instance for web server on port "80"
WebSocketsServer webSocket = WebSocketsServer(81);  //create instance for webSocket server on port"81"
Next, we have our setup() section. In the setup section, we have defined all the necessary input and output pins. We initialize the serial. Next, we connect to the Wi-Fi and print the IP address on the serial monitor window. Once done, we initialize the webserver and WebSocket server, and finally, we initialize the DHT sensor. This marks the end of our setup process.
void setup() {
  // put your setup code here, to run once:
  pinMode(22, OUTPUT); // Set PIN22 As output(LED Pin)
  Serial.begin(115200); // Init Serial for Debugging.
  WiFi.begin(ssid, password); // Connect to Wifi
  while (WiFi.status() != WL_CONNECTED) { // Check if wifi is connected or not
    delay(500);
    Serial.print(".");
  }
  Serial.println();
  // Print the IP address in the serial monitor windows.
  Serial.print("IP address: ");
  Serial.println(WiFi.localIP());
  // Initialize a web server on the default IP address. and send the webpage as a response.
  server.on("/", []() {
    server.send(200, "text\html", web);
  });
  server.begin(); // init the server
  webSocket.begin();  // init the Websocketserver
  webSocket.onEvent(webSocketEvent);  // init the webSocketEvent function when a websocket event occurs
  dht.begin(); // Init DHT sensor
}
In the loop section, we call upon the webserver Handle client method to handle all the webserver clients, and we also call the WebSocket server loop method to handle all the WebSocket clients. Next, we call the millis function to update the temperature and humidity data.
void loop() {
  server.handleClient();  // webserver methode that handles all Client
  webSocket.loop(); // websocket server methode that handles all Client
  unsigned long currentMillis = millis(); // call millis  and Get snapshot of time
  if ((unsigned long)(currentMillis - previousMillis) >= interval) { // How much time has passed, accounting for rollover with subtraction!
    update_temp_hum(); // update temperature data.
    update_webpage(); // Update Humidity Data
    previousMillis = currentMillis;   // Use the snapshot to set track time until next event
  }
Next we have the webSocketEvent() function. This function is called when a WebSocket event occurs. In this section, we check the status and print out the number of connected clients. Next, we check if a client is connected via WebSocket or not. If so, we update the status on the webpage. Next, we check if the webserver has sent us any data as a response. If so, we process it, and depending upon the status; we turn the attached LED on or off.
// This function gets a call when a WebSocket event occurs
void webSocketEvent(byte num, WStype_t type, uint8_t * payload, size_t length) {
  switch (type) {
    case WStype_DISCONNECTED: // enum that read status this is used for debugging.
      Serial.print("WS Type ");
      Serial.print(type);
      Serial.println(": DISCONNECTED");
      break;
    case WStype_CONNECTED:  // Check if a WebSocket client is connected or not
      Serial.print("WS Type ");
      Serial.print(type);
      Serial.println(": CONNECTED");
      if (digitalRead(22) == HIGH) {  //check if pin 22 is high or low
        pin_status = "ON";
        update_webpage(); // update the webpage accordingly
      }
      else {
        pin_status = "OFF"; //check if pin 22 is high or low
        update_webpage();// update the webpage accordingly
      }
      break;
    case WStype_TEXT: // check responce from client
      Serial.println(); // the payload variable stores teh status internally
      Serial.println(payload[0]);
      if (payload[0] == '1') {
        pin_status = "ON";
        digitalWrite(22, HIGH);
      }
      if (payload[0] == '0') {
        pin_status = "OFF";
        digitalWrite(22, LOW);
      }
      break;
  }
}
The function update_temp_hum() is to update the temperature and humidity data.
void update_temp_hum(){
  h = dht.readHumidity(); // Read temperature as Celsius (the default)
  t = dht.readTemperature(); // Read temperature as Fahrenheit (isFahrenheit = true
}
Next, we have our update_webpage() function. In this function, we update the webpage with all the values. Inside this function, we have created a JSON object and we print the information inside this object just to debug. Next, we broadcast the data inside the JSON object with the help of webSocket.broadcasrTXT(jsonString); function.
void update_webpage()
{
  StaticJsonDocument<100> doc;
  // create an object
  JsonObject object = doc.to<JsonObject>();
  object["PIN_Status"] = pin_status ;
  object["Temp"] = t ;
  object["Hum"] = h ;
  serializeJson(doc, jsonString); // serialize the object and save teh result to teh string variable.
  Serial.println( jsonString ); // print the string for debugging.
  webSocket.broadcastTXT(jsonString); // send the JSON object through the websocket
  jsonString = ""; // clear the String.
}
This marks the end of our coding section. For testing and demonstration of ESP32 WebSocket Server, do check out the video at the end of the article. If you liked the article, let me know in the comment section below.
/*
ArduinoWebSockets library:
https://github.com/Links2004/arduinoWebSockets
HTML COmpress tool
https://www.textfixer.com/html/compress-html-compression.php
*/
#include <WiFi.h> // Include WIFi Library for ESP32
#include <WebServer.h> // Include WebSwever Library for ESP32
#include <ArduinoJson.h> // Include ArduinoJson Library
#include "DHT.h" // Include DHT Library
#include <WebSocketsServer.h> // Include Websocket Library
#define DHTPIN 21 // DHT PIn
#define DHTTYPE DHT22 // DHT Type
const char* ssid = "YourSSID"; // Your SSID
const char* password = "YourPASS"; // Your Password
int interval = 1000; // virtual delay
unsigned long previousMillis = 0; // Tracks the time since last event fired
String web = "<!DOCTYPE html><html><head> <title>Websocket</title> <meta name='viewport' content='width=device-width, initial-scale=1.0' /> <meta charset='UTF-8'> <style> body { background-color: #F7F9FD; text-align: center; } </style></head><body> <h1>Temperature: <span id='temp'>-</span></h1> <h1>Humidity: <span id='hum'>-</span></h1> <h1>Received message: <span id='message'>-</span></h1><button type='button' id='btnA'> <h1>ON</h1> </button><button type='button' id='btnB'> <h1>OFF</h1> </button></body><script> var Socket; document.getElementById('btnA').addEventListener('click', buttonApressed); document.getElementById('btnB').addEventListener('click', buttonBpressed); function init() { Socket = new WebSocket('ws://' + window.location.hostname + ':81/'); Socket.onmessage = function(event) { processReceivedCommand(event); }; } function processReceivedCommand(event) { var obj = JSON.parse(event.data); document.getElementById('message').innerHTML = obj.PIN_Status; document.getElementById('temp').innerHTML = obj.Temp; document.getElementById('hum').innerHTML = obj.Hum; console.log(obj.PIN_Status); console.log(obj.Temp); console.log(obj.Hum); } function buttonApressed() { Socket.send('1'); } function buttonBpressed() { Socket.send('0'); } window.onload = function(event) { init(); }</script></html>


