


ESP series WiFi module becomes very popular among hobbyists and industries for IoT based projects. ESP8266 Wi-Fi transceiver is one of the most used module for IoT based Applications. Here, we are using ESP8266 NodeMCU to connect with ThingSpeak IoT cloud Platform. A NodeMCU have inbuilt Wi-Fi shield so we don’t need to connect an external Wi-Fi shield like we used to do with Arduino. Previously, we have used ESP32 webserver for controlling LED using webpage.
In this project, we are making an IoT based LED control from webpage using ESP8266. Even by doing some small modifications in this same project, we can use this for home automation. For controlling the LED using Webserver we need to create an HTML webpage. The page will have two buttons for turning LED ON and OFF.
Components Required
- ESP8266 NodeMCU
- LED
- 250 ohm Resistor
- Breadboard
- Jumper Wires
Circuit diagram
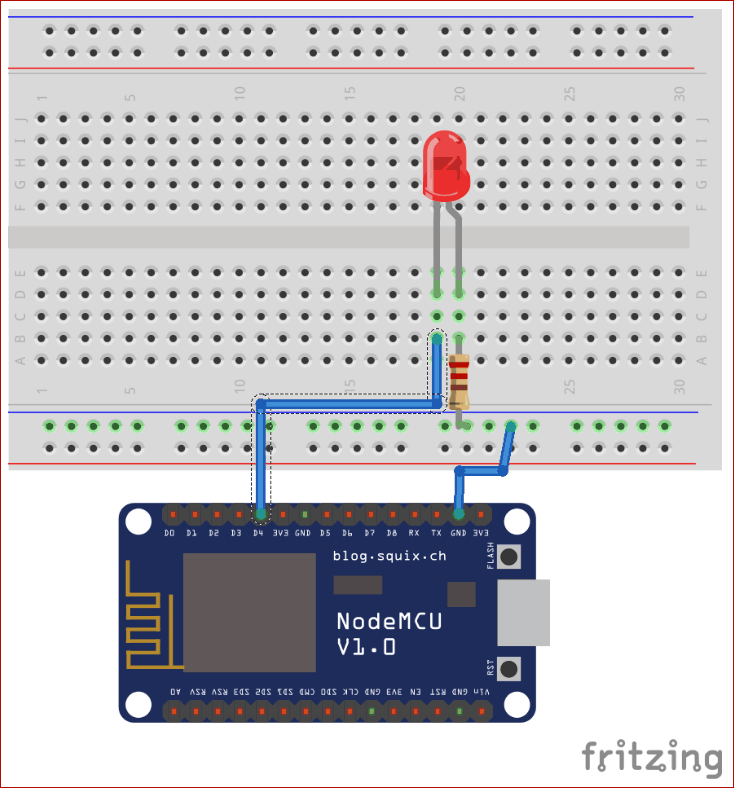
- Connect positive pin of LED to D4 pin of NodeMCU.
- Ground the negative pin of the LED with a resistor.
Program Explanation
Complete code is given at the end of this project. In this section, I will tell you how the code actually works.
The first thing you need to do is include the ESP8266 WiFi library.
#include <ESP8266WiFi.h>
Now enter your network credentials i.e. SSID and password of your WiFi Network inside the double inverted comma:
const char* ssid = "Wi-Fi Name";
const char* password = "Password";
Here, in the below code we are initializing the Led pin:
int LED = 2;
In void setup() function, we will initialize the baud rate, LED output, and will connect the module with the Wi-Fi using WiFi.begin(ssid,password); function. This function begins the Wi-Fi connection, wait for a successful connection and print the ESP IP address in the serial monitor.
void setup()
{
  Serial.begin(115200); //Default Baudrate
  pinMode(LED, OUTPUT);
  digitalWrite(LED, LOW);

  Serial.print("Connecting to the Newtork");
  WiFi.begin(ssid, password);
If we connected with the Wi-FI successfully, the serial monitor will display “Wi-Fi Connected” and “web server starts”, otherwise it will display “dots” on Serial Monitor.
 while (WiFi.status() != WL_CONNECTED)
  {
    delay(500);
    Serial.print(".");
  }

  Serial.println("WiFi connected");
  server.begin();  // Starts the Server
  Serial.println("Server started");
It will print the IP address of Esp8266 and webpage URL:
Serial.print("IP Address of network: ");
  Serial.println(WiFi.localIP());
  Serial.print("Copy and paste the following URL: https://");
  Serial.print(WiFi.localIP());
  Serial.println("/");
}
In loop() function you will have to program what happens when a new client establishes a connection with the web server. The ESP8266 is always listening to the incoming clients using server.available(); and store the incoming data to a string variable and print the data on the serial monitor.
void loop()
{
  WiFiClient client = server.available();
  if (!client)
  {
    return;
  }
  Serial.println("Waiting for new client");

  while(!client.available())
  {
    delay(1);
  }

  String request = client.readStringUntil('\r');
  Serial.println(request);
  client.flush();
LED is initialize as low means LED will be in off condition in the starting of the program.
 int value = LOW;
  if(request.indexOf("/LED=ON") != -1)
  {
    digitalWrite(LED, HIGH); // Turn LED ON
    value = HIGH;
  }
  if(request.indexOf("/LED=OFF") != -1)
  {
    digitalWrite(LED, LOW); // Turn LED OFF
    value = LOW;
HTML code for ESP8266 Webserver
Creating the web page in HTML which is most important for this project, The ESP8266 will send a response to your browser with some HTML code to build the web page. – Here we have embedded the complete HTML code in Arduino code using client.println. The complete code is given at the end.
The HTML code to create two buttons ‘ON’ and ‘OFF’ on the webpage, is mentioned below:
client.println("HTTP/1.1 200 OK"); //
  client.println("Content-Type: text/html");
  client.println("");
  client.println("<!DOCTYPE HTML>");
  client.println("<html>");
  client.print(" CONTROL LED: ");

  if(value == HIGH)
  {
    client.print("ON");
  }
  else
  {
    client.print("OFF");
  }
  client.println("<br><br>");
  client.println("<a href=\"/LED=ON\"\"><button>ON</button></a>");
  client.println("<a href=\"/LED=OFF\"\"><button>OFF</button></a><br />");
  client.println("</html>");

  delay(1);
  Serial.println("Client disonnected");
  Serial.println("");
}
Program your ESP8266 NodeMCU with Arduino IDE
Now you are in a stage to upload the code in your ESP32 and perform the project, for this following steps should be performed:
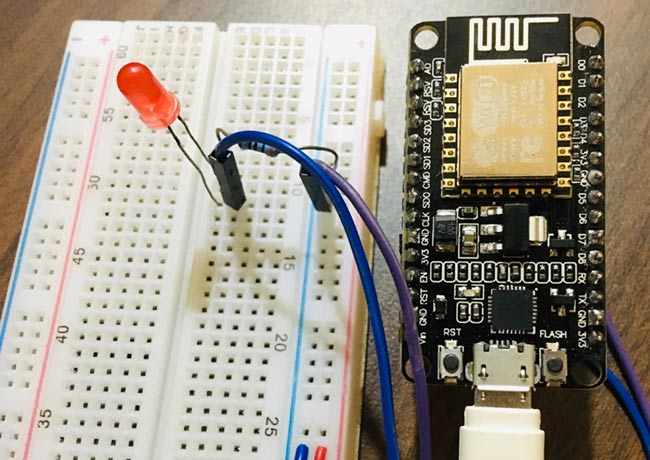
- Connect your ESP8266 to your PC via USB cable and make circuit as given above.
- Open your Arduino IDE and copy this code to your IDE window but make sure that you provide correct WiFi credentials of your network.
- Now go to Tools--> Board--> NodeMCU module.
- Now go to Tools-->Port and select port to which yourNodeCU is connected.
- Now click on upload to upload the code.
If your program run successfully your serial monitor will look like this:
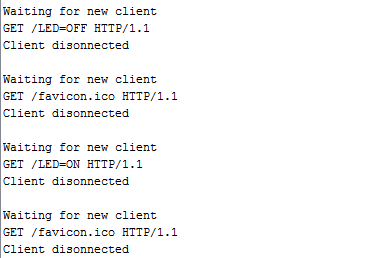
Now open your serial monitor and press reset button of your ESP8266 and now your ESP starts connecting to your network, once connected it will give you IP of this ESP.
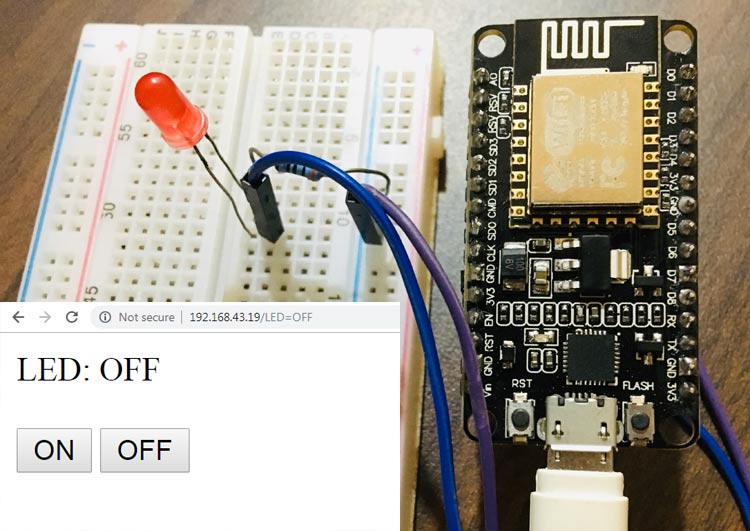
Then open the browser and copy the IP address from serial monitor and you will find the following webpage.
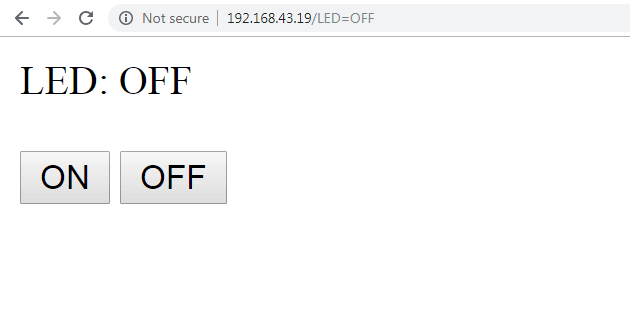
From this webpage, you can control your LED and you can see on serial monitor as well what happening on the background.
This is how you are successfully able to create a webserver and control LED from the webpage. Like this, you can also control Home appliances from anywhere in the world using ESP8266 webserver. Also, check our previous article for creating webserver using ESP32.
#include <ESP8266WiFi.h>
const char* ssid = "Wi-Fi Name"; // Your Wi-Fi Name
const char* password = "Password"; // Wi-Fi Password
int LED = 2; // led connected to GPIO2 (D4)
WiFiServer server(80);
void setup()
{
Serial.begin(115200); //Default Baudrate
pinMode(LED, OUTPUT);
digitalWrite(LED, LOW);
Serial.print("Connecting to the Newtork");
WiFi.begin(ssid, password);
while (WiFi.status() != WL_CONNECTED)
{
delay(500);
Serial.print(".");
}
Serial.println("WiFi connected");
server.begin(); // Starts the Server
Serial.println("Server started");
Serial.print("IP Address of network: "); // will IP address on Serial Monitor
Serial.println(WiFi.localIP());
Serial.print("Copy and paste the following URL: https://"); // Will print IP address in URL format
Serial.print(WiFi.localIP());
Serial.println("/");
}
void loop()
{
WiFiClient client = server.available();
if (!client)
{
return;
}
Serial.println("Waiting for new client");
while(!client.available())
{
delay(1);
}
String request = client.readStringUntil('\r');
Serial.println(request);
client.flush();
int value = LOW;
if(request.indexOf("/LED=ON") != -1)
{
digitalWrite(LED, HIGH); // Turn LED ON
value = HIGH;
}
if(request.indexOf("/LED=OFF") != -1)
{
digitalWrite(LED, LOW); // Turn LED OFF
value = LOW;
}
//*------------------HTML Page Code---------------------*//
client.println("HTTP/1.1 200 OK"); //
client.println("Content-Type: text/html");
client.println("");
client.println("<!DOCTYPE HTML>");
client.println("<html>");
client.print(" CONTROL LED: ");
if(value == HIGH)
{
client.print("ON");
}
else
{
client.print("OFF");
}
client.println("<br><br>");
client.println("<a href=\"/LED=ON\"\"><button>ON</button></a>");
client.println("<a href=\"/LED=OFF\"\"><button>OFF</button></a><br />");
client.println("</html>");
delay(1);
Serial.println("Client disonnected");
Serial.println("");
}


