


Previously we built an IoT based Wi-Fi robot that can be controlled from a local webserver. With a similar approach here we are building a Wi-Fi Garage Door Opener Circuit using NodeMCU and DC Motor which can be controlled using a webpage. This webpage will also display the status of the door whether it is closed or open. NodeMCU ESP12E is very similar to the more popular ESP8266 module, so NodeMCU ESP8266 can also be used for this project. Check more IoT projects on NodeMCU ESP8266 here.
Components Required:
- NodeMCU (ESP-12e)
- L298 motor driver or Relay Module
- DC motor
- Jumper wires.
L298D motor driver module has an inbuilt 5v supply but if you are using L293D IC, then you have to make a 5v power supply circuit using 7805 IC.
Circuit Diagram
Complete circuit diagram for Smart Garage Door Opener is given below:
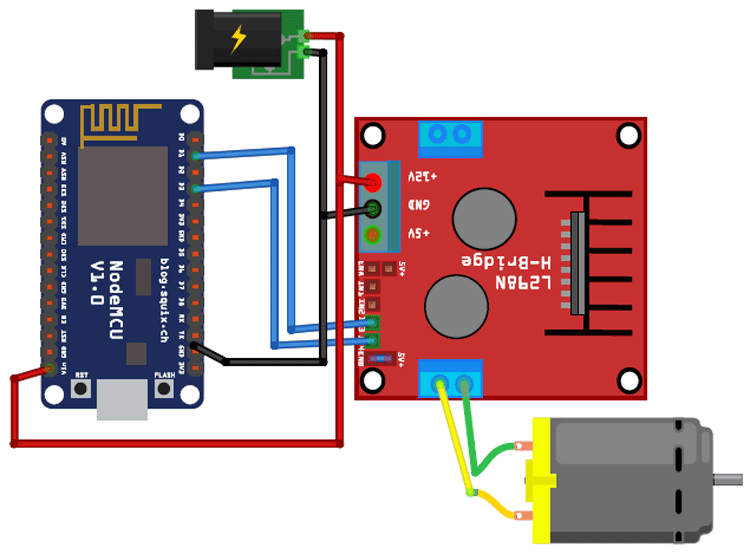
Connections for the circuit are given below:
IN3 pin of L298 -> D1 of NodeMCU
IN4 pin of L298 -> D3 of NodeMCU
Vin of NodeMCU -> 12v battery
12v of L298 module -> 12v battery
To adjust the speed of the motor, use enables pins of a driver module and connect them to the PWM pin of NodeMCU (D2, D5) otherwise connect them to 5v using a jumper.
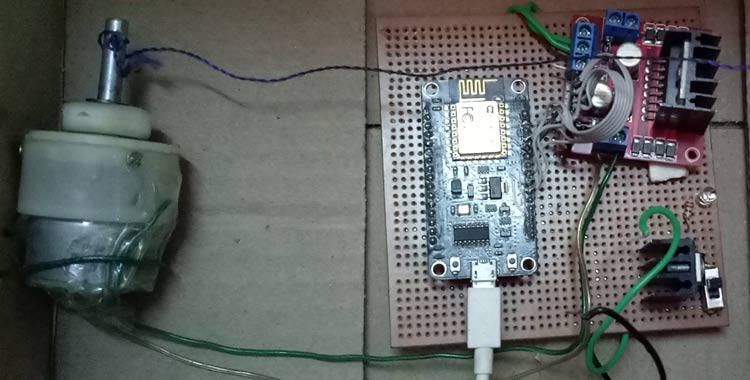
The final setup for Wi-Fi Garage Door Opener will look like this:
Code and Explanation
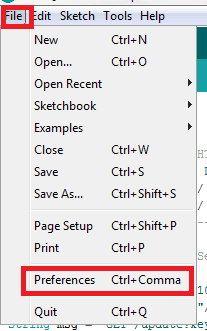
To program NodeMCU with Arduino IDE go to File–>Perferences–>Settings.
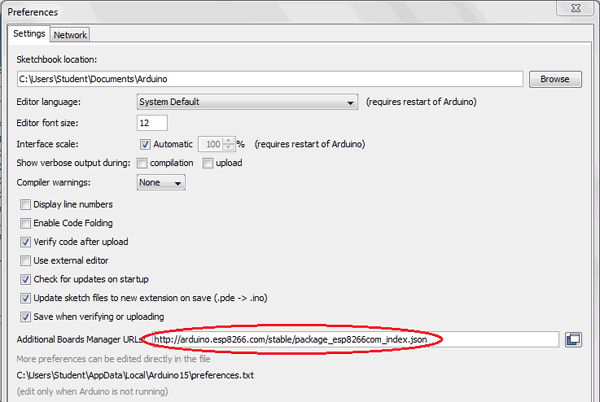
Enter http:// arduino.esp8266.com/stable/package_esp8266com_index.json into ‘Additional Board Manager URL’ field and click ‘Ok’.
Now go to Tools > Board > Boards Manager.
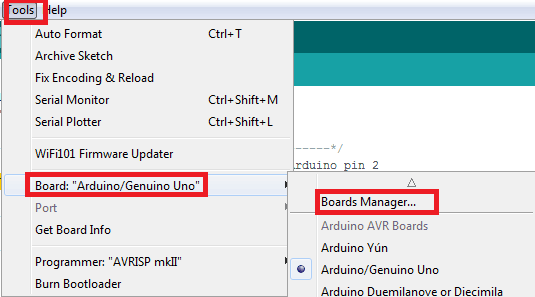
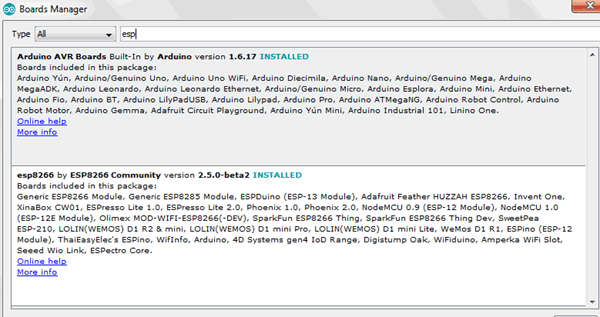
In Boards Manager window, Type esp in the search box, esp8266 will be listed there below. Now select latest version of board and click on install.
After installation is complete, go to Tools >Board >and select NodeMCU 1.0(ESP-12E Module). Now you can program NodeMCU with Arduino IDE.
Complete code is given at the end of this tutorial here we are explaining the code step by step.
1. First, include all the required libraries using #include<>
#include <ESP8266WiFi.h>
2. Set your Wi-Fi credentials and declare all the required pins of NodeMCU for sensor and motor drivers.
const char* ssid = "******";
const char* password = "*****";
int MB1 = D1;
int MB2 = D3;
int ENB = D2;
3. In the void setup function, connect the module with Wi-Fi. Initialize serial communication with 115200 baud rate and check for the given Wi-Fi network and print the IP address.
void setup() {
  Serial.begin(115200);
  ..
  Serial.print("Connecting to ");
  Serial.println(ssid);
  WiFi.begin(ssid, password);
  while (WiFi.status() != WL_CONNECTED) {
    delay(500);
..
}
4. Now, in void loop function, listen for the messages from the client and save the incoming characters in a variable.
void loop(){
  WiFiClient client = server.available();
  if (client) {
    String currentLine = "";
    while (client.connected()) {
      if (client.available()) {
        char c = client.read();
..
5. Next, check which button is pressed and open or close the garage door accordingly by rotating the motor clockwise or anticlockwise.
if (header.indexOf("GET /open") >= 0) {
  door_state = "open";
  analogWrite(ENB,200);
  digitalWrite(MB1,HIGH);
  digitalWrite(MB2,LOW);
  delay(5000);
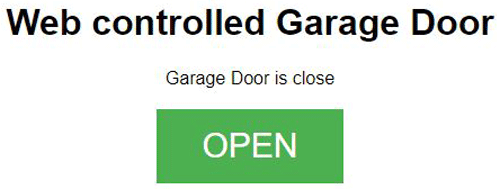
6. Now, we will make an HTML page, which will have 1 button to open and close the garage door. It will also display the status of the door whether it is opened or closed. You can edit the look of the page according to your choice.
client.println("<!DOCTYPE html><html>");
            client.println("<head><meta name=\"viewport\" content=\"width=device-width, initial-scale=1\">");
            client.println("<link rel=\"icon\" href=\"data:,\">");
            client.println("<style>html { font-family: Helvetica; display: inline-block; margin: 0px auto; text-align: center;}");
..
..
Complete code along with a demonstration video is given at the end of this tutorial.
Testing the Wi-Fi Garage Door Opener using NodeMCU
Connect the NodeMCU with the laptop/PC using the USB cable and choose the board from the tools menu and upload the code. Make sure your module and laptop/PC are connected with the same Wi-Fi network.
Now, open the serial monitor. Here you will see the IP address of your NodeMCU. Copy this IP and paste in the address field of the browser. 
After entering the IP address in the browser, the webpage will be loaded on the screen as shown below.
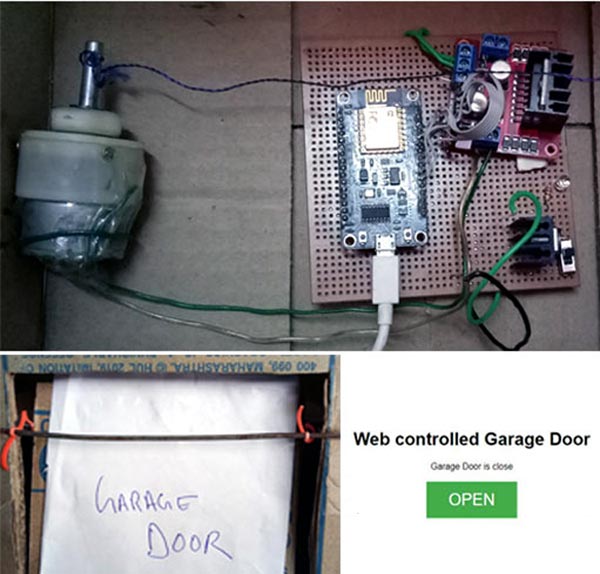
Now, you can control your Smart Garage Door using your web browser from anywhere. You can make the door opening and closing arrangement more attractive and useful, here we have built it just for demonstration purpose. To make the Garage door controlled automatically, you can interface the PIR or IR sensor to detect the presence of a vehicle and open the door automatically.
#include <ESP8266WiFi.h>
const char* ssid = "******";
const char* password = "*****";
WiFiServer server(80);
String header;
String door_state = "close";
int MB1 = D1;
int MB2 = D3;
int ENB = D2;
void setup() {
Serial.begin(115200);
pinMode(MB1, OUTPUT);
pinMode(MB2, OUTPUT);
pinMode(ENB, OUTPUT);
analogWrite(ENB,0);
Serial.print("Connecting to ");
Serial.println(ssid);
WiFi.begin(ssid, password);
while (WiFi.status() != WL_CONNECTED) {
delay(500);
Serial.print(".");
}
Serial.println("IP address: ");
Serial.println(WiFi.localIP());
server.begin();
}
void loop(){
analogWrite(ENB,0);
WiFiClient client = server.available();
if (client) {
String currentLine = "";
while (client.connected()) {
if (client.available()) {
char c = client.read(); // read a byte, then
Serial.write(c); // print it out the serial monitor
header += c;
if (c == '\n') { // if the byte is a newline character
if (currentLine.length() == 0) {
client.println("HTTP/1.1 200 OK");
client.println("Content-type:text/html");
client.println("Connection: close");
client.println();
if (header.indexOf("GET /open") >= 0) {
door_state = "open";
analogWrite(ENB,200);
digitalWrite(MB1,HIGH);
digitalWrite(MB2,LOW);
delay(5000);
} else if (header.indexOf("GET /close") >= 0) {
door_state = "close";
analogWrite(ENB,200);
digitalWrite(MB1,LOW);
digitalWrite(MB2,HIGH);
delay(3000);
}
client.println("<!DOCTYPE html><html>");
client.println("<head><meta name=\"viewport\" content=\"width=device-width, initial-scale=1\">");
client.println("<link rel=\"icon\" href=\"data:,\">");
client.println("<style>html { font-family: Helvetica; display: inline-block; margin: 0px auto; text-align: center;}");
client.println(".button { background-color: #4CAF50; border: none; color: white; padding: 16px 40px;");
client.println("text-decoration: none; font-size: 30px; margin: 2px; cursor: pointer;}");
client.println(".button2 {background-color: #555555;}</style></head>");
client.println("<body><h1>Web controlled Garage Door</h1>"); client.println("<p>Garage Door is " + door_state + "</p>");
if (door_state=="close") {
client.println("<p><a href=\"/open\"><button class=\"button\">OPEN</button></a></p>");
} else {
client.println("<p><a href=\"/close\"><button class=\"button button2\">CLOSE</button></a></p>");
}
client.println("</body></html>");
client.println();
break;
} else {
currentLine = "";
}
} else if (c != '\r') {
currentLine += c;
}
}
}
header = "";
client.stop();
Serial.println("Client disconnected.");
Serial.println("");
}
}


