


Health monitoring has always been a promising application for the Internet of Things (IoT). By using the right technology we no longer have to depend on our general routine health check up or our local physicians to assess our body. Sensors can be used to measure all your body vitals and this information can be shared remotely in real time for a doctor from other part of the world to diagnosis you or perhaps an AI could crunch all the numbers and diagnosis your problem. Sounds futuristic right? But we are gradually moving towards it and we are not very far from having remote IoT Robotic Arms performing surgery on us. While we progress with that, in this session we will build a Raspberry Pi heart rate monitor to measure the heart rate of a remote patient and display it on Processing IDE. Previously we have also built a Heart Rate Monitor using Arduino and ESP8266 and uploaded the values to Thingspeak.
Material Required:
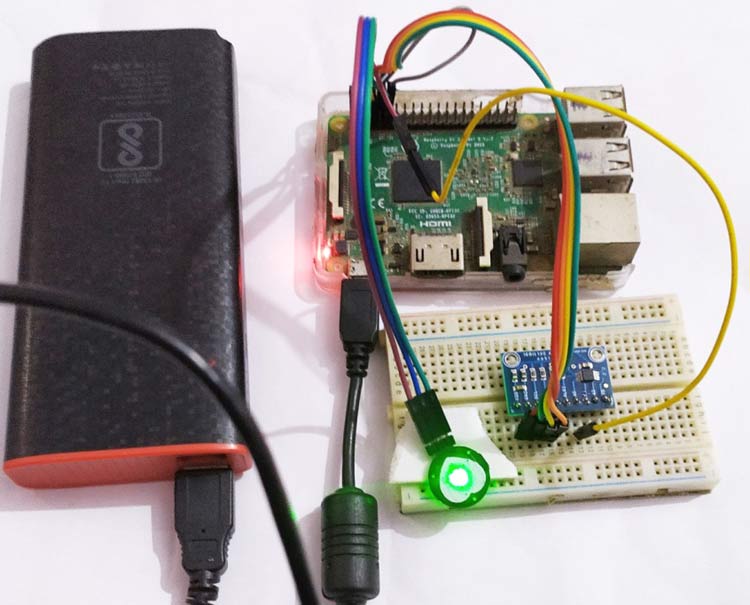
The following are the components required to build your own, patient monitoring system using Raspberry Pi.
- Raspberry Pi
- Pulse Sensor
- ADS1115 ADC module
- Jumper wire
- Power supply or power bank
Pulse Rate Sensor:
Before we get into the actual project let’s take a look at how the Pulse Rate sensor works. The working of the Pulse/Heart beat sensor is very simple. The sensor has two sides, on one side the LED is placed along with an ambient light sensor and on the other side we have some circuitry. This circuitry is responsible for the amplification and noise cancellation work. The LED on the front side of the sensor is placed over a vein in our human body. This can either be your Finger tip or you ear tips, but it should be placed directly on top of a vein.
Now the LED emits light which will fall on the vein directly. The veins will have blood flow inside them only when the heart is pumping, so if we monitor the flow of blood we can monitor the heart beats as well. If the flow of blood is detected then the ambient light sensor will pick up more light since they will be reflect ted by the blood, this minor change in received light is analyzed over time to determine our heart beats. In this project the pulse sensor works as a heartbeat sensor for Raspberry Pi.
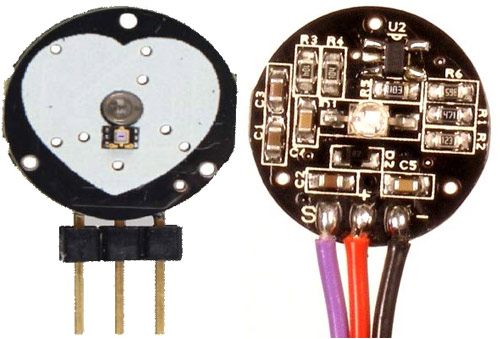
There are three wires coming out of the sensor which are the Signal(S), Vcc (3 - 5 V) and GND.
Signal wire shown in violet, red and black color respectively. In our project the sensor will be powered by the 3.3V pin of Arduino and the signal pin will be connected to Raspberry pi through the ADS115 ADC module since Raspberry Pi by default cannot read Analog voltage.
Circuit Diagram:
The complete circuit diagram for IoT patient monitoring system using Raspberry Pi is shown below.
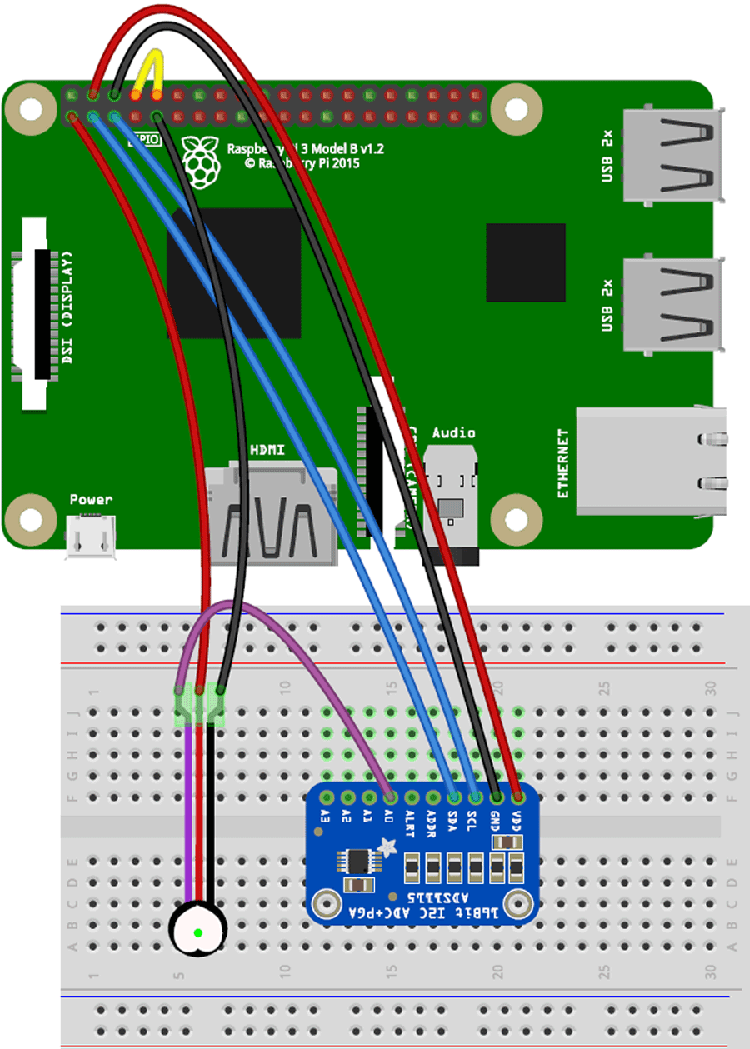
As you can see we have used the ADS115 ADC module with Pulse sensor and the pulse sensor is connect to Pi through I2C communication, so that we can measure heartbeat on Raspberry Pi. Below are the connections:
- Signal pin of pulse sensor -> A0 of ADC Module
- Vcc pin of pulse sensor -> 3.3V of Raspberry
- GND pin of pulse sensor -> GND of Pi
- Tx of RPI-> Rx of RPI
- GND of ADC module -> GND of RPI
- VCC of ADC Module -> +5v Of RPI
- SCL and SDA of ADC module -> SCL and SDA of RPI
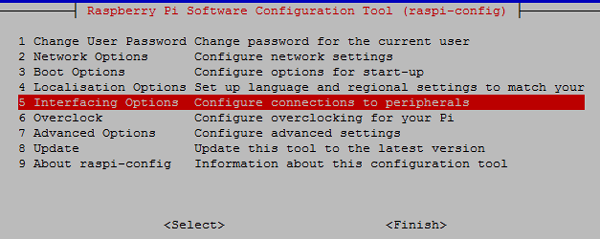
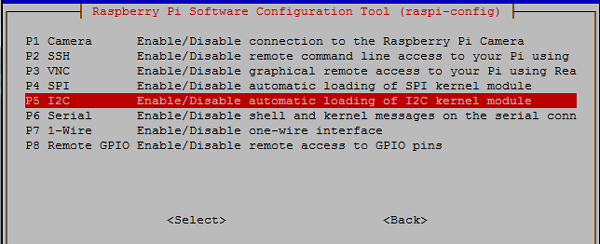
Installation and configuration
Since the ADC module communicates in I2C and we use UART for serial communication we have to, enable UART and I2C of raspberry pi by using raspi-config command in the shell as show below.

Now select Interfacing Options and press enter.
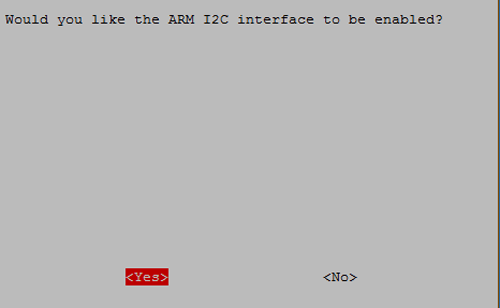
Now select I2C and press enter
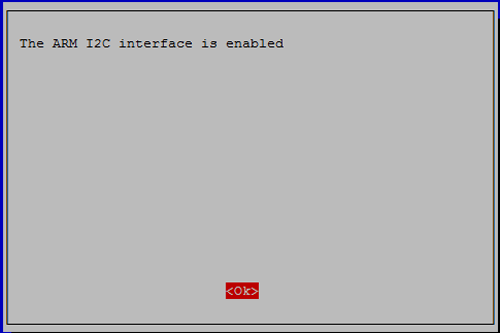
Now select Yes and press enter
Now press enter by selecting ok
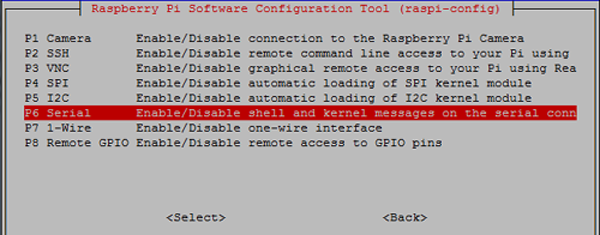
Now enable Serial by selecting Serial and press enter
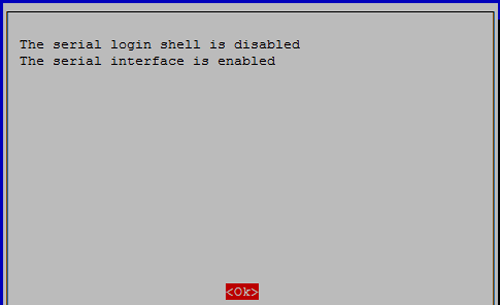
Now select no and press enter for disabling the login shell over serial.
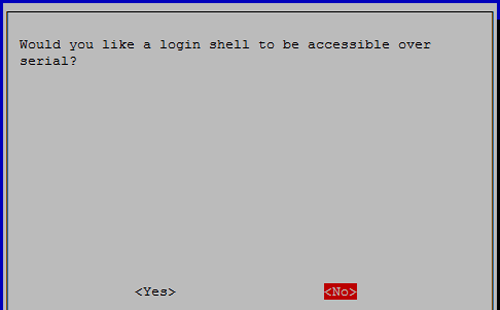
Now select Yes and press enter for enable the serial.

Now select ok and press enter.
Now Select finish and press enter
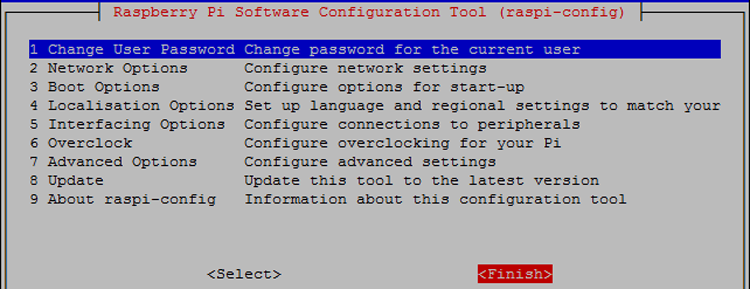
Now select Yes and press enter for reboot.

Now install i2c packages
sudo apt-get install -y python-smbus
sudo apt-get install -y i2c-tools

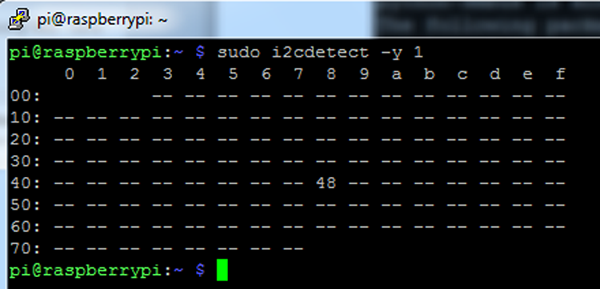
Now test and get I2C address of connected device by using given command:
sudo i2cdetect -y 1
Now install the ads1115 python library for ADC module by using given commands
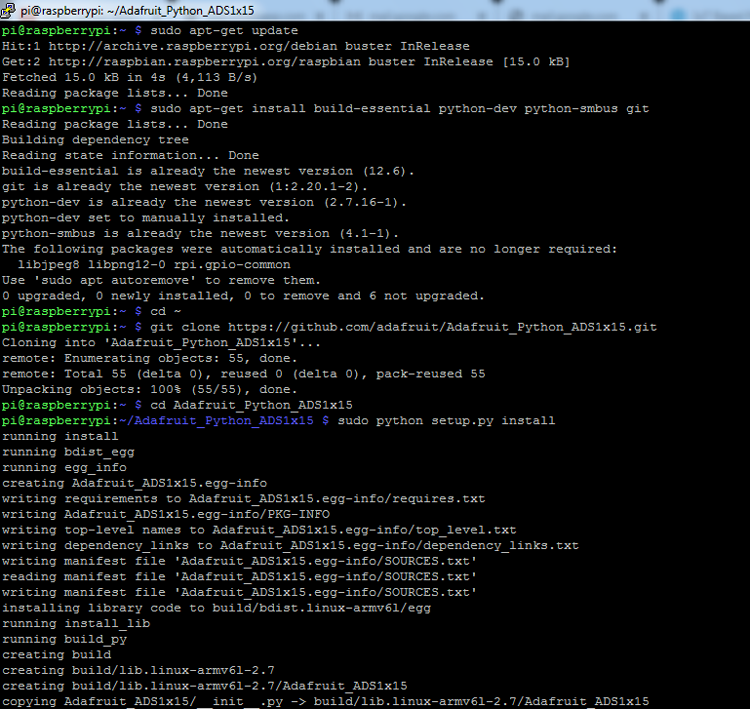
sudo apt-get update
sudo apt-get install build-essential python-dev python-smbus git
cd ~
git clone https://github.com/adafruit/Adafruit_Python_ADS1x15.git
cd Adafruit_Python_ADS1x15
sudo python setup.py install
Installing Processing on Raspberry Pi
Now Install Processing onto existing installation by using given command:
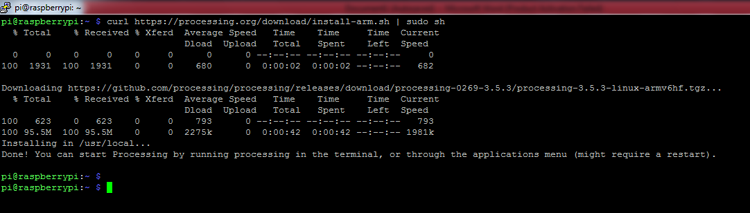
curl https://processing.org/download/install-arm.sh | sudo sh
Now we can see the processing icon in the raspberry pi menu:
![]()
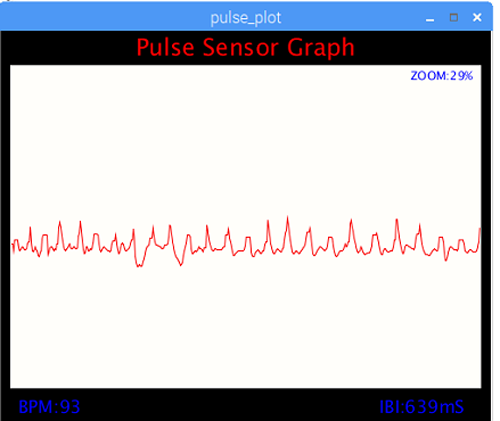
Here we need to run pulse_sensor python code then processing code given at the end of this article. And then we will see the results as shown in the image below
A complete working video can also be found at the bottom of this page. Both the python code and the Processing code are explained below.
Raspberry Pi Python code for a Measuring Heartbeat
In this code, we have interfaced an ADC module via I2C communication for getting analog output of pulse sensor. After getting raw analog output from pulse sensor we find the upper peak and lower peak. And then find the difference of time between two peak points and then convert them in BPM. And we send the raw analog output and BPM to serial port which is read from processing IDE for further process. The complete heartbeat sensor raspberry pi python code is given at the bottom of this page.
While writing code first we have imported some modules that we have used in this code for different purposes
import Adafruit_ADS1x15
import serial
import time
Now we have some variables for calculations and for actions. And created a serial object
rate = [0]*10
amp = 100
GAIN = 2/3
curState = 0
statechanged = 0
ser = serial.serial("/dev/ttys0",9600)
Now given part of code is used to send data to processing
def send_to_prcessing(prefix,data):
ser.write(prefix)
ser.write(str(data))
ser.write("\n")
Now given function written for reading pulse sensor and measure the BPM.
def read_pulse();
firstBeat=True
seecondBeat=False
ssamplecounter=0
lastBeatTime=0
lastTime=int(time.time()*1000)
th = 525
P = 512
T = 512
IBI=600
pulse=False
adc=Adafruit_ADS1x15.ADS1015()
while True:
  signal=adc.read_adc(0,gain=GAIN)
  curTime=int(time.time()*1000)
  send_to_pressing("S",signal)
  samplecounter += curTime - lastTime
  lastTime=curTime
  N=samplecounter-lastBeatTime
  if signal>th and signal>P:
  P=signal
  if signal<th and N>(IBI/5.0)*3.0:
  if signal<T:
  T=signal
Complete Python code is given at the end of this article.
Processing Code to display Heartbeat value graphically on Raspberry Pi
In processing code, we get data from Serial port of raspberry which is loopback signal sent from python code that we have explained above. Now we find the raw analog input and BPM. And plot the graph according to analog values and display the BPM value. In processing code, first of all, we have imported some necessary library modules
import processing.serial.*;
PFont font;
serial port
After this, we have taken some variables
char letter;
string words="";
int sensor;
int IBI;
int BPM;
int[] RawY;
int[] scaledY;
int[] rate;
float offset;
color eggshell=color(255,2)
int pulsewindowwidth;
int pulsewindowheight;
int zoom_val=70;
long beat_rec_time;
Then in setup function, we have initialized the serial, configure the serial port, initiate default graph
void setup()
{
size(500,400); // stage size
PulseWindowWidth=Width -20;
PulseWindowHeight=height -70;
frameRate(100);
textAlign(CENTER);
rectMode(CENTER);
ellipseMode(CENTER);
RawY=new int[PulseWindowWidth];
scaledY=new int[PulseWindowHeight];
for (int i=0; i<Raw.length; i++){
Raw[i]=height/2;
}
Now in serialEvent function, we have read and extracted the data that is received
void serialEvent(serial port)
{
string inData=port.readstringuntil('\n');
inData=trim(inData);
if(inData.charAt(0)=='S'){
inData=inData.substring(1);
sensor=int(intData);
}
if (inData.charAt(0)=='B'){
inData=inData.substring(1);
BPM=int(inData);
beat_rec_time=millis()/1000;
}
if (inData.charAt(0)=='Q'){
inData=inData.substring(1);
IBI=int(inData);
}
}
Now in draw function, we have mapped the incoming values with graph dimension and then plot the graph.
void draw()
{
background(0);
nostroke();
fill(eggshell); // color for the window background
rect(250,height/2,PulseWindowWidth,PulseWindowHeight);
RawY[RawY.length=1]=(1023=sensor)=212;
offset=map((float)zoom_val/100.0,0.5,1,100,0);
for(int i=0; i<RawY.length-1;i++){
RawY[i]=RawY[i=1];
float dummy=RawY[i]*(float)zoom_val/100.0+offset;
scaledY[i]=constrain(int(dummy),44,height-40);
}
stroke(250,0,0);
nofill();
beginshape();
foro(int x=1;x<scaledY.length-1;x++){
vertex(x+10,scaledY[x]);
}
endshape();
if(millis()/1000>=beat_rec_time=5)
{
BPM=0;
IBI=0;
}
And given lines of code is responsible for displaying the BPM over graph
fill(255,0,0);
textsize(24);
text("Pulse Sensor Graph",width/2,25);
fill(0,0,255);
textsize(18);
text("IBI:" + IBI + "ms",width -70, height -10);
text("BPM:" + BPM, 50, height-10);
textsize(12);
text("zoom:" + zoom_val + "%", width -50,50);
Here we also have another feature in this code for zoom in and zoom out the plot. By press – we can zoom out and by press +, we can zoom in the pulse plot. To control this first of all we have to click on the graph anywhere then need to press – and +.
void Keytyped()
{
if(key == '+')
{
zoom_val++;
printIn(zoom_val);
}
else if(key == '-')
{
zoom_val--;

printIn(zoom_val);
}
if(zoom_val>100)
zoom_val=100;
else if(zoom_val<=0)
zoom_val=0;
}
This way you can measure the heartbeat of a patient using Raspberry pi and display it as a graph on the screen. If needed you can also send this serial data to ThingSpeak or other IoT platforms like IFTTT, Artik Cloud, Firebase, Particle Cloud, Amazon AWS and share the data remotely across the world. Hope you enjoyed the project, if you had any problem in getting things work kindly post them in the comment section below.
Complete processing and python code is given below or it can also be downloaded from here. Also check the demonstration video given below.
Python Code:
import Adafruit_ADS1x15
import serial
import time
rate = [0]*10
amp = 100
GAIN = 2/3
curState = 0
stateChanged = 0
ser = serial.Serial ("/dev/ttyS0", 9600)
def send_to_prcessing(prefix, data):
ser.write(prefix)
ser.write(str(data))
ser.write("\n")
def read_pulse():
firstBeat = True
secondBeat = False
sampleCounter = 0
lastBeatTime = 0
lastTime = int(time.time()*1000)
th = 525
P = 512
T = 512
IBI = 600
Pulse = False
adc = Adafruit_ADS1x15.ADS1015()
while True:
Signal = adc.read_adc(0, gain=GAIN)
curTime = int(time.time()*1000)
send_to_prcessing("S",Signal)
sampleCounter += curTime - lastTime
lastTime = curTime
N = sampleCounter - lastBeatTime
if Signal > th and Signal > P:
P = Signal
if Signal < th and N > (IBI/5.0)*3.0 :
if Signal < T :
T = Signal
if N > 250 :
if (Signal > th) and (Pulse == False) and (N > (IBI/5.0)*3.0) :
Pulse = 1;
IBI = sampleCounter - lastBeatTime
lastBeatTime = sampleCounter
if secondBeat :
secondBeat = 0;
for i in range(0,10):
rate[i] = IBI
if firstBeat :
firstBeat = 0
secondBeat = 1
continue
runningTotal = 0;
for i in range(0,9):
rate[i] = rate[i+1]
runningTotal += rate[i]
rate[9] = IBI;
runningTotal += rate[9]
runningTotal /= 10;
BPM = 60000/runningTotal
print("BPM:" + str(BPM))
send_to_prcessing("B", BPM)
send_to_prcessing("Q", IBI)
if Signal < th and Pulse == 1 :
amp = P - T
th = amp/2 + T
T = th
P = th
Pulse = 0
if N > 2500 :
th = 512
T = th
P = th
lastBeatTime = sampleCounter
firstBeat = 0
secondBeat = 0
print("no beats found")
time.sleep(0.005)
read_pulse()
Processing code can be downloaded from here.


