


In previous tutorials we learned about installing operating system in Raspberry Pi, now lets move ahead to the first step in building any IoT project using Raspberry Pi, that is to upload the data to any cloud server using Raspberry Pi. In this simplest Raspberry Pi IOT project, we will use ThingSpeak as cloud server to store the data. Here Raspberry Pi will read its CPU temperature and send it to ThingSpeak, and it can be monitored from anywhere in the world using internet. This will be useful if you are running the Pi for long time for some application at some remote place and need monitor its CPU temperature.
ThingSpeak is an open IoT platform for monitoring your data online. In ThingSpeak channel you can set the data as private or public according to your choice. ThingSpeak takes minimum of 15 seconds to update your readings. Its a great and very easy to use platform for building IOT projects.
There are also some other platforms available for monitoring your data online which we will cover in later articles but there are some advantages of ThingSpeak over other platforms like it is very easy to set up and it also has many options to plot graph.
Components Required
- Raspberry Pi
- Power Cable
- WiFi or Internet
Steps for building Raspberry Pi Data Logger on Cloud
Step 1: Signup for ThingSpeak
For creating your channel on ThingSpeak you first need to sign up on ThingSpeak. In case if you already have account on ThingSpeak just sign in using your id and password.
For creating your account go to www.thinspeak.com
Click on signup if you don’t have account and if you already have account click on sign in.
After clicking on signup fill your details.
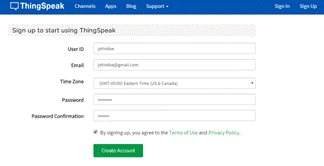
After this verify your E-mail id and click on continue.
Step 2: Create a Channel for Your Data
Once you Sign in after your account verification, Create a new channel by clicking “New Channel” button
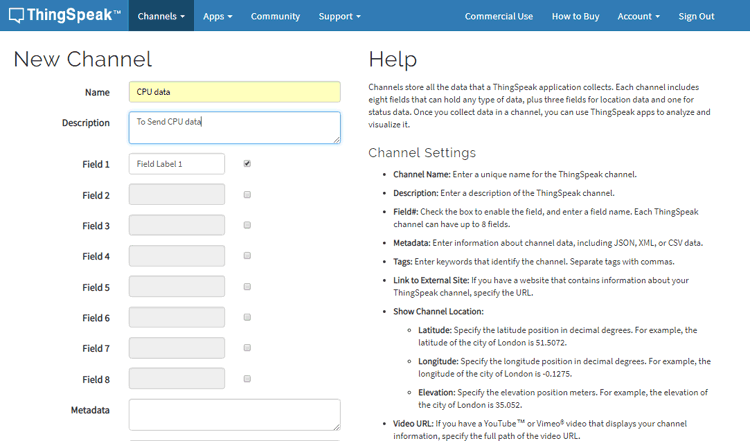
After clicking on “New Channel”, enter the Name and Description of the data you want to upload on this channel. For example I am sending my CPU data (temperature), so I named it as CPU data.
Now enter the name of your data (like Temperature or pressure) in Field1. If you want to use more than one Field you can check the box next to Field option and enter the name and description of your data.
After this click on save channel button to save your details.
Step 3: Getting API Key in ThingSpeak
To send data to ThingSpeak, we need an unique API key, which we will use later in our python code to upload our CPU data to ThingSpeak Website.
Click on “API Keys” button to get your unique API key for uploading your CPU data.
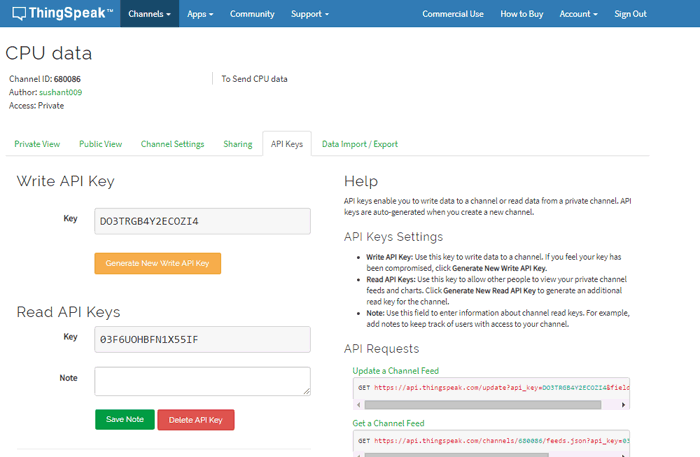
Now copy your “Write API Key”. We will use this API key in our code.
Step 4: Python Code for Raspberry Pi
Complete code is given at the end of this tutorial, just make a file with any name and .py extension and copy-paste the code and save the file. Don’t forget to replace the API key with yours. You can run the python file any time using below command:
python /path/filename.py
Assuming you already installed python in Raspberry pi using this command
sudo apt-get install python
Case 1: If you are using monitor screen then just use the given code.
Now install all libraries:
sudo apt-get install httplib
sudo apt-get install urllib
After installing libraries run your python code (python /path/filename.py)
If the code runs properly you will see some CPU temperature values as shown in below image.
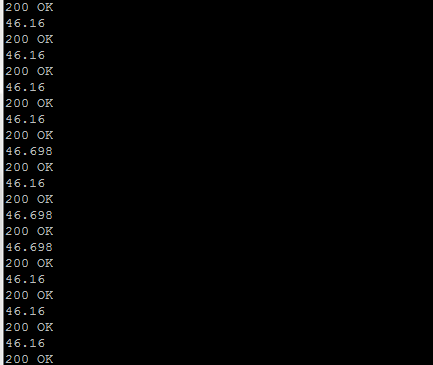
If there are any errors uploading the data, you will receive “connection failed” message.
Case 2: If you are using “Putty” then you should follow these commands:
First update your pi using:
sudo apt-get update
After this make a file cpu.py using:
nano cpu.py
After creating this file copy your code to this file and save it using CTRL + X and then ‘y’ and Enter.
After this install all libraries using:
sudo apt-get install httplib
sudo apt-get install urllib
After installing libraries run your python code using:
python cpu.py
If the code runs properly you will see some CPU temperature values as shown in above image.
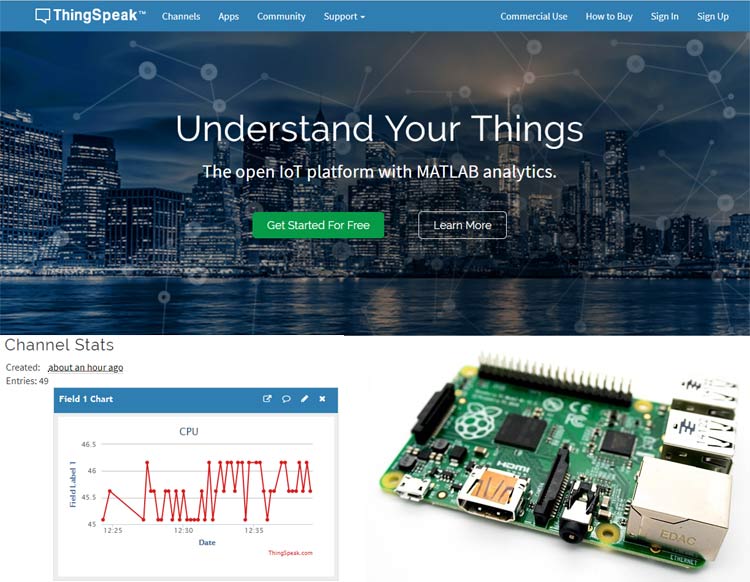
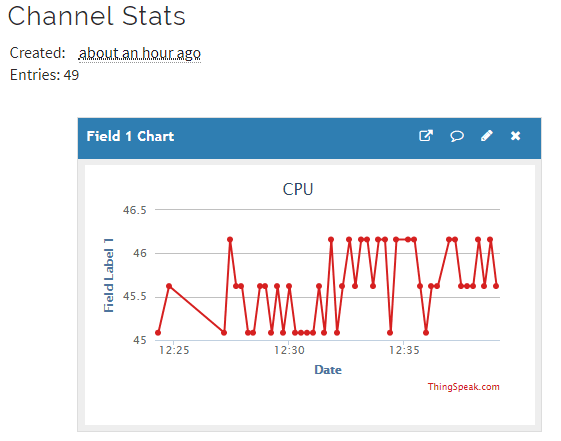
Step 6: Check ThingSpeak site for Data Logging
After completing these steps open your channel and you will see the CPU temperature data is updating into ThingSpeak website.
Like this you can send any sensor data connected with Raspberry pi to the ThingSpeak Cloud. In next article we will connect LM35 temperature sensor with Raspberry Pi and send the temperature data to ThingSpeak, which can be monitored from anywhere.
Complete Python code for this Raspberry Pi Cloud Server is given below. Code is easy and self-explanatory to understand.
import httplib
import urllib
import time
key = "ABCD" # Put your API Key here
def thermometer():
while True:
#Calculate CPU temperature of Raspberry Pi in Degrees C
temp = int(open('/sys/class/thermal/thermal_zone0/temp').read()) / 1e3 # Get Raspberry Pi CPU temp
params = urllib.urlencode({'field1': temp, 'key':key })
headers = {"Content-typZZe": "application/x-www-form-urlencoded","Accept": "text/plain"}
conn = httplib.HTTPConnection("api.thingspeak.com:80")
try:
conn.request("POST", "/update", params, headers)
response = conn.getresponse()
print temp
print response.status, response.reason
data = response.read()
conn.close()
except:
print "connection failed"
break
if __name__ == "__main__":
while True:
thermometer()


