


IoT allows machine-to-machine communication which helps in increasing the system efficiency. ESP8266 is a cheap Wi-Fi SOC (system on chip) module that works on 3.3V, manufactured by Espressif Systems, used to provide a number of IoT solutions. This Wi-Fi module is integrated with TCP/IP stack and microcontroller capability.
ESP8266 has a number of advanced features that make it unique from other available modules. ESP8266 Wi-Fi module uses less number of external components and allows the user to offload all the Wi-Fi networking function from another application processor.
ESP has a number of applications in various domains like Home Automation, Industrial Wireless motor, IP cameras, and Security Systems.
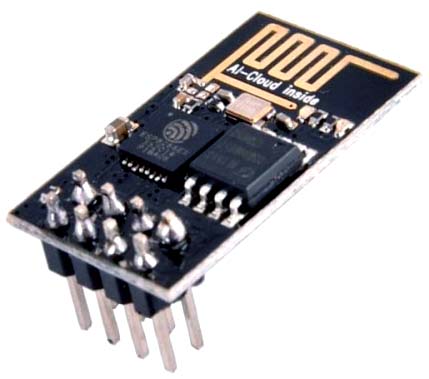
ESP8266 Wi-Fi Module
ESP8266 Wi-Fi Module has eight pins, below is the pinout image of the ESP266 Wi-Fi module:
Features of ESP8266 Wi-Fi Module
- TCP/IP Protocol stack
- High Durability, Compact size
- 32-bit Tensilica Processor
- Power Saving Architecture
- Support Infrastructure BSS Station mode/SoftAP mode/Promiscuous mode
Specification of ESP8266 Wi-Fi Module
- Operating Voltage: 3.3V
- TCP Connection: 5 (maximum)
- Can be used as Access Point and station
- Current Consumption: 100mA
- Input and Output Voltage: 3.6V (maximum)
- Input and Output Current: 12mA (maximum)
- Flash Memory: 512 Kb
- LAN specification: 802.11 b/g/n supports (2.4 GHz), up to 72.2 Mbps
- Low power integrated 32-bit CPU
- Low standby power consumption (less than 1mW)
Now, you know what ESP8266 is, also its pinout, features, and technical specification.
So, let’s move on, as we know that the ESP comes with a preloaded firmware, if you will use it with Arduino or any other microcontroller, the firmware will be overwritten automatically. So, if you have a fresh ESP8266, you can directly use it for AT commands. If you haven't used one, you have to follow this tutorial to learn How to Flash ESP8266 to use AT commands.
Circuit Diagram
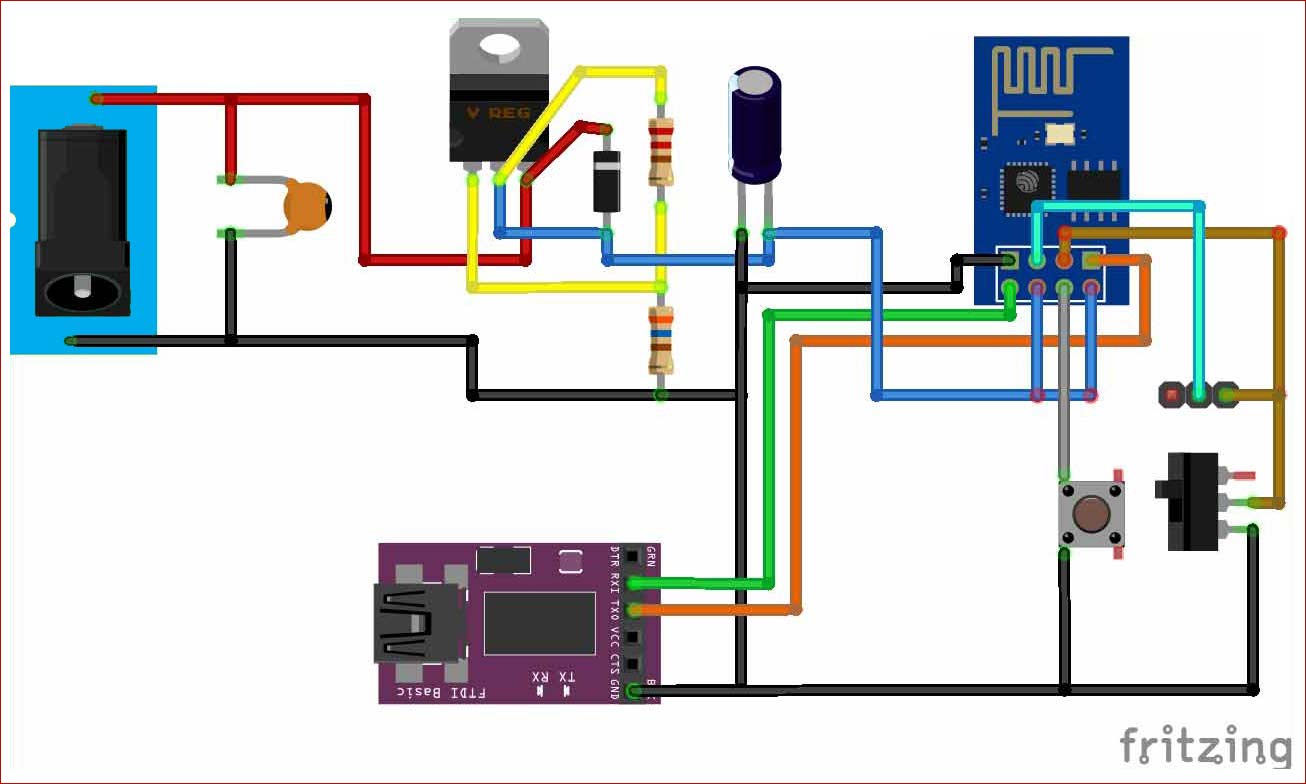
Components Required
- ESP8266 Module
- FTDI Board (Set to 3.3V mode)
- Perf Board
- LM317- Voltage Regulator IC
- Capacitor (0.1uf, 10uf)
- Barrel Jack
- Push Button
- Bergstik Male and Female
- 12V adapter
How to Flash ESP8266 Module?
Not only for AT commands but while getting started with ESP8266, we face several problems and might want to flash the ESP8266. So, you can follow the same method to do the same. Design the circuit given above and set it to Arduino Mode and then follow the below mentioned steps.
Step 1: First, you have to download the flashing tool and the firmware from here.
Step 2: Unzip the folder and launch the Flashing tool from the folder, as shown below
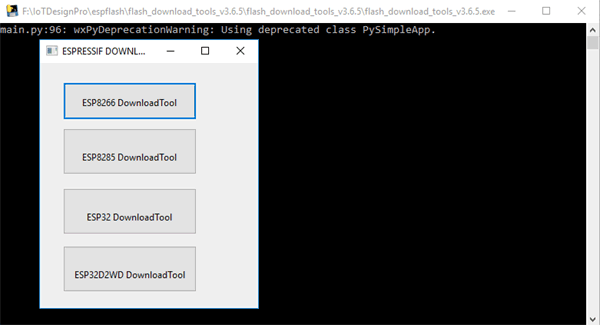
You will see the window like the image below, after launching the flashing tool.
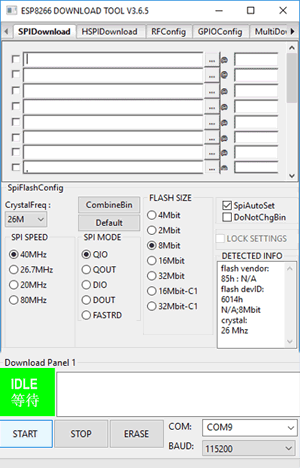
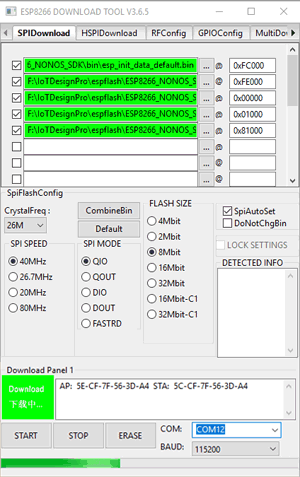
Step 3: Now, a dialog box will open, as shown in the above image. You have to set the parameters and configure the download path before start flashing ESP8266.
- Crystal Frequency – 26M
- SPI Speed – 40 MHz
- SPI Mode – QI0
- Flash Size – 8-bit
- Baud rate - 115200
- Select the COM Port (mine is ##)
Now, for configuring the download path include the files with the given address from the firmware folder in the given sequence.
|
File Name |
Address |
File Location |
|
esp_init_data_default.bin |
0xFC000 |
|
|
blank.bin |
0xFE000 |
|
|
boot_V1.4.bin |
0x00000 |
|
|
user1.1024.new.2.bin |
0x01000 |
|
|
User2.1024.new.2.bin |
0x81000 |
|
Step 4: Now, turn ON the adapter to power your designed circuit. And, set the hardware to Flash Mode. Press the reset button (pushbutton), then click on START to flash your ESP8266. Now, your ESP8266 start flashing, and it will look like the below image:
Step 5: As your flashing complete, the dialog box will look like the image below:

So, you have successfully flashed your ESP8266.
ESP8266 is now ready for use in the AT command Mode.
Step 6: Now, open your Arduino IDE software, and select the PORT on which your hardware is connected.
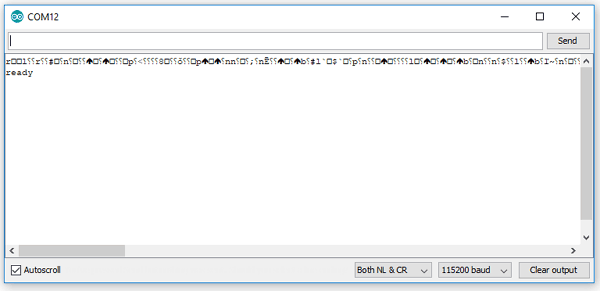
As you open the serial monitor in Arduino and press the reset button, it will show ready with some garbage value, on the output screen, like as the image below:

Step 7: To check your ESP8266 module is connected successfully or not.
Send ‘AT’ using the serial monitor, the ESP will respond with output ‘OK’, as shown in the below image.
Hence, we have successfully flashed ESP8266 for using AT commands with Arduino IDE.


