Internet of Things (IoT) is expanding at a prodigious rate, the scope of the IoT applications is growing from controlling appliances to monitoring devices and sending e-mails. SMTP signifies “Simple Mail Transfer Protocol”, it is the collection of a number of servers with an objective to send and receive messages in the form of Emails.
In this project, we are going to send an SMTP email using ESP8266 NodeMCU. The SMTP server is a third-party server, which we are using here for sending email from ESP8266 NodeMCU. SMTP is similar to other email servers, only its functionality makes it a bit different.
Components Required
- NodeMCU
- SMTP Server
SMTP Server Setup
To send an email using SMTP, we need to setup an SMTP server.
Click on “Try SMTP2GO Free” to register with a free account.

A window will pop up, where you need to enter some credential like name, email id and password.

After sign up, you will receive an activation request on the entered Email. Activate your account from the verify link in email and then login using your email id and password.
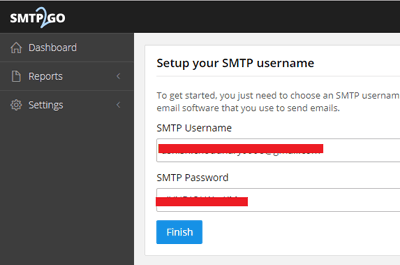
Once you log in, you will get your SMTP Username and SMTP Password. Remember or copy these to your notepad for further use. After this click on ‘finish’.
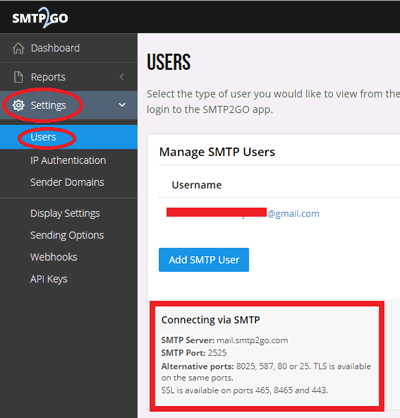
Now on the left access bar, click on “Settings” and then on “Users”. Here, you can see the information regarding to the SMTP Server and PORT number. It is usually as follows:
Encode Username and Password
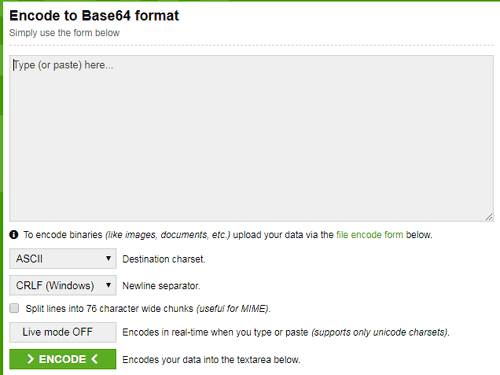
Now we have to change Username and Password in base64 encoded format with ASCII character set. For converting the Email and Password in base64 encoded format use a website called BASE64ENCODE (https://www.base64encode.org/).Copy the encoded username and password, for further use:
Code Explanation
First install the ESP8266 WiFi library and enter the details of WiFi and then initialize the SMTP server.
#include <ESP8266WiFi.h>
const char* ssid = "WiFi Name";   // Enter the namme of your WiFi Network.
const char* password = "WiFi Password";  // Enter the Password of your WiFi Network.
char server[] = "mail.smtp2go.com";   // The SMTP Server
Hence, by using the below code ESP8266 will test whether wifi is connected or not, if wifi connects then it will print WiFi connected and IP address on serial monitor.
WiFiClient espClient;
void setup()
{
  Serial.begin(115200);
  delay(10);
  Serial.println("");
  Serial.println("");
  Serial.print("Connecting To: ");
  Serial.println(ssid);
  WiFi.begin(ssid, password);

  while (WiFi.status() != WL_CONNECTED)
  {
    delay(500);
    Serial.print("*");
  }
  Serial.println("");
  Serial.println("WiFi Connected.");
  Serial.print("IP address: ");
  Serial.println(WiFi.localIP());
  byte ret = sendEmail();
 }
To connect with the SMTP Server on a PORT, we have coded as below. The ‘client.connect(SMTP_SERVER, SMTP_PORT)’ is used here to connect with the SMTP server. If it connects it will greet the SMTP Server with ‘EHLO’ Command.
After this, it will authorize the user with AUTH LOGIN Command ‘client.println(“AUTH LOGIN”)’.
void loop()
{
}
byte sendEmail()
{
  if (espClient.connect(server, 2525) == 1)
  {
    Serial.println(F("connected"));
  }
  else
  {
    Serial.println(F("connection failed"));
    return 0;
  }
  if (!emailResp())
    return 0;

  Serial.println(F("Sending EHLO"));
  espClient.println("EHLO www.example.com");
  if (!emailResp())
    return 0;

  Serial.println(F("Sending auth login"));
  espClient.println("AUTH LOGIN");
  if (!emailResp())
    return 0;
Send the encoded SMTP Username and Password one after the other. The commands are client.println(“Enter Encoded Username Here”); and client.println(“Your Encoded Password Here”);.
  Serial.println(F("Sending User"));
 espClient.println("Enter Encoded Username Here"); // Your encoded Username
  if (!emailResp())
    return 0;

  Serial.println(F("Sending Password"));

  espClient.println("Your Encoded Password Here");// Your encoded Password
  if (!emailResp())
    return 0;
Now enter the sender and receiver’s Email ID.
  Serial.println(F("Sending From"));

  espClient.println(F("MAIL From: [email protected]")); // Enter Sender Mail Id
  if (!emailResp())
    return 0;

  Serial.println(F("Sending To"));
  espClient.println(F("RCPT To: [email protected]")); // Enter Receiver Mail Id
  if (!emailResp())
    return 0;
Send the “DATA” followed by the Message body of the e-mail using these commands:
  Serial.println(F("Sending email"));

  espClient.println(F("To:  [email protected]")); // Enter Receiver Mail Id
  // change to your address
  espClient.println(F("From: [email protected]")); // Enter Sender Mail Id
  espClient.println(F("Subject: ESP8266 test e-mail\r\n"));
  espClient.println(F("This is is a test e-mail sent from ESP8266.\n"));
  espClient.println(F("Second line of the test e-mail."));
  espClient.println(F("Third line of the test e-mail."));
Finally, terminate the mail with “.” and send the quit command.
  espClient.println(F("."));
  if (!emailResp())
    return 0;
  //
  Serial.println(F("Sending QUIT"));
  espClient.println(F("QUIT"));
  if (!emailResp())
    return 0;
Programming ESP8266 for Sending Email using SMTP Server
The complete code for this project is given at the end of the article. After, making all the necessary changes in this code and then upload it to your Arduino IDE. Your serial monitor will look like this:
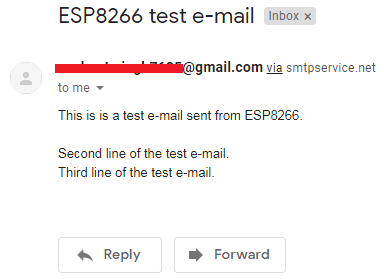
Hence, an email will be received like the image below, on your given email address:
For more IoT project using ESP8266, ESP32 and Raspberry PI with different IoT platforms, like Adafruit IO, IFTTT, ThingSpeak follow the given links.
#include <ESP8266WiFi.h>
const char* ssid = "WiFi Name"; // Enter the namme of your WiFi Network.
const char* password = "WiFi Password"; // Enter the Password of your WiFi Network.
char server[] = "mail.smtp2go.com"; // The SMTP Server
WiFiClient espClient;
void setup()
{
Serial.begin(115200);
delay(10);
Serial.println("");
Serial.println("");
Serial.print("Connecting To: ");
Serial.println(ssid);
WiFi.begin(ssid, password);
while (WiFi.status() != WL_CONNECTED)
{
delay(500);
Serial.print("*");
}
Serial.println("");
Serial.println("WiFi Connected.");
Serial.print("IP address: ");
Serial.println(WiFi.localIP());
byte ret = sendEmail();
}
void loop()
{
}
byte sendEmail()
{
if (espClient.connect(server, 2525) == 1)
{
Serial.println(F("connected"));
}
else
{
Serial.println(F("connection failed"));
return 0;
}
if (!emailResp())
return 0;
Serial.println(F("Sending EHLO"));
espClient.println("EHLO www.example.com");
if (!emailResp())
return 0;
Serial.println(F("Sending auth login"));
espClient.println("AUTH LOGIN");
if (!emailResp())
return 0;
Serial.println(F("Sending User"));
espClient.println("Enter Encoded Username Here"); // Your encoded Username
if (!emailResp())
return 0;
Serial.println(F("Sending Password"));
espClient.println("Your Encoded Password Here");// Your encoded Password
if (!emailResp())
return 0;
Serial.println(F("Sending From"));
espClient.println(F("MAIL From: [email protected]")); // Enter Sender Mail Id
if (!emailResp())
return 0;
Serial.println(F("Sending To"));
espClient.println(F("RCPT To: [email protected]")); // Enter Receiver Mail Id
if (!emailResp())
return 0;
Serial.println(F("Sending DATA"));
espClient.println(F("DATA"));
if (!emailResp())
return 0;
Serial.println(F("Sending email"));
espClient.println(F("To: [email protected]")); // Enter Receiver Mail Id
// change to your address
espClient.println(F("From: [email protected]")); // Enter Sender Mail Id
espClient.println(F("Subject: ESP8266 test e-mail\r\n"));
espClient.println(F("This is is a test e-mail sent from ESP8266.\n"));
espClient.println(F("Second line of the test e-mail."));
espClient.println(F("Third line of the test e-mail."));
//
espClient.println(F("."));
if (!emailResp())
return 0;
//
Serial.println(F("Sending QUIT"));
espClient.println(F("QUIT"));
if (!emailResp())
return 0;
//
espClient.stop();
Serial.println(F("disconnected"));
return 1;
}
byte emailResp()
{
byte responseCode;
byte readByte;
int loopCount = 0;
while (!espClient.available())
{
delay(1);
loopCount++;
if (loopCount > 20000)
{
espClient.stop();
Serial.println(F("\r\nTimeout"));
return 0;
}
}
responseCode = espClient.peek();
while (espClient.available())
{
readByte = espClient.read();
Serial.write(readByte);
}
if (responseCode >= '4')
{
return 0;
}
return 1;
}


