


This article shows how to interface a BMP280 Pressure sensor with Arduino. BMP280 is a pressure, humidity, temperature, and approximate altitude sensor developed by Bosch Sensortec. It is ideally used for environment-related applications and this sensor can also be used for Prosthetic related applications where pressure is a very critical parameter to work with. It is further useful in drones where pressure, temperature, and altitude can be useful to monitor and make further observations.
The Bosch BMP280 can be interfaced with various microcontrollers like PIC, AVR, ESP32/ESP8266, Arduino, etc. In this tutorial, we will use Arduino to interface our BMP280 sensor. Apart from BMP280, there is also another sensor called BMP180 which can measure pressure. We have previously interfaced BMP180 with Raspberry pi and BMP180 with ESP32 to build IoT based weather stations, you can check them out if interested.
Components Required
- Arduino Uno and USB cable.
- BMP280.
- Breadboard.
- Jumper Wires.
Working of BMP280 Pressure Sensor
Before starting with the interfacing. Let us know some important details about the sensor. This sensor can operate from a minimum of 1.7V up to 3.6V. BMP280 consists of a Piezo-resistive sensing element which is then connected with an A/D converter. This converter provides the conversion results with specific sensor compensation along with a digital interface and is equipped with a built-in IIR filter to minimize the disturbances in output data.
The BMP280 can be interfaced using two protocols that are I2C and SPI. It can measure pressure from 300 to 1100 hPa with ±1% accuracy, temperature from -40 to +85℃ with ±1% accuracy, and can give us approximate altitude with some calculations. The operating voltage of the sensor is 1.2V to 3.6V with current consumption of 0.1uA in sleep mode which makes it useful for low power applications in embedded electronics. To know more about the sensor and its technical specification, you can check out BMP280 Datasheet.
Let us understand in short what is I2C (Inter-Integrated Circuit) protocol, it allows us to connect multiple slaves integrated with one or more master electronics. It is a 2 wire protocol that can support up to 1008 slaves. Each slave can be identified using a unique address.
Difference between BME280 vs BMP280
Do note that there two types of sensors sold in the market, namely the BME280 and BMP280. Here are the differences between these two sensors.
- Both BME280 and BMP280 are developed by Bosch Sensortec.
- The BMP280 sensor is used to find the Digital Pressure and Temperature, whereas BME280 can be used to measure digital pressure, temperature, and humidity.
- Because of this difference, BME280 is slightly more expensive than BMP280.
- So depending upon your project requirement, you can select the sensor which serves your purpose.
Circuit Diagram for Interfacing BMP280 with Arduino
The complete schematics for connecting BMP280 with Arduino is shown below. I have also used the notes option to illustrate which pins are connected to what.
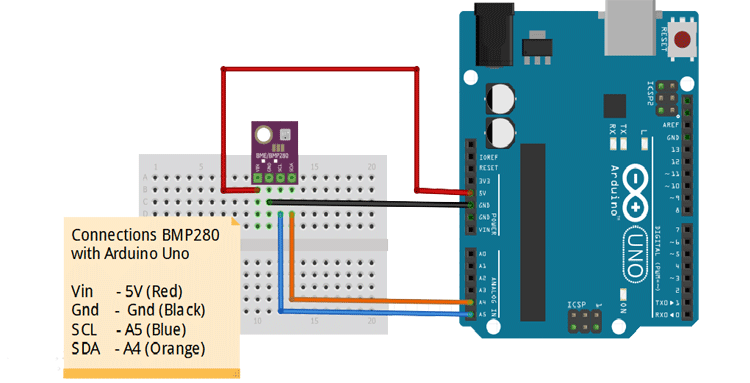
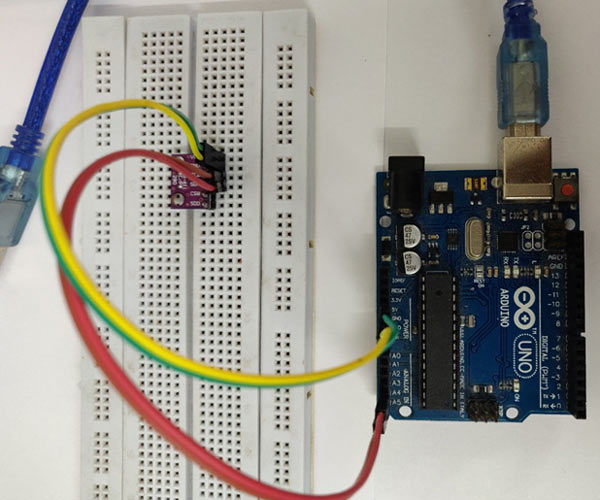
The connections are very simple, I have used a breadboard to mount the sensor and used connecting wires to interface my sensor with Arduino. My hardware set-up looks like this below
Install BMP280 library in Arduino IDE
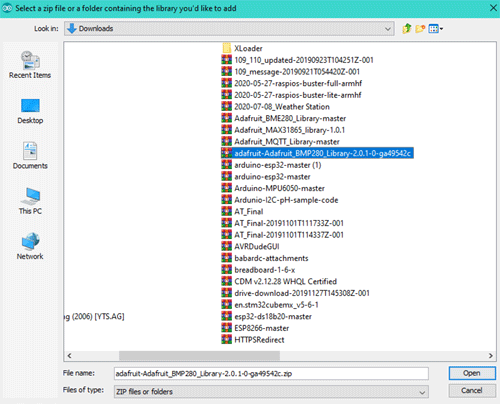
To communicate with this module using I2C and avoid complex programming techniques, we need to use this library Adafruit_BMP280_Library. Download the library in zip format and follow the steps to install it in your Arduino IDE
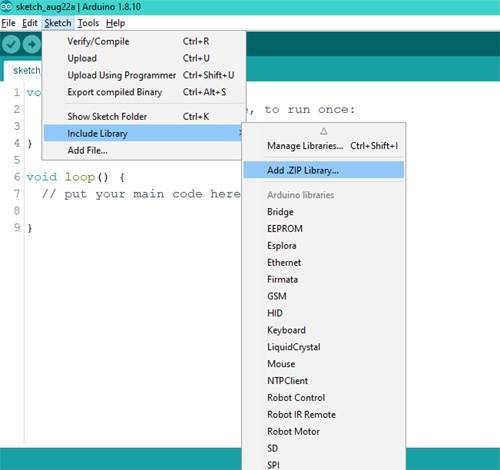
Go to the location where you have downloaded the zip folder and select the zip file and press open.
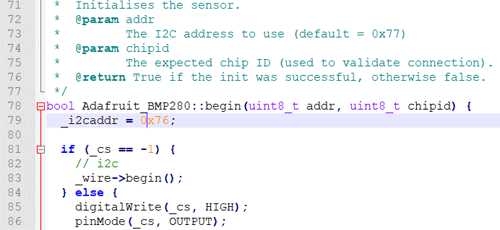
This will install the library on your Arduino IDE. The default I2C address of this sensor is 0x77. In case if you get the error as Could not find a valid BMP280 sensor like shown below, check wiring!

Then if the problem persists, change the sensor address to 0x76 in the _i2caddr of Adafruit_BMP280.cpp as shown below.
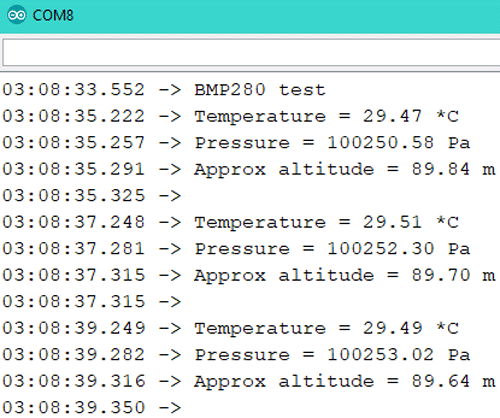
If everything is working as it should, the output can be found on your serial monitor as shown below.
Arduino Program to Read Temperature, Pressure, and Altitude using BMP280
The complete program demonstrated in this article can be found at the bottom of this page. The explanation of the code is as follows.
We start the program by defining the libraries as below.
#include <Wire.h>
#include <SPI.h>
#include <Adafruit_BMP280.h>
Then we will be defining SPI pins if we use SPI communication protocol.
#define BMP_SCK  (13)
#define BMP_MISO (12)
#define BMP_MOSI (11)
#define BMP_CS   (10)
In the setup, we define the Serial monitor baud rate and Initialize the I2C module by calling the begin() function. It has some print statements to make the code interactive on reset. If the sensor fails to read due to the wrong address or wiring issue, it gives the error on serial to check the sensor wiring and address. If the sensor connects successfully, it will start printing the value on your serial terminal.
  Serial.begin(9600);
  Serial.println(F("BMP280 test"));
  if (!bmp.begin()) {
    Serial.println(F("Could not find a valid BMP280 sensor, check wiring!"));
    while (1);
  }
/* Default settings from datasheet. */
  bmp.setSampling(Adafruit_BMP280::MODE_NORMAL,     /* Operating Mode. */
                  Adafruit_BMP280::SAMPLING_X2,     /* Temp. oversampling */
                  Adafruit_BMP280::SAMPLING_X16,    /* Pressure oversampling */
                  Adafruit_BMP280::FILTER_X16,      /* Filtering. */
                  Adafruit_BMP280::STANDBY_MS_500); /* Standby time. */
In the loop, the code gives us the reading from the sensor using the following functions and prints it on the serial terminal.
bmp.readTemperature() - reads the temperature in celsius
bmp.readAltitude(1013.25) - calculates altitude in meter based on the sea level pressure defined
bmp.readPressure() - reads pressure in hPA (hectoPascal = millibar)
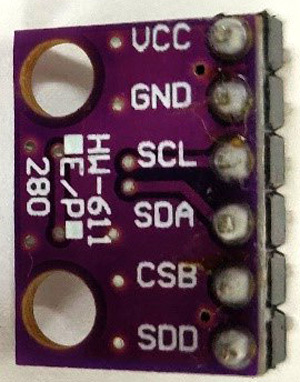
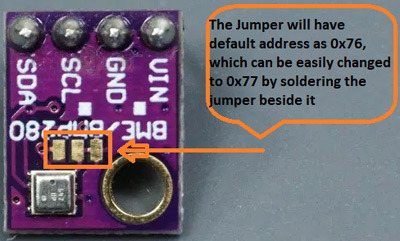
In the market, there are various sensor module, the sensor we had with us was direct to the interface, but there is a chance you may get the sensor which may have I2C address selector something like this,
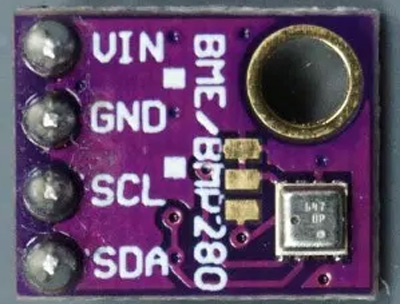
You need not to worry about it, we will explain how you can interface this sensor using the same steps as explained above.
The complete working can also be found in the video linked below. In conclusion, this sensor gives us ease to get pressure, humidity, temperature, and altitude without any complicated wiring or programming. The sensor works on I2C protocol which is easy to understand and has predefined functions which does the job for us.
/***************************************************************************
This is a library for the BMP280 humidity, temperature & pressure sensor
Designed specifically to work with the Adafruit BMP280 Breakout
----> http://www.adafruit.com/products/2651
These sensors use I2C or SPI to communicate, 2 or 4 pins are required
to interface.
This code was tested by Taher Ujjainwala on behalf of CircuitDigest
To learn more visit our website wwww.circuitdigest.com
*/
#include <Wire.h>
#include <SPI.h>
#include <Adafruit_BMP280.h>
#define BMP_SCK (13)
#define BMP_MISO (12)
#define BMP_MOSI (11)
#define BMP_CS (10)
Adafruit_BMP280 bmp; // I2C
//Adafruit_BMP280 bmp(BMP_CS); // hardware SPI
//Adafruit_BMP280 bmp(BMP_CS, BMP_MOSI, BMP_MISO, BMP_SCK);
void setup() {
Serial.begin(9600);
Serial.println(F("BMP280 test"));
if (!bmp.begin()) {
Serial.println(F("Could not find a valid BMP280 sensor, check wiring!"));
while (1);
}
/* Default settings from datasheet. */
bmp.setSampling(Adafruit_BMP280::MODE_NORMAL, /* Operating Mode. */
Adafruit_BMP280::SAMPLING_X2, /* Temp. oversampling */
Adafruit_BMP280::SAMPLING_X16, /* Pressure oversampling */
Adafruit_BMP280::FILTER_X16, /* Filtering. */
Adafruit_BMP280::STANDBY_MS_500); /* Standby time. */
}
void loop() {
Serial.print(F("Temperature = "));
Serial.print(bmp.readTemperature());
Serial.println(" *C");
Serial.print(F("Pressure = "));
Serial.print(bmp.readPressure());
Serial.println(" Pa");
Serial.print(F("Approx altitude = "));
Serial.print(bmp.readAltitude(1013.25)); /* Adjusted to local forecast! */
Serial.println(" m");
Serial.println();
delay(2000);
}


