


Home automation now becomes an essential part of IoT applications and people use their smartphone to control home appliances from anywhere over internet. There are various ways to control AC appliances with smartphone, some of them we have covered in our previous IoT Home Automation Tutorials, today we will learn one more method to control appliance through our smart phone. In this IoT project we will control an AC lamp with a text message from Telegram application using NodeMCU.
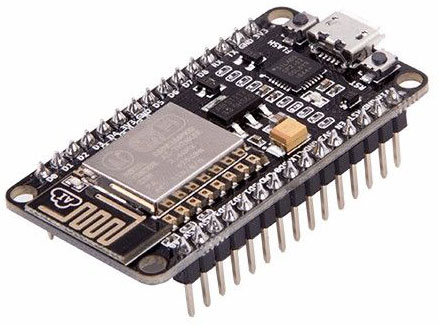
ESP8266 NodeMCU
ESP8266 NodeMCU is an open source IoT platform. It includes firmware which runs on the low cost Wi-Fi enabled ESP8266 Wi-Fi SoC from Espressif Systems, and hardware which is based on the ESP-12 module. It has GPIO, SPI, I2C, ADC, PWM AND UART pins for communication and controlling other peripherals attached to it. On board NodeMCU has CP2102 IC which provides USB to TTL functionality. In this project we are going to use D0 GPIO pin to change the state of the relay.
Components Required
- ESP8266 NodeMCU
- Lamp
- Jumper wires
- Telegram Application
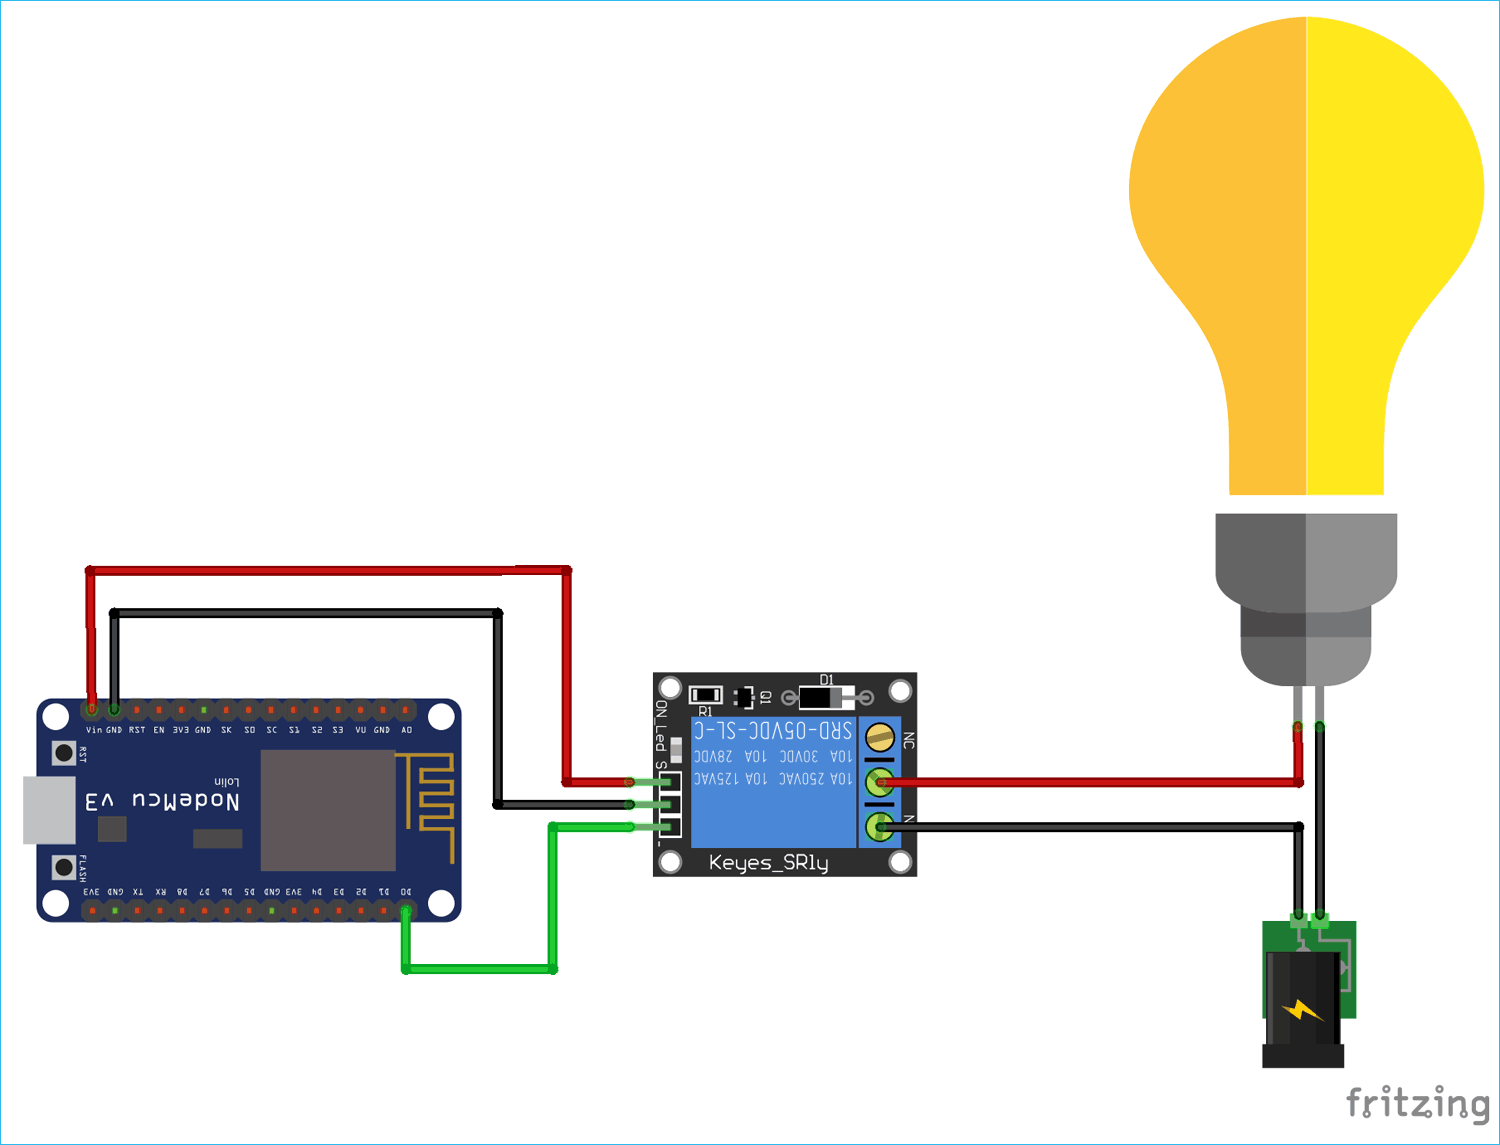
Circuit Diagram
Circuit diagram for this Telegram controlled Home Automation is given below:
Setting up Telegram for Home Automation
Telegram is a messaging application which is used to send text, images or video messages free of cost. It also allows using other API to create programs to integrate Telegram in their applications. There are special bots which do not need phone number to set up and can be interfaced with any embedded or software application to trigger some event using telegram text messages.
Install “Telegram” app on your smartphone from your play store or apple store. Sign Up if you are going to use it for the first time with your country code and mobile number. It will ask for OTP code for verification.
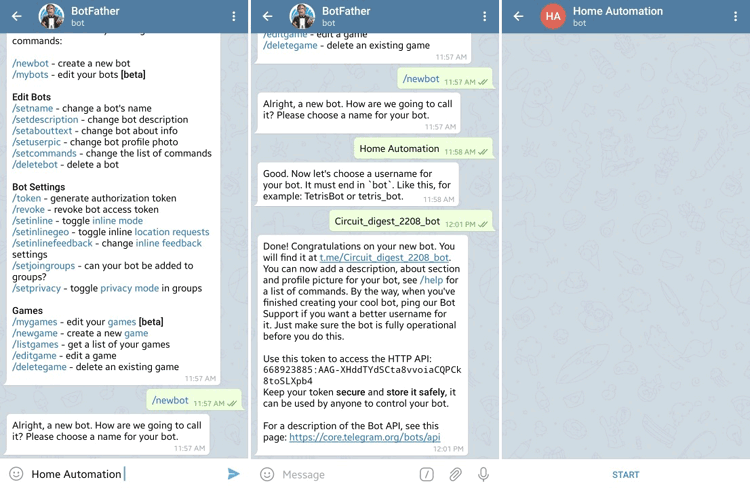
After successfully sign up, search for BotFather and open it. Open BotFather and click on RESTART for creating your bot as shown in screenshot below. It will show set of codes which can be used to create and edit bots. Type “/newbot” in the text section for creating new bot.

Now you have to choose a name for your bot. Type the name of your bot and click on send. Here I gave “Home Automation” name to my bot. Now it’s time to choose a unique username for your bot. Here I have given “Circuit_digest_2208_bot” username to my bot. This username should be unique. After giving username you will receive a text from BotFather about your new bot and will get a token for the new bot. This token will be used in code for NodeMCU. Click on the link given in the message to go to your new chat box of the bot and then click on Start. You can now send your commands by send a text message from Telegram app.
Installing Telegram Library in Arduino IDE
To integrate telegram in Arduino code, there is a library for that, to install it open Arduino IDE and Go to Sketch -> Include Library -> Manage Libraries.
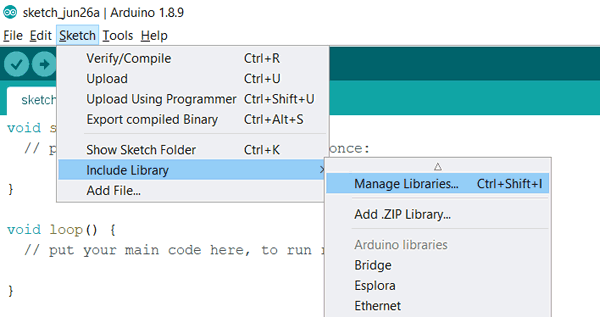
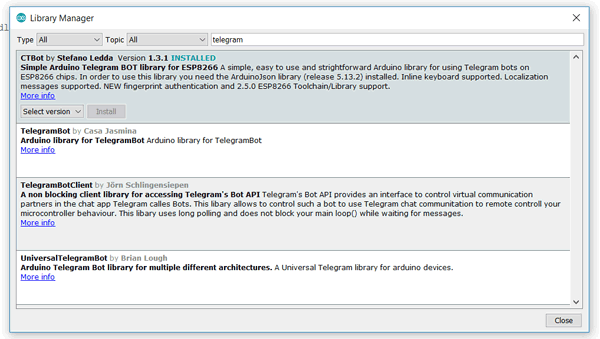
Search for “Telegram” and install the latest version of CTBot by Stefano Ledda. This library is easy to use and very straightforward for interfacing Telegram with ESP8266 chips.
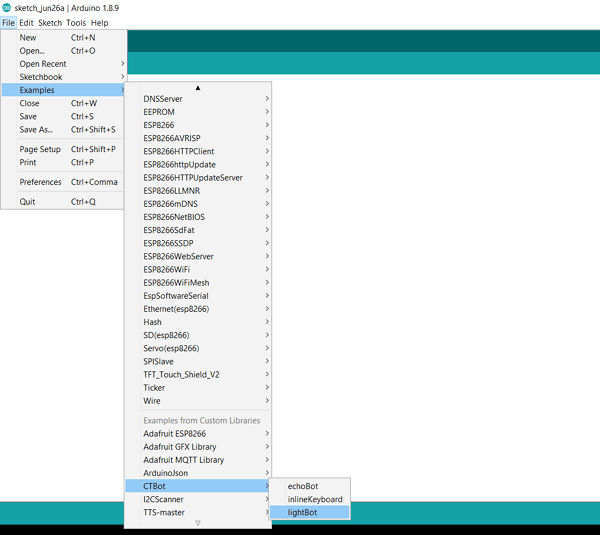
CTBot library by Stefano Ledda comes with inbuilt examples. We are going to use one of its examples in this project.
Open lightBot example from File -> Example -> CTBot -> lightBot. This example helps us to change the state of the LED on one GPIO pin of ESP8266.
Edit the code given in the example to run it in NodeMCU. Firstly replace the SSID and password given in the code with the SSID and password of your Wi-Fi connection. Then paste the token number you got after creating the telegram bot. Complete edited code is given at the end of this tutorial.
Code Explanation
Complete code with a working video for this IoT controlled Home Automation is given at the end of this tutorial, here we are explaining the complete program to understand the working of the project.
Replace SSID and password with your Wi-Fi credentials. String token stores the unique token number you got after creating your bot. D0 is the digital output pin for changing the state of the relay.
String ssid = "**********";     // Replace with your ssid
String pass = "************"; // Replace with your password
String token = "66****885:A*G-X**dTYdSCt******aCQPCk***SL**b4";   // token number of your bot
int led = D0;    // digital pin on NodeMCU
myBot.wifiConnect() function takes the SSID and password to connect ESP8266 with the Wi-Fi and function myBot.setTelegramToken() takes the unique token number which further establishes the connection between telegram bot and NodeMCU. On successful connection you get “testConnection OK” on the serial monitor.
myBot.wifiConnect(ssid, pass);
myBot.setTelegramToken(token);
if (myBot.testConnection())

                     Serial.println("\ntestConnection OK");
                else
                     Serial.println("\ntestConnection NOK");
TBMessage stores the message received from the telegram bot. msg.text.equalsIgnoreCase() checks if the text received matches with string “light on” or “light off”. If the message received is “Light on” it changes the relay state to turn on the lamp and if the message received is “Light off” then it changes the relay state to turn off the lamp. If the text received is different from “light on” and “light off” then it sends welcome message back to the telegram.
TBMessage msg;
if (myBot.getNewMessage(msg)) {
   if (msg.text.equalsIgnoreCase("LIGHT ON")) {
       digitalWrite(led, HIGH);
          myBot.sendMessage(msg.sender.id, "Light is now ON");
            }
            else if (msg.text.equalsIgnoreCase("LIGHT OFF")) {
              digitalWrite(led, LOW);
                 myBot.sendMessage(msg.sender.id, "Light is now OFF");
                    }
         else {
           String reply;
            reply = (String)"Welcome " + msg.sender.username + (String)". Try LIGHT ON or LIGHT OFF.";
          myBot.sendMessage(msg.sender.id, reply);
       }

  }
Now after completing the code its time to test the system.
Testing the Telegram controlled Home Appliances
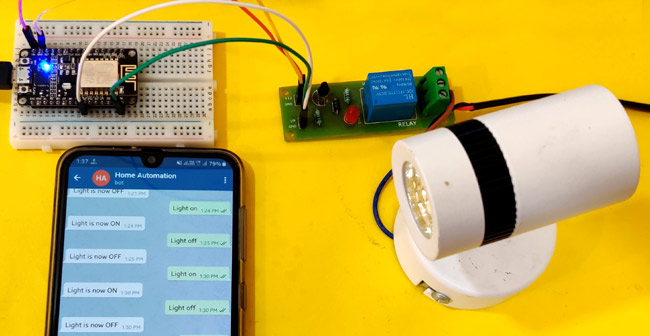
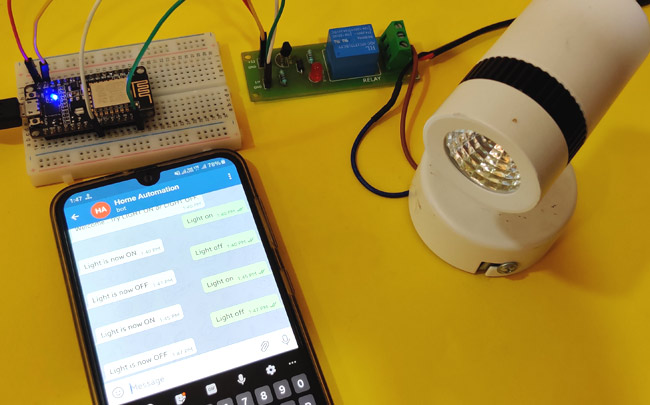
Connect the AC light with NodeMCU as shown in the circuit diagram and upload the code in NodeMCU using Arduino IDE. After uploading the code successfully open the serial monitor and wait for few seconds till NodeMCU gets connected to Wi-Fi and Telegram bot. Now open Telegram application in your smartphone and open the chatbox of your bot. Then send the message “Light on” and it will turn on the lamp.
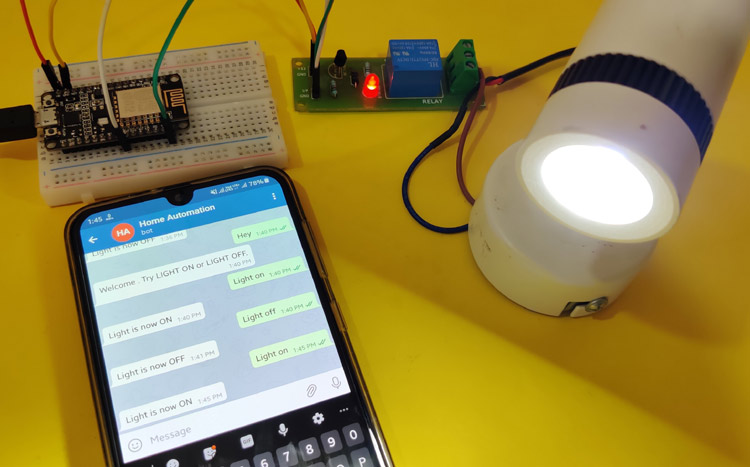
Similarly send the message “Light off” to turn off the lamp. This is how you can automate AC appliances in your home.
Find the complete program and demonstration Video below.
/*
Name: lightBot.ino
Created: 17/01/2018
Author: Stefano Ledda <[email protected]>
Description: a simple example that do:
1) parse incoming messages
2) if "LIGHT ON" message is received, turn on the onboard LED
3) if "LIGHT OFF" message is received, turn off the onboard LED
4) otherwise, reply to sender with a welcome message
*/
#include "CTBot.h"
CTBot myBot;
String ssid = "CircuitLoop"; // REPLACE mySSID WITH YOUR WIFI SSID
String pass = "circuitdigest101";
// REPLACE myPassword YOUR WIFI PASSWORD, IF ANY
String token = "668923885:AAG-XHddTYdSCta8vvoiaCQPCk8toSLXpb4"; // REPLACE myToken WITH YOUR TELEGRAM BOT TOKEN
uint8_t led = D0; // the onboard ESP8266 LED.
// If you have a NodeMCU you can use the BUILTIN_LED pin
// (replace 2 with BUILTIN_LED)
void setup() {
// initialize the Serial
Serial.begin(115200);
Serial.println("Starting TelegramBot...");
// connect the ESP8266 to the desired access point
myBot.wifiConnect(ssid, pass);
// set the telegram bot token
myBot.setTelegramToken(token);
// check if all things are ok
if (myBot.testConnection())
Serial.println("\ntestConnection OK");
else
Serial.println("\ntestConnection NOK");
// set the pin connected to the LED to act as output pin
pinMode(led, OUTPUT);
digitalWrite(led, HIGH); // turn off the led (inverted logic!)
}
void loop() {
// a variable to store telegram message data
TBMessage msg;
// if there is an incoming message...
if (myBot.getNewMessage(msg)) {
if (msg.text.equalsIgnoreCase("LIGHT ON")) { // if the received message is "LIGHT ON"...
digitalWrite(led, HIGH); // turn on the LED (inverted logic!)
myBot.sendMessage(msg.sender.id, "Light is now ON"); // notify the sender
}
else if (msg.text.equalsIgnoreCase("LIGHT OFF")) { // if the received message is "LIGHT OFF"...
digitalWrite(led, LOW); // turn off the led (inverted logic!)
myBot.sendMessage(msg.sender.id, "Light is now OFF"); // notify the sender
}
else { // otherwise...
// generate the message for the sender
String reply;
reply = (String)"Welcome " + msg.sender.username + (String)". Try LIGHT ON or LIGHT OFF.";
myBot.sendMessage(msg.sender.id, reply); // and send it
}
}
// wait 500 milliseconds
delay(500);
}


