


Designing a comprehensive Machine Learning Model that is capable of identifying multiple objects in one image is a challenging task in computer vision. However, with the latest advances in deep learning and object recognition systems, it is easier to develop this multiple object recognition system. Here we will use TensorFlow and OpenCV with Raspberry Pi to build object detection models.
TensorFlow's Object Detection API is an open-source framework built on top of TensorFlow that provides a collection of detection models, pre-trained on the COCO dataset, the Kitti dataset, the Open Images dataset, the AVA v2.1 dataset, and the iNaturalist Species Detection Dataset.
So in this tutorial, we are going to build an Object Detection System using TensorFlow and Raspberry Pi. We are going to use a pre-trained model from COCO that contains around 330K labeled images.
Requirements
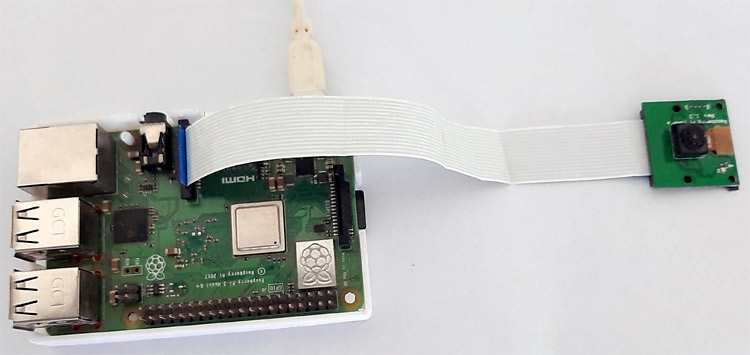
- Raspberry Pi 3 (any version)
- Pi Camera Module
Here only Raspberry Pi and Pi camera are used to build this Raspberry Pi object detection using TensorFlow. We previously used Pi camera with Raspberry pi, and built few projects using it like-
- Web Controlled Raspberry Pi Surveillance Robot
- IoT based Smart Wi-Fi doorbell
- Smart CCTV Surveillance System
- Real-Time License Plate Recognition using Raspberry Pi and Python
Before proceeding with the project, let's have a look at the prerequisites. Here we need TensorFlow, Object Detection API, Pre-trained object detection model, OpenCV, Protobuf, and some other dependencies in this project.
Installing TensorFlow in Raspberry Pi for Object Detection
Before installing the TensorFlow and other dependencies, the Raspberry Pi needs to be fully updated. Use the below commands to update the Raspberry Pi to its latest version:
sudo apt-get update
sudo apt-get upgrade
Once the update is finished, install TensorFlow via pip3 using below command:
pip3 install tensorflow
Then Install the Atlas library to get support for the TensorFlow, Numpy, and other dependencies. Use the below command to install Atlas:
sudo apt-get install libatlas-base-dev
Installing OpenCV in Raspberry Pi 3
Use the following commands to install the required dependencies for installing OpenCV on your Raspberry Pi. We previously used OpenCV with Raspberry Pi in a few projects for License plate recognition and face recognition.
sudo apt-get install libhdf5-dev -y
sudo apt-get install libhdf5-serial-dev –y
sudo apt-get install libatlas-base-dev –y
sudo apt-get install libjasper-dev -y
sudo apt-get install libqtgui4 –y
sudo apt-get install libqt4-test –y
After that, use the below command to install the OpenCV on your Raspberry Pi.
pip3 install opencv-contrib-python==4.1.0.25
Installing Protobuf
Protocol buffers are Google's language-neutral, platform-neutral, extensible mechanism for serializing structured data – think XML, but smaller, faster, and simpler. Use the below command to install the Protobuf on your Raspberry Pi:
sudo apt-get install protobuf-compiler
Use the below commands to install the rest of the libraries.
pip install --user Cython
pip install --user contextlib2
pip install --user pillow
pip install --user lxml
pip install --user matplotlib
Now create a project directory. We are going to keep the TensorFlow models and Protobuf under one folder. Use the below command to create a new project directory called ObjectDetection
mkdir ObjectDetection
Now move inside your project directory using the cd command.
cd ObjectDetection
And download the TensorFlow's Model from Github.
git clone https://github.com/tensorflow/models.git
Next, go inside the ObjectDetection and then inside the research folder and run protobuf from there using this command:
cd /home/pi/ObjectDetection/models/research
protoc object_detection/protos/*.proto --python_out=.
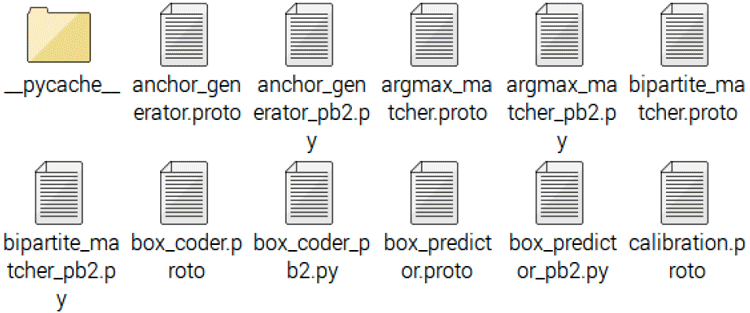
Now to check whether this worked or not, go to-models>object_detection>protos and there you can see that for every proto file there's one python file created.
When running locally, the ObjectDetection/models/research/ and slim directories should be appended to PYTHONPATH. This can be done by running the following command from ObjectDetection/models/research/:
export PYTHONPATH=$PYTHONPATH:`pwd`:`pwd`/slim
Installing SSD_Lite in Raspberry Pi:
Next, we will download the SSD_Lite model from the TensorFlow detection model zoo which is trained on the COCO dataset. Tensorflow detection model zoo provides a collection of detection models pre-trained on the COCO dataset, the Kitti dataset, the Open Images dataset, the AVA v2.1 dataset, and the iNaturalist Species Detection Dataset. COCO stands for Common Objects in Context; this dataset contains around 330K labeled images. We need to install the SSD_Lite model inside the object_detection directory, so first navigate to object_detection directory using the below command:
cd /home/pi/ObjectDetection/models/research/object_detection
Now download and unpack the SSD_Lite model by using the below commands:
wget http://download.tensorflow.org/models/object_detection/ssdlite_mobilenet_v2_coco_2018_05_09.tar.gz
tar -xzvf ssdlite_mobilenet_v2_coco_2018_05_09.tar.gz
After installing all the dependencies and SSD_Lite model, you need to create a new python file inside the same directory (object_detection). Use the below command to create a new python file:
sudo nano TensorFlow.py
The complete code for OpenCV Object Detection using TensorFlow is given at the end of this page. Copy the code paste it inside this file and save the changes using Ctrl+X > Y > Enter.
Python Code Explanation
Complete python code is given at the end of the page. Here we are explaining the important sections of the code for a better explanation.
So at the starting of the code, we import all the required libraries that are going to be used in this project.
import os
import cv2
import numpy as np
from picamera.array import PiRGBArray
from picamera import PiCamera
import tensorflow as tf
import argparse
import sys
from utils import label_map_util
from utils import visualization_utils as vis_util
The sys.path function is a list that is used to include new file paths that will point to modules that we want to import. This is needed because the working directory is the object_detection folder.
sys.path.append('..')
Next, we provide the directory containing the object detection module and Path to frozen detection graph .pb file, which includes the model that is used for object detection.
MODEL_NAME = 'ssdlite_mobilenet_v2_coco_2018_05_09'
PATH_TO_CKPT = os.path.join(CWD_PATH,MODEL_NAME,'frozen_inference_graph.pb')
PATH_TO_LABELS = os.path.join(CWD_PATH,'data','mscoco_label_map.pbtxt')
NUM_CLASSES = 90
Now, we are going to load all the labels. Label maps map indices to category names.
label_map = label_map_util.load_labelmap(PATH_TO_LABELS)
categories=label_map_util.convert_label_map_to_categories(label_map, max_num_classes=NUM_CLASSES, use_display_name=True)
category_index = label_map_util.create_category_index(categories)
Now, load the Tensorflow model into memory.
detection_graph = tf.Graph()
with detection_graph.as_default():
    od_graph_def = tf.GraphDef()
    with tf.gfile.GFile(PATH_TO_CKPT, 'rb') as fid:
        serialized_graph = fid.read()
        od_graph_def.ParseFromString(serialized_graph)
        tf.import_graph_def(od_graph_def, name='')
Each box around the object indicates that a particular object was detected
detection_boxes = detection_graph.get_tensor_by_name('detection_boxes:0')
The score is shown on the result image indicates confidence.
detection_scores = detection_graph.get_tensor_by_name('detection_scores:0')
Now, inside the while loop initialize the camera object and set the resolution at (640, 480) and the frame rate at 10 fps
camera = PiCamera()
    camera.resolution = (640,480)
    camera.framerate = 10
    rawCapture = PiRGBArray(camera, size=(640,480))
    rawCapture.truncate(0)
Then perform the object detection by running the model with the image as input.
(boxes, scores, classes, num) = sess.run(
            [detection_boxes, detection_scores, detection_classes, num_detections],
            feed_dict={image_tensor: frame_expanded})
Visualize the results of the detection by drawing a box around the detected object with the percentage of confidence and the class label of the detected object.
vis_util.visualize_boxes_and_labels_on_image_array(
            frame,
            np.squeeze(boxes),
            np.squeeze(classes).astype(np.int32),
            np.squeeze(scores),
            category_index,
            use_normalized_coordinates=True,
            line_thickness=8,
            min_score_thresh=0.40)
Testing the TensorFlow based Object Detection
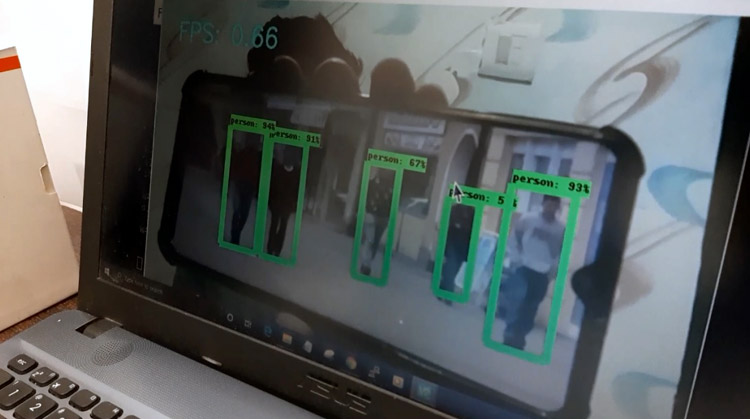
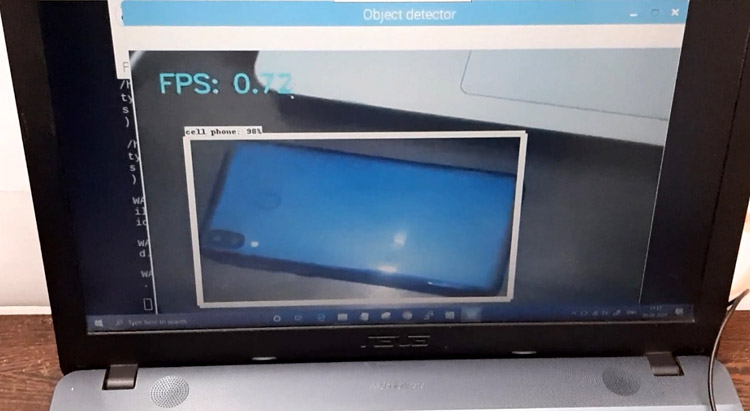
Once everything is set up, navigate to the program directory and launch the object detection program. You will see a window showing a live view from your camera (It can take from 20 to 30 seconds). Identified objects will have a rectangle drawn around them like shown in the below image:
With this, we come to the end of this Object Detection using TensorFlow and OpenCV Tutorial. I hope you guys enjoyed this article. If you have questions regarding this project, mention them in the comments section
import os
import cv2
import numpy as np
from picamera.array import PiRGBArray
from picamera import PiCamera
import tensorflow as tf
import argparse
import sys
# This is needed since the working directory is the object_detection folder.
sys.path.append('..')
# Import utilites
from utils import label_map_util
from utils import visualization_utils as vis_util
# Name of the directory containing the object detection module we're using
MODEL_NAME = 'ssdlite_mobilenet_v2_coco_2018_05_09'
# Grab path to current working directory
CWD_PATH = os.getcwd()
# Path to frozen detection graph .pb file, which contains the model that is used
# for object detection.
PATH_TO_CKPT = os.path.join(CWD_PATH,MODEL_NAME,'frozen_inference_graph.pb')
# Path to label map file
PATH_TO_LABELS = os.path.join(CWD_PATH,'data','mscoco_label_map.pbtxt')
# Number of classes the object detector can identify
NUM_CLASSES = 90
label_map = label_map_util.load_labelmap(PATH_TO_LABELS)
categories = label_map_util.convert_label_map_to_categories(label_map, max_num_classes=NUM_CLASSES, use_display_name=True)
category_index = label_map_util.create_category_index(categories)
# Load the Tensorflow model into memory.
detection_graph = tf.Graph()
with detection_graph.as_default():
od_graph_def = tf.GraphDef()
with tf.gfile.GFile(PATH_TO_CKPT, 'rb') as fid:
serialized_graph = fid.read()
od_graph_def.ParseFromString(serialized_graph)
tf.import_graph_def(od_graph_def, name='')
sess = tf.Session(graph=detection_graph)
image_tensor = detection_graph.get_tensor_by_name('image_tensor:0')
detection_boxes = detection_graph.get_tensor_by_name('detection_boxes:0')
detection_scores = detection_graph.get_tensor_by_name('detection_scores:0')
detection_classes = detection_graph.get_tensor_by_name('detection_classes:0')
num_detections = detection_graph.get_tensor_by_name('num_detections:0')
# Initialize frame rate calculation
frame_rate_calc = 1
freq = cv2.getTickFrequency()
font = cv2.FONT_HERSHEY_SIMPLEX
while True:
# Initialize Picamera and grab reference to the raw capture
camera = PiCamera()
camera.resolution = (640,480)
camera.framerate = 10
rawCapture = PiRGBArray(camera, size=(640,480))
rawCapture.truncate(0)
for frame1 in camera.capture_continuous(rawCapture, format="bgr",use_video_port=True):
t1 = cv2.getTickCount()
# Acquire frame and expand frame dimensions to have shape: [1, None, None, 3]
# i.e. a single-column array, where each item in the column has the pixel RGB value
frame = np.copy(frame1.array)
frame.setflags(write=1)
frame_rgb = cv2.cvtColor(frame, cv2.COLOR_BGR2RGB)
frame_expanded = np.expand_dims(frame_rgb, axis=0)
# Perform the actual detection by running the model with the image as input
(boxes, scores, classes, num) = sess.run(
[detection_boxes, detection_scores, detection_classes, num_detections],
feed_dict={image_tensor: frame_expanded})
# Draw the results of the detection (aka 'visulaize the results')
vis_util.visualize_boxes_and_labels_on_image_array(
frame,
np.squeeze(boxes),
np.squeeze(classes).astype(np.int32),
np.squeeze(scores),
category_index,
use_normalized_coordinates=True,
line_thickness=8,
min_score_thresh=0.40)
cv2.putText(frame,"FPS: {0:.2f}".format(frame_rate_calc),(30,50),font,1,(255,255,0),2,cv2.LINE_AA)
# All the results have been drawn on the frame, so it's time to display it.
cv2.imshow('Object detector', frame)
t2 = cv2.getTickCount()
time1 = (t2-t1)/freq
frame_rate_calc = 1/time1
# Press 'q' to quit
if cv2.waitKey(1) == ord('s'):
break
rawCapture.truncate(0)
camera.close()


