


MQTT is a messaging protocol that specifically used for communication in IoT connected devices. The whole MQTT system consists of many clients and one broker. Our devices act as clients. MQTT is supported by most microcontrollers and systems. In this project, we will connect our Raspberry Pi with MQTT. There are several applications that can be used to send and receive through MQTT, but in this project, Mosquitto is used to set up a communication platform between two Raspberry Pi’s. Earlier we have connected the MQTT broker with ESP8266.
Components Required
This project works without much additional hardware. You just need a Raspberry Pi.
- Raspberry Pi
What is MQTT?
MQTT stands for Message Queuing Telemetry Transport. MQTT is a machine-to-machine connectivity protocol. It is useful for connections with remote locations where we want to send just a few bytes of data or our sensor values. It is a system where you can publish and receive messages as a client.
By using MQTT you can send commands to control outputs, read and publish data from sensors and much more. Therefore, by using MQTT you can establish communication between multiple devices. Using MQTT you can send a command with a client to control output or you can read data from a sensor and publish it to a client. There are two main terms in MQTT i.e. Client and Broker. Let’s discuss what is client and broker.
MQTT Client: An MQTT client is any device that runs an MQTT library and connects to an MQTT broker over a network. Both publisher and subscriber are MQTT clients. The publisher and subscriber refer that whether the client is publishing messages or subscribing to messages.
MQTT Broker: The broker receives all messages, filter the messages, determine who is subscribed to each message, and send the message to these subscribed clients.
Raspberry Pi MQTT Server Install
To install Mosquitto server and client on your Pi, open Pi terminal and run this command:
sudo apt-get install -y mosquitto mosquitto-clients
After running this command, a Mosquitto server is started automatically.
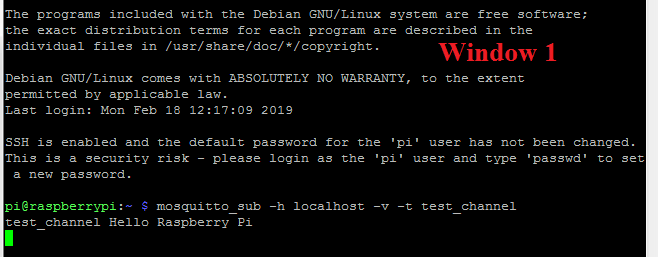
Now we will open a subscriber in the channel using “test_channel” that will receive messages from publisher:
mosquitto_sub -h localhost -v -t test_channel
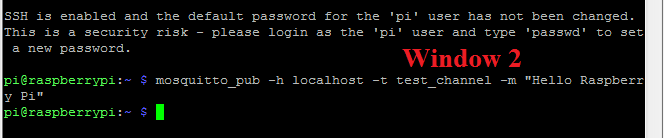
After subscriber we will open a publisher in the same channel with a message to subscriber:
mosquitto_pub -h localhost -t test_channel -m "Hello Raspberry Pi"
Note: We are simply transferring data to the same Raspberry Pi. For that just open two putty terminals, one for the subscriber and other for the publisher. If you are using two different Raspberry Pi’s, then enter your second Pi’ IP address rather than localhost. For example:
mosquitto_pub -h 192.168.1.31 -t test_channel -m "Hello Raspberry Pi"
Raspberry Pi - MQTT Data Exchanging Using Python
The second method to set up a connection between two Raspberry Pi’s using MQTT is using Python code.
In this method, we will use two different python codes for the subscriber and publisher in two different windows or two different Pi’s.
For this first install Paho MQTT library using this command:
sudo pip install paho-mqtt
Now in the first terminal window, create a subscriber file
sudo nano mqtt_subscriber.py
Copy this code and paste it to the subscriber file.
import paho.mqtt.client as mqtt
MQTT_SERVER = "localhost"
MQTT_PATH = "test_channel"

# The callback for when the client receives a connect response from the server.
def on_connect(client, userdata, flags, rc):
    print("Connected with result code "+str(rc))

    # on_connect() means that if we lose the connection and reconnect then subscriptions will be renewed.
    client.subscribe(MQTT_PATH)

# The callback for when a PUBLISH message is received from the server.
def on_message(client, userdata, msg):
    print(msg.topic+" "+str(msg.payload))
    # more callbacks, etc

client = mqtt.Client()
client.on_connect = on_connect
client.on_message = on_message
client.connect(MQTT_SERVER, 1883, 60)

# Blocking call that processes network traffic, dispatches callbacks and
# handles reconnecting.
# Other loop*() functions are available that give a threaded interface and a
# manual interface.
client.loop_forever()
Now run this code using:
sudo python mqtt_subscriber.py
Now our subscriber setup is complete. To set up publisher open a new putty window and create a publisher file using:
sudo nano mqtt_publisher.py
Copy the below code to publisher file.
import paho.mqtt.publish as publish
MQTT_SERVER = "localhost"
MQTT_PATH = "test_channel"
publish.single(MQTT_PATH, "Hello World!", hostname=MQTT_SERVER)
Note: If you are using two different Pi’s, then enter your second Pi’s IP address in place of ‘localhost’ in MQTT_ SERVER.
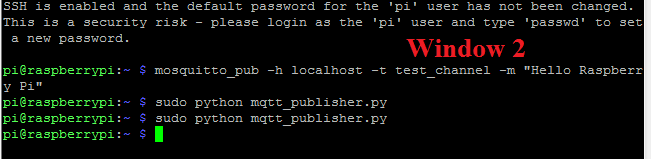
And run it using:
sudo python mqtt_publisher.py

Hence, we have successfully sended the data from Pi using MQTT Server. We have also used ESP8266 to send data using MQTT Server.


