


Servo Motors are commonly used motor in DIY and industrial projects, because of their fast functioning and Accuracy. Also, it’s easy to interface servos with controllers like Arduino, Raspberry Pi, and many others. Earlier we have controlled a LED using Arduino and Esp8266. Here, in this project, we are controlling a Servo Motor using a web browser with the help of Arduino and ESP8266. ESP8266 Wi-Fi module is a cheap and powerful device, helps in communicating with any microcontroller, like here Arduino UNO.
ESP8266 is establishing a connection between the servo motor and the web browser through the IP address. We will develop a small webpage using HTML and javascript and then send commands to Arduino using the Wi-Fi module. The servo motor will be controlled by moving the slider on a webpage. By using this webpage, you can control the Servo from anywhere in the world over the internet. We are using Arduino IDE for Programming ESP8266 NodeMCU.
Components Required
- Servo Motor
- Arduino Uno
- ESP8266 Wi-Fi module
- Breadboard
- Connecting wires
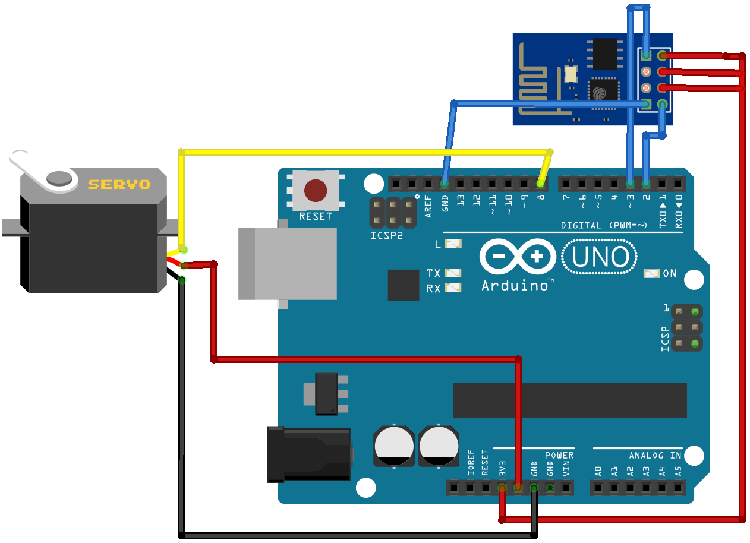
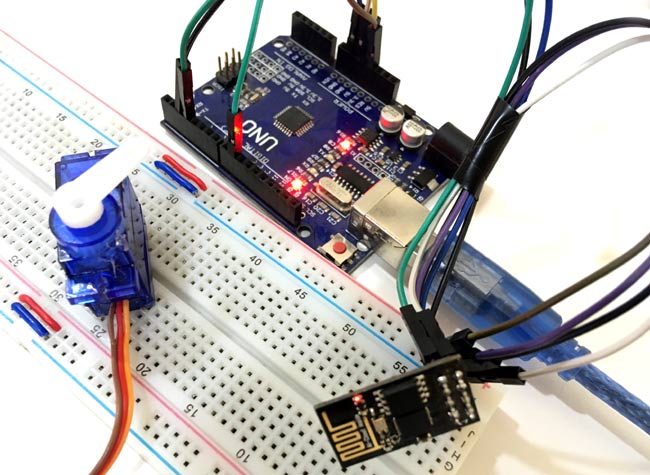
Circuit Diagram
|
S.NO. |
Pin Name |
Arduino Pin |
|
1 |
ESP8266 VCC |
3.3V |
|
2 |
ESP8266 RST |
3.3V |
|
3 |
ESP8266 CH-PD |
3.3V |
|
4 |
ESP8266 RX |
TX |
|
5 |
ESP8266 TX |
RX |
|
6 |
ESP8266 GND |
GND |
|
7 |
Servo Yellow Wire |
8 |
|
8 |
Servo Red Wire |
5V |
|
9 |
Servo Black Wire |
GND |
HTML Code for Web Page
The complete HTML code for controlling the Servo using Arduino and ESP8266 is given below:
<!DOCTYPE html >
<html>
<head>
<title>Web controlled Servo</title>
<script src="jquery.js"></script>
</head>
<body>
<h1> <b> Control Servo Via Web Page</b> </h1>

<div style="margin: 0; width:500px; height:80px;">
    <FORM NAME="form" ACTION="" METHOD="GET">
        Enter ESP8266 IP Address:
        <INPUT TYPE="text" NAME="inputbox" VALUE="192.168.1.254">
    </FORM>
</div>
<h3> Scroll it to rotate servo  </h3>
<input type="range" min="20" max="170" onmouseup="servo1(this.value)" />
</body>

<script>
$.ajaxSetup({timeout:1000});
function servo1(angle)
{
    TextVar = form.inputbox.value;
    ArduinoVar = "http://" + TextVar + ":80";
    $.get( ArduinoVar, { "sr1": angle })    ;
    {Connection: close};
}
</script>
</html>
Copy the given HTML code in the notepad and save it in the ‘.html’ extension. For example, if you want to save the file as ‘motor’, then it should be as ‘motor.html’ so that it can easily open in the web browser.
Now download the jQuery file from here (File Link) and save it in the same folder where you saved the HTML file. Now to create the web page, change the IP address in the program and open the ‘motor.html’ using any web browser. It will show you a simple webpage containing a scroll bar and the IP address of your ESP8266.

Code Explanation
The complete Arduino code for controlling servo motor using ESP8266 based webpage is given at the end of this project.
First, initialize the Software Serial and the servo libraries and define the pins where we have connected ESP8266.
After this, define the servo pin and servo variable.
#include <SoftwareSerial.h>
#include <Servo.h>
SoftwareSerial esp(2, 3); //set ESP8266 Receiver pin = 2, and transmitter pin = 3
#define DEBUG true //This will display the ESP8266 messages on Serial Monitor
#define servopin 8 //servo  on digital port 8
Servo servo1; // Variable for servo
Set the servo at the max position and set the baud rate at 115200.
servo1.attach(servopin);
servo1.write(maxposition);
servo1.detach();
Serial.begin(115200);
esp.begin(115200);
Enter your WiFi name and password. It will connect the ESP8266 to the Wi-Fi and will print the IP address of ESP8266 on the serial monitor.
sendData("AT+RST\r\n", 2000, DEBUG);
  sendData("AT+CWMODE=1\r\n", 1000, DEBUG);
  sendData("AT+CWJAP=\"WiFi Name\",\"Password\"\r\n", 2000, DEBUG); //Enter WiFi name and password
  while(!esp.find("OK")) { // This will check the connection
  }
  sendData("AT+CIFSR\r\n", 1000, DEBUG); // This will print IP address on serial monitor
  sendData("AT+CIPMUX=1\r\n", 1000, DEBUG);
  sendData("AT+CIPSERVER=1,80\r\n", 1000, DEBUG); //start web server on port 80
Now, by using the below commands, ESP8266 will check for the input availability. If the input is available, it will print it on the serial monitor and also will rotate the servo according to the input.
if (esp.available()) // This will check if input available on ESP8266 or not
{
if (esp.find("+IPD,")) {
String msg;
esp.find("?"); //run cursor until command is found
msg = esp.readStringUntil(' ');
String command = msg.substring(0, 3);
String valueStr = msg.substring(4);
int value = valueStr.toInt(); // This will convert Value to integer
if (DEBUG) {
Serial.println(command);
Serial.println(value);
}
Now in the below code, by using the SendData function, it will send the commands to the ESP8266 and will check their response.
String sendData(String command, const int timeout, boolean debug)
{
  String response = "";
  esp.print(command);
  long int time = millis();
  while ( (time + timeout) > millis())
  {
    while (esp.available())
    {
      char c = esp.read();
      response += c;
    }
  }
  if (debug)
  {
    Serial.print(response);
  }
  return response;
}
Make the required changes in this and upload it to Arduino IDE. Your serial monitor will show you the IP address of your ESP8266. Now after this, navigate to your browser and open the web page that you created earlier and scroll the button to move the servo.
Hence, we have successfully set up a local server using ESP8266 for controlling the servo through a webpage. Not only ESP8266 but you can also use ESP32 for designing IoT projects.
#include <SoftwareSerial.h> //Including the software serial library
#include <Servo.h> //including the servo library
SoftwareSerial esp(2,3); //set ESP8266 Receiver pin = 2, and transmitter pin = 3
#define DEBUG true //This will display the ESP8266 messages on Serial Monitor
#define servopin 8 //connect servo on pin 8
Servo servo1; //variable for servo
int current_position = 170;
int v = 10;
int minposition = 20;
int maxposition = 160;
void setup()
{
servo1.attach(servopin);
servo1.write(maxposition);
servo1.detach();
Serial.begin(115200);
esp.begin(115200);
sendData("AT+RST\r\n", 2000, DEBUG);
sendData("AT+CWMODE=1\r\n", 1000, DEBUG);
sendData("AT+CWJAP=\"WiFiName\",\"WiFi Password\"\r\n", 2000, DEBUG); //Enter WiFi name and password
while(!esp.find("OK")) { //this will check for connection
}
sendData("AT+CIFSR\r\n", 1000, DEBUG); //This will print IP address on the serial monitor
sendData("AT+CIPMUX=1\r\n", 1000, DEBUG);
sendData("AT+CIPSERVER=1,80\r\n", 1000, DEBUG); //This will start the web server on port 80
}
void loop()
{
if (esp.available()) // This will check if input is available on ESP8266
{
if (esp.find("+IPD,")) {
String msg;
esp.find("?"); //run cursor until command is found
msg = esp.readStringUntil(' ');
String command = msg.substring(0, 3);
String valueStr = msg.substring(4);
int value = valueStr.toInt(); //It will convert Value to integer
if (DEBUG) {
Serial.println(command);
Serial.println(value);
}
delay(100);
if(command == "sr1") {
if (value >= maxposition) {
value = maxposition;
}
if (value <= minposition) {
value = minposition;
}
servo1.attach(servopin);
while(current_position != value) {
if (current_position > value) {
current_position -= 1;
servo1.write(current_position);
delay(100/v);
}
if (current_position < value) {
current_position += 1;
servo1.write(current_position);
delay(100/v);
}
}
servo1.detach();
}
}
}
}
String sendData(String command, const int timeout, boolean debug)
{
String response = "";
esp.print(command);
long int time = millis();
while ( (time + timeout) > millis())
{
while (esp.available())
{
char c = esp.read();
response += c;
}
}
if (debug)
{
Serial.print(response);
}
return response;
}


