


From local supermarkets to factories and industries we can notice a weighing scale being used to measure weight of goods and products. This practise usually helps in maintaining standard and desired ratio in chemical or food industries. In some cases the goods that are being measured might be very valuable and should be monitored remotely to make sure everything is delivered in the correct proportion.
These instruments which measure the weight mostly has a sensor called Load Cell. The load cell actually converts the physical force into electrical signals. By using the idea of IOT (Internet of Things) we can automate this process by monitoring weight from anywhere in the world. In this tutorial we will measure weight using Load Cell & HX711 with NodeMCU ESP8266 and send those weight data over the internet using the ThingSpeak server to build our own smart weighing machine. Since NodeMCU has a built in ESP8266 Wi-Fi it makes our IOT project quite simple. Now lels see about ThingSpeak and get into our project.
Components Required:
- Weighing Load Cell Sensor 1Kg
- Loadcell sensor 24-bit ADC - HX711
- NodeMCU
- 5V DC Power Adapter
- I2C 16x2 LCD Display
- Breadboard
- Connecting Wires
How to use Load cell with HX711:
Before we dive into the IoT part of the project, it is important to know how our weight sensor i.e how load cell works and how it can be set-up with HX711 to measure weight with load cell. Then we will connect it with NodeMCU to use it like an IoT weight sensor.
Load Cell Working:
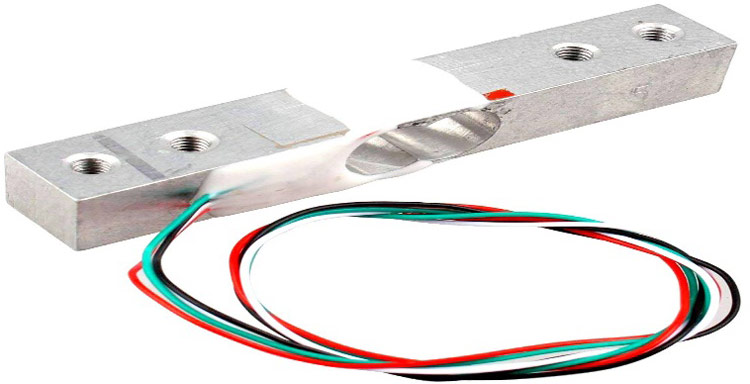
The load cell is able to measure the electrical resistance that changes in response to the strain (e.g. pressure or force) applied to the load cell. Load cells are used for quick and precise measurements. Compared with other sensors load cell are relatively more affordable and has longer life span. The one I have used in this project is a straight bar load cell. This straight bar load cell is made from an aluminium alloy and is capable of reading a capacity of 1KG of weight. It has four lead wires which can be connected to HX711 A/D Pressure Sensor.
Setting up load cell:
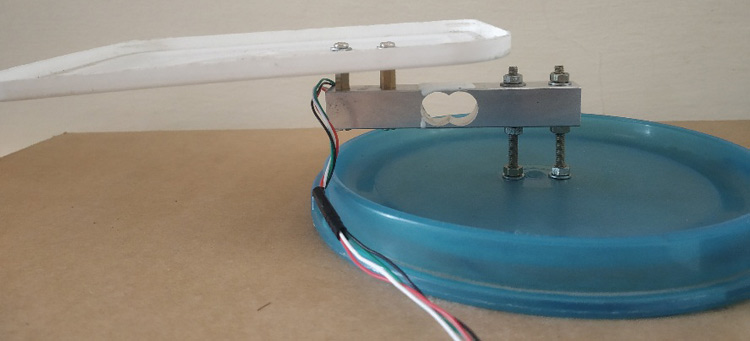
Now let’s see the installation of the load cell sensor. It is very simple the load cell needs to be fixed at one end through the screw hole and the other end left floating state. A label (with arrow) indicates the direction of the gravitational force. See the below image where I have mounted the load cell on the plastic material. You can use wooden panels to get high accuracy.
HX711 Module:
The HX711 load cell amplifier uses 24 high precision A/D converter chip HX711. It is a specially designed for the high precision electronic scale design, with two analog input channel, the internal integration of 128 times the programmable gain amplifier. The HX711 circuit can be configured to provide a bridge type pressure bridge (such as pressure, weighing sensor mode), of high precision and low cost.
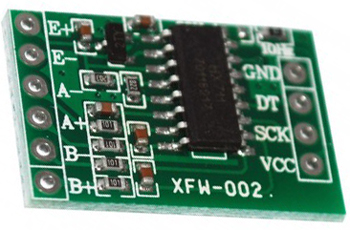
Specifications of HX711
- Differential input voltage: ±40mV (Full-scale differential input voltage is ± 40mV)
- Data accuracy: 24 bit (24 bit A / D converter chip.)
- Refresh frequency: 10/80 Hz
- Operating Voltage: 2.7V to 5VDC
- Operating current: <10 mA
- Size: 24x16mm
Now let’s see the circuit connection details:
Circuit Diagram:
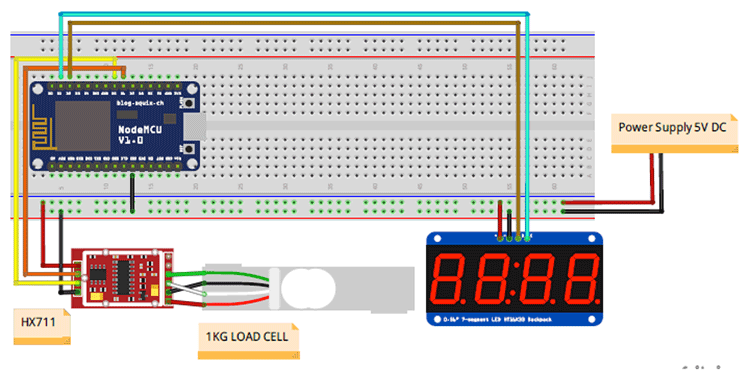
The circuit diagram to interface load cell with NodeMCU is shown below. An I2C display unit is shown in place of LCD, you can follow the same steps (in table below) to connect your I2C LCD module with NodeMCU.
Connections between Load Cell and HX711:
|
Load Cell (Wires) |
HX711 |
|
Red |
E+ |
|
Black |
E- |
|
White |
A- |
|
Green |
A+ |
Connections between HX711 & NodeMCU & 5V DC Power Adapter:
|
NodeMCU |
HX711 |
5V DC Power Source |
|
D5 |
DT |
- |
|
D6 |
SCK |
- |
|
GND |
GND |
GND |
|
|
VCC |
+5V |
16x2 I2C display with NodeMCU:
|
16X2 I2C LCD Display |
NodeMCU |
|
VCC |
+3.3V |
|
GND |
GND |
|
SDA |
D2 |
|
SCL |
D1 |
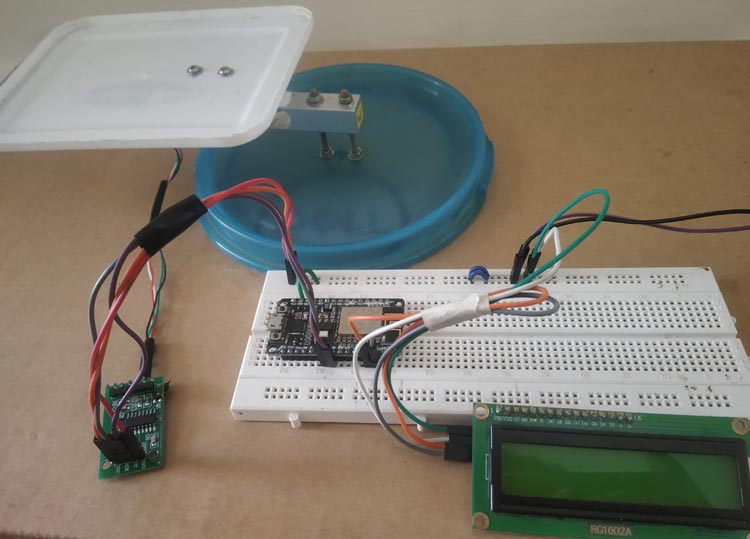
This is how the complete setup for this Smart weighing machine will look:
Now let’s setup the ThingSpeak account and then proceed with programming.
ThingSpeak:
ThingSpeak is a cloud based data platform which is used to send and receive the data in real time using HTTP protocol. It is used in Iot application to store and monitor the data from anywhere in the world over internet. In this tutorial we won’t tell you the basics on how to get started with ThingSpeak since we have already built a lot of projects around it, Here are some Iot projects where ThingSpeak is used as an IoT cloud:
- IoT Wireless Weather Station using Arduino, ESP8266 and ThingSpeak
- IoT Based Temperature and Humidity Monitoring over ThingSpeak using Arduino UNO and ESP8266
- IoT Based Raspberry Pi Weather Station using DHT11 and BMP180 Sensor
- IoT Based Temperature and Humidity Monitoring using ThingSpeak and ESP8266
Programming NodeMCU for measuring the weight and uploading data to ThingSpeak:
For this IoT weighing Machine we will connect the NodeMCU and then measure the weight from the load cell by interfacing HX711 with NodeMCU and then display those measured weight on 16x2 LCD display and also upload those values to the ThingSpeak server.
In this project we have used few libraries. For interfacing I2C 16X2 LCD display with NodeMCU, a library called LiquidCrystal.h is used along with Wire.h library to use I2C bus. Make sure you download and add this I2C LCD Display library to your Arduino IDE.
For measuring weight from the HX711 we have used a library called HX711 library, download and add this to your IDE. With the help of this library, by using just one line we can determine the weight and also, we can calibrate our IoT load cell for accurate results. Do remember HX711 calibration plays a vital role in determining the accuracy of your results.
For using ThingSpeak with NodeMCU we need the ThingSpeak library which can be downloaded in Arduino IDE by opening Sketch-> Include library -> Manage Libraries and search ThingSpeak library and then install.
Complete code with a working video is given at the end of the tutorial, here we are explaining the code in detail.
Now the following libraries are included in the program
#include "HX711.h"
#include <ESP8266WiFi.h>;
#include <WiFiClient.h>;
#include <ThingSpeak.h>;
#include <Wire.h>
#include <LiquidCrystal_I2C.h>
Next for the LiquidCrystal_I2C the lcd object is created, parameters such as 0x27 is I2C address and 16,2 is type of LCD display
LiquidCrystal_I2C lcd(0x27, 16, 2);
Next for the WifiClient the client object is created.
WiFiClient client;
Next your Wi-Fi details such as SSID and password are included.
const char* ssid = ""; //Your Network SSID const char* password = "!"; //Your Network Password
Next Channel number and the Write API according to your ThingSpeak account is given. Replace XXXXX with channel number and then your Write API key.
unsigned long myChannelNumber = XXXXX; //Your Channel Number (Without Brackets)

const char * myWriteAPIKey = "  ";   //Your Write API Key
Next the object scale for the HX711 library is created with parameters of the pins (DT,SCK) HX711 connected with NodeMCU.
HX711 scale(D5, D6);
Next the calibration factor according to my load cell is (888). You can change according to your load cell.
float calibration_factor = 888; // this calibration factor is adjusted according to my load cell
A variable is defined to store the measured weight. I have used integer variable to have weight values without decimal places. (You can also use float instead)
int units;
Next in the void setup(), a welcome message is displayed on the LCD display and then the NodeMCU is connected to the Wi-Fi network (To hotspot whose username and password you provided). After that NodeMCU is connected with ThingSpeak Server.
{
  Serial.begin(9600);
  Wire.begin(D2, D1);
  lcd.begin();
  lcd.print("Circuit Digest");
  lcd.setCursor(0,1);
  lcd.print("NodeMCU Wg Scale");
  delay(2000);
  lcd.clear();
  lcd.print("Connecting Wifi");
  lcd.setCursor(0,1);
  lcd.print("And Thingsspeak");
  WiFi.begin(ssid, password);
  ThingSpeak.begin(client);
  delay(3000);
  Serial.println("HX711 calibration sketch");
  Serial.println("Remove all weight from scale");
  Serial.println("After readings begin, place known weight on scale");
  Serial.println("Press + or a to increase calibration factor");
  Serial.println("Press - or z to decrease calibration factor");
  scale.set_scale();
  scale.tare();  //Reset the scale to 0
  long zero_factor = scale.read_average(); //Get a baseline reading
  Serial.print("Zero factor: "); //This can be used to remove the need to tare the scale. Useful in permanent scale projects.
  Serial.println(zero_factor);
}
Next in the void loop(), the weight from the HX711 is obtained and stored in the variable units using the line
units = scale.get_units(), 10;
and this value is updated to the ThingSpeak server using the line.
ThingSpeak.writeField(myChannelNumber, 1,units, myWriteAPIKey); //Update in ThingSpeak
This value is updated every 15 seconds to the ThingSpeak as ThingSpeak free account has limitation of updating value every 15 seconds.
{
scale.set_scale(calibration_factor); //Adjust to this calibration factor
Serial.print("Reading: ");
lcd.clear();
units = scale.get_units(), 10;
if (units < 0)
{
units = 0;
}
if (units == 0)
{
lcd.print("Weight :");
lcd.print(units);
lcd.print("  g");
ThingSpeak.writeField(myChannelNumber, 1,units, myWriteAPIKey); //Update in ThingSpeak
Serial.print(units);
Serial.print(" grams");
Serial.print(" calibration_factor: ");
Serial.print(calibration_factor);
Serial.println();
delay(15000);
}
if (units > 0)
{
lcd.print("Weight :");
lcd.print(units);
lcd.print("  g");
ThingSpeak.writeField(myChannelNumber, 1,units, myWriteAPIKey); //Update in ThingSpeak
Serial.print(units);
Serial.print(" grams");
Serial.print(" calibration_factor: ");
Serial.print(calibration_factor);
Serial.println();
delay(15000);
}
This function is used to set the calibration factor by comparing to the known weights to make good weight measurement accuracy. So, this can be done in the Serial monitor (Tools->Serial Monitor). By sending (+ or a) the calibration factor increases and the by pressing (- or z) decreases calibration factor.
  if(Serial.available())
  {
    char temp = Serial.read();
    if(temp == '+' || temp == 'a')
      calibration_factor += 1;
    else if(temp == '-' || temp == 'z')
      calibration_factor -= 1;
  }
Complete code for this IoT Load Cell is given at the end of the tutorial.
Working of IoT Weighing Machine:
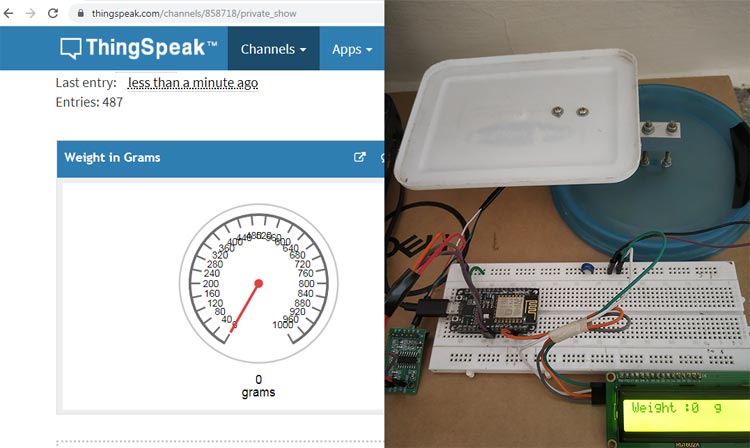
After uploading code and signing into your ThingSpeak account. Place the object whose weight is to be measured on the loadcell. The value gets displayed in the LCD display and also on the ThingSpeak gauge widget. When no weight is placed the gauge shows zero as shown in the below image.
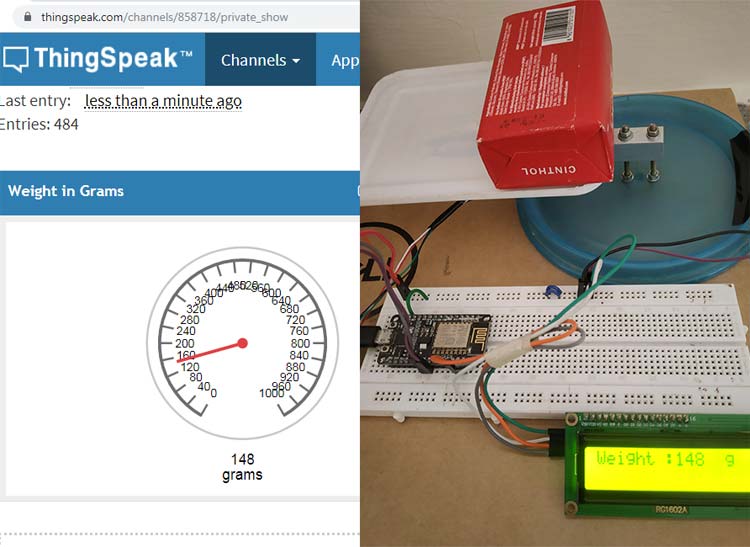
When a soap of know weight (150g) placed, the LCD display shows 148kg and the gauge also display the same. As you can see the measured weight is 2g less than actual weight.
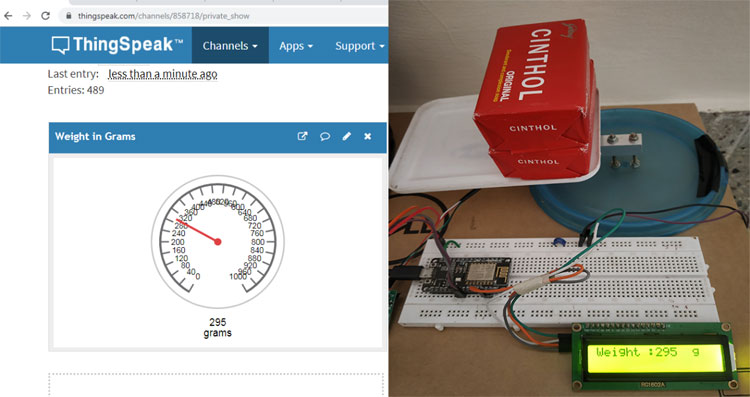
When two soap bars (150g + 150g) is placed. Since I have used plastic mounting of Load Cell there is slight inaccurate value of 295g which is still close to the original value of 300g.
Hope you understood the tutorial and learnt something useful from it. If you have any questions in getting it to work, please leave them in the comment section below. You can watch the video linked below for the complete working of this project.
#include "HX711.h"
#include <ESP8266WiFi.h>;
#include <WiFiClient.h>;
#include <ThingSpeak.h>;
#include <Wire.h>
#include <LiquidCrystal_I2C.h>
LiquidCrystal_I2C lcd(0x27, 16, 2);
const char* ssid = "488pista"; //Your Network SSID
const char* password = "!@#123wasd"; //Your Network Password
WiFiClient client;
unsigned long myChannelNumber = 858718; //Your Channel Number (Without Brackets)
const char * myWriteAPIKey = "NLDSW5N6UHWHSOHO"; //Your Write API Key
HX711 scale(D5, D6);
float calibration_factor = 888; // this calibration factor is adjusted according to my load cell
int units;
float ounces;
void setup()
{
Serial.begin(9600);
Wire.begin(D2, D1);
lcd.begin();
lcd.print("Circuit Digest");
lcd.setCursor(0,1);
lcd.print("NodeMCU Wg Scale");
delay(2000);
lcd.clear();
lcd.print("Connecting Wifi");
lcd.setCursor(0,1);
lcd.print("And Thingsspeak");
WiFi.begin(ssid, password);
ThingSpeak.begin(client);
delay(3000);
Serial.println("HX711 calibration sketch");
Serial.println("Remove all weight from scale");
Serial.println("After readings begin, place known weight on scale");
Serial.println("Press + or a to increase calibration factor");
Serial.println("Press - or z to decrease calibration factor");
scale.set_scale();
scale.tare(); //Reset the scale to 0
long zero_factor = scale.read_average(); //Get a baseline reading
Serial.print("Zero factor: "); //This can be used to remove the need to tare the scale. Useful in permanent scale projects.
Serial.println(zero_factor);
}
void loop()
{
scale.set_scale(calibration_factor); //Adjust to this calibration factor
Serial.print("Reading: ");
lcd.clear();
units = scale.get_units(), 10;
if (units < 0)
{
units = 0;
}
if (units == 0)
{
lcd.print("Weight :");
lcd.print(units);
lcd.print(" g");
ThingSpeak.writeField(myChannelNumber, 1,units, myWriteAPIKey); //Update in ThingSpeak
Serial.print(units);
Serial.print(" grams");
Serial.print(" calibration_factor: ");
Serial.print(calibration_factor);
Serial.println();
delay(15000);
}
if (units > 0)
{
lcd.print("Weight :");
lcd.print(units);
lcd.print(" g");
ThingSpeak.writeField(myChannelNumber, 1,units, myWriteAPIKey); //Update in ThingSpeak
Serial.print(units);
Serial.print(" grams");
Serial.print(" calibration_factor: ");
Serial.print(calibration_factor);
Serial.println();
delay(15000);
}
if(Serial.available())
{
char temp = Serial.read();
if(temp == '+' || temp == 'a')
calibration_factor += 1;
else if(temp == '-' || temp == 'z')
calibration_factor -= 1;
}
}


