


Conventional energy meter which we use in our households to measure Energy consumption is an offline device, so it has to be monitored manually. But nowadays there are Smart Energy Meters available in the market whose readings can be monitored from anywhere using the internet and not only energy consumption but we can monitor multiple parameters such as voltage, current, power factor, frequency, etc. on laptop or mobile using IoT.
So today we are building Smart Energy Meter using IoT. Here we will use PZEM-004T AC multifunction Electric Energy Metering Power Monitor module to measure the parameters and will use NodeMCU ESP8266 to post the data to an HTML Webpage.
Materials used
- NodeMCU ESP8266
- PZEM-004T module
- CT coil
- Breadboard
- Jumpers
- Connecting Wire
Working of PZEM-004T Module
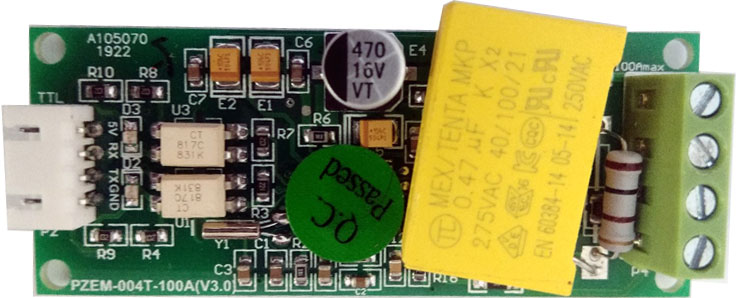
PZEM-004TAC Module is used for measuring AC voltage, current, active power, frequency, power factor, and active energy. The module gives output through TTL terminals, which can be read by various microcontrollers for further applications.
Technical Features:
-
Voltage Measuring Range: 80-260 VAC
-
Current Measuring Range: 0-100 Amp
-
Active Power Measuring Range: 0-23KW
-
Power Factor Measuring Range: 0-1
-
Frequency Measuring Range: 45-65 Hz
-
Module Working Voltage: 5V DC
-
Output Interface: TTL
Pin Description:
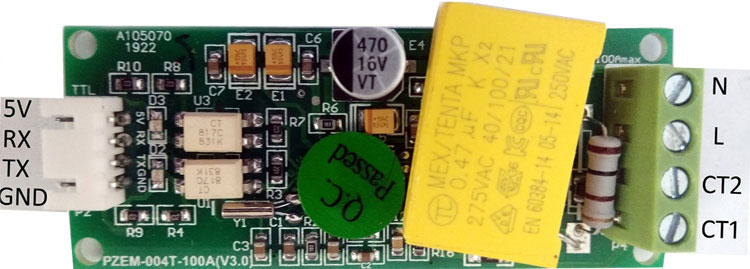
VCC: 5V DC Input supply for the Module
GND: Ground electrical Reference
TX: UART Transmission pin for Data
RX: UART Receiver pin for Data
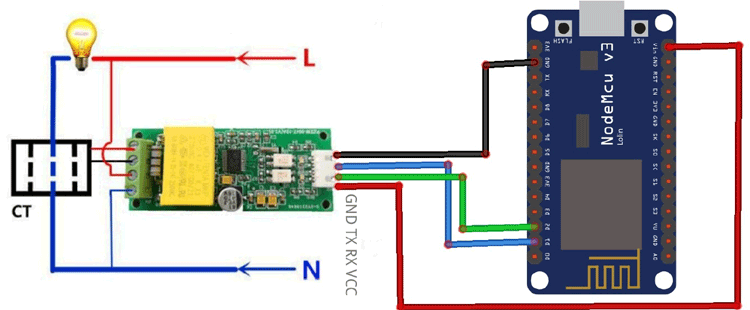
IoT Energy Meter Circuit Diagram
Circuit diagram for IoT based smart energy meter using NodeMCU ESP8266 is given below:
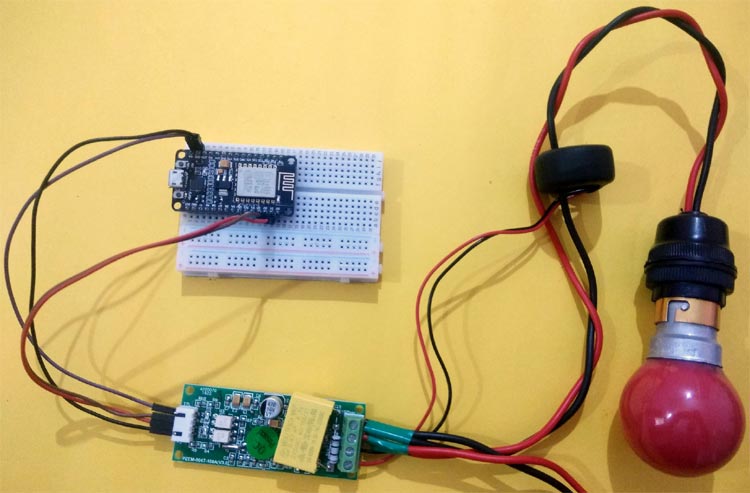
This is how the complete setup for IoT energy meter will look after all the connections:
Programming Explanation
After the successful completion of the hardware setup, now it’s time to program NodeMCU. Complete code for this smart electricity meter along with the video is given at the end of this tutorial. The stepwise description of the code is given below.
To upload code into NodeMCU using Arduino IDE, follow the steps below:
1. Open Arduino IDE, then go to File–>Preferences–>Settings.
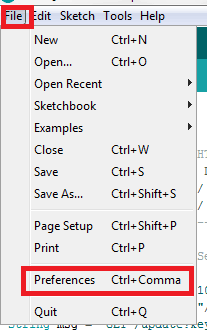
2. Type https://arduino.esp8266.com/stable/package_esp8266com_index.json in the ‘Additional Board Manager URL’ field and click ‘Ok’.

3. Now go to Tools > Board > Boards Manager. In the Boards Manager window, Type ESP8266 in the search box, select the latest version of the board, and click on install.
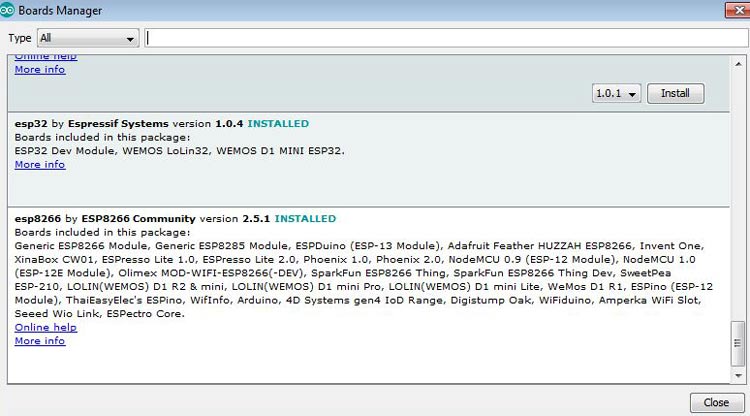
4. After installation is complete, go to Tools ->Board -> and select NodeMCU 1.0(ESP-12E Module). Now you can program NodeMCU with Arduino IDE.
After the above setup for programming NodeMCU using Arduino IDE, upload the complete code into ESP8266 NodeMCU. The stepwise explanation of the complete code is given below.
First, include all the required library files in the code. Here ESP8266 board library is used for NodeMCU and PZEM004Tv30.h is used for the Energy monitoring module which can be downloaded from here.
#include<ESP8266WiFi.h>
#include<WiFiClient.h>
#include<ESP8266WebServer.h>
#include <PZEM004Tv30.h>
Then an object is created in the class PZEM004Tv30 which can be used throughout the program scope. The Software serial pins are also defined, which are D1 and D2 in my case.
PZEM004Tv30 pzem(D1,D2); //RX/TX
Then create the ESP8266WebServer class object with the name server and default port number 80.
ESP8266WebServer server (80);
Now, declare the network credentials, i.e. SSID and password. It is required to connect our NodeMCU to the internet.
const char* ssid = "admin";
const char* password = "12345678";
Then, to connect NodeMCU to the internet, call WiFi.begin and pass network SSID and password as its arguments. Check for the successful network connection using WiFi.status() and after a successful connection, print a message in Serial Monitor with IP address.
Serial.begin(115200);
WiFi.begin(ssid, password);
while (WiFi.status() != WL_CONNECTED)
  {
  delay(500);
  Serial.print(".");
  }
  Serial.print(WiFi.localIP());
In the next step, an HTML page is created as shown below, which has an HTML table to show the product details and billing information in the cart. The HTML page is stored in a string variable so that it can be sent back on client request using the server.send() function.
server.on("/", []()
  {
    page = "<html><head><title>Smart Energy Meter using IoT</title></head><style type=\"text/css\">";
    page += "table{border-collapse: collapse;}th {background-color:  green ;color: white;}table,td {border: 4px solid black;font-size: x-large;";
    page += "text-align:center;border-style: groove;border-color: rgb(255,0,0);}</style><body><center>";
    page += "<h1>Smart Energy Meter using IoT</h1><br><br><table style=\"width: 1200px;height: 450px;\"><tr>";
    page += "<th>Parameters</th><th>Value</th><th>Units</th></tr><tr><td>Voltage</td><td>"+String(voltage)+"</td><td>Volts</td></tr>";
    page += "<tr><td>Current</td><td>"+String(current)+"</td><td>Amperes</td></tr><tr><td>Power Factor</td><td>"+String(pf)+"</td><td>XXXX</td>";
    page += "<tr><td>Power</td><td>"+String(power)+"</td><td>Watts</td></tr><tr>";
    page += "</tr><tr><td>Frequency</td><td>"+String(frequency,1)+"</td><td>Hz</td></tr>";
    page += "<meta http-equiv=\"refresh\" content=\"3\">";
    server.send(200, "text/html", page);
  });
  server.begin();
Inside loop(), different parameters are read using dedicated functions like voltage(), current(), etc. and then assigned to separate variables that will be appended with the HTML webpage.
voltage = pzem.voltage();
current = pzem.current();
power = pzem.power();
frequency = pzem.frequency();
pf = pzem.pf();
In the end, to handle the client request, we have to call server.handleClient(). It will handle new requests and check them.
server.handleClient();
Testing the IoT based energy meter using NodeMCU
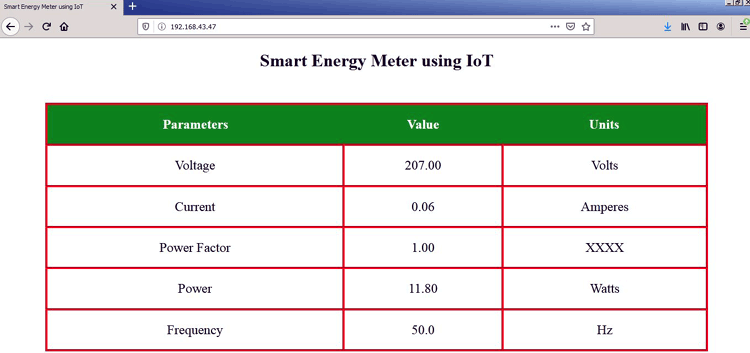
After complete connections and hardware setup, just upload the code into NodeMCU and open the IP address printed in the serial monitor. You will see something like below.
Here we have attached an AC bulb to monitor the energy consumed by the bulb along with other parameters like voltage, current, power factor, etc.
Here we don’t have to worry about the calculations of voltage, current, power, etc. as the library provided for PZEM-004T Module (PZEM004Tv30.h) has all the functions related to it, we just have to call them to display the related information.
So this is how we can build the IoT based smart energy meter using NodeMCU ESP8266. Complete code and demo video are given below.
#include<ESP8266WiFi.h>
#include<WiFiClient.h>
#include<ESP8266WebServer.h>
#include <PZEM004Tv30.h>
PZEM004Tv30 pzem(D1,D2); //RX/TX
const char* ssid = "admin";//Replace with your network SSID
const char* password = "12345678";//Replace with your network password
ESP8266WebServer server(80);
float voltage,current,pf,frequency,power;
String page = "";
void setup()
{
Serial.begin(115200);
WiFi.begin(ssid, password);
while (WiFi.status() != WL_CONNECTED)
{
delay(500);
Serial.print(".");
}
Serial.println(WiFi.localIP());
server.on("/", []()
{
page = "<html><head><title>Smart Energy Meter using IoT</title></head><style type=\"text/css\">";
page += "table{border-collapse: collapse;}th {background-color: green ;color: white;}table,td {border: 4px solid black;font-size: x-large;";
page += "text-align:center;border-style: groove;border-color: rgb(255,0,0);}</style><body><center>";
page += "<h1>Smart Energy Meter using IoT</h1><br><br><table style=\"width: 1200px;height: 450px;\"><tr>";
page += "<th>Parameters</th><th>Value</th><th>Units</th></tr><tr><td>Voltage</td><td>"+String(voltage)+"</td><td>Volts</td></tr>";
page += "<tr><td>Current</td><td>"+String(current)+"</td><td>Amperes</td></tr><tr><td>Power Factor</td><td>"+String(pf)+"</td><td>XXXX</td>";
page += "<tr><td>Power</td><td>"+String(power)+"</td><td>Watts</td></tr><tr>";
page += "</tr><tr><td>Frequency</td><td>"+String(frequency,1)+"</td><td>Hz</td></tr>";
page += "<meta http-equiv=\"refresh\" content=\"3\">";
server.send(200, "text/html", page);
});
server.begin();
}
void loop()
{
voltage = pzem.voltage();
current = pzem.current();
power = pzem.power();
frequency = pzem.frequency();
pf = pzem.pf();
server.handleClient();
}


