


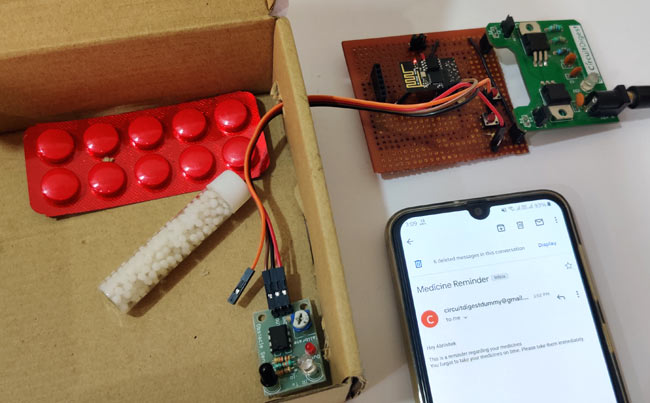
In our busy and hectic life, we sometimes forget to take medicines on time. In hospitals it becomes difficult for doctors to remind every patient to take the medicines on time. The perfect solution for this problem should be a Automatic Medicine Reminder Alarm System which will alert the patient either by sending email/SMS or by triggering some alarm. In this tutorial we will build an IOT Medicine Reminder Project using ESP8266-01 board which will get the time from internet (NTP server) and send an email as a reminder to take medicines according to the schedule of medication.
Components Required
- ESP8266-01
- IR Sensor
- 3.3 V power supply
- Push button
- FTDI Board
- Soldering wire
- Jumper wires
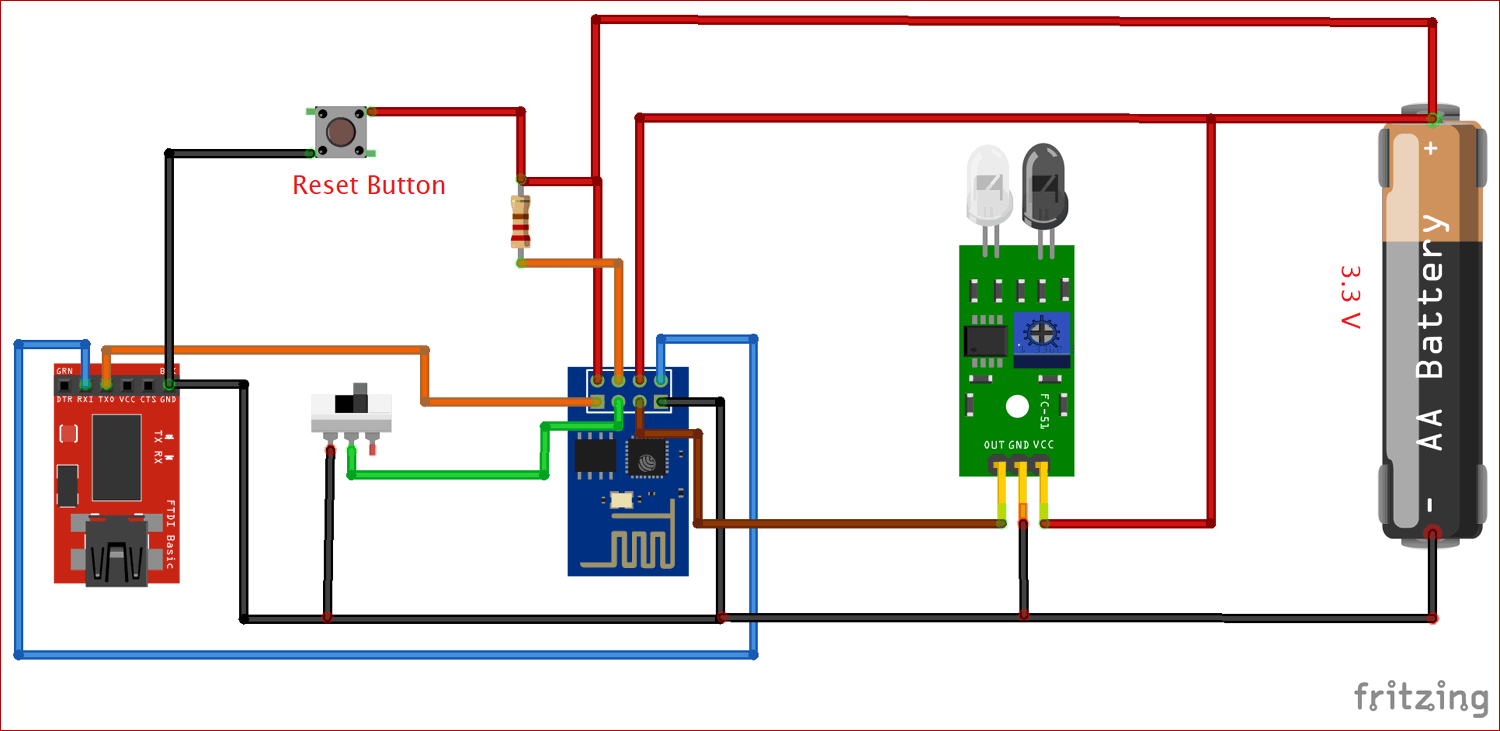
Circuit Diagram
ESP8266-01 Wi-Fi module
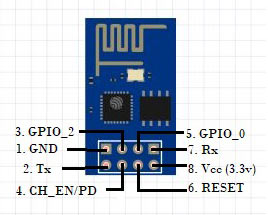
ESP8266-01 is a Wi-Fi module and has a onboard microcontroller manufactured by Espressif. This module help microcontrollers to get connect to the Wi-Fi Network using AT commands through UART communication. There is a range of Wi-Fi modules from ESP-01 to ESP-12 by Espressif Systems, but ESP-01 is very low cost and easily available in the market. It has 8 pins -Two UART Pins (RX and TX), two GPIO pins, one Reset and one CH_PD and two for 3.3 V and Ground.
Programming ESP-01:
ESP8266-01 can be programmed in many ways but in this project we will be programming it with FTDI Serial Adapter Module. You can also use USB to TTL converter to program it. ESP8266 is not breadboard friendly so here I have soldered all the components on a perf board as per above circuit diagram. This board can be used to program ESP8266 in future projects. Check the detailed tutorial on how to program ESP-01 using FTDI module.

Here a Reset button with pull up resistor is used to reset the Wi-Fi module and a jumper switch is used to switch the module in programmable mode. During programming mode, GPIO0 PIN (Flash pin) is made grounded with the help of Jumper cap, and when left open it can be used as GPIO pin.
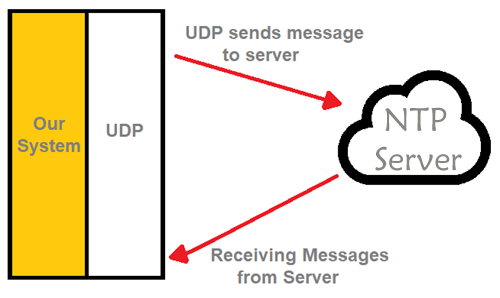
Network Time Protocol (NTP)
NTP is very old networking Internet Protocol (IP) used for synchronization the time between systems and Data networks. To synchronize computer clock times with extreme precision NTP uses Coordinated Universal Time, offering greater accuracy on smaller networks -- down to a single millisecond in a local area network.. NTP uses UTC as the time reference and provides accurate and synchronized time across the Internet.
NTP works on client-server mode, where NTP is the server and requesting device like ESP8266-01 acts as client. The client sends request to NTP server and NTP server responds with data packet consisting timestamp and time zone related information.
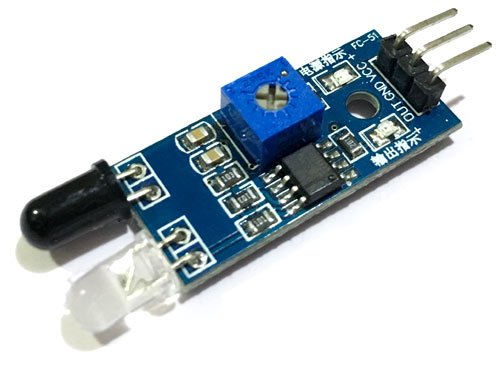
IR Sensor
IR sensor is an electronic device which is used to detect objects by sensing infrared radiations reflected from the objects. It mainly consists of a transmitter IR LED and a receiver photodiode. It detects infrared radiations which have wavelength from 700nm to 1mm. When a specific positive voltage is applied across the transmitter LED it transmits the IR rays. If these rays fall on some object then that object reflects back the IR rays which are received by the receiver photodiode. The receiver diode generates a voltage across its terminals which depend on the intensity of light reflected by the object. Generally IR receiver LED is darker (black) whereas transmitter is transparent in color. In this project one IR sensor will be kept inside the medicine box to detect the opening and closing of the box.
Configure SMTP2GO to Send Email Alert
SMTP (Simple Mail Transfer Protocol) is a platform used to send and receive large number of emails from remote locations automatically. Due to its fast and reliable service it is mostly used by developers and marketers to save their time in sending emails in a secured way. Its servers and data centers are all around the world which helps it to select the nearest server and hence provides fastest connection in sending and receiving emails. It can be used in IOT projects to send emails automatically when a particular task is occurred. In this project we will be using SMTP2GO to send emails alerts when fire is detected by the flame sensor.
Setting up SMTP2Go:
Go to https://www.smtp2go.com/ and click on Try SMTP2GO Free.

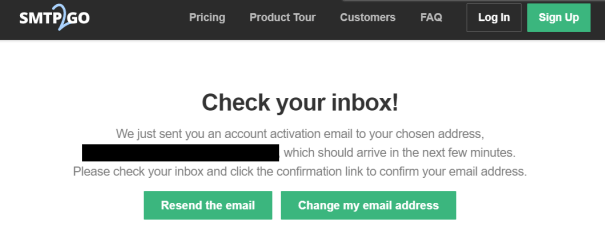
Fill the details with your name, email id and password and click on Submit. Then it will redirect to a page where it will ask you to activate SMTP2GO.
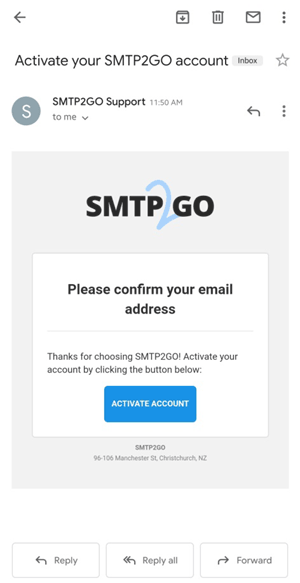
Go to your mail box and click on the mail received by SMTP2GO. Click on Activate Account.
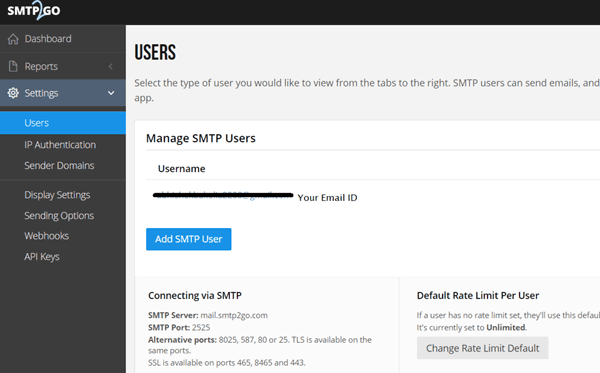
Now enter the username which is your email id and password. A new page will open with your username. Save these username and password in a notepad file which will be needed later in Arduino IDE code. Now click on Settings and then Click on Users. A new page will open with your user name and SMTP server details. Save the SMTP server and SMTP Port as these will be used in Arduino code to connect with SMTP server.
Encoding to Base64 Value
Before sending username and password to SMTPTOGO server, we need to encode them into Base64. To encode them we will used the https://www.base64encode.org/.
Here just enter the username and password you want to encode into base64 and Click on Encode to generate the encoded values. Copy and save the encoded values.
For instance, is your user name is “[email protected]” then enter this username in the given text area and then click on encode. The encoded base64 value is “cGFzc3dvcmQ=”. Similarly do it for password.

We previously used SMTP2GO service in Panic Alarm system and IoT Fire Alarm System.
Working of IoT Medicine Reminder Alarm
Connections for this Medicine Reminder Project are already shown in the circuit diagram above. Here The RX pin of FTDI is connected to TX pin of ESP-01 and TX pin of FTDI is connected to RX pin of ESP-01. Since the output voltage we get from FTDI is around 4 volts therefore it can’t be used to power the ESP-01 as it will damage the ESP. So we will use a 3.3V DC from a breadboard power supply which takes input power from a adapter and provides a dual output of 5 volts and 3.3 volts. This bread board power supply module is created by following this tutorial on CircuitDigest.
Make sure to connect the grounds of FTDI and ESP-01 to the ground of power supply module. GPIO 2 pin of the ESP-01 is connected with the data pin of IR Sensor and it is placed inside the medicine box to detect the opening and closing of the box.
Now copy the complete code given in the end of the tutorial and paste in the Arduino IDE. Replace the Wi-Fi credentials with your SSID and password. Change the username and password of SMTP2GO to Base 64 value as shown above. Connect the GPIO0 of flash pin to ground for programming mode and connect the FTDI with PC using USB port. Click on upload and press the reset button 2-3 times. After successfully uploading the code, disconnect the GPIO0 pin from the ground and press Reset button once and open the serial monitor to see the status messages.
Serial monitor will show the Time, No. of times box opened to take medicines and box status (Closed/open). Suppose time to take medicine is 12 PM and if you have already taken the medicines before 12PM then at 12 PM it will show the message “Medicines Taken Already”. And if you haven’t taken medicines before 12 PM then system will work normally like IR sensor will detect whether the box is not opened and ESP-01 will send an mail regarding the reminder to take medicines using SMTP2GO. You will also get confirmation of mail sent in the Serial monitor as shown below.
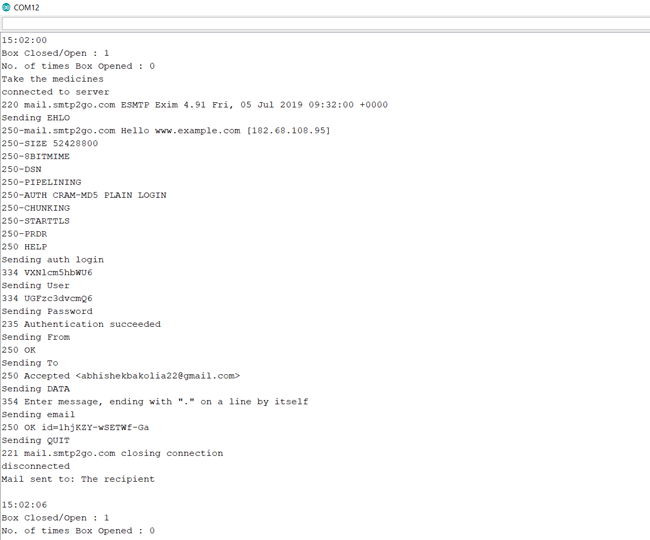
Here is the sample mail sent by Medicine Reminder System, it can be changed accordingly.

Code Explanation
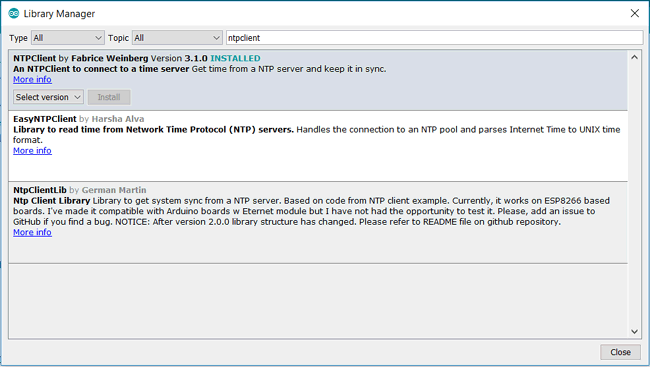
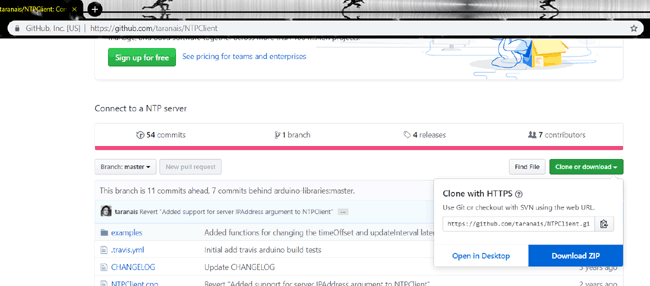
First we have to download and install NTP library into ESP8266. There are many libraries available for NTP Client. You can install any of them from Arduino IDE. In this tutorial I have installed NTPClient library by Taranais because it is easy to use and have functions to get date and time from NTP servers. ESP8266 NodeMCU can be easily programmed using Arduino IDE.
To install the NTP library, first download the library using above link and then install it using Arduino IDE. To install it go to Sketch > Include Library > Add .ZIP Library, then open the Zip folder by going to the location where you have downloaded the zip folder and restart the Arduino IDE.
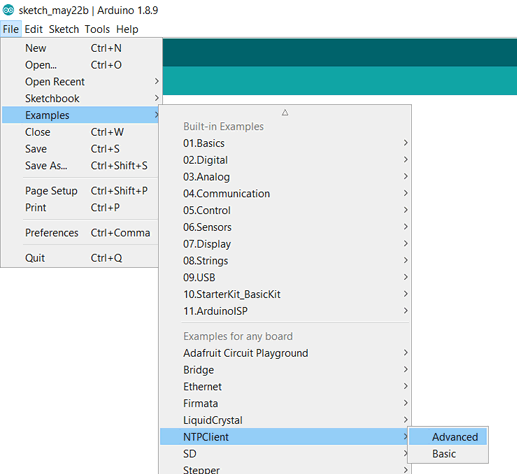
NTPClient library comes with examples. Open Arduino IDE and Goto Examples > NTPClient > Advanced. The code given in this sketch displays the time from NTP server on the serial monitor.
Complete code with a working video is given at the end of this tutorial, here we are explaining the complete program to understand the working of the project.
Start with including all the necessary libraries
#include <NTPClient.h>
#include <ESP8266WiFi.h>
#include <WiFiUdp.h>
To request date and time we have to initialize time client with address of NTP servers. For better accuracy choose the address of NTP servers which are closer to your geographical area. Here we use “pool.ntp.org” which gives servers from worldwide. If you wish to choose servers from Asia you can use “asia.pool.ntp.org”. timeClient also takes UTC time offset of your timezone in milliseconds. For instance, UTC offset for India is +5:30 so convert this offset in milliseconds which is equal to 5*60*60+30*60 = 19800.
WiFiUDP ntpUDP; NTPClient timeClient(ntpUDP, "pool.ntp.org", 19800, 60000);
Connecting to Wi-Fi:
WiFi.begin(ssid, password);
  while ( WiFi.status() != WL_CONNECTED ) {
    delay ( 500 );
    Serial.print ( "." );
  }
In the loop function time is updated every time. Variable “obs” stores the digital value from the IR sensor and “tt” stores the time. A counter “cnt” is created which will count the number of times the box opened before the time.
timeClient.update();
  int obs = digitalRead(ir);
  tt=timeClient.getFormattedTime();
  Serial.println(tt);
  Serial.print("Box Closed/Open : ");
  Serial.println(obs);
  Serial.print("No. of times Box Opened : ");
  Serial.println(cnt);
Below code checks if the box is opened before the time of taking medicines. Counter “cnt” increases as the box is opened.
  if(tt<"15:02:00")
  {
    if(obs==0)
    {
      cnt++;
    }
  }
If the counter “cnt” is 0 then it means the box is not opened before the time of sending the mail and if someone opens the box before the time then it simply displays the message on the serial monitor that “Medicine already taken”.
  if(tt=="15:02:00")
  {
    if(cnt==0)
    {
      Serial.println("Take the medicines");
      sendEmail();
      Serial.print("Mail sent to:");
      Serial.println(" The recipient");
      Serial.println("");
    }
    else
    {
      Serial.println("Medicine already taken");
    }
  }
Client.connect() function which takes SMTP Server and SMTP Port to connect to SMTP server. It gives “1” if the connection establishes successfully and acknowledge the server with EHLO command.
  if (Client.connect(server, 2525) == 1)        // connect to smtp server with port address 2525
  {
    Serial.println(F("connected to server"));
  }
  else
  {
    Serial.println(F("connection failed"));
    return 0;
  }
Client.println("EHLO www.example.com");
Send the encoded user name and password to the server. The user name and the password from the SMTP2GO which we pasted in notepad are encoded to base64 value. The procedure to encode into base64 value is shown above.
Client.println("AUTH LOGIN");
 Serial.println(F("Sending User"));
  Client.println("c2VuZGVyQHh5ei5jb20= "); //base64, ASCII encoded SMTP Username
  Serial.println(F("Sending Password"));
  Client.println("cGFzc3dvcmQ=");   //base64, ASCII encoded SMTP Password
After successful authentication, here the complete email is formed with fields like “To”, “From”, “Subject”, “Body”.
Client.println(F("To:  [email protected] "));
  Client.println(F("From: [email protected] "));
  Client.println(F("Subject: Medicine Reminder\r\n"));
  Client.println(F("Hey Abhishek\n"));
  Client.println(F("This is a reminder regarding your medicines"));
  Client.println(F("You forgot to take your medicines on time. Please take them immediately."));
After sending the data QUIT command is sent to complete the email.
  Serial.println(F("Sending QUIT"));
  Client.println(F("QUIT"));
  if (!emailResp())
    return 0;
  Client.stop();
This is how a IoT Medicine Alarm system can be made easily using ESP-01 module.
Check the complete code and demonstration video below.
#include <NTPClient.h>
#include <ESP8266WiFi.h>
#include <WiFiUdp.h>
char server[] = "mail.smtp2go.com";
const char *ssid = "Enter your SSID";
const char *password = "Enter your password";
const int ir = 2;
String tt;
int cnt =0;
WiFiClient Client; //define wifi client as client
WiFiUDP ntpUDP;
NTPClient timeClient(ntpUDP, "pool.ntp.org", 19800, 60000);
// You can specify the time server pool and the offset (in seconds, can be
// changed later with setTimeOffset() ). Additionaly you can specify the
// update interval (in milliseconds, can be changed using setUpdateInterval() ).
void setup() {
Serial.begin(115200);
pinMode(ir, INPUT);
WiFi.begin(ssid, password);
while ( WiFi.status() != WL_CONNECTED ) {
delay ( 500 );
Serial.print ( "." );
}
timeClient.begin();
}
void loop() {
timeClient.update();
int obs = digitalRead(ir);
tt=timeClient.getFormattedTime();
Serial.println(tt);
Serial.print("Box Closed/Open : ");
Serial.println(obs);
Serial.print("No. of times Box Opened : ");
Serial.println(cnt);
if(tt<"15:02:00")
{
if(obs==0) // condition when box is open before the time
{
cnt++;
}
}
if(tt=="15:02:00")
{
if(cnt==0)
{
Serial.println("Take the medicines");
sendEmail();
Serial.print("Mail sent to:");
Serial.println(" The recipient");
Serial.println("");
}
else
{
Serial.println("Medicine already taken");
}
}
delay(1000);
}
byte sendEmail()
{
if (Client.connect(server, 2525) == 1) // connect to smtp server with port address 2525
{
Serial.println(F("connected to server"));
}
else
{
Serial.println(F("connection failed"));
return 0;
}
if (!emailResp()) // if connection failed return now
return 0;
//
Serial.println(F("Sending EHLO"));
Client.println("EHLO www.example.com"); // Send command EHLO previosly it was HELO********************
if (!emailResp())
return 0;
Serial.println(F("Sending auth login"));
Client.println("AUTH LOGIN");
if (!emailResp())
return 0;
//
Serial.println(F("Sending User"));
Client.println("c2VuZGVyQHh5ei5jb20="); //base64, ASCII encoded SMTP Username
if (!emailResp())
return 0;
Serial.println(F("Sending Password"));
Client.println("cGFzc3dvcmQ="); //base64, ASCII encoded SMTP Password
if (!emailResp())
return 0;
Serial.println(F("Sending From"));
Client.println(F("MAIL From: [email protected]"));
if (!emailResp())
return 0;
// change to recipient address
Serial.println(F("Sending To"));
Client.println(F("RCPT To: [email protected]"));
if (!emailResp())
return 0;
Serial.println(F("Sending DATA"));
Client.println(F("DATA"));
if (!emailResp())
return 0;
Serial.println(F("Sending email"));
Client.println(F("To: [email protected] "));
Client.println(F("From: [email protected] "));
Client.println(F("Subject: Medicine Reminder\r\n"));
Client.println(F("Hey Abhishek\n"));
Client.println(F("This is a reminder regarding your medicines"));
Client.println(F("You forgot to take your medicines on time. Please take them immediately."));
//
Client.println(F("."));
if (!emailResp())
return 0;
//
Serial.println(F("Sending QUIT"));
Client.println(F("QUIT"));
if (!emailResp())
return 0;
//
Client.stop();
Serial.println(F("disconnected"));
return 1;
}
byte emailResp()
{
byte responseCode;
byte readByte;
int loopCount = 0;
while (!Client.available())
{
delay(1);
loopCount++;
// Wait for 20 seconds and if nothing is received, stop.
if (loopCount > 20000)
{
Client.stop();
Serial.println(F("\r\nTimeout"));
return 0;
}
}
responseCode = Client.peek();
while (Client.available())
{
readByte = Client.read();
Serial.write(readByte);
}
if (responseCode >= '4')
{
// efail();
return 0;
}
return 1;
}


