


Today, we are going to build an Arduino based Touch Screen Door Lock System that contains a 2.4" TFT Screen for entering the Personal Identification Number (PIN) and for visual display of the entered PIN. It also contains a 12V Solenoid Lock and Relay Module. The solenoid lock is used for locking and unlocking the door.
When a user enters a PIN using the TFT Display, the Arduino captures the PIN and compares it with the PIN stored in EEPROM for a match. If the entered PIN matches with the stored PIN, Arduino opens the door, and ‘Welcome’ is displayed on the display; otherwise, ‘Access Denied’ is displayed on the TFT and the door remains closed. The PIN can be changed by long-pressing the ‘Cancel’ button and then selecting ‘Yes’ on the next screen. The system then asks for the current PIN and matches it with the stored PIN for a match. If a match is found, then the user will be asked to enter a new PIN. This Door lock system can be mounted to any of your existing doors to secure them with a digital password. Previously, we have also built other interesting automatic door lock system projects that are listed below:
- IoT Based Solenoid Door Lock using Raspberry Pi 4
- IoT based Smart Door Lock System using NodeMCU
- Fingerprint Door Lock System using Arduino and Smartphone
- Face Recognition Door Lock System using Raspberry Pi
Components Required for Arduino Touch Screen Door Lock
- Arduino Uno
- 2.4” TFT LCD Display Shield
- Solenoid Lock
- Relay Module
- Buzzer
2.4” TFT LCD Display Shield - Introduction
The 2.4” TFT LCD Touch screen is one of the most common RGB color display modules. The LCD has excellent vivid color contrast and comes with a built-in microSD card connection. This TFT display consists of a bright backlight (4 white-LED backlights) and a colorful 240X320 pixels display. It also features individual RGB pixel control giving a much better resolution than the black and white 128×64 displays. We have used this display earlier in our IoT Menu Ordering System and Biometric voting system projects. Before using it with Arduino, let us take a look at the pinout of this 2.4” TFT LCD screen module.
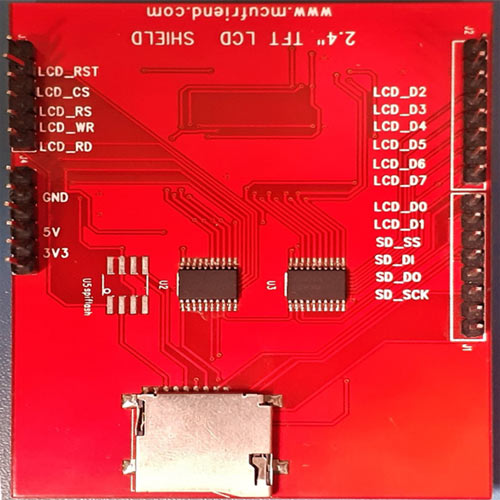
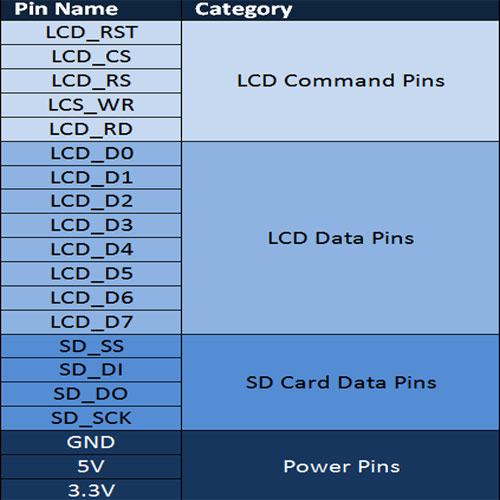
As you can see, 28 pins will perfectly fit into any Arduino Uno / Arduino Mega Board. The TFT display pins are classified into four main parts i.e. Command Pins, Data Pins, SD Card Pins, and Power Pins. A small classification of these pins is given in the table below.
TFT LCD Connections with Arduino
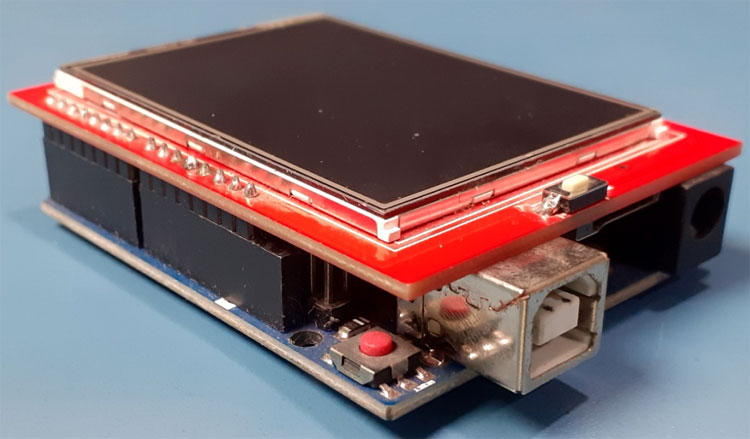
The 2.4” TFT LCD screen is a perfect Arduino Shield. You can directly mount this display on top of the Arduino Uno/Mega and it will perfectly match with the pins as shown in the image given below.
Circuit Diagram for Touch Screen Door Lock System
The complete schematic to build a Smart Door Lock using Arduino is given below. The circuit was drawn using fritzing, since there was no solenoid lock available, I have used a motor to represent it. Both the solenoid lock and this DC motor do not have any polarity and hence can be connected as such.
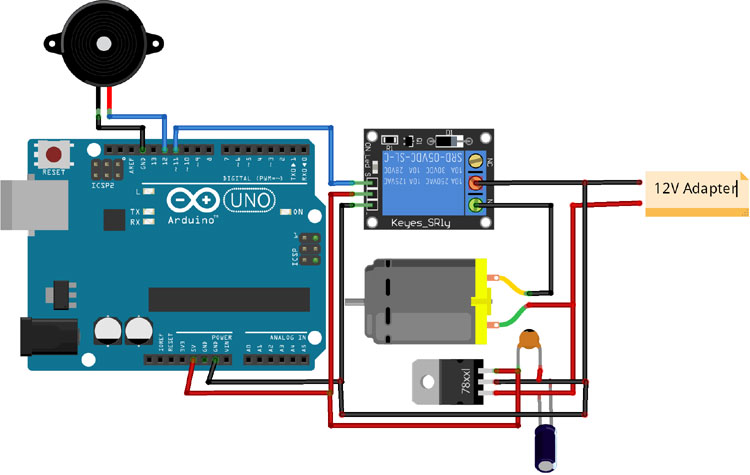
With a TFT display mounted on Arduino, we only need to connect a relay module and buzzer to Arduino. The Vcc and GND pins of the Relay Module are connected to 5V and GND of Arduino while the Input pin is connected to the 11th pin of Arduino. The positive pin of Buzzer is connected to digital pin 12 of Arduino and the negative pin is connected to the GND pin of Arduino. The entire setup is powered by the 12V Adapter. The onboard 7805 voltage regulator is used to get the regulated 5V to power the Arduino Uno.
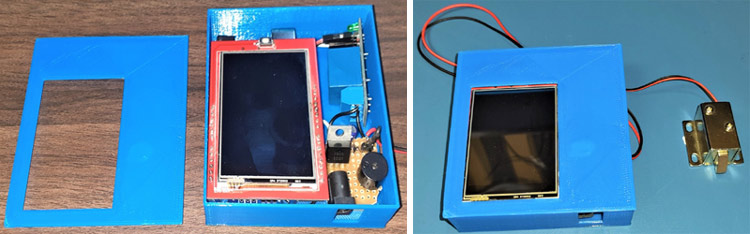
3D Printed Casing for Touch Screen Door Lock System
Next, I measured the dimensions of the setup using the scale and also measured the dimensions of the barrel jack and TFT display to design a casing. My design looked something like this once it was done.
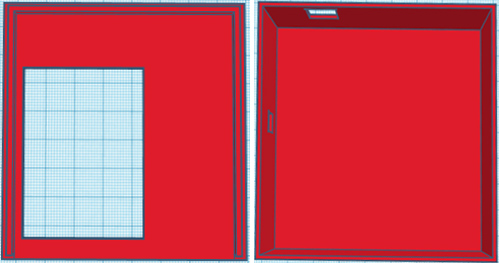
Once I finished the design, I exported it as an STL file, sliced it based on printer settings, and finally printed it. The STL file is also available for download from Thingiverse and you can print your casing using it. After printing, I proceeded with assembling the project set up in a permanent enclosure to install it in a facility. With the complete connection was made, I assembled the circuit into my casing and everything was nicely fit as you can see here.
Programming Arduino for Touch Screen Door Lock System
Here we are using SPFD5408 Library that is the modified version of the original Adafruit Library. Complete code is given at the end of the page. Here we are explaining the important sections of the code. There are four sections involved in this code. The first section is creating a UI of a pin lock. The second is detecting the buttons based on the user's touch, the third is checking the user-entered password and the final section is resetting the password.
Start the code by including all the required libraries. All these three SPFD5408 libraries are given in the ZIP file, you can download them from the link provided above.
#include <SPFD5408_Adafruit_GFX.h>    // Core graphics library
#include <SPFD5408_Adafruit_TFTLCD.h> // Hardware-specific library
#include <SPFD5408_TouchScreen.h>
#include <EEPROM.h>
Now in the next lines, define the minimum and maximum calibrated X & Y-axis values. The values given here are universal and almost work for everyone. You can calibrate the TFT and change them if you feel the calibration is not satisfactory.
#define TS_MINX 125
#define TS_MINY 85
#define TS_MAXX 965
#define TS_MAXY 905
Inside the setup() function, initialize the serial monitor at 9600 baud rate for debugging purposes and also initialize the TFT display. Then define the relay and buzzer pins as output pins.
void setup()
{
  Serial.begin(9600);
  tft.reset();
  tft.begin(0x9341);
  tft.setRotation(2);
  draw_BoxNButtons();
  pinMode(relayPin, OUTPUT);
  pinMode(buzzer, OUTPUT);
  currentpage = 0;
  pass = 0;
}
After initializing the variables and pins, now we can get into the main programming part. As mentioned earlier, there are four sections involved in this program and the first one is creating a UI of a pin lock. I have simply made a basic layout of a pin lock with 12 Buttons and one display unit. The TFT display library allows you to draw Lines, Rectangles, Circles, Charts, Strings, and a lot more. I have used lines and rectangles to design the UI. Each box has a width of 80 pixels and a height of 60 pixels.
void draw_BoxNButtons()
{
  tft.fillRect(0, 0, 240, 80, CYAN);
  tft.setCursor(37, 27);
  tft.setTextSize(3);
  tft.setTextColor(BLACK);
  tft.println("Enter PIN");
 //Draw First Column
  tft.fillRect  (0,260,80,60,RED);
  tft.fillRect  (0,200,80,60,BLACK);
  tft.fillRect  (0,140,80,60,BLACK);
  tft.fillRect  (0,80,80,60,BLACK);
 //Draw Second Column
  tft.fillRect  (80,260,80,60,BLACK);
  tft.fillRect  (80,200,80,60,BLACK);
  tft.fillRect  (80,140,80,60,BLACK);
  tft.fillRect  (80,80,80,60,BLACK);
………………………………………………………..
}
Now after creating UI, the second section includes detecting the user touch for each button and then performing the task associated with that button. Every time the user touches the screen, we will be able to know the X and Y position of the pixel he/she has touched. This value can be displayed on the serial monitor as shown below.
TSPoint p = waitTouch();
X = p.y; Y = p.x;
Serial.print(X); Serial.print(','); Serial.println(Y);// + " " + Y);
Or instead of this, we can predict the position of each button as shown in the image given below:
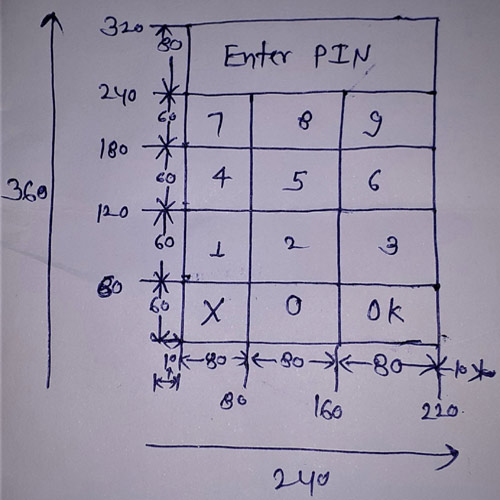
After getting the position of all the boxes, compare these values with user touch to predict the button where he has touched.
if (X<80 && X>0) //Detecting Buttons on Column 1
  {
    if (Y>0 && Y<80) //If cancel Button is pressed
    {Serial.println ("Cancel");
    Number=0;
    if ((unsigned long)(currentMillis - previousMillis) >= interval) {
      Serial.print("Detected");
      currentpage = 1;
      previousMillis = millis();
    }
    }
     if (Y>80 && Y<140) //If Button 1 is pressed
    {Serial.println ("Button 7");
    if (Number==0)
    Number=7;
    else
    Number = (Number*10) + 7; //Pressed twice
    tft.println(Number); //update new value
    delay(150);
    }
    …………………………………….
……………………………………….
……………………………………….
The third section is checking the user-entered password and controlling the gate. As the default password is stored in Arduino’s EEPROM, so first, we will read the password from EEPROM and then compare it with the user-entered password. The password is stored on two different addresses because Arduino Uno EEPROM can only store 0-255 numbers at one address.
int value1 = EEPROM.read(addr) ;
int value2 = EEPROM.read(addr1) ;
password = (value1*100)+(value2);
  if (pass == 0){
     if (Number == password){
      Serial.println("Access Granted");
      Serial.println("Relay ON");
      tft.fillScreen(BLACK);
      tft.setCursor(25, 115);
      tft.setTextSize(5);
      tft.setTextColor(BLUE);
      tft.println("Welcome");
      digitalWrite(relayPin, HIGH);// Turn the relay switch ON to open door
      digitalWrite(buzzer, HIGH);
      delay(1000);
      digitalWrite(relayPin, LOW);// set relay pin to LOW
      digitalWrite(buzzer, LOW);
      Serial.println("Relay OFF");
Testing the Touch Screen Door Lock System
After connecting all the hardware and uploading the code, now it’s time to test the project. We used an external 12V 1A adapter to power the device. By default, it will show the Pin Lock UI on TFT Display. As soon as the correct password is entered, the door lock gets unlocked and then again gets locked after 8 seconds. The default password can be changed by long-pressing the ‘Cancel’ button and then selecting ‘Yes’ on the next screen.

This is how you can build an Arduino Solenoid Door Lock System using the TFT Display and Solenoid Lock. The complete working and code of the project are given below. Hope you enjoyed the project and found it interesting to build your own. If you have any questions, please leave them in the comment section below.
#include <SPFD5408_Adafruit_GFX.h> // Core graphics library
#include <SPFD5408_Adafruit_TFTLCD.h> // Hardware-specific library
#include <SPFD5408_TouchScreen.h>
#include <EEPROM.h>
#define YP A1 // must be an analog pin, use "An" notation!
#define XM A2 // must be an analog pin, use "An" notation!
#define YM 7 // can be a digital pin
#define XP 6 // can be a digital pin
#define LCD_CS A3
#define LCD_CD A2
#define LCD_WR A1
#define LCD_RD A0
#define LCD_RESET A4
#define WHITE 0x0000 //Black->White
#define YELLOW 0x001F //Blue->Yellow
#define CYAN 0xF800 //Red->Cyan
#define PINK 0x07E0 //Green-> Pink
#define RED 0x07FF //Cyan -> Red
#define GREEN 0xF81F //Pink -> Green
#define BLUE 0xFFE0 //Yellow->Blue
#define BLACK 0xFFFF //White-> Black
#define MINPRESSURE 10
#define MAXPRESSURE 1000
/*_______Assigned______*/
/*____Calibrate TFT LCD_____*/
#define TS_MINX 125
#define TS_MINY 85
#define TS_MAXX 965
#define TS_MAXY 905
/*______End of Calibration______*/
TouchScreen ts = TouchScreen(XP, YP, XM, YM, 300); //300 is the sensitivity
Adafruit_TFTLCD tft(LCD_CS, LCD_CD, LCD_WR, LCD_RD, LCD_RESET); //Start communication with LCD
String symbol[4][3] = {
{ "1", "2", "3"},
{ "4", "5", "6"},
{ "7", "8", "9"},
{ "x", "0", "OK"}
};
int X,Y;
int Number;
int relayPin = 11;// set pin 11 for relay output
int buzzer = 12;
int pass, currentpage;
int password;
int addr = 0;
int addr1 = 1;
unsigned long interval = 2000;
unsigned long previousMillis = 0;
unsigned long currentMillis;
void setup()
{
Serial.begin(9600); //Use serial monitor for debugging
tft.reset(); //Always reset at start
tft.begin(0x9341); // My LCD uses LIL9341 Interface driver IC
tft.setRotation(2); //
tft.fillScreen(WHITE);
draw_BoxNButtons();
pinMode(relayPin, OUTPUT);
pinMode(buzzer, OUTPUT);
digitalWrite(relayPin, LOW);// set relay pin to LOW
currentpage = 0;
pass = 0;
}
void loop() {
currentMillis = millis(); // grab current time
TSPoint p = waitTouch();
X = p.y; Y = p.x;
// Serial.print(X); Serial.print(','); Serial.println(Y);// + " " + Y);
DetectButtons();
delay(300);
}
TSPoint waitTouch() {
TSPoint p;
do {
p = ts.getPoint();
pinMode(XM, OUTPUT);
pinMode(YP, OUTPUT);
} while((p.z < MINPRESSURE )|| (p.z > MAXPRESSURE));
p.x = map(p.x, TS_MINX, TS_MAXX, 0, 320);
p.y = map(p.y, TS_MINY, TS_MAXY, 0, 240);;
return p;
}
void DetectButtons()
{
if (currentpage == 0)
{
tft.fillRect(0, 0, 240, 80, CYAN); //clear result box
tft.setCursor(10, 20);
tft.setTextSize(4);
tft.setTextColor(BLACK);
if (X<80 && X>0) //Detecting Buttons on Column 1
{
if (Y>0 && Y<80) //If cancel Button is pressed
{Serial.println ("Cancel");
Number=0;
if ((unsigned long)(currentMillis - previousMillis) >= interval) {
Serial.print("Detected");
currentpage = 1;
previousMillis = millis();
}
}
if (Y>80 && Y<140) //If Button 1 is pressed
{Serial.println ("Button 7");
if (Number==0)
Number=7;
else
Number = (Number*10) + 7; //Pressed twice
tft.println(Number); //update new value
delay(150);
}
if (Y>140 && Y<200) //If Button 4 is pressed
{Serial.println ("Button 4");
if (Number==0)
Number=4;
else
Number = (Number*10) + 4; //Pressed twice
tft.println(Number); //update new value
delay(150);
}
if (Y>200 && Y<260) //If Button 1 is pressed
{Serial.println ("Button 1");
if (Number==0)
Number=1;
else
Number = (Number*10) + 1; //Pressed twice
tft.println(Number); //update new value
delay(150);
}
}
if (X<160 && X>80) //Detecting Buttons on Column 2
{
if (Y>0 && Y<85)
{Serial.println ("Button 0"); //Button 0 is Pressed
if (Number==0)
Number=0;
else
Number = (Number*10) + 0; //Pressed twice
tft.println(Number); //update new value
delay(150);
}
if (Y>85 && Y<140)
{Serial.println ("Button 8");
if (Number==0)
Number=8;
else
Number = (Number*10) + 8; //Pressed twice
tft.println(Number); //update new value
delay(150);
}
if (Y>140 && Y<192)
{Serial.println ("Button 5");
if (Number==0)
Number=5;
else
Number = (Number*10) + 5; //Pressed twic
tft.println(Number); //update new value
delay(150);
}
if (Y>192 && Y<245)
{Serial.println ("Button 2");
if (Number==0)
Number=2;
else
Number = (Number*10) + 2; //Pressed twice
tft.println(Number); //update new value
delay(150);
}
}
if (X<240 && X>160) //Detecting Buttons on Column 3
{
if (Y>0 && Y<85)
{Serial.println ("OK");
checkPassword();
Number = 0;
delay(150);
}
if (Y>85 && Y<140)
{Serial.println ("Button 9");
if (Number==0)
Number=9;
else
Number = (Number*10) + 9; //Pressed twice
tft.println(Number); //update new value
delay(150);
}
if (Y>140 && Y<192)
{Serial.println ("Button 6");
if (Number==0)
Number=6;
else
Number = (Number*10) + 6; //Pressed twice
tft.println(Number); //update new value
delay(150);
}
if (Y>192 && Y<245)
{Serial.println ("Button 3");
if (Number==0)
Number=3;
else
Number = (Number*10) + 3; //Pressed twice
tft.println(Number); //update new value
delay(150);
}
}
}
if (currentpage == 1) {
tft.fillScreen(BLACK);
tft.setCursor(30, 55);
tft.setTextSize(3);
tft.setTextColor(BLUE);
tft.println("Reset PIN?");
tft.fillRect (35,140,60,50,BLUE);
tft.fillRect (140,140,60,50,RED);
tft.setTextSize(2);
tft.setTextColor(WHITE);
tft.setCursor(45, 157);
tft.println("Yes");
tft.setCursor(157, 157);
tft.println("No");
if (Y>140 && Y<190)
{
if (X>35 && X<95){
Serial.print("Yes");
setup();
pass = 1;
checkPassword();
}
if (X>140 && X<200){
Serial.print("No");
setup();
}
}
}
if (currentpage == 2)
{
tft.fillRect(0, 0, 240, 80, CYAN); //clear result box
tft.setCursor(10, 20);
tft.setTextSize(4);
tft.setTextColor(BLACK);
if (X<80 && X>0) //Detecting Buttons on Column 1
{
if (Y>0 && Y<80) //If cancel Button is pressed
{Serial.println ("Set");
Serial.println(Number);
int password1 = (Number / 100); //12 First two digit of entered number
int password2 = (Number % 100); //34 Last two digit of entered number
Serial.println(password1);
Serial.println(password2);
EEPROM.write(addr, password1);
EEPROM.write(addr1, password2);
setup();
Number = 0;
}
if (Y>80 && Y<140) //If Button 1 is pressed
{Serial.println ("Button 7");
if (Number==0)
Number=7;
else
Number = (Number*10) + 7; //Pressed twice
tft.println(Number); //update new value
delay(150);
}
if (Y>140 && Y<200) //If Button 4 is pressed
{Serial.println ("Button 4");
if (Number==0)
Number=4;
else
Number = (Number*10) + 4; //Pressed twice
tft.println(Number); //update new value
delay(150);
}
if (Y>200 && Y<260) //If Button 1 is pressed
{Serial.println ("Button 1");
if (Number==0)
Number=1;
else
Number = (Number*10) + 1; //Pressed twice
tft.println(Number); //update new value
delay(150);
}
}
if (X<160 && X>80) //Detecting Buttons on Column 2
{
if (Y>0 && Y<85)
{Serial.println ("Button 0"); //Button 0 is Pressed
if (Number==0)
Number=0;
else
Number = (Number*10) + 0; //Pressed twice
tft.println(Number); //update new value
delay(150);
}
if (Y>85 && Y<140)
{Serial.println ("Button 8");
if (Number==0)
Number=8;
else
Number = (Number*10) + 8; //Pressed twice
tft.println(Number); //update new value
delay(150);
}
if (Y>140 && Y<192)
{Serial.println ("Button 5");
if (Number==0)
Number=5;
else
Number = (Number*10) + 5; //Pressed twic
tft.println(Number); //update new value
delay(150);
}
if (Y>192 && Y<245)
{Serial.println ("Button 2");
if (Number==0)
Number=2;
else
Number = (Number*10) + 2; //Pressed twice
tft.println(Number); //update new value
delay(150);
}
}
if (X<240 && X>160) //Detecting Buttons on Column 3
{
// if (Y>0 && Y<85)
//{Serial.println ("OK");
//delay(150);
//}
if (Y>85 && Y<140)
{Serial.println ("Button 9");
if (Number==0)
Number=9;
else
Number = (Number*10) + 9; //Pressed twice
tft.println(Number); //update new value
delay(150);
}
if (Y>140 && Y<192)
{Serial.println ("Button 6");
if (Number==0)
Number=6;
else
Number = (Number*10) + 6; //Pressed twice
tft.println(Number); //update new value
delay(150);
}
if (Y>192 && Y<245)
{Serial.println ("Button 3");
if (Number==0)
Number=3;
else
Number = (Number*10) + 3; //Pressed twice
tft.println(Number); //update new value
delay(150);
}
}
}
}
void draw_BoxNButtons()
{
//Draw the Result Box
tft.fillRect(0, 0, 240, 80, CYAN);
tft.setCursor(37, 27);
tft.setTextSize(3);
tft.setTextColor(BLACK);
tft.println("Enter PIN");
//Draw First Column
tft.fillRect (0,260,80,60,RED);
tft.fillRect (0,200,80,60,BLACK);
tft.fillRect (0,140,80,60,BLACK);
tft.fillRect (0,80,80,60,BLACK);
//Draw SEcond Column
tft.fillRect (80,260,80,60,BLACK);
tft.fillRect (80,200,80,60,BLACK);
tft.fillRect (80,140,80,60,BLACK);
tft.fillRect (80,80,80,60,BLACK);
//Draw Third Column
tft.fillRect (160,260,80,60,BLUE);
tft.fillRect (160,200,80,60,BLACK);
tft.fillRect (160,140,80,60,BLACK);
tft.fillRect (160,80,80,60,BLACK);
//Draw Horizontal Lines
for (int h=80; h<=320; h+=60)
tft.drawFastHLine(0, h, 240, WHITE);
//Draw Vertical Lines
for (int v=0; v<=240; v+=80)
tft.drawFastVLine(v, 80, 240, WHITE);
//Display keypad lables
for (int j=0;j<4;j++) {
for (int i=0;i<3;i++) {
tft.setCursor(22 + (85*i), 100 + (60*j));
tft.setTextSize(3);
tft.setTextColor(WHITE);
tft.println(symbol[j][i]);
}
}
}
void checkPassword() {
int value1 = EEPROM.read(addr) ;
int value2 = EEPROM.read(addr1) ;
password = (value1*100)+(value2);
if (pass == 0){
Serial.print(password);
Serial.println();
Serial.print(Number);
if (Number == password){
Serial.println("Access Granted");
Serial.println("Relay ON");
tft.fillScreen(BLACK);
tft.setCursor(25, 115);
tft.setTextSize(5);
tft.setTextColor(BLUE);
tft.println("Welcome");
digitalWrite(relayPin, HIGH);// Turn the relay switch ON to open door
digitalWrite(buzzer, HIGH);
delay(1000);
digitalWrite(buzzer, LOW);
Serial.println("Relay OFF");
delay(8000);
digitalWrite(relayPin, LOW);// set relay pin to LOW
}
else {
Serial.println("Access Denied");
tft.fillScreen(BLACK);
tft.setCursor(30, 100);
tft.setTextSize(5);
tft.setTextColor(RED);
tft.println("Access Denied");
delay(2000);
digitalWrite(relayPin, LOW);// set relay pin to LOW
}
Number = 0;
setup();
}
if (pass==1){
tft.fillRect(0, 0, 240, 80, CYAN);
tft.setCursor(5, 10);
tft.setTextSize(2);
tft.setTextColor(BLACK);
tft.println("Enter Current PIN:");
if (X<240 && X>160 && Y>0 && Y<85)
{
Serial.println ("OK");
Serial.print(password);
Serial.println(Number);
if (Number == password){
Number = 0;
tft.fillRect(0, 0, 240, 80, CYAN);
tft.setCursor(5, 10);
tft.setTextColor(BLACK);
currentpage = 2;
tft.println("Enter New PIN:");
if (X<80 && X>0 && Y>0 && Y<80){
Serial.print("Set");
}
}
else{
Serial.println("Wrong Pin");
tft.fillScreen(BLACK);
tft.setCursor(60, 100);
tft.setTextSize(5);
tft.setTextColor(RED);
tft.println("Wrong");
tft.setCursor(86, 140);
tft.println("Pin");
delay(2000);
setup();
}
}
}
}


