


NodeMCU is an open source IoT platform, contains firmware which runs on the ESP8266 Wi-Fi SoC from Espressif Systems and the hardware is based on the ESP-12 module. One of the speciality of NodeMCU is that it can be simply programmed using Arduino IDE. If you are new to ESP8266 module then start with the article Getting started with ESP8266 and Programming it using Arduino IDE and learn more about it by following the other IoT based projects with ESP8266:
- Facebook Controlled Home Automation using ESP8266 NodeMCU
- IoT Wireless Weather Station using Arduino, ESP8266 and ThingSpeak
- IoT Based Temperature and Humidity Monitoring over ThingSpeak using Arduino UNO and ESP8266
- IoT Controlled LED using Cayenne and ESP8266
- IoT Controlled LED using Blynk and ESP8266 (Node MCU)
NodeMCU have the advantages of both ESP-8266 and Arduino. It got enough I/O pins and can connect to computer using a micro USB cable. If we compare NodeMCU with a normal ESP8266-01 module- the ESP8266-01 module’s I/O pins are limited to 2 and you cannot connect ESP8266 directly to your computer without an additional add on board. And if we compare NodeMCU with Arduino, NodeMCU have inbuilt Wi-Fi where Arduino don’t have any inbuilt hardware for internet connectivity. So it’s easier to use NodeMCU for the applications where it need less GPIO pins and also needs to connect to WiFi network.
Here in this IoT project, we will interface at GPS Module with NodeMCU ESP8266 and display the GPS data (Latitude, longitude, date and time) on a local webserver. And by forwarding the port in the router, this webpage can be accessed from anywhere in the world to monitor the location of tracking vehicle where this system is installed.
Components Required
- NodeMCU ESP8266
- GPS module- Ublox 6m
- Jumper wires
Configuring Arduino IDE to program NodeMCU ESP8266
Here NodeMCU is programmed using Arduino IDE, to do this you have to add NodeMCU board to Arduino IDE first.
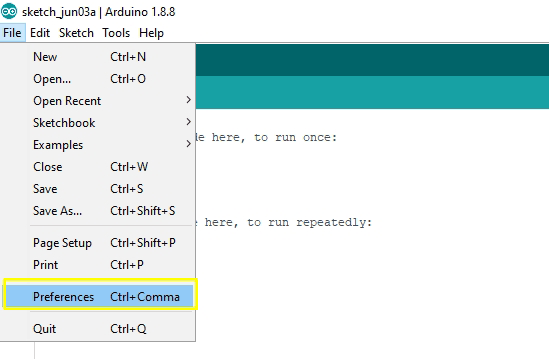
So to do this, open Arduino IDE and go to File>>Preferences
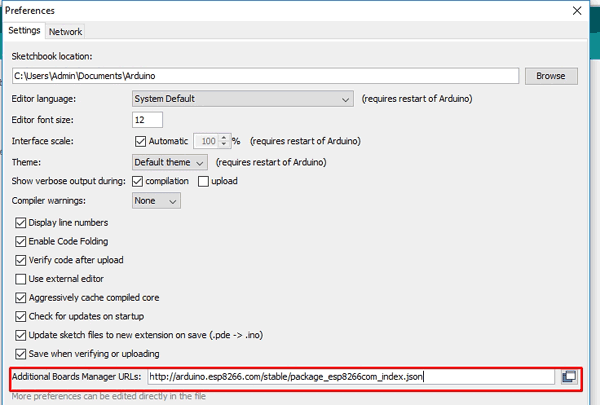
Then a new window will pop-up in which add the below link in “Additional Board Manager URL’s” and click “OK”
http://arduino.esp8266.com/stable/package_esp8266com_index.json
Now in your Arduino IDE go to Tools>>Board>>Boards Manager
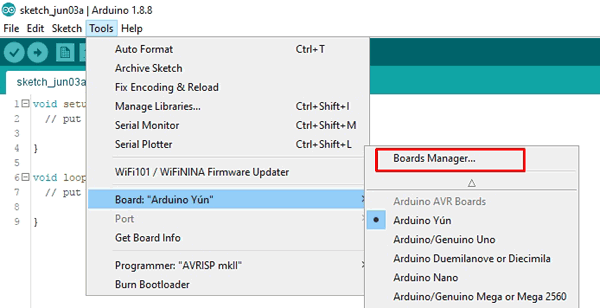
And search for “ESP8266”, then install “ESP8266 by ESP8266 community” package by clicking on ‘Install’ button (I already installed the board that is why the install button in disabled)
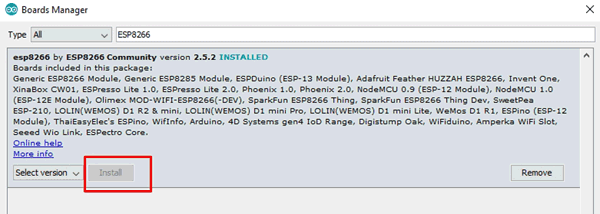
It will take a couple of minutes to complete the installation.Once the installation is complete you will be able to see NodeMCU in your boards list
Circuit Diagram
Circuit diagram for NodeMCU ESP8266 based GPS tracker is given below:
![]()
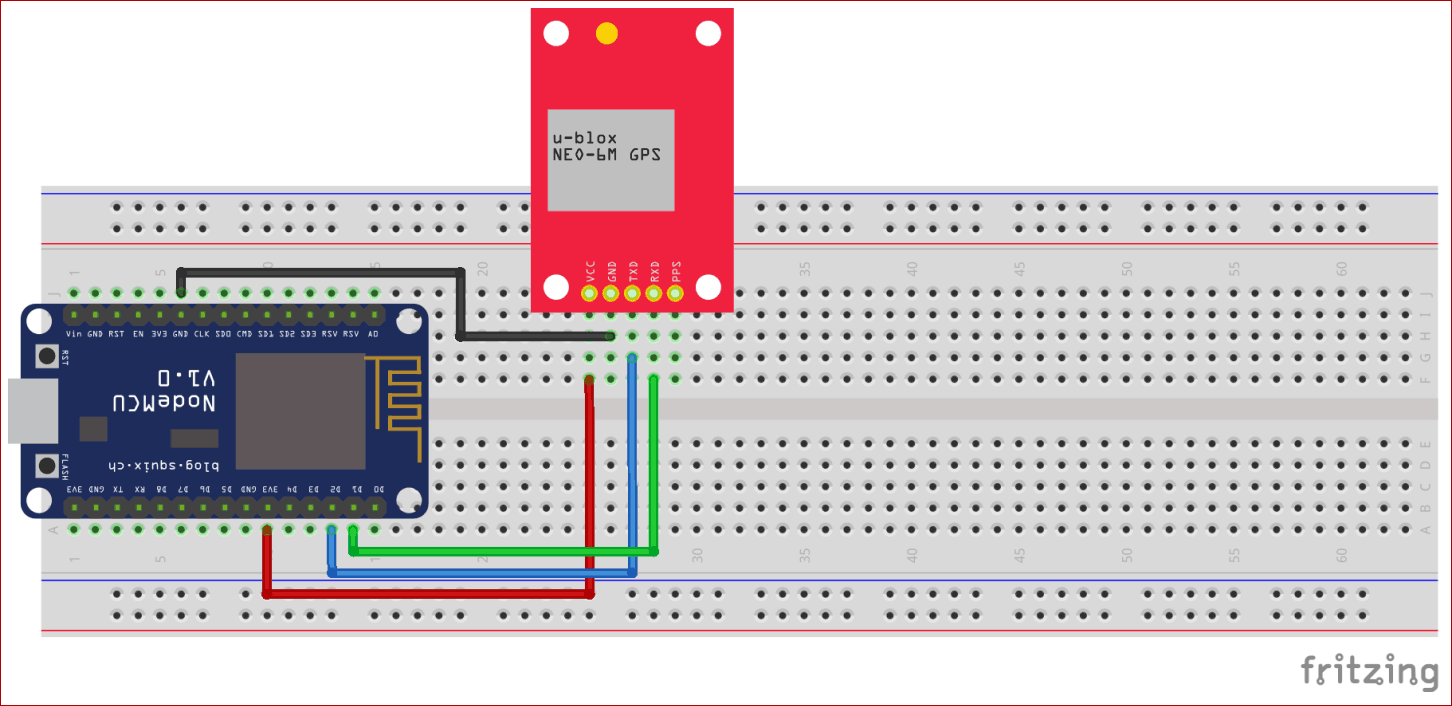
Connect the Ublox Neo 6m GPS module directly to NodeMCU board by connecting GND pin of neo 6m to GND pin of NodeMCU and VCC pin to 3v3 pin. Also connect RXD to D1 and TXD to D2.
Most of the other GPS modules need 5v power but Neo-6m works on 3.3v so we can directly power the GPS module from the NodeMCU module.
Programming NodeMCU with Arduino IDE for sending GPS data to Local server
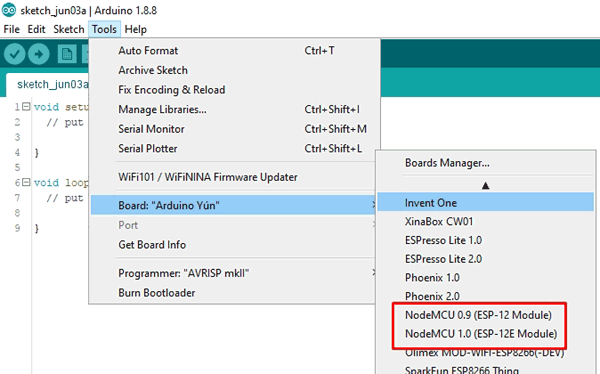
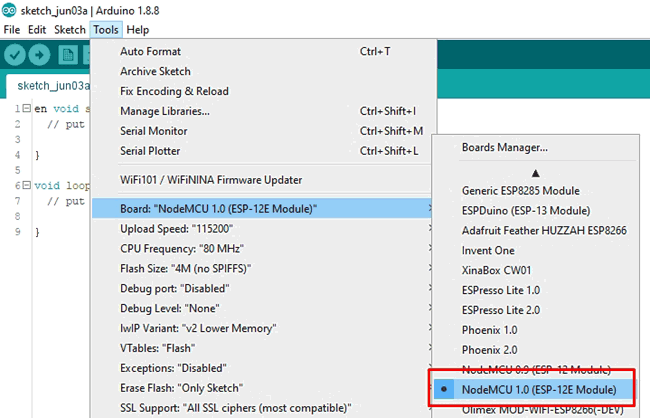
NodeMCU can be easily programmed using ArduinoIDE, just connect NodeMCU to the computer using a microUSB cable and select Tools>>boards>>NodeMCU 1.0 (ESP-12E Module) in Arduino IDE.
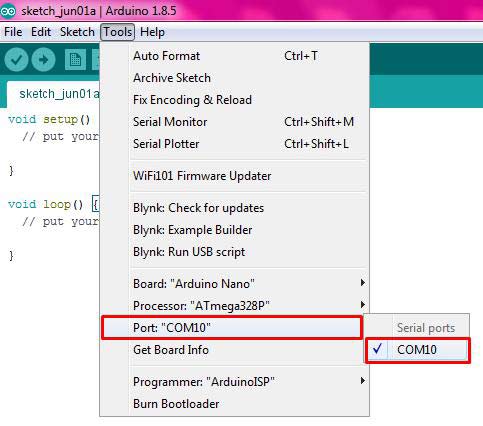
Then select the correct port from Tools>>Port. In my example the active port is “COM10” but it may be different in your computer.
Now we ready to upload the program in NodeMCU. Complete program is given at the end of this tutorial, here we are explaining few important parts of it.
The program is mainly divided into two parts. The first part is to take the location data from the GPS module and second part is to send it over WiFi to a webpage.
First download and install TinyGPS library into Arduino IDE by Arduino IDE going into Sketch>>Include library>>Add .ZIP library. The library can be downloaded from this link. Then include all the required libraries and define all the variables in program as shown below:
#include <TinyGPS++.h> // library for GPS module
#include <SoftwareSerial.h>
#include <ESP8266WiFi.h>
TinyGPSPlus gps;  // The TinyGPS++ object
SoftwareSerial ss(4, 5); // The serial connection to the GPS device
const char* ssid = "Onlilo_SP"; //ssid of your wifi
const char* password = "ArduinoUno"; //password of your wifi
float latitude , longitude;
int year , month , date, hour , minute , second;
String date_str , time_str , lat_str , lng_str;
int pm;
WiFiServer server(80);
To connect NodeMCU to your WiFi network we need to add the WiFi network’s SSID and Password inside the code. Make sure to change the SSID and WiFi password inside the code (here My SSID is “Onlilo_SP” and password is “ArduinoUno)
Inside the setup() function, begin with the baud rate as 115200. After this initialize the WiFi connection using the WiFi SSID and password. Once the NodeMCU is connected to the WiFi network a local IP address will be generated and displayed on the serial monitor. This IP address will be used to access the GPS location data from your phone or laptop.
void setup()
{
  Serial.begin(115200);
  ss.begin(9600);
  Serial.println();
  Serial.print("Connecting to ");
  Serial.println(ssid);
  WiFi.begin(ssid, password); //connecting to wifi
  while (WiFi.status() != WL_CONNECTED)// while wifi not connected
  {
    delay(500);
    Serial.print("."); //print "...."
  }
  Serial.println("");
  Serial.println("WiFi connected");
  server.begin();
  Serial.println("Server started");
  Serial.println(WiFi.localIP());  // Print the IP address
}
Inside the loop() function, we are continuously checking if the GPS data is available and if it is available we extract the latitude, longitude, date and time from the NMEA string received from the GPS module.
The data from the GPS module is continue string of 28 characters which will contain Latitude, Longitude, Date, Time and many other information. It is called NMEA string, to learn more about it, follow the link.
$GPGGA,104534.000,7791.0381,N,06727.4434,E,1,08,0.9,510.4,M,43.9,M,,*47
$GPGGA,HHMMSS.SSS,latitude,N,longitude,E,FQ,NOS,HDP,altitude,M,height,M,,checksum data
TinyGPS library has inbuilt function to get the required data from the NMEA string. So here in the below code we extract the latitude, longitude, date and time from the string and stored the values in the variables “lat_str”, “lng_str, “date_str” and “time_str” respectively.
Time that we get from the GPS module will be in GMT format. So first separate the time data from the long string then convert this to local time format
void loop()
{
  while (ss.available() > 0) //while data is available
    if (gps.encode(ss.read())) //read gps data
    {
      if (gps.location.isValid()) //check whether gps location is valid
      {
        latitude = gps.location.lat();
        lat_str = String(latitude , 6); // latitude location is stored in a string
        longitude = gps.location.lng();
        lng_str = String(longitude , 6); //longitude location is stored in a string
      }
      if (gps.date.isValid()) //check whether gps date is valid
      {
        date_str = "";
        date = gps.date.day();
        month = gps.date.month();
        year = gps.date.year();
        if (date < 10)
         date_str = '0';
        date_str += String(date);// values of date,month and year are stored in a string
        date_str += " / ";
       ………………..
……………………………..
Now add HTML code to display the GPS data on the webpage. So here all the HTML code is embedded into a variable called “s”, then this variable is printed using client.print(s) to send all embedded HTML code to webpage.
 WiFiClient client = server.available(); // Check if a client has connected
  if (!client)
  {
    return;
  }
  // Prepare the response
  String s = "HTTP/1.1 200 OK\r\nContent-Type: text/html\r\n\r\n <!DOCTYPE html> <html> <head> <title>GPS DATA</title> <style>";
  s += "a:link {background-color: YELLOW;text-decoration: none;}";
  s += "table, th, td </style> </head> <body> <h1  style=";
  s += "font-size:300%;";
  s += " ALIGN=CENTER> GPS DATA</h1>";
  s += "<p ALIGN=CENTER style=""font-size:150%;""";
  s += "> <b>Location Details</b></p> <table ALIGN=CENTER style=";
  s += "width:50%";
  s += "> <tr> <th>Latitude</th>";
  s += "<td ALIGN=CENTER >";
  s += lat_str;
  s += "</td> </tr> <tr> <th>Longitude</th> <td ALIGN=CENTER >";
  s += lng_str;
  s += "</td> </tr> <tr>  <th>Date</th> <td ALIGN=CENTER >";
  s += date_str;
  s += "</td></tr> <tr> <th>Time</th> <td ALIGN=CENTER >";
  s += time_str;
  s += "</td>  </tr> </table> ";
  s += "</body> </html> \n";
  client.print(s); // all the values are send to the webpage
  delay(100);
}
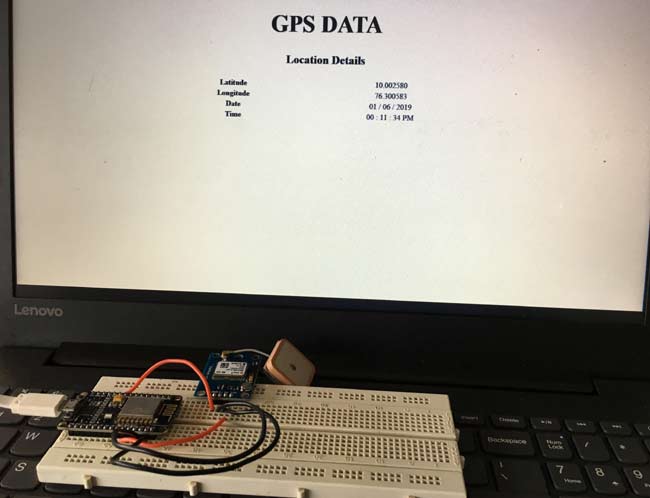
Showing the Latitude and Longitude on a Webpage
Now once the code is uploaded into NodeMCU open the serial monitor.
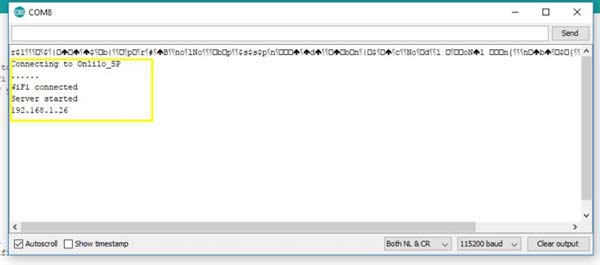
In the serial monitor you will be able to see some information like whether the WiFi is connected or not. If it is connected you will get the local IP address, here it is 192.168.1.26 (This be different for you). Note down the one that displayed on your serial monitor. If the serial monitor is showing blank then press RESET button on NodeMCU board.
Sometimes it takes a couple of minutes to connect the GPS module to the satellite. Once it get connected a blue LED will start to blink on the module.
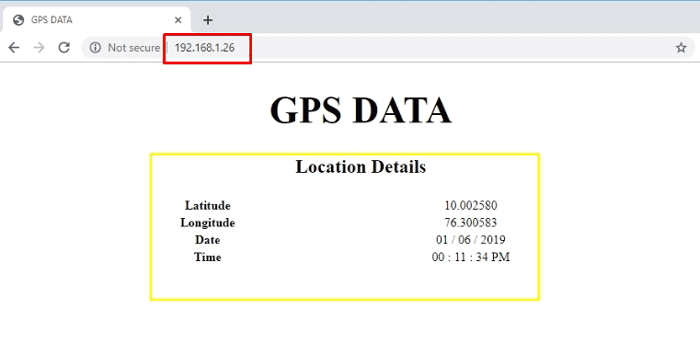
Now open a webpage from your computer (just open a page in Google chrome, Firefox or any browser) and type the IP address that we collected from the serial monitor in the address bar and press ENTER. Now you will be able to see the location,date and time displayed on your computer screen as below
By forwarding the port in your Wi-Fi router, you will be able to monitor this GPS data from anywhere in the world over internet.
#include <TinyGPS++.h> // library for GPS module
#include <SoftwareSerial.h>
#include <ESP8266WiFi.h>
TinyGPSPlus gps; // The TinyGPS++ object
SoftwareSerial ss(4, 5); // The serial connection to the GPS device
const char* ssid = "Onlilo_SP"; //ssid of your wifi
const char* password = "ArduinoUno"; //password of your wifi
float latitude , longitude;
int year , month , date, hour , minute , second;
String date_str , time_str , lat_str , lng_str;
int pm;
WiFiServer server(80);
void setup()
{
Serial.begin(115200);
ss.begin(9600);
Serial.println();
Serial.print("Connecting to ");
Serial.println(ssid);
WiFi.begin(ssid, password); //connecting to wifi
while (WiFi.status() != WL_CONNECTED)// while wifi not connected
{
delay(500);
Serial.print("."); //print "...."
}
Serial.println("");
Serial.println("WiFi connected");
server.begin();
Serial.println("Server started");
Serial.println(WiFi.localIP()); // Print the IP address
}
void loop()
{
while (ss.available() > 0) //while data is available
if (gps.encode(ss.read())) //read gps data
{
if (gps.location.isValid()) //check whether gps location is valid
{
latitude = gps.location.lat();
lat_str = String(latitude , 6); // latitude location is stored in a string
longitude = gps.location.lng();
lng_str = String(longitude , 6); //longitude location is stored in a string
}
if (gps.date.isValid()) //check whether gps date is valid
{
date_str = "";
date = gps.date.day();
month = gps.date.month();
year = gps.date.year();
if (date < 10)
date_str = '0';
date_str += String(date);// values of date,month and year are stored in a string
date_str += " / ";
if (month < 10)
date_str += '0';
date_str += String(month); // values of date,month and year are stored in a string
date_str += " / ";
if (year < 10)
date_str += '0';
date_str += String(year); // values of date,month and year are stored in a string
}
if (gps.time.isValid()) //check whether gps time is valid
{
time_str = "";
hour = gps.time.hour();
minute = gps.time.minute();
second = gps.time.second();
minute = (minute + 30); // converting to IST
if (minute > 59)
{
minute = minute - 60;
hour = hour + 1;
}
hour = (hour + 5) ;
if (hour > 23)
hour = hour - 24; // converting to IST
if (hour >= 12) // checking whether AM or PM
pm = 1;
else
pm = 0;
hour = hour % 12;
if (hour < 10)
time_str = '0';
time_str += String(hour); //values of hour,minute and time are stored in a string
time_str += " : ";
if (minute < 10)
time_str += '0';
time_str += String(minute); //values of hour,minute and time are stored in a string
time_str += " : ";
if (second < 10)
time_str += '0';
time_str += String(second); //values of hour,minute and time are stored in a string
if (pm == 1)
time_str += " PM ";
else
time_str += " AM ";
}
}
WiFiClient client = server.available(); // Check if a client has connected
if (!client)
{
return;
}
// Prepare the response
String s = "HTTP/1.1 200 OK\r\nContent-Type: text/html\r\n\r\n <!DOCTYPE html> <html> <head> <title>GPS DATA</title> <style>";
s += "a:link {background-color: YELLOW;text-decoration: none;}";
s += "table, th, td </style> </head> <body> <h1 style=";
s += "font-size:300%;";
s += " ALIGN=CENTER> GPS DATA</h1>";
s += "<p ALIGN=CENTER style=""font-size:150%;""";
s += "> <b>Location Details</b></p> <table ALIGN=CENTER style=";
s += "width:50%";
s += "> <tr> <th>Latitude</th>";
s += "<td ALIGN=CENTER >";
s += lat_str;
s += "</td> </tr> <tr> <th>Longitude</th> <td ALIGN=CENTER >";
s += lng_str;
s += "</td> </tr> <tr> <th>Date</th> <td ALIGN=CENTER >";
s += date_str;
s += "</td></tr> <tr> <th>Time</th> <td ALIGN=CENTER >";
s += time_str;
s += "</td> </tr> </table> ";
s += "</body> </html>"
client.print(s); // all the values are send to the webpage
delay(100);
}


