


In previous IoT articles we have used ESP32 to control an LED using IFTTT and using Adafruit IO. IFTTT and Adafruit IO are two popular cloud platform to build IoT (Internet of Things) based projects easily and rapidly. We also used another popular android application “Blynk” for controlling the ESP32 GPIO using Smart phone. With some minor changes in hardware you can replace the LED with any AC home Appliances to control it remotely from anywhere using internet.
In this article we will use Google Assistant with Adafruit IO to control an LED with ESP32. Here we have used IFTTT to access Google Assistant and to control LED by voice commands. ESP32 has been programmed using Arduino IDE.
Components Required
- ESP32 module
- USB cable
- Breadboard
- LED
- Resistor and jumper wires
- Google assistant enabled device.
- Account on Adafruit IO
- Account on IFTTT
- Google account- same account for which you are using Google Assistant.
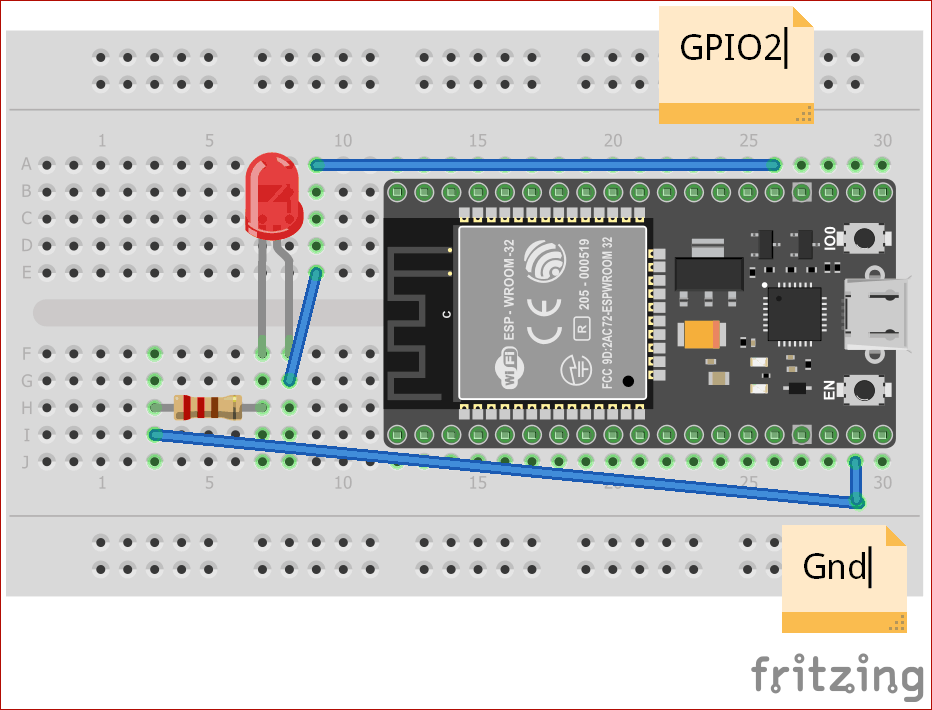
Circuit Diagram
Step1: Setting up Adafruit IO Account for IOT controlled LED
Adafruit IO is an IOT platform built around the MQTT Protocol. MQTT is a lightweight messaging protocol that provides resource-constrained network clients with a simple way to distribute telemetry information. The protocol which uses a publish/subscribe communication pattern, is used for machine to machine (M2M) communication and plays an important role in the Internet of Things (IoT).
For this project you have to follow following steps to getting started with Adafruit IO:
- Visit https://io.adafruit.com and create an account.
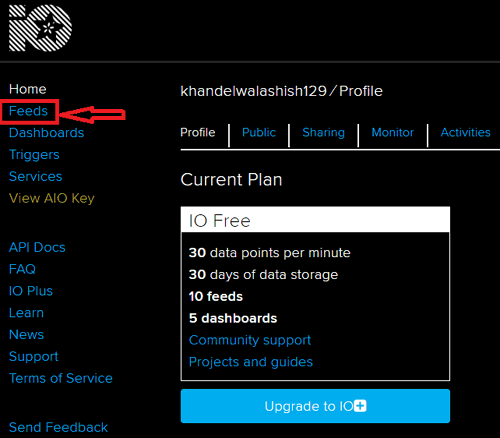
- After creating your Account you will be taken to your home screen. Click on “Feeds” from the left hand menu.
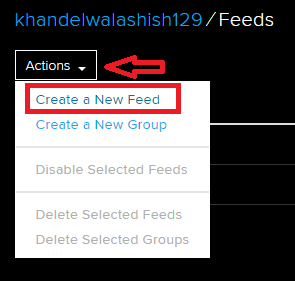
- Now click on Actions and then create a New feed. Then it will ask you to name your feed I am giving it LED_Control, you can give according to you and then create and your feed is created.
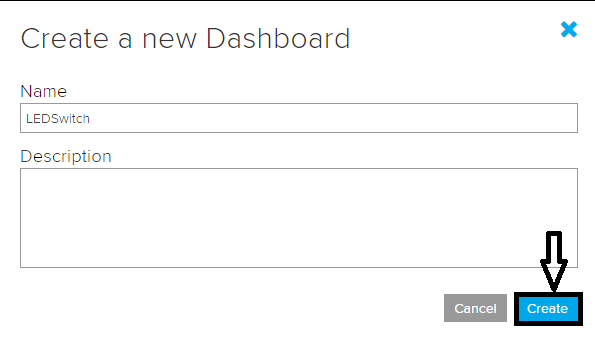
- Now go to “Dashboards” from the left hand menu. Click on Actions and then click on create a new dashboard, give it name as you want; I am giving “LEDSwitch” and then click on Create and your dashboard will now created.
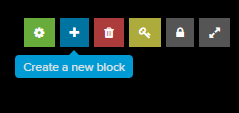
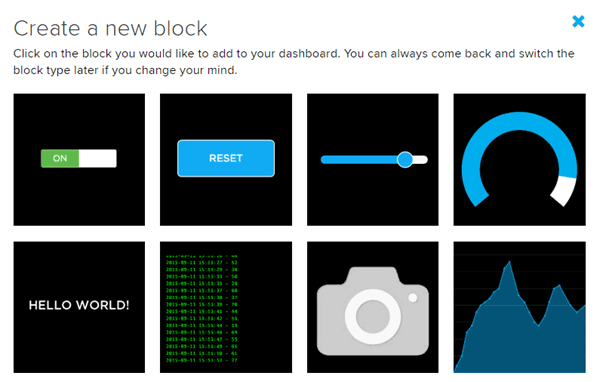
- Now open your new dashboard by simply clicking on it and you should be taken to a mostly blank page. Clicking on blue + button will let you add new UI components to the dashboard.
- For this project I just need a button, so select first option, it will ask you to select the feed, so select the one you just made and keep the defaults for the rest of the settings.
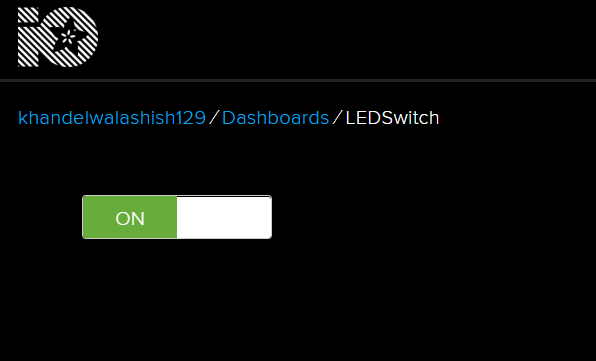
- After selecting your dashboard window will look like this:
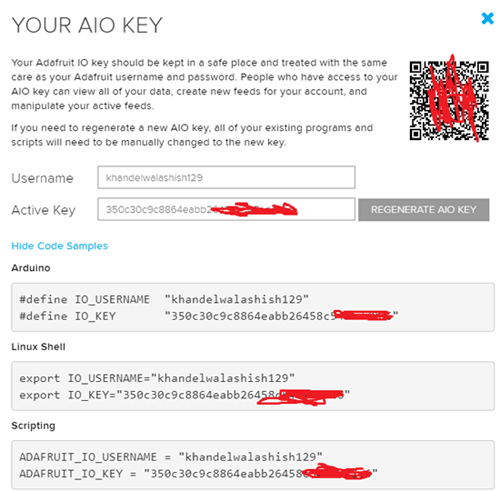
- During programming you will required your unique AIO key so for this click on key button at right hand corner of your window.
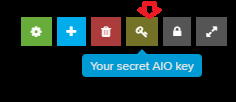
- After clicking on key button your Active key for this project is generated, don’t share this key with anyone this must be confidential.
Step2. Connecting to Google Assistant through IFTTT
In this step, we will connect our Google Assistant to the Adafruit IO MQTT Broker to allow us to control the lights with voice commands. To do this I am using IFTTT (If This Then That) platform.
To perform this you need to follow the following procedure:
- Go to www.IFTTT.com website and create a new account if you are not having already. You can sign up using your Google account also.
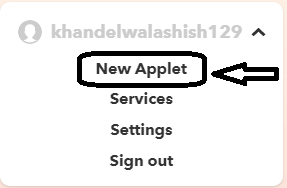
- After creating an account click on your username at right hand corner of the window and click on “New Applet” button.
- After clicking on New applet you will find a window which ask you ‘If this then that’. The term IF THIS THEN THAT means if something happens on the “This” then we have do something on “that”.

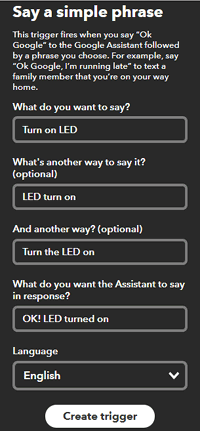
- Click on + blue button and search for “Google Assistant”, and then select “Say a simple phrase” from the menu of specific triggers. This will ask you some details, fill according to you and create trigger.
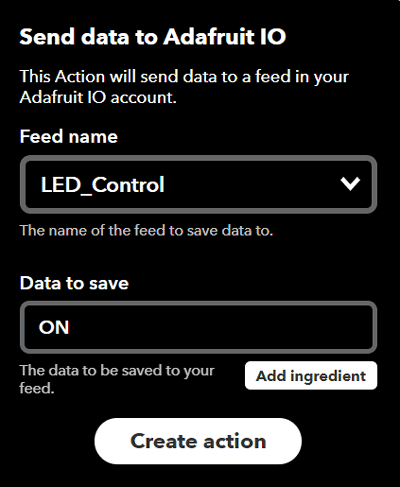
- Now you have to give Action so click on + button of “That”, and search for Adafruit and click on “Send data to Adafruit IO”
- Now it will ask you to select the Feed name so select the feed that you made earlier for this project and in Data to save we will send ON for this applet and click on Create action.
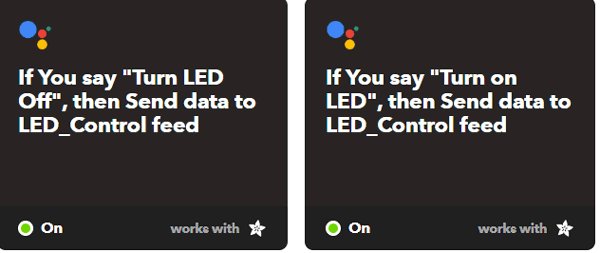
- Once you have created this applet, you have to create another applet for turning the LED “OFF”. You have to follow the same steps to create another applet.
- After creating both the applets go to “My Applets” and you can see both the applets here.
Programming ESP32 for Google Assistant Controlled LED
Complete program is given at the end of this project. ESP32 is programmed using Arduino IDE. Connecting ESP32 with Adafruit IO is very easy using Arduino IDE, you have to include Adafruit MQTT Client Library in your IDE, for this open your Arduino IDE and go to Sketch--> include library-->Manage library and search for “adafruit mqtt” then a library associated with this will be shown to you; you just have to install it.

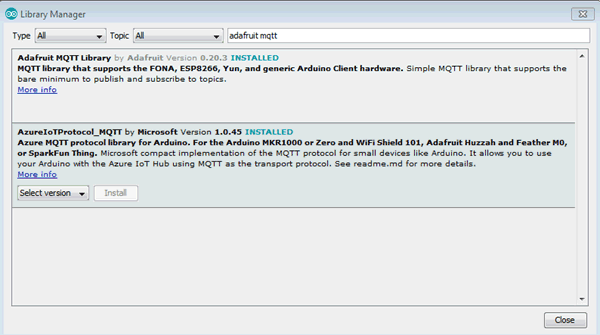
After installing this library you are ready to use Adafruit IO with the ESP32.
The complete code for this project is given at last of this article, I will explain you about the code briefly and will tell you where you have to do the modifications.
At the start of the program, you have to add following libraries:
#include <WiFi.h>
#include "Adafruit_MQTT.h"
#include "Adafruit_MQTT_Client.h"
Now you have to define your network SSID, password, your Adafruit username and your AIO key that you got while doing Adafruit IO setup.
#define WLAN_SSID       "Ashish"
#define WLAN_PASS       "12345678"
#define AIO_SERVER      "io.adafruit.com"
#define AIO_SERVERPORT  1883
#define AIO_USERNAME    "khandelwalashish129"
#define AIO_KEY         "350c30c9c8864eabb26458c547XXXXXX"
Now you have to define LED to which you are taking your output.
int output=2;
Now, create WiFiClient and Adafruit_MQTT_Client objects as global variables, and instantiate the feed for your LED_Control.
WiFiClient client;
Adafruit_MQTT_Client mqtt(&client, AIO_SERVER, AIO_SERVERPORT, AIO_USERNAME, AIO_KEY);
Adafruit_MQTT_Subscribe LED_Control = Adafruit_MQTT_Subscribe(&mqtt, AIO_USERNAME "/feeds/LED_Control");
Now in the setup function we will define our LED pin, baud rate and we will connect to WiFi and MQTT Server.
void setup() {
  Serial.begin(115200);
  delay(10);
pinMode(2,OUTPUT);
  Serial.println(); Serial.println();
  Serial.print("Connecting to ");
  Serial.println(WLAN_SSID);
 WiFi.begin(WLAN_SSID, WLAN_PASS);
  while (WiFi.status() != WL_CONNECTED) {
    delay(500);
    Serial.print(".");
  }
  Serial.println();
  Serial.println("WiFi connected");
  Serial.println("IP address: "); Serial.println(WiFi.localIP());
  mqtt.subscribe(&LED_Control);
}
Now, in the Loop function, we need to check to see if our subscription has been updated, and act accordingly.
void loop() {
MQTT_connect();
Adafruit_MQTT_Subscribe *subscription;
  while ((subscription = mqtt.readSubscription(5000))) {
    if (subscription == &LED_Control) {
      Serial.print(F("Got: "));
      Serial.println((char *)LED_Control.lastread);
       if (!strcmp((char*) LED_Control.lastread, "ON"))
{
        digitalWrite(2, HIGH);
      }
      else
      {
        digitalWrite(2, LOW);
      }
    }
  }
}
Finally, add the MQTT Connect function so that MQTT connection is established.
void MQTT_connect() {
int8_t ret;
if (mqtt.connected()) {
return;
}
Serial.print("Connecting to MQTT... ");
uint8_t retries = 3;
while ((ret = mqtt.connect()) != 0) {
Serial.println(mqtt.connectErrorString(ret));
Serial.println("Retrying MQTT connection in 5 seconds...");
mqtt.disconnect();
delay(5000);
retries--;
if (retries == 0) {
while (1);
}
}
Serial.println("MQTT Connected!");
}
Once your code is ready with modifications, you are ready to upload it to your ESP32 from Arduino IDE.
Testing LED control with Google Assistant
After uploading of code open your serial monitor and your serial monitor should look like this:
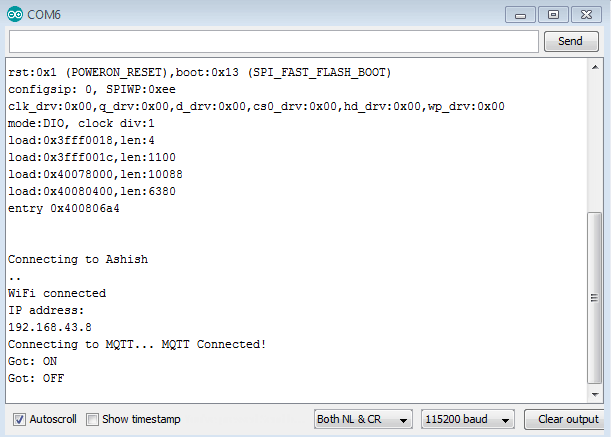
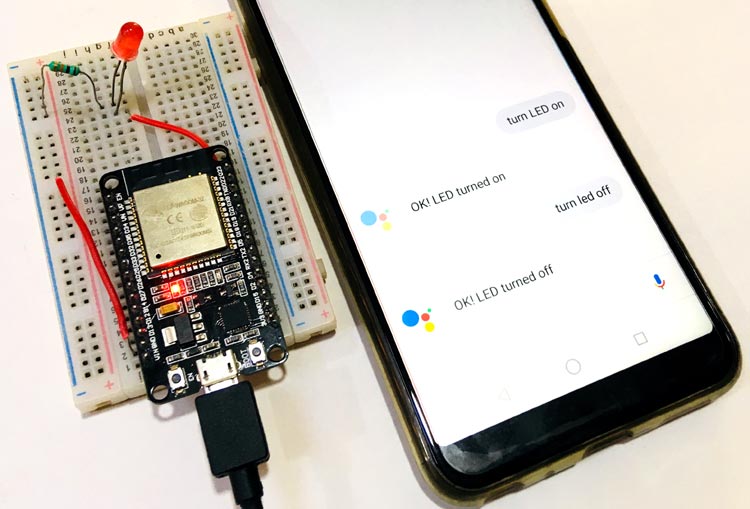
Now open Google assistant in your Android and give voice command like “Turn LED on” or “Turn LED off” and it will respond you like you defined earlier and you will observe change of LED state also.
#include <WiFi.h>
#include "Adafruit_MQTT.h"
#include "Adafruit_MQTT_Client.h"
#define WLAN_SSID "Ashish"
#define WLAN_PASS "12345678"
#define AIO_SERVER "io.adafruit.com"
#define AIO_SERVERPORT 1883
#define AIO_USERNAME "khandelwalashish129"
#define AIO_KEY "350c30c9c8864eabb26458c547XXXXXX"
int output=2;
WiFiClient client; // Create an ESP8266 WiFiClient class to connect to the MQTT server.
Adafruit_MQTT_Client mqtt(&client, AIO_SERVER, AIO_SERVERPORT, AIO_USERNAME, AIO_KEY); // Setup the MQTT client class by passing in the WiFi client and MQTT server and login details.
Adafruit_MQTT_Subscribe LED_Control = Adafruit_MQTT_Subscribe(&mqtt, AIO_USERNAME "/feeds/LED_Control");
void MQTT_connect();
void setup() {
Serial.begin(115200);
delay(10);
pinMode(2,OUTPUT);
// Connect to WiFi access point.
Serial.println(); Serial.println();
Serial.print("Connecting to ");
Serial.println(WLAN_SSID);
WiFi.begin(WLAN_SSID, WLAN_PASS);
while (WiFi.status() != WL_CONNECTED) {
delay(500);
Serial.print(".");
}
Serial.println();
Serial.println("WiFi connected");
Serial.println("IP address: "); Serial.println(WiFi.localIP());
mqtt.subscribe(&LED_Control);
}
uint32_t x=0;
void loop() {
MQTT_connect();
Adafruit_MQTT_Subscribe *subscription;
while ((subscription = mqtt.readSubscription(5000))) {
if (subscription == &LED_Control) {
Serial.print(F("Got: "));
Serial.println((char *)LED_Control.lastread);
if (!strcmp((char*) LED_Control.lastread, "ON"))
{
digitalWrite(2, HIGH);
}
else
{
digitalWrite(2, LOW);
}
}
}
}
void MQTT_connect() {
int8_t ret;
// Stop if already connected.
if (mqtt.connected()) {
return;
}
Serial.print("Connecting to MQTT... ");
uint8_t retries = 3;
while ((ret = mqtt.connect()) != 0) { // connect will return 0 for connected
Serial.println(mqtt.connectErrorString(ret));
Serial.println("Retrying MQTT connection in 5 seconds...");
mqtt.disconnect();
delay(5000); // wait 5 seconds
retries--;
if (retries == 0) {
// basically die and wait for WDT to reset me
while (1);
}
}
Serial.println("MQTT Connected!");
}


