


Emails are worldwide used as an essential part of digital communication. Emails are mostly used for official communication purposes because it is most convenient, cost-effective, record-keeping, global reach, and environmentally friendly. Emails are a very faster way of communication, only you need a steady internet connection.
In this project, we are going to send emails (Plain text and HTML) using the ESP32 board. The ESP32's built-in Wi-Fi connectivity enables it to communicate with the internet using SMTP servers for sending emails. This project has various benefits for various applications, such as delivering notifications, alarms, and alerts.
We already built some Email Alert Projects, check them out for learning,
Components Required
For this project, we need very few requirements including Software and Hardware
- ESP32 Microcontroller Module
- Gmail Account
- Arduino IDE
Configuring Google Gmail Account
We are using Gmail as a sender Email account; don’t worry it’s free at all. By using the Gmail SMTP server, we will send and receive mail. SMTP server known as Simple mail transfer Protocol is responsible for sending and receiving mail between the sender and receiver. Different email providers like Gmail, Yahoo, Hotmail, Outlook, etc. have unique SMTP addresses and settings.
Gmail SMTP Server Settings are provided below: other emails provider setting you can check on the Internet
Server: smtp.gmail.com
Server port (TLS): 587
Server port (SSL): 465
SMTP TLS/SSL required: yes
Now, to send the emails using esp32 we need a sender mail Account, which we use a Gmail account. You can also use your older Gmail account, but it is not recommended because it will be blocked if something wrong happens during programming. Opening a new Gmail account is very easy, all you have to do is just follow the basic steps:
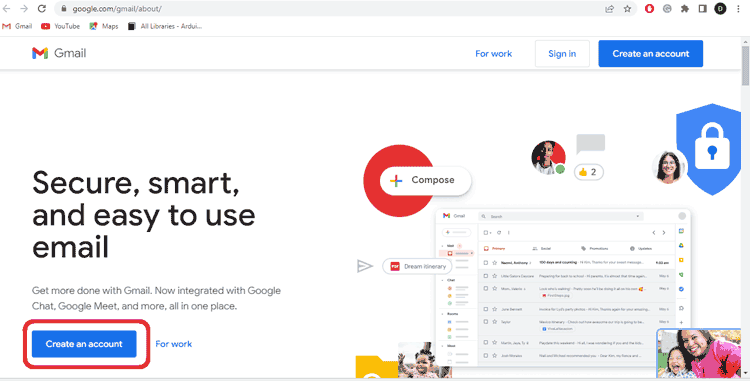
- Go to the Google Gmail page.
- Click on Create a new account.
- Fill in the Required details. All the details are mandatory to fill in as these are required to open a Google Gmail Account.
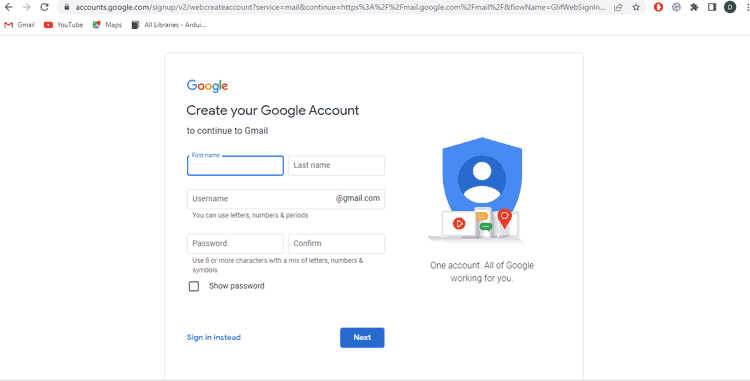
- After filling in the details, click ‘next’. Accept all terms and conditions and verify the mobile number if it asked for it. Hence your account will be created.
Create an App Password
To email with an ESP32, generate a unique app password in your Gmail account for the app or device that doesn't support 2-step verification. An app password serves as a substitute for your regular password to access Gmail on such devices. These passwords can be revoked from the Google Account security settings and are valid only for the specified app or device.
First, the necessary condition to create an app password is to enable 2-step verification on your account.
- Login to your Google account, go to Manage Google account settings.
- Go to Security settings, and scroll down till you see “2-step verification”
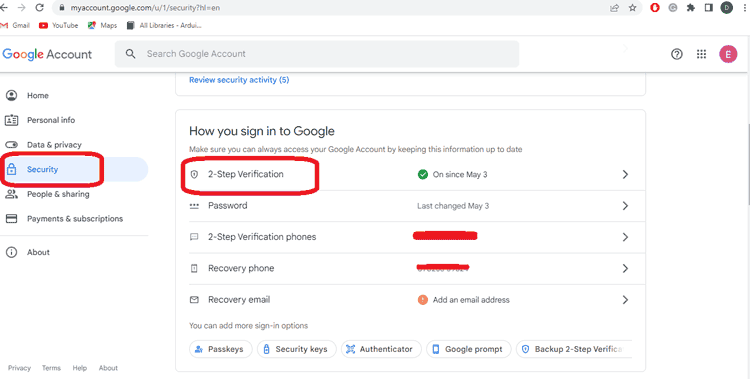
- Enable 2-step verification by adding and verifying mobile number
- After Enabling it, you always prompt to enter a verification code that was sent on your smartphone whenever you are trying to log in to that account on any other device.
Creating an App Password
- Now, go to the search bar and search “App Password”. Click on the App password option.
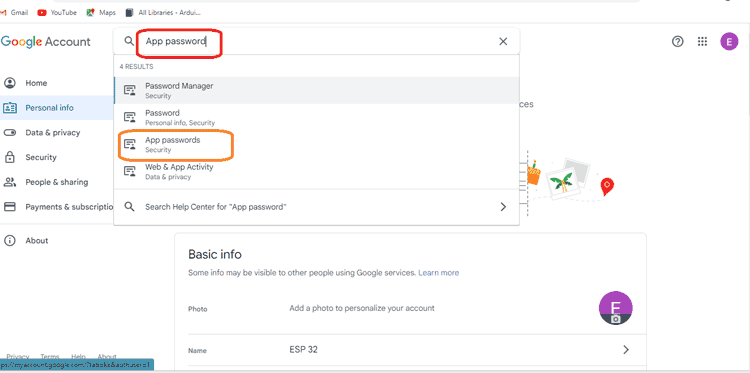
- Here, you will see a window where you can create an App password for the app you want to use with your Google Account. In selected fields, select the app as mail type and the device as others.
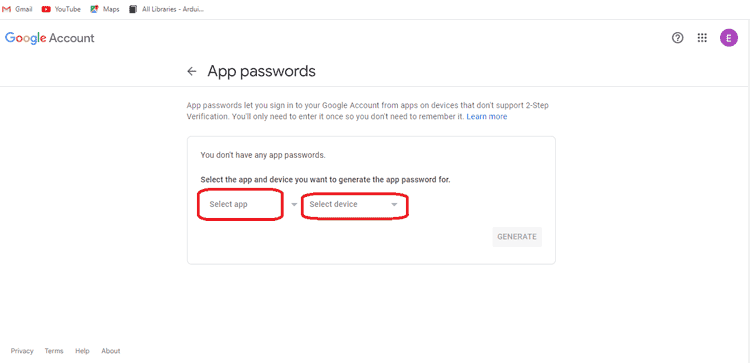
- After selecting the fields, give a name when it prompts to the next field and finally click Generate. You will see that an App password would be generated, and save the code for later, which we will use in our programming to provide access of the Gmail account to ESP32.

Finally, you see that a device is added.

Programming ESP32 Using Arduino IDE
The program you create can include various features such as customizing the email message content, specifying the recipient’s email address, and including message or other data in the email.
- Set up the ESP32 microcontroller board with the Arduino IDE software development environment, including the necessary Wi-Fi and email communication libraries.
- Configure the Wi-Fi network settings on the ESP32 to enable connectivity to the internet.
- Set up an SMTP server to handle the email communications, and provide the required server credentials such as the server address, port number, login credentials, and security settings.
- Write a program using the Arduino IDE that uses the ESP32's Wi-Fi and email libraries to establish a connection to the SMTP server and send emails.
ESP Mail Client Library Setup
It is necessary to use the ESP mail client library to work with SMTP servers. So, let’s learn to install the library.
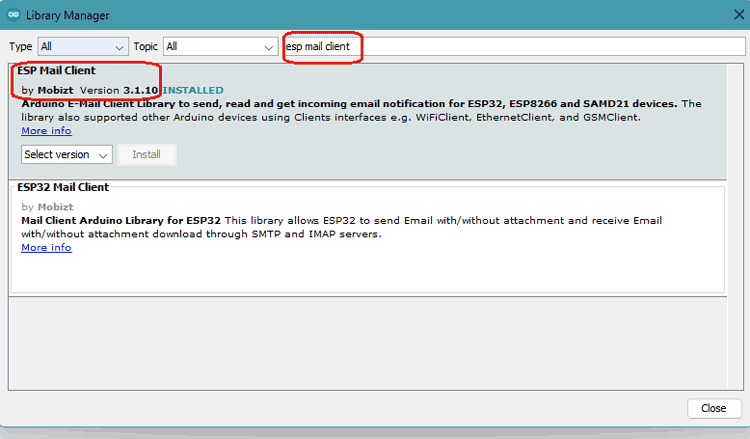
- Go to the library manager of your Arduino by Sketch> include libraries> manage libraries.
- Search for “ESP mail client” and you will find the first library named “ESP Mail Client by Mobitz”.
- Install it and that’s it.
Sending HTML and Plain Text using ESP32
The code requires all the necessary libraries for successful execution. Libraries include ESP Mail Client, and Wifi.h only. For sending mail using ESP32 requires an Internet connection and due to that we use library WIFI.h. We have also included some variables and objects to store data for further programming.
#include <WiFi.h>
#include <ESP_Mail_Client.h>
#define WIFI_SSID "Semicon Media 2.4"
#define WIFI_PASSWORD "cdfiP29to665"
#define SMTP_server "smtp.gmail.com"
#define SMTP_Port 465
#define sender_email "[email protected]"
#define sender_password "nlzvmivlrvdxttgy"
#define Recipient_email "[email protected]"
#define Recipient_name ""
SMTPSession smtp;
WIFI.h library connects the ESP32 to a Wi-Fi network in the Arduino IDE. You will need to provide the SSID and password of the network you want to connect to, into the created variables named WIFI_SSID and WIFI_Password. You need to replace these credentials with your network credentials.
Then we have to provide an SMTP server address and port variables to store values to connect to the Servers. Since we have used the Google Gmail SMTP Protocol so we have to provide a Gmail SMTP address and Port. Choosing Gmail as an SMTP server is optional, you can also choose another Mail provider’s options.
Also, we defined variables for Sender’s Email address & password and the Receiver’s Email address & name to store the data values. The recipient’s name is optional, if you want you can define otherwise leave it as it is.
void setup(){
  Serial.begin(115200);
  Serial.println();
  Serial.print("Connecting...");
  WiFi.begin(WIFI_SSID, WIFI_PASSWORD);
  while (WiFi.status() != WL_CONNECTED)
  { Serial.print(".");
    delay(200);
   }
  Serial.println("");
  Serial.println("WiFi connected.");
  Serial.println("IP address: ");
  Serial.println(WiFi.localIP());
  Serial.println();
  smtp.debug(1);
Inside the Setup function(), we initialize the serial port on baud rate 115200. Then we start to command WiFi.begin() to initialize the WIFI to connect to a network by providing the correct SSID and password.
Then we monitor the connection by command WL_CONNECTED and, we print periods to the serial monitor as a progress indicator by a delay of 200 milliseconds. Finally, the IP Address will print on the serial monitor after a successful connection. And finally, we start the function of object ‘smtp’ that is created of the class “SMTPsession”.
ESP_Mail_Session session;
  session.server.host_name = SMTP_server ;
  session.server.port = SMTP_Port;
  session.login.email = sender_email;
  session.login.password = sender_password;
  session.login.user_domain = "";
We have configured the Session by creating an object named 'session’ of the class ‘ESP_Mail_Session’ and providing all the details to the class members which are defined earlier as variables.
SMTP_Message message;
  message.sender.name = "ESP 32";
  message.sender.email = sender_email;
  message.subject = "ESP32 Testing Email";
  message.addRecipient(Recipient_name,Recipient_email);
Now, in the above lines of code, we can provide the details of the email message which we going to send. It includes the sender’s name, email, and message subject which is the subject of the mail. Some of these variables we have defined already but you need to change them as per your communication data. Else subject and sender name can be directly defined here as per your choice.
HTML message body
//Send HTML message
String htmlMsg = "<div style=\"color: #000000;\"><h1> Hello Semicon!</h1><p> Mail Generated from  ESP32</p></div>";
  message.html.content = htmlMsg.c_str();
  message.html.content = htmlMsg.c_str();
  message.text.charSet = "us-ascii";
  message.html.transfer_encoding = Content_Transfer_Encoding::enc_7bit;
The above lines of code define the HTML text body. For the heading, we are specifying ‘Hello Semicon’. The next line will consist of ‘Mail Generated from ESP32’. This message displayed to the sender will be in Black as we have specified the hex code for that. You can add your own HTML text and settings according to your preference.
Simple Text Message body
//Send simple text message
  String textMsg = "How are you doing";
  message.text.content = textMsg.c_str();
  message.text.charSet = "us-ascii";
  message.text.transfer_encoding = Content_Transfer_Encoding::enc_7bit;
The above code sends plain text but before that, you have to comment out the complete HTML text body.
if (!smtp.connect(&session))
    return;
  if (!MailClient.sendMail(&smtp, &message))
    Serial.println("Error sending Email, " + smtp.errorReason());
}
The following line of code check and start the SMTP session and send the mail.
In the last, you will find the complete code.
Working
The main task we are going to do is to send an email via the Gmail SMTP server. The necessary changes shouldn’t be forgotten in the code like Receiver and sender Gmail addresses and also comment out any of one in the HTML body or the Plain text body inside the code.
Configure the message body as per your requirement like changing the subject, sender name, and message.
Also don’t forget to provide your WiFi credentials to successfully connect the board to the internet.
The sender password is the App password (created earlier) which is the only key to access the Sender’s Gmail account. So be careful while copy-pasting it.
Further working steps:
- Open the code sketch in Arduino IDE, and connect the ESP32 module via a micro-USB cable.
- Select the board as ESP32 Dev Module (only work if you installed ESP32 board manager already)
- Select a COM port
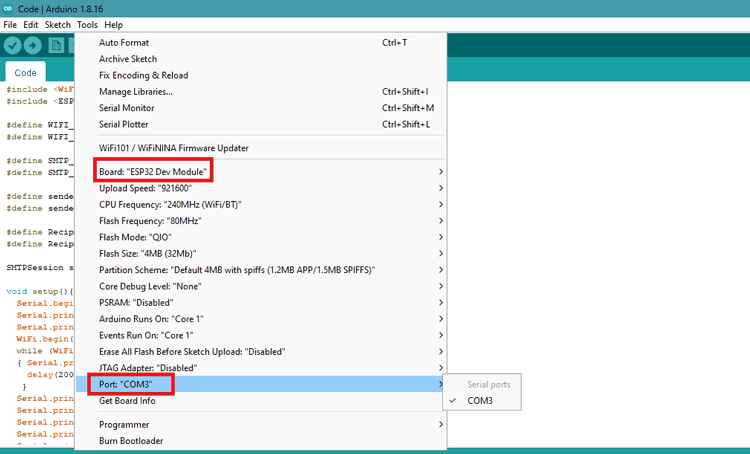
- Upload the code by following the steps already discussed above and give it a try. Open the serial monitor set the correct baud rate and wait until it shows an IP Address.
- On the serial monitor, there will be every information you get like whether mail sends, Gmail authorization is accessed, or not.
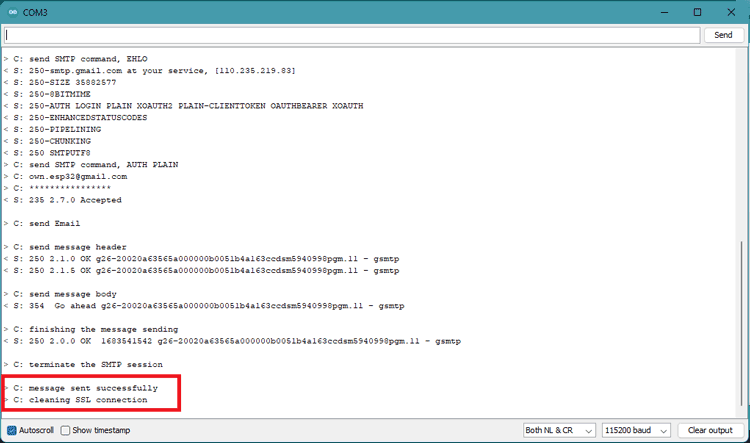
- Finally, if everything is okay, a successfully sent message will be displayed. Check for the mail on your Email ID. An Email will be sent whenever you boot up the device.
Let’s see how real our mail looks:
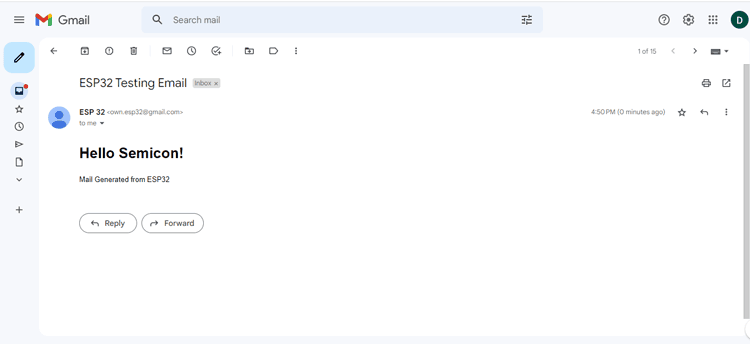
Hope you liked and enjoyed the project and learned something useful from it. If you have any questions, you can leave them in the comment section below.
#include <WiFi.h>
#include <ESP_Mail_Client.h>
#define WIFI_SSID "Semicon Media 2.4"
#define WIFI_PASSWORD "cdfiP29to665"
#define SMTP_server "smtp.gmail.com"
#define SMTP_Port 465
#define sender_email "[email protected]"
#define sender_password "nlzvmivlrvdxttgy"
#define Recipient_email "[email protected]"
#define Recipient_name ""
SMTPSession smtp;
void setup(){
Serial.begin(115200);
Serial.println();
Serial.print("Connecting...");
WiFi.begin(WIFI_SSID, WIFI_PASSWORD);
while (WiFi.status() != WL_CONNECTED)
{ Serial.print(".");
delay(200);
}
Serial.println("");
Serial.println("WiFi connected.");
Serial.println("IP address: ");
Serial.println(WiFi.localIP());
Serial.println();
smtp.debug(1);
ESP_Mail_Session session;
session.server.host_name = SMTP_server ;
session.server.port = SMTP_Port;
session.login.email = sender_email;
session.login.password = sender_password;
session.login.user_domain = "";
/* Declare the message class */
SMTP_Message message;
message.sender.name = "ESP 32";
message.sender.email = sender_email;
message.subject = "ESP32 Testing Email";
message.addRecipient(Recipient_name,Recipient_email);
//Send HTML message
String htmlMsg = "<div style=\"color:#000000;\"><h1> Hello Semicon!</h1><p> Mail Generated from ESP32</p></div>";
message.html.content = htmlMsg.c_str();
message.html.content = htmlMsg.c_str();
message.text.charSet = "us-ascii";
message.html.transfer_encoding = Content_Transfer_Encoding::enc_7bit;
/* //Send simple text message
String textMsg = "How are you doing";
message.text.content = textMsg.c_str();
message.text.charSet = "us-ascii";
message.text.transfer_encoding = Content_Transfer_Encoding::enc_7bit;*/
if (!smtp.connect(&session))
return;
if (!MailClient.sendMail(&smtp, &message))
Serial.println("Error sending Email, " + smtp.errorReason());
}
void loop(){
}


