


Whether it is IoT, M2M, or Industry 4.0, LoRa is one of the most popular wireless communication medium. LoRa is getting popular day by day and there are many LoRaWAN networks all around. It consumes very low power and can communicate over a long-range. Previously we used LoRa for Arduino to Arduino and ESP32 to ESP32 communications.
Here in this tutorial, we will use LoRa module SX1278 for peer to peer communication between Raspberry Pi and Arduino. Here Arduino will act as Transmitter/Server and Raspberry Pi as Receiver/Client. A DHT 11 sensor is connected to the transmitter side which will send temperature and humidity data to the receiver side. On the receiving side, Raspberry pi will publish these readings on the Cayenne dashboard.
Components Required
- Raspberry Pi 4
- Arduino Uno
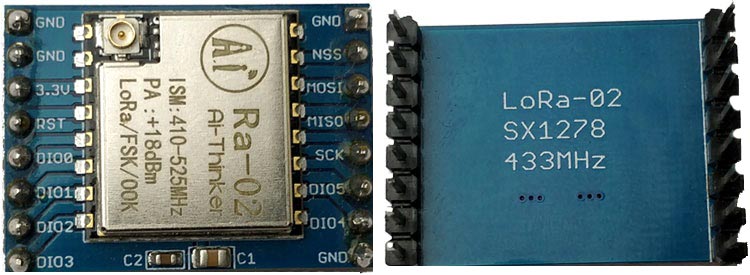
- SX1278 433MHz LoRa Transmitter- Receiver Module
- DHT11
Circuit Diagram
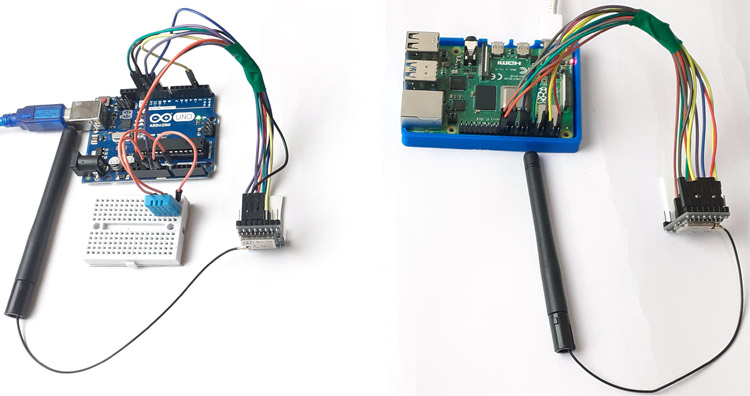
The circuit diagrams for the LoRa transmitter/Server and Receiver/Client section are given below. In this project, we are going to send temperature and humidity values from Arduino to Raspberry Pi using the LoRa SX1278 module. The DHT11 sensor is connected to the transmitting side where Arduino will get temperature and humidity values from DHT11 and then sends it to Raspberry Pi via the LoRa SX1278 module. These humidity and temperature values will be uploaded to the Cayenne IoT platform which can be monitored from anywhere in the world using the internet.
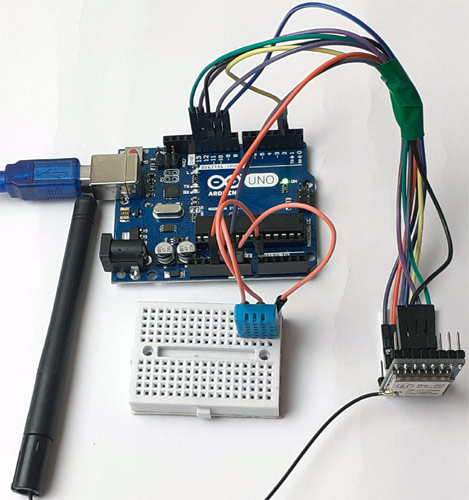
Transmitter Section- Interfacing LoRa with Arduino UNO
On the transmitter side, an Arduino UNO is interfaced with the LoRa module and DHT11 sensor. The interfacing of the Arduino UNO with LoRa and DHT11 is shown below. Also, check the detailed explanation of interfacing Arduino Uno with LoRa.
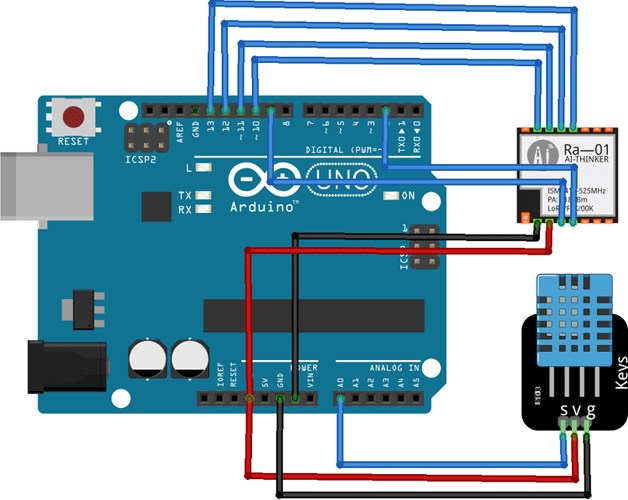
The LoRa module consists of 16 pins, out of these six pins are GPIO pins, and four are Ground pins. This LoRa module operates at 3.3V, and so the 3.3V pin on LoRa is connected to the 3.3v pin on the Arduino UNO board. Complete connections are given in the below table. The DHT11 sensor is connected to the A0 pin of Arduino.
|
LoRa SX1278 Module |
Arduino Uno |
|
3.3V |
3.3V |
|
GND |
GND |
|
NSS |
D10 |
|
DIO0 |
D2 |
|
SCK |
D13 |
|
MISO |
D12 |
|
MOSI |
D11 |
|
RST |
D9 |
|
DHT 11 Sensor |
Arduino Uno |
|
VCC |
3.3V |
|
GND |
GND |
|
DATA |
A0 |
Receiver Section- Interfacing Raspberry Pi with LoRa Module
On the receiver side, a Raspberry Pi is used to get the data from the LoRa Receiver and send it to the Cayenne platform.
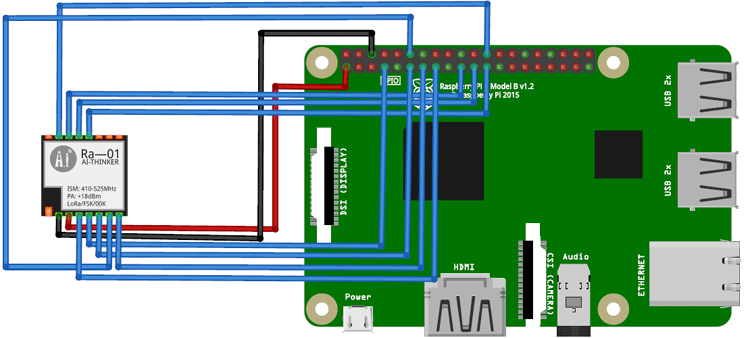
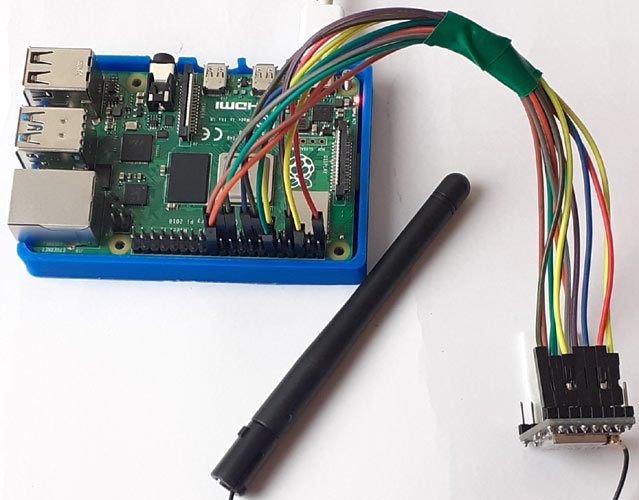
Complete connections between the LoRa module and Raspberry Pi are given in the below table.
|
Raspberry Pi |
Lora – SX1278 Module |
|
3.3V |
3.3V |
|
Ground |
Ground |
|
GPIO 10 |
MOSI |
|
GPIO 9 |
MISO |
|
GPIO 11 |
SCK |
|
GPIO 8 |
Nss / Enable |
|
GPIO 4 |
DIO 0 |
|
GPIO 17 |
DIO 1 |
|
GPIO 18 |
DIO 2 |
|
GPIO 27 |
DIO 3 |
|
GPIO 22 |
RST |
Cayenne Setup for LoRa Communication
Cayenne is an IoT platform that allows you to control the microcontrollers. It is also used to upload any sensor data to the Cayenne cloud. Here temperature and humidity data from the DHT11 sensor will be uploaded to Cayenne.
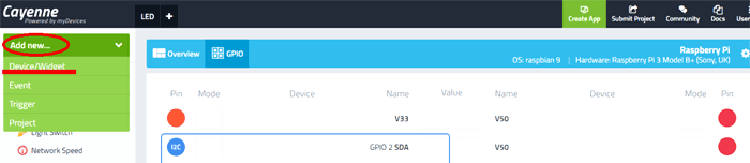
First, sign-in/Signup into your Cayenne account and then go to the Cayenne dashboard and click on ‘Add new’ and then click on ‘Device/Widget.’
After this, scroll down and click on ‘Bring Your Own Thing.’

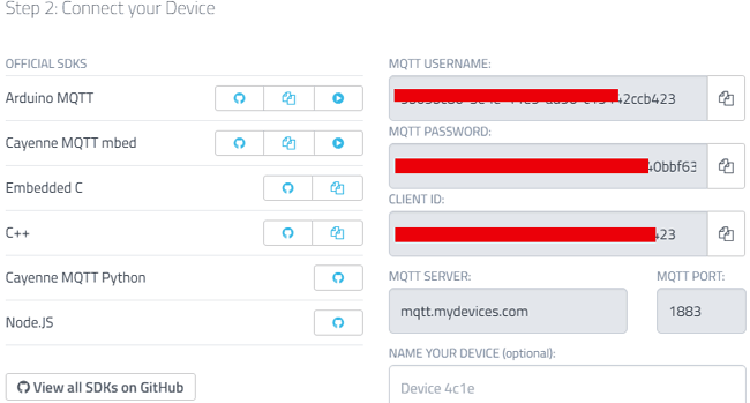
A window with your device details will appear. Copy these details; it will be used in the python code.
Programing Arduino for LoRa Communication
For communication between Arduino and Raspberry Pi, Radiohead library is used. This library can be downloaded from here. Here Arduino is working as Transmitter/Server and sending DHT sensor data to Raspberry Pi.
Complete Arduino code is given at the end of the page. Here we are explaining some important parts of the code.
As usual, start the code by including all the required libraries. SPI library is used for SPI communication between Arduino and LoRa modules. RH_RF95 library is used for LoRa communication, and the DHT library is used to read the temperature and humidity values from the DHT sensor.
#include <SPI.h>
#include <RH_RF95.h>
#include "DHT.h"
Then define the DHT type and pin where you connected the DHT sensor.
#define DHTPIN A0     // what pin we're connected to
#define DHTTYPE DHT11   // DHT type
DHT dht(DHTPIN, DHTTYPE);
Inside the void loop, read the temperature and humidity values.
temp = dht.readTemperature();
hum = dht.readHumidity();
Now to send the temperature and humidity values to Raspberry Pi, you have to convert them into a char array. To do that, first, convert the integer values to a string and then add both the temperature and humidity values into a single string.
String humidity = String(hum); //int to String
String temperature = String(temp);
String data = temperature + humidity;
Now convert the string values into a char array. Here ‘data’ is the string and ‘d’ is the char array.
char d[5];
data.toCharArray(d, 5); //String to char array
Finally, send the values to the LoRa receiver.
rf95.send(d, sizeof(d));
rf95.waitPacketSent();
Raspberry Pi Setup for LoRa Communication
As mentioned earlier that Radiohead library is used for peer to peer communication between Arduino and Raspberry Pi. LoRa module works with SPI protocol, so we have to enable the SPI interface in Raspberry pi. Use the below command to get into the configuration window.
sudo raspi-config
Now in the configuration window, go to interfacing options and enable the SPI interface.
After enabling the SPI interface, now install the spidev package using the below command. It is a python module for interfacing SPI devices from user space via the spidev Linux kernel driver.
pip install spidev
Then install the pyLoRa package using the below command. This package installs the required models for LoRa communication.
pip install pyLoRa
Programming Raspberry Pi for LoRa Communication
Here Raspberry Pi is used as Receiver/client and receives the DHT sensor data transmitted by Arduino.
The complete Python program is given at the end of the page. Here I am explaining some important parts of the code.
At the beginning of the code, import all the required libraries. MQTT library is used for sending the temperature and humidity values to the cayenne platform.
from time import sleep
from SX127x.LoRa import *
from SX127x.board_config import BOARD
import paho.mqtt.client as mqtt
Now enter the required credentials for MQTT communication between Raspberry Pi and Cayenne.
username = "20f70690-4976-11ea-84bb-8f71124cfdfb"
password = "3d7eaaf9a7c9e28626fcab4ec5a61108cfbb8be0"
clientid = "cccb41b0-4977-11ea-b73d-1be39589c6b2"
After that, create two channels for temperature and humidity values.
topic_dht11_temp = "v1/" + username + "/things/" + clientid + "/data/1"
topic_dht11_humidity = "v1/" + username + "/things/" + clientid + "/data/2"
Now create a LoRa class with three functions i.e. init, class and on_rx_done. The init function is used to initialize the LoRa module in 433MHz with 125 kHz bandwidth.
def __init__(self, verbose=False):
        super(LoRaRcvCont, self).__init__(verbose)
        self.set_mode(MODE.SLEEP)
        self.set_dio_mapping([0] * 6)
The start function is used to configure the module as a receiver and to get RSSI value, operating frequency, etc.
def start(self):
        self.reset_ptr_rx()
        self.set_mode(MODE.RXCONT)
        while True:
            sleep(.5)
            rssi_value = self.get_rssi_value()
            status = self.get_modem_status()
            sys.stdout.flush()
The on_rx_done function is used to read the incoming vales. Then received values are moved into a variable called payload and decoded with utf-8 and moved into a variable called data.
def on_rx_done(self):
        self.clear_irq_flags(RxDone=1)
        payload = self.read_payload(nocheck=True)
        data = bytes(payload).decode("utf-8",'ignore')
Now split the temperature and humidity values and publish them on Cayenne platform
        temp = (data[0:4])
        humidity = (data[4:6]
        mqttc.publish(topic_dht11_temp, payload=temp, retain=True)
        mqttc.publish(topic_dht11_humidity, payload=humidity, retain=True)
Establishing Communication between Arduino & Raspberry Pi
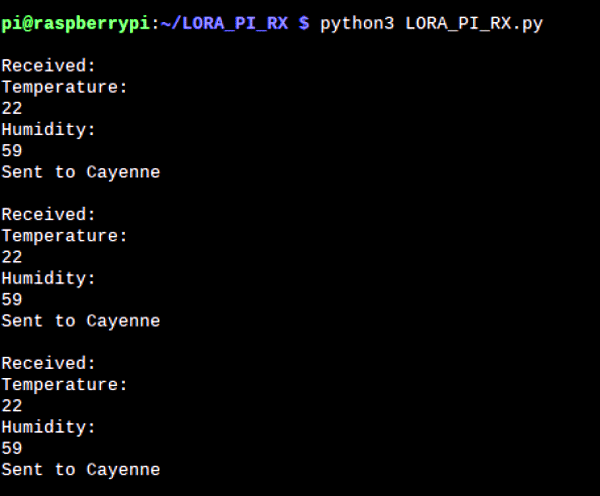
Once the hardware and program are ready, upload the Arduino code to the Arduino board and launch the python code in Pi. If everything is working properly, you should see the temperature and humidity values received in pi though the shell window, as shown below.
Now open the Cayenne using your default browser and you should see the temperature and humidity value on your Dashboard as shown below.
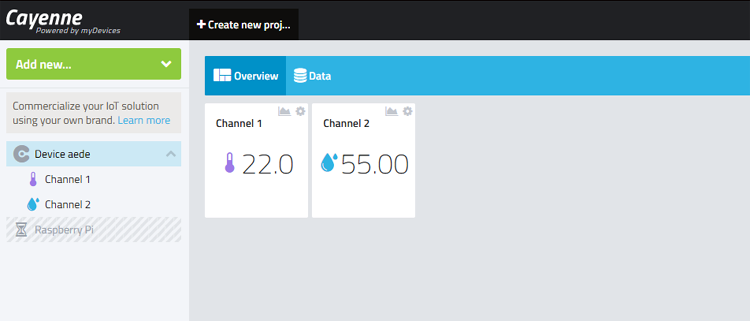
This is how an Arduino can wirelessly communicate with Raspberry Pi using the LoRa Module and further Raspberry pi can upload the sensor data to any cloud so that it can be monitored from anywhere.
A demonstration video with a complete code is shown below.
from time import sleep
from SX127x.LoRa import *
from SX127x.board_config import BOARD
import paho.mqtt.client as mqtt
username = "20f70690-4976-11ea-84bb-8f71124cfdfb"
password = "3d7eaaf9a7c9e28626fcab4ec5a61108cfbb8be0"
clientid = "cccb41b0-4977-11ea-b73d-1be39589c6b2"
mqttc = mqtt.Client(client_id=clientid)
mqttc.username_pw_set(username, password=password)
mqttc.connect("mqtt.mydevices.com", port=1883, keepalive=60)
mqttc.loop_start()
topic_dht11_temp = "v1/" + username + "/things/" + clientid + "/data/1"
topic_dht11_humidity = "v1/" + username + "/things/" + clientid + "/data/2"
BOARD.setup()
class LoRaRcvCont(LoRa):
def __init__(self, verbose=False):
super(LoRaRcvCont, self).__init__(verbose)
self.set_mode(MODE.SLEEP)
self.set_dio_mapping([0] * 6)
def start(self):
self.reset_ptr_rx()
self.set_mode(MODE.RXCONT)
while True:
sleep(.5)
rssi_value = self.get_rssi_value()
status = self.get_modem_status()
sys.stdout.flush()
def on_rx_done(self):
print ("\nReceived: ")
self.clear_irq_flags(RxDone=1)
payload = self.read_payload(nocheck=True)
#print (bytes(payload).decode("utf-8",'ignore'))
data = bytes(payload).decode("utf-8",'ignore')
print (data)
temp = (data[0:4])
humidity = (data[4:6])
print ("Temperature:")
print (temp)
print ("Humidity:")
print (humidity)
mqttc.publish(topic_dht11_temp, payload=temp, retain=True)
mqttc.publish(topic_dht11_humidity, payload=humidity, retain=True)
print ("Sent to Cayenne")
self.set_mode(MODE.SLEEP)
self.reset_ptr_rx()
self.set_mode(MODE.RXCONT)
lora = LoRaRcvCont(verbose=False)
lora.set_mode(MODE.STDBY)
# Medium Range Defaults after init are 434.0MHz, Bw = 125 kHz, Cr = 4/5, Sf = 128chips/symbol, CRC on 13 dBm
lora.set_pa_config(pa_select=1)
try:
lora.start()
except KeyboardInterrupt:
sys.stdout.flush()
print ("")
sys.stderr.write("KeyboardInterrupt\n")
finally:
sys.stdout.flush()
print ("")
lora.set_mode(MODE.SLEEP)
BOARD.teardown()
Arduino Code:
#include <SPI.h>
#include <RH_RF95.h>
#include "DHT.h"
#define DHTPIN A0 // what pin we're connected to
#define DHTTYPE DHT11 // DHT type
DHT dht(DHTPIN, DHTTYPE);
int hum; //Stores humidity value
int temp; //Stores temperature value
RH_RF95 rf95;
void setup()
{
Serial.begin(9600);
dht.begin();
if (!rf95.init())
Serial.println("init failed");
// Defaults after init are 434.0MHz, 13dBm, Bw = 125 kHz, Cr = 4/5, Sf = 128chips/symbol, CRC on
}
void loop()
{
temp = dht.readTemperature();
hum = dht.readHumidity();
String humidity = String(hum); //int to String
String temperature = String(temp);
String data = temperature + humidity;
Serial.print(data);
char d[5];
data.toCharArray(d, 5); //String to char array
Serial.println("Sending to rf95_server");
rf95.send(d, sizeof(d));
rf95.waitPacketSent();
delay(400);
}


