


Raspberry Pi 4 is the improved version of Raspberry Pi 3 B+. Raspberry Pi 4 comes with Cortex-A72 quad-core processor running at 1.5GHz with memory bumped up to the LPDDR4. It has three times better processing performance and speed than the Raspberry Pi 3. With Raspberry Pi 4, you can run two monitors at once in 4K. Instead of the MicroUSB, Pi 4 has added a USB Type-C connector for power.
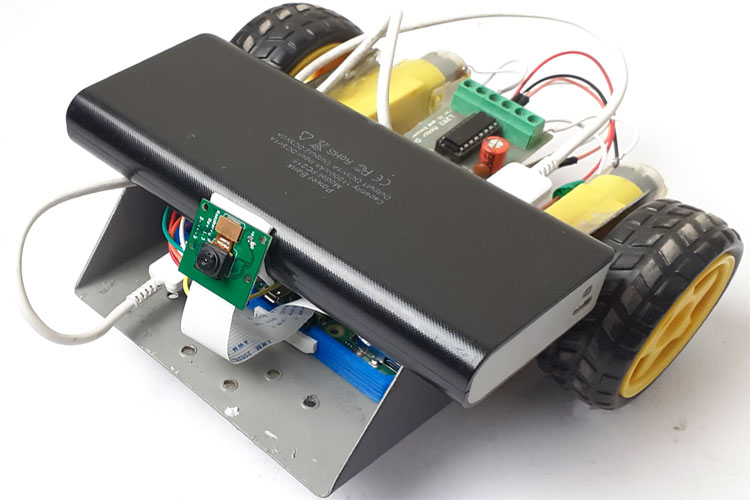
We previously used Raspberry Pi 3 with Pi camera to build applications like IoT based Smart Wi-Fi doorbell, surveillance camera, and Raspberry Pi cloud camera. Here we are using a Pi camera with Raspberry Pi 4 to build Raspberry Pi Web Controlled Robot. Here we will use Flask to create the webpage which will have controls to move the robot and it will also display a live feed of video. The web page will have five control buttons to move the Robot in Forward, Reverse, Left, Right direction, and Stop.
Components Required
- Raspberry Pi 4 (any model will work)
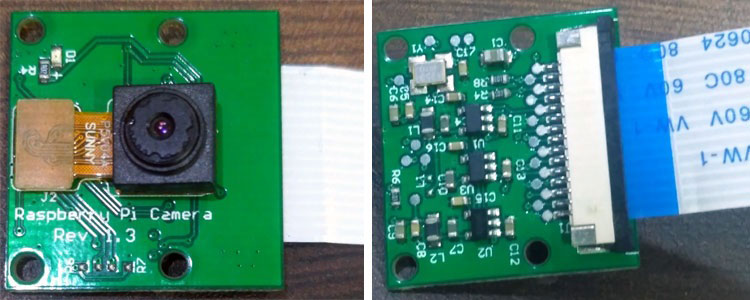
- Pi Camera
- L293D Motor Driver Module
- DC Motors (2)
Interfacing Pi Camera or USB webcam with Raspberry Pi 4
Pi Camera:
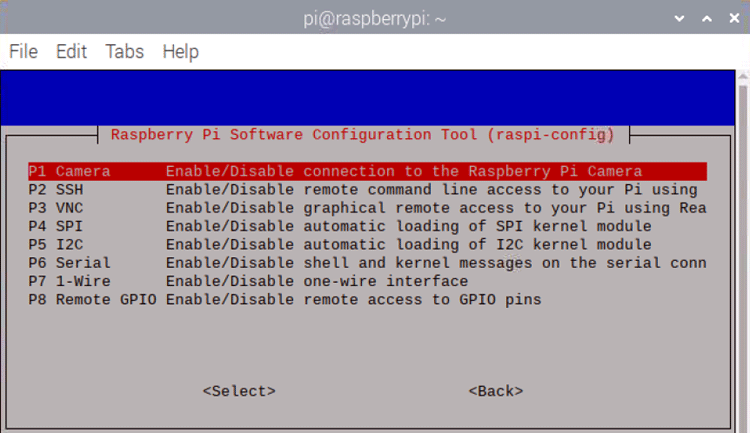
1. To use pi-camera with Raspberry Pi, first enable camera interfacing from raspi-config. For it, run the sudo raspi-config and select Interfacing options.
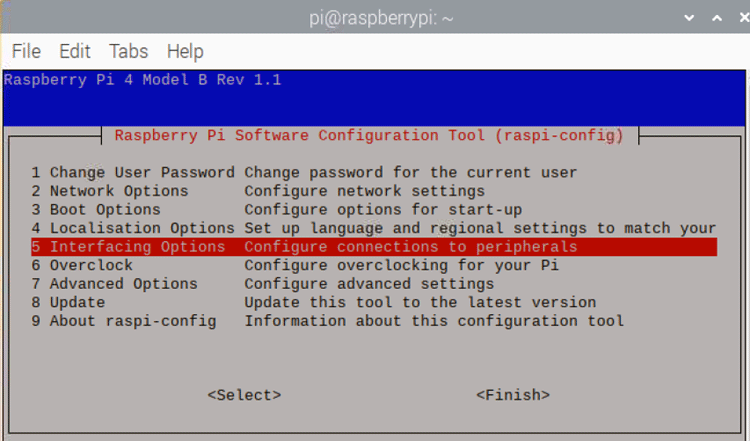
2. Then select the Camera option and Enable it on the next window and reboot the Pi.
3. Now to test the camera, use the below command to capture a photo.
raspistill -o image.jpg
If you get an image in Pi directory, then you are ready to go else check your camera strip and camera module.
USB Camera:
If you don’t have Pi Camera, a USB camera can also be used. Just install some packages to enable the webcam functionalities. Install the package using below command
sudo apt-get install fswebcam
Now, check for the working of the camera by capturing a photo using the following command
fswebcam image.jpg
Installing ‘Motion’ in Raspberry Pi for Video feed
Motion Software is free, open-source motion detector CCTV software, developed for Linux. It can process images from many different types of cameras. Motion software can monitor video from more than one camera, and it can detect a change in the picture. With the help of Motion software, you can change your Raspberry pi into a CCTV surveillance camera that can detect the motion and send alerts. Motion software can also be used to get the live video feed on a Webpage.
Before installing the Motion, first, update your Raspberry Pi OS using the following command:
sudo apt-get update
After that, install the Motion using the below command:
sudo apt-get install motion
Now navigate to the /etc/default/motion file to set Motion daemon to yes so that it will always be running. Use the below command to edit the file:
sudo nano /etc/default/motion

Then press CTRL+X > ‘Y’ > Enter to save the file.
Now, use the below command to set the permission for the motion Directory (/var/lib/motion/), where it saves all the Video recordings and picture files.
sudo chown motion:motion /var/lib/motion/
Now in this final step, turn off the localhost inside the motion configuration file to access the video feed outside the Raspberry Pi on the same network. To turn off the localhost, use the following command:
sudo nano /etc/motion/motion.conf
You can use the ctrl+W to search for a specific word inside the nano editor.

Now to check the video feed, start the motion using the below command:
sudo /etc/init.d/motion restart
After that, open the video feed page using your Pi’s IP address with port 8081 (192.168.1.207:8081).
Installing Flask in Raspberry Pi
After Motion, now install Flask to create a Web Server to control the robot.
The webpage to control the Robot will be created using Flask Web Framework. The webpage will have controls to move the robot in left, right, forward, and backward. In IoT based applications, Webservers are used to control or monitor any sensor values using web browsers, we previously created many webservers using Arduino, ESP8266, NodeMCU, ESP32, Raspberry Pi, etc.
Flask is a popular Python web framework developed by Armin Ronacher of Pocoo. It is a third-party Python library used for developing web applications. Flask is classified as micro-framework, and it is based on the Pocoo projects Werkzeug and Jinja2. Flask is very commonly used with Raspberry Pi, as RPi has Linux OS which can easily process Python script. Raspberry Pi is also popular for creating webserver and making IoT based projects because of its high processing power and inbuilt Wi-Fi capabilities.
Use the below command to install the Flask:
pip install Flask
We previously used Flask to control the Servo motor and stepper motor through the webpage.
Raspberry Pi Surveillance Robot Circuit Diagram
Circuit diagram for Raspberry Pi based surveillance robot is given below.
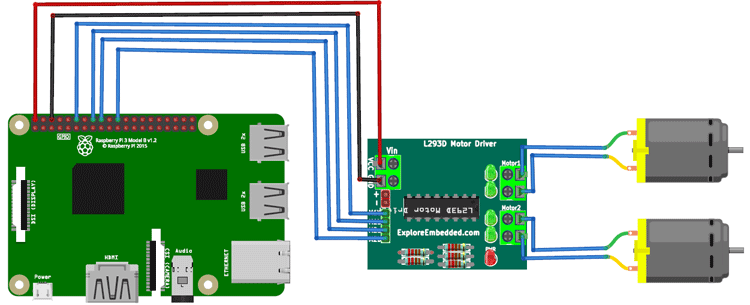
In this project, we don’t need to make many connections. We only need to connect two DC motors to the raspberry pi using the L293D Motor driver module. After this, mount the DC motors and Raspberry Pi to the robot chassis. The four pins (A1, A2, and B1, B2) of the motor driver module are connected to the GPIO pins 18, 23, 24 & 25 of Raspberry Pi.
HTML Code for Raspberry Pi controlled Robot
A webpage is created using HTML to control the robot and for displaying the video feed. In this HTML code, we have assigned different integers for different direction buttons. For example, 1 for Forward and 2 for Left. So whenever the Forward button is pressed on the web page, it will send 1.
Complete HTML code for controlling the robot using webserver is given below. Create a directory named SurveillanceRobot, and inside this directory, create a new folder called templates. Then copy the below code and save it inside the templates folder as index.html.
<!DOCTYPE html>
<html>
            <head>
                        <title>Surveillance Robot</title>
                        <meta name="viewport" content="width=device-width, initial-scale=1">
            </head>
<style>
table ,td, tr {
                        width: 30%;
}
</style>
            <body>
                        <img src="http://192.168.1.207:8081/" style="float:left; width:100%; max-width: 700px; max-height:600px; border-radius:10px"></img>
                <table style="float:right; width:100%; max-width: 400px; height:300px;">
                 <tr style="text-align:center">
                    <td >
                         <h2>Web Controlled Surveillance Robot</h2>
                            <td >
                 <tr>
                 <tr>
                             <td style="text-align: center">
                                    <form action="/1" method="POST">
                                  <button id="FWD" class="robot">FORWARD</button>
                                  </br>
                                </form>
                             </td>
                 <tr>
                 <tr style="text-align: left">
                             <td style="text-align: left>
                            <form action="/2" method="POST">
                                     <button id="LFT" class="robot">LEFT</button>
                                     </br>
                                </form>
                             </td>
                     <td style="text-align: left>
                                    <form action="/4" method="POST">
                                     <button id="RGT" class="robot">RIGHT</button>
                                  </br>
                                    </form>
                             </td>
                             <td >
                                    <form action="/3" method="POST">
                                     <button id="STP" class="robot">STOP</button>
                                      </br>
                                    </form>
                     </td>
                   <tr>
                   <tr>
                             <td style="text-align: center">
                                    <form action="/5" method="POST">
                                     <button id="REV" class="robot">REVERSE</button>
                                     </br>
                                </form>
                             </td>
                   </tr>
                        </table>
        </body>
</html>
Python Code
Complete python code for this IoT Raspberry Pi robot is given at the end of this document. Copy the provided code and save it inside the SurveillanceRobot folder by using the following commands:
cd SurveillanceRobot
sudo nano robot.py
In the python code, there are five functions for moving the robot Forward, Left, Right, Reverse, and Stop. Five different integers are assigned to these five functions. Received integer from the web page will be saved in a variable named changePin, and it will be compared with all the functions. So when we press the Forward button on the web page, it will send one and based on that, the robot will move in the forward direction.
Testing the IoT controlled Robot
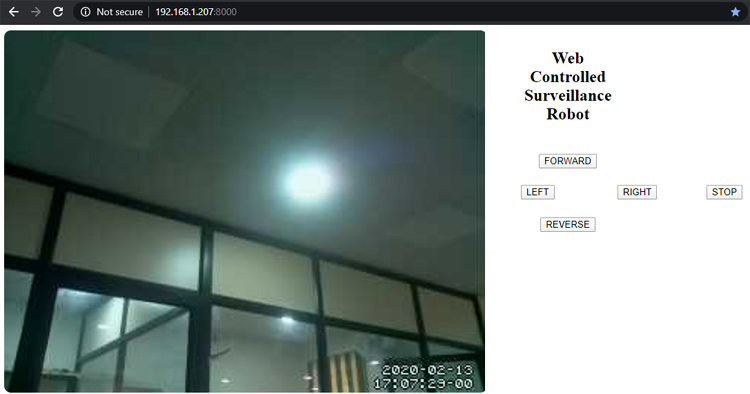
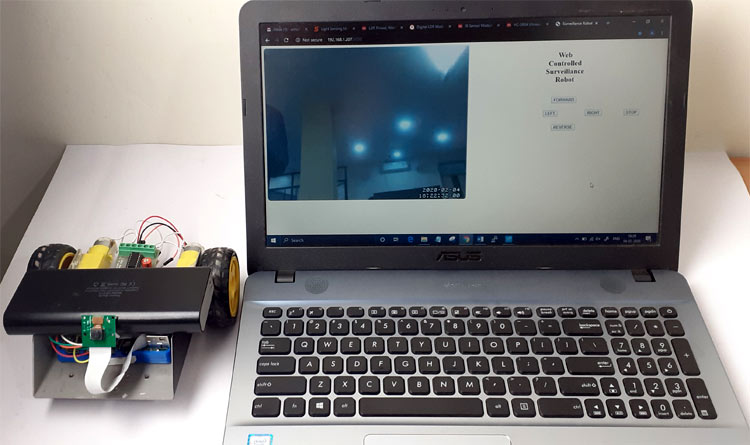
After completing all the setups and mounting the Raspberry Pi on Robot chassis, run the python code. Then open Raspberry Pi IP address with port 8000 (http://192.168.1.207:8000) in a web browser. Now you will see video streaming on the left side of the page and control buttons on the right side of the page as shown in the below image. Now this Raspberry Pi surveillance robot can be controlled through the webpage.
A demonstration video with a complete python code is given below.
HTML Code:
<html>
<head>
<script src="https://ajax.googleapis.com/ajax/libs/jquery/3.1.1/jquery.min.js"></script>
</head>
<body>
<img src="http://192.168.43.199:8081" /> <!--Enter the IP Address of your Raspberry Pi-->
<div style="float:right">
</div>
<div style=" height:400px; width:300px; float:right;">
<center>
<h2>Web Controlled</h2>
<h2>Surveillance Robot</h2><br><br>
<a href="#" id="up" style="font-size:30px;text-decoration:none;"> 🢁🢁<br>Forward</a><br><br></center>
<a href="#" id="left" style="font-size:30px;text-decoration:none;"> 🢀🢀Left</a>
<a href="#" id="right" style="font-size:30px; text-decoration:none;"> Right 🢂🢂</a><br><br>
<center><a href="#" id="down" style="font-size:30px;text-decoration:none;"> Backward<br> 🢃🢃</a></center>
</div>
<script>
$( document ).ready(function(){
$("#down").on("mousedown", function() {
$.get('/down_side');
}).on('mouseup', function() {
$.get('/stop');
});
$("#up").on("mousedown", function() {
$.get('/up_side');
}).on('mouseup', function() {
$.get('/stop');
});
$("#left").on("mousedown", function() {
$.get('/left_side');
}).on('mouseup', function() {
$.get('/stop');
});
$("#right").on("mousedown", function() {
$.get('/right_side');
}).on('mouseup', function() {
$.get('/stop');
});
});
</script>
</body>
</html>
Python Code:
from flask import Flask, render_template, request, redirect, url_for, make_response
import time
import RPi.GPIO as GPIO
mA1=18
mA2=23
mB1=24
mB2=25
GPIO.setwarnings(False)
GPIO.setmode(GPIO.BCM)
GPIO.setup(mA1, GPIO.OUT)
GPIO.setup(mA2, GPIO.OUT)
GPIO.setup(mB1, GPIO.OUT)
GPIO.setup(mB2, GPIO.OUT)
GPIO.output(mA1 , 0)
GPIO.output(mA2 , 0)
GPIO.output(mB1, 0)
GPIO.output(mB2, 0)
app = Flask(__name__) #set up flask server
#when the root IP is selected, return index.html page
@app.route('/')
def index():
return render_template('index.html')
#recieve which pin to change from the button press on index.html
#each button returns a number that triggers a command in this function
#
#Uses methods from motors.py to send commands to the GPIO to operate the motors
@app.route('/<changepin>', methods=['POST'])
def reroute(changepin):
changePin = int(changepin) #cast changepin to an int
if changePin == 1:
print "Left"
GPIO.output(mA1 , 0)
GPIO.output(mA2 , 0)
GPIO.output(mB1 , 1)
GPIO.output(mB2 , 0)
elif changePin == 2:
print "Forward"
GPIO.output(mA1 , 1)
GPIO.output(mA2 , 0)
GPIO.output(mB1 , 1)
GPIO.output(mB2 , 0)
elif changePin == 3:
print "Right"
GPIO.output(mA1 , 1)
GPIO.output(mA2 , 0)
GPIO.output(mB1 , 0)
GPIO.output(mB2 , 0)
elif changePin == 4:
print "Reverse"
GPIO.output(mA1 , 0)
GPIO.output(mA2 , 1)
GPIO.output(mB1 , 0)
GPIO.output(mB2 , 1)
else:
GPIO.output(mA1 , 0)
GPIO.output(mA2 , 0)
GPIO.output(mB1 , 0)
GPIO.output(mB2 , 0)
response = make_response(redirect(url_for('index')))
return(response)
app.run(debug=True, host='0.0.0.0', port=8000) #set up the server in debug mode to the port 8000


