


Alarm clocks have been in use for decades but since after the mobile phone came into the market, people prefer to set alarms on their cell phones. This Alarm clock project has always been popular among electronics hobbyists. Today we are also building an IoT Alarm clock using NodeMCU where you can set the alarm time using a web page without having any internet connectivity.
This can be done using Captive Portal. A captive portal is a web page that is displayed to newly connected users of a Wi-Fi network. We can create a captive portal using NodeMCU. NodeMCU has an inbuilt ESP8266 Wi-Fi shield and this Wi-Fi shield can be used as a Wi-Fi access point (AP), and provide free WiFi network but it doesn’t have internet access. So when you connect to this WiFI it will redirect you to your alarm web page.
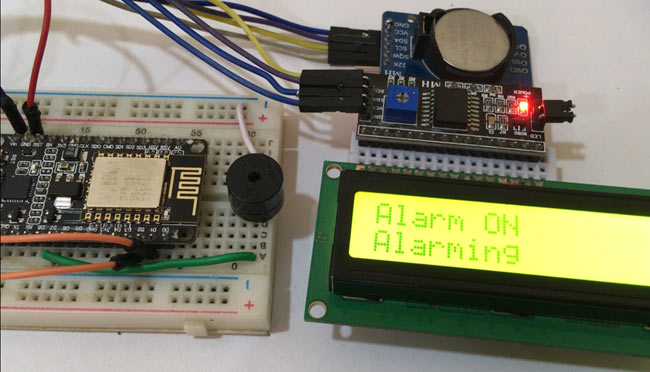
In this NodeMCU based IOT Alarm Clock project, four major components are used- DS3231 RTC Module, NodeMCU ESP8266, 16x2 LCD Module and an LCD I2C Module. Here NodeMCU is used for reading time from DS3231 RTC and display it on 16x2 LCD Display. A buzzer is used for alarm indication, which beeps when alarm is activated.
Components Required
- NodeMCU ESP8266
- DS3231 RTC Module
- 16×2 LCD
- LCD I2C Module
- Buzzer
IoT Alarm Clock Circuit Diagram
The complete circuit diagram for IoT Alarm Clock is shown below. It is pretty simple as we only need to connect one RTC module and one LCD with our ESP NodeMCU board.
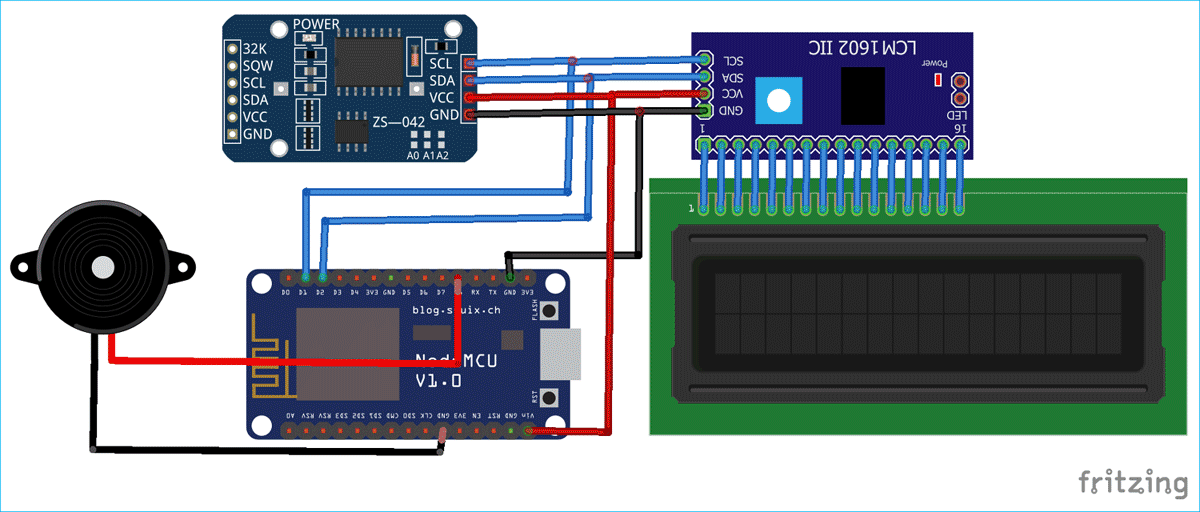
The Vcc and GND pin, of DS3231 RTC module and LCD I2C module, are connected with Vin and GND pin of NodeMCU. While SCL and SDA pins of DS3231 and I2C module are connected with D1 and D2 pin of NodeMCU respectively. A buzzer is connected to D8 pin of the NodeMCU for alarm.
DS3231 RTC Module
DS3231 RTC (Real Time Clock) module, as the name suggests, is a clock module. DS3231 is a six-pin module that uses I2C interface. This module has battery connected to it which keeps the module running in absence of external power to keep track of time and date.
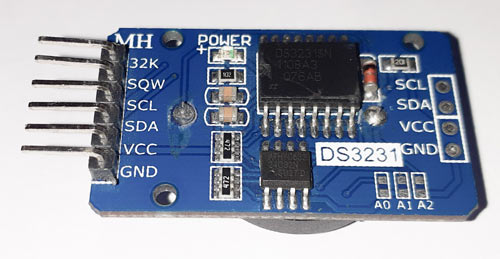
RTC module provides seconds, minutes, hours, day, date, month, and year qualified data. The DS3231 works on both 24Hr and 12Hr format. It has two alarm clock and temperature sensor. Out of six pins two pins of this module is not compulsory to use. To use this module all you need to do is connect SDA & SCL pins of module to SDA & SCL pins of controller.
Code Explanation
The complete code for this IoT Alarm Clock is given at the bottom of the page, code can also be downloaded from here. Here I am explaining the code for better understanding.
This code requires DNSServer.h, RtcDS3231.h, Wire.h and LiquidCrystal_I2C.h libraries. You can download the libraries from the links given below:
After downloading the libraries add them into your Arduino IDE and include all the libraries in the code.
We also need to design a HTML page for webpage interface. Here all the HTML code is assigned in a String called “style_details”. This part of the code is used to set the background colour of the page, button style, text style, etc.
String style_detials =
   "<style type=\"text/css\">"
   " body{"
    "  background-color: #a69695;"
    "}"
    "button{"
     " display: inline-block;"
    "}"
    "#buttons{"
     " text-align: center;"
    "}"
………………………
………………………
‘home_screen’ string is used to display the Web Page title and an option for entering alarm time. When the alarm time is submitted, it will redirect the user to next screen, i.e. confirmation_screen.
String home_screen = "" //Page 1 - Home Screen HTML code
                      "<!DOCTYPE html><html>"
                      "<head><meta name=\"viewport\" content=\"width=device-width, initial-scale=1\">"
                      + style_detials +
                      "<body><h1>IoT Alarm Clock</h1>"
                      "<div id=\"login\">"
                      "  <form action=\"confirmation_screen.php\" method=\"get\">"
                      "  <h2>Please enter your next Alarm in format (05:45)</h2>"
………………………..
……………………….

‘confirmation_screen’ string is used to confirm that the alarm is set.
String confirmation_screen = "" //Page 2 - If Alarm is Set
                      "<!DOCTYPE html><html>"
                      "<head><meta name=\"viewport\" content=\"width=device-width, initial-scale=1\">"
                      + style_detials +
Inside the void setup(), we will get the alarm data from the user in the format of 05:45 where 05 is hour and 45 is minutes. This data will be saved in a string named ‘new_time’. After getting the data we have to split it into hour and minute form to compare it with the current time. To split data we used ‘mystring.substring(from, to)’ function where ‘mystring’ is a variable of type String which contain the string to be splitted. After splitting the string into minute and hour strings now it time to convert string into integers. For that “mystring.toInt()” function is used where ‘mystring’ is the string that you want to convert into integer.
void setup() {
…………………..
…………………..
   webServer.on("/home_screen.php", []() {
    webServer.send(200, "text/html", home_screen);
  });

  webServer.on("/confirmation_screen.php", []() {
    if(webServer.args() > 0) {
      new_time = webServer.arg(0);
      webServer.send(200, "text/html", confirmation_screen);
      }

      hr= new_time.substring(0, 2);
      hr1 = hr.toInt();
      minut= new_time.substring(3, 5);
      minut1 = minut.toInt();
………………………
………………………
Inside the void alarm() loop, we will get the time data from the RTC module and print it on LCD. After that compare the current time to the alarm time and start the buzzer if current time matches with alarm time.
void alarm ()
{
    RtcDateTime now = Rtc.GetDateTime();
    lcd.setCursor(0,0);
    lcd.print("Time:");
    lcd.print(now.Hour(), DEC);
    lcd.print(':');
    lcd.print(now.Minute(), DEC);

if( now.Hour() == hr1 && now.Minute() == minut1)
 {
  Buzzer();
Programming the NodeMCU
Now its time to upload the code into NodeMCU, connect the NodeMCU with the laptop and choose the board and port correctly, and then click the Upload button. In case, you don’t know how to program NodeMCU using Arduino IDE. You can follow our previous tutorial.
After uploading the code, click on the wifi icon on your laptop and then connect to “ESP8266 DNS Server”.
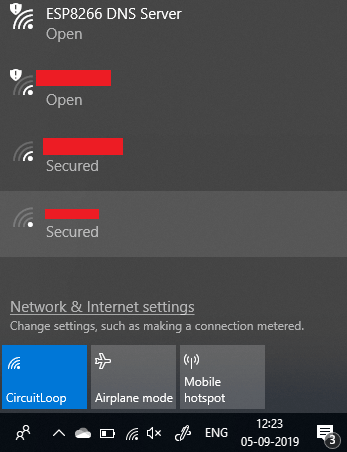
When it connects with the WiFi, it will open a web page, or you can manually open the web page by searching “alarmclock.com”. Now you can enter the alarm time through the webpage and when click on submit button.
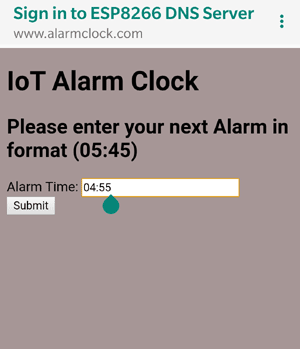
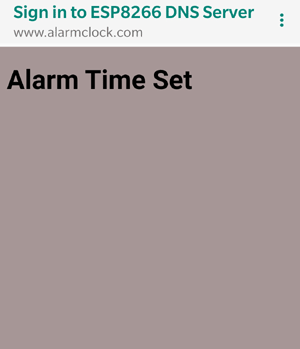
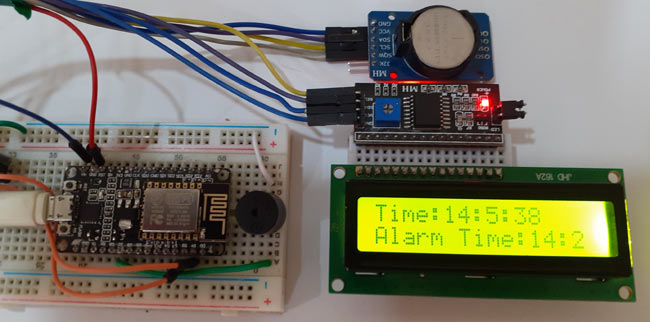
After entering the alarm it will take you to the next screen and your alarm time will be printed on LCD Display. Now when the current time will match with the entered alarm time, buzzer will start beeping for one minute.

This is how you can easily make an IoT alarm clock without using Wi-Fi router. If you face any difficulty while doing this project, then please comment below.
Complete code with header files can be downloaded from here, also check the demonstration video below.
#include <ESP8266WiFi.h>
#include "./DNSServer.h"
#include <ESP8266WebServer.h>
#include <RtcDS3231.h>
#include <Wire.h> // must be included here so that Arduino library object file references work
RtcDS3231<TwoWire> Rtc(Wire);
#include <LiquidCrystal_I2C.h>
const byte DNS_PORT = 53; // 53 is set as DNS port
IPAddress apIP(10, 10, 10, 1); // Network Server
DNSServer dnsServer; // DNS server object
ESP8266WebServer webServer(80); // Webserver object
#define buzzer D8
LiquidCrystal_I2C lcd(0x27, 16, 2);
String hr,minut ;
int hr1, minut1;
String new_time;
/*START OF HMTL CODE*/
String style_detials = //This String defines the style attributes for webpage
"<style type=\"text/css\">"
" body{"
" background-color: #a69695;"
"}"
"button{"
" display: inline-block;"
"}"
"#buttons{"
" text-align: center;"
"}"
".controllButtons{"
" margin-top: 15px;"
"margin-left: 5px;"
"background-color: white;"
"padding: 10px;"
"border:1px solid black;"
"border-radius: 10px;"
"cursor: pointer;"
"font-size: 14px;"
"}"
".controllButtons:hover{"
" background-color: orange;"
"padding: 10px;"
"border:1px solid black;"
"border-radius: 10px;"
"cursor: pointer;"
"font-size: 14px;"
"}"
"@media only screen and (max-width: 700px) {"
" button{"
" display: block;"
"}"
"#buttons{"
" margin-top: 10%;"
"margin-left: 35%;"
"}"
" .controllButtons{"
" margin-top: 15px;"
"margin-left: 5px;"
"background-color: white;"
"padding: 15px;"
"border:1px solid black;"
"border-radius: 10px;"
"cursor: pointer;"
"font-size: 16px;"
"}"
".controllButtons:hover{"
" background-color: orange;"
"padding: 15px;"
"border:1px solid black;"
"border-radius: 10px;"
"cursor: pointer;"
"font-size: 16px;"
"}"
"}"
"</style>";
String home_screen = "" //Page 1 - Home Screen HTML code
"<!DOCTYPE html><html>"
"<head><meta name=\"viewport\" content=\"width=device-width, initial-scale=1\">"
+ style_detials +
"<body><h1>IoT Alarm Clock</h1>"
"<div id=\"login\">"
" <form action=\"confirmation_screen.php\" method=\"get\">"
" <h2>Please enter your next Alarm in format (05:45)</h2>"
" <div>Alarm Time: <input type=\"numeric\" name=\"code\" autofocus></div>"
" <div id=\"submit\"><input type=\"submit\" value=\"Submit\"></div>"
" </form>"
"</div>"
"</body></html>
void loop() {
dnsServer.processNextRequest();
webServer.handleClient();
alarm();
}
void alarm ()
{
RtcDateTime now = Rtc.GetDateTime();
lcd.setCursor(0,0);
lcd.print("Time:");
lcd.print(now.Hour(), DEC);
lcd.print(':');
lcd.print(now.Minute(), DEC);
lcd.print(':');
lcd.print(now.Second(), DEC);
lcd.setCursor(0,1);
lcd.print("Alarm Time:");
lcd.print(hr1);
lcd.print(':');
lcd.print(minut1);
if( now.Hour() == hr1 && now.Minute() == minut1) //Comparing the current time with the Alarm time
{
Buzzer();
Buzzer();
lcd.clear();
lcd.print("Alarm ON");
lcd.setCursor(0,1);
lcd.print("Alarming");
Buzzer();
Buzzer();
}
}
void Buzzer()
{
digitalWrite(buzzer,HIGH);
delay(500);
digitalWrite(buzzer, LOW);
delay(500);
}


