


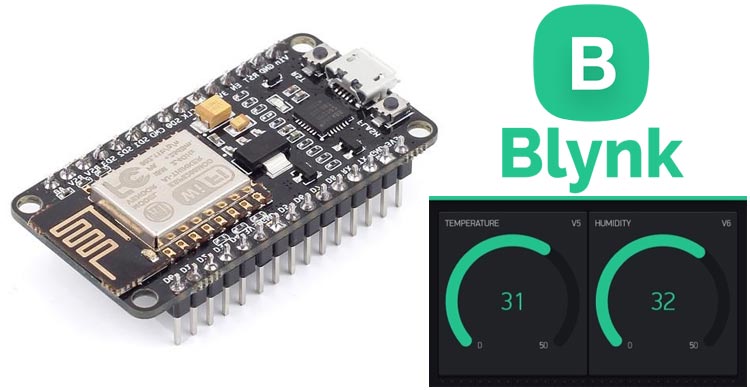
Earlier we have learned that how to blink the led using Blynk app, now we going to monitor the humidity and temperature data over the internet using BLYNK.
Blynk is an IoT Platform used with Arduino, Raspberry Pi, ESP8266 and NodeMCU and other microcontrollers. Blynk app is a digital dashboard where you will be able to build or design a graphical interface for any IoT based project by just drag and drop widgets.
It is easy to use this IoT platform to create advanced applications. Blynk isn't limited to some specific board or platform it can be used with any microcontroller.
Component Required
- ESP8266 module
- USB Cable
- Blynk App
- Breadboard
- Jumper wires
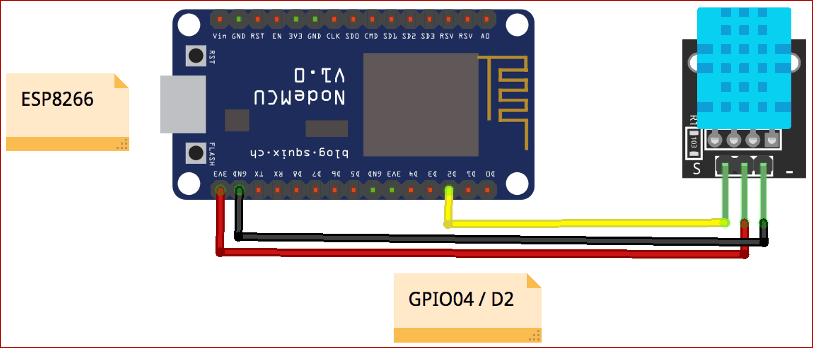
Circuit Diagram
Blynk App Setup with NODE MCU
To recieve temperature and humidity data from DHT11 sensor on Blynk app, download and install the Blynk app from Google play store or Apple app store.
Log in to Blynk App using your email id and password, if you don’t have an account create one.
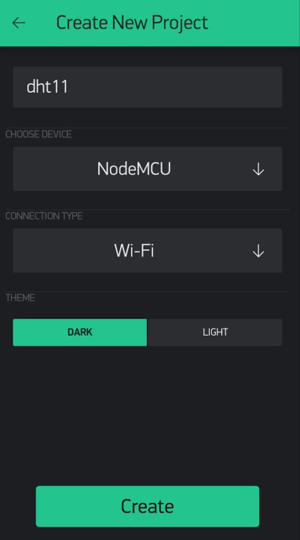
1. After sign up click on ‘New Project’ to start.

2. Now give a name to the project and choose your board. As, I have selected NodeMCU.
3. After these steps click on ‘Create’ button to form your project.
4. Now, add Widgets to the project by clicking on Add button (Plus sign)
5. Choose ‘gauge’ widget to add on the Blynk app dashboard.
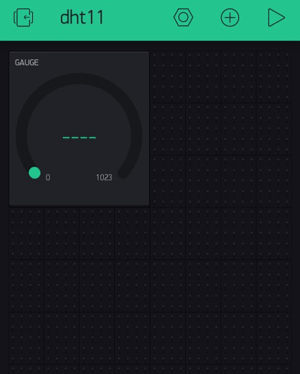
6. Now provides a name to the widget by edit the settings. Also, select the pin for the ‘OUTPUT’ and give names to On/Off labels.
NODE MCU Setup with DHT11
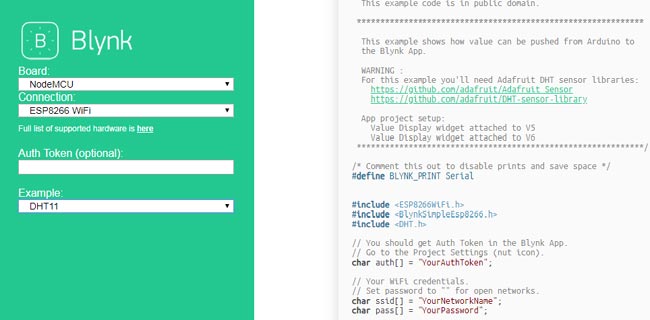
To get the example code for DHT11 with NodeMCU search in browser “blynk code generator” then open the first link of blynk example browser. Then, select NodeMCU as board and example code for DHT11, as shown below:
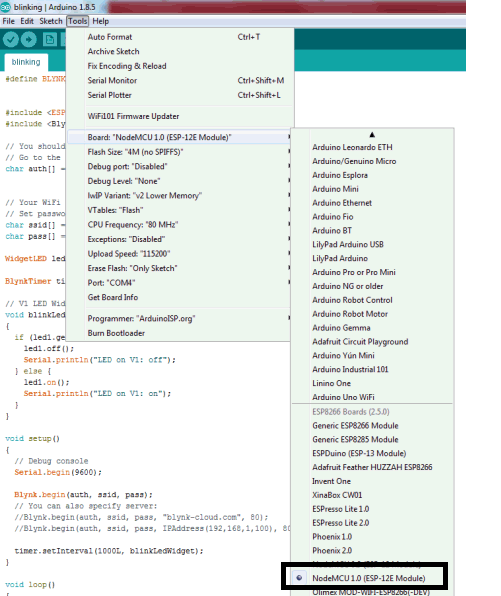
Now, open Arduino ide and select Tools option as shown below:
Copy the example code for DHT11 with NodeMCU from the link then paste and run into Arduino IDE.
Programming Explanation
The complete code for the project is given at the end. Now, include the required libraries for Blynk, ESP8266 and DHT11.
#define BLYNK_PRINT Serial
#include <ESP8266WiFi.h>
#include <BlynkSimpleEsp8266.h>
#include <DHT.h>
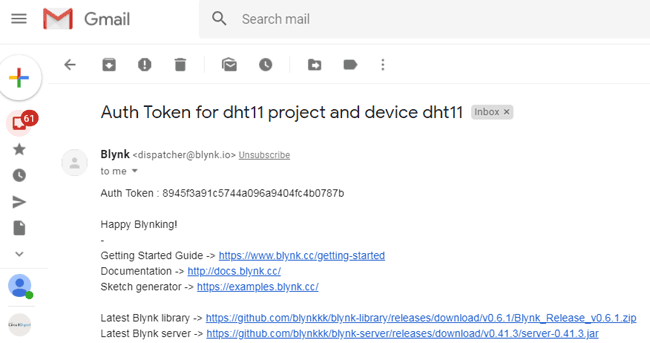
Enter the Auth Token in the code, which is send to your email (as shown in the below image) or you can also check in the project setting of the Blynk App.
char auth[ ] = "68c69bdc0f4d47a2b304a96357427278";
Here, in the below code we are configuring the wifi credential and defining the pins for DHT11.
char ssid[ ] = "CircuitLoop";  //wifi name
char pass[ ] = "circuitdigest101"; //wifi password
#define DHTPIN 0          // D3 of Node MCU
#define DHTTYPE DHT11     // DHT 11
DHT dht(DHTPIN, DHTTYPE);
BlynkTimer timer;
The below function is used to send Arduino's up time every second to Virtual Pin (5).
void sendSensor()
{
  float h = dht.readHumidity();
  float t = dht.readTemperature(); // or dht.readTemperature(true) for Fahrenheit
  if (isnan(humidity) || isnan(temperature)) {
    Serial.println("Failed to read from DHT sensor!");
    return;
  }
In void setup() function, we will initialize the baud rate, LED output and connect the module with the Wi-Fi using Blynk.begin(ssid,password);
void setup()
{
    Serial.begin(9600);
  Blynk.begin(auth, ssid, pass);
  dht.begin();
Setup a timer interval for the function to call every second
  timer.setInterval(1000L, sendSensor);
}
After, uploading the complete code in the Arduino IDE run the blynk app to measure the temperature and humidity. The app will look like as the image given below:
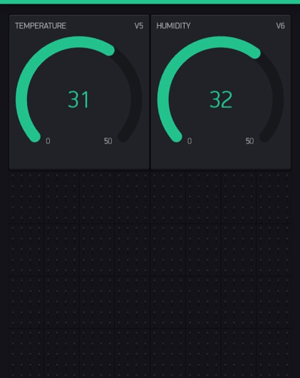
Hence, we have successfully interfaced DHT11 with Blynk App. Checkout some projects of ESP8266 interfacing with Blynk, Artik, Particle, IFTTT and ThingSpeak.
#define BLYNK_PRINT Serial
#include <ESP8266WiFi.h>
#include <BlynkSimpleEsp8266.h>
#include <DHT.h>
// You should get Auth Token in the Blynk App.
// Go to the Project Settings (nut icon).
char auth[] = "YourAuthToken";
// Your WiFi credentials.
// Set password to "" for open networks.
char ssid[] = "YourNetworkName";
char pass[] = "YourPassword";
#define DHTPIN 2 // What digital pin we're connected to
// Uncomment whatever type you're using!
#define DHTTYPE DHT11 // DHT 11
//#define DHTTYPE DHT22 // DHT 22, AM2302, AM2321
//#define DHTTYPE DHT21 // DHT 21, AM2301
DHT dht(DHTPIN, DHTTYPE);
BlynkTimer timer;
// This function sends Arduino's up time every second to Virtual Pin (5).
// In the app, Widget's reading frequency should be set to PUSH. This means
// that you define how often to send data to Blynk App.
void sendSensor()
{
float h = dht.readHumidity();
float t = dht.readTemperature(); // or dht.readTemperature(true) for Fahrenheit
if (isnan(h) || isnan(t)) {
Serial.println("Failed to read from DHT sensor!");
return;
}
// You can send any value at any time.
// Please don't send more that 10 values per second.
Blynk.virtualWrite(V5, h);
Blynk.virtualWrite(V6, t);
}
void setup()
{
// Debug console
Serial.begin(9600);
Blynk.begin(auth, ssid, pass);
// You can also specify server:
//Blynk.begin(auth, ssid, pass, "blynk-cloud.com", 80);
//Blynk.begin(auth, ssid, pass, IPAddress(192,168,1,100), 8080);
dht.begin();
// Setup a function to be called every second
timer.setInterval(1000L, sendSensor);
}
void loop()
{
Blynk.run();
timer.run();
}


 Platform")


