Nowadays many household appliances are IoT-enabled from light bulbs to washing machines. Even though we may be able to control them over the local area network easily but to control them or store and retrieve their data over the internet, we must use an IoT cloud service. There are plenty of different IoT cloud services and protocols available but these services are limited in one way or another. Some are free, while others are paid. The free services will have a limit on how much data you can collect at a time or how many devices you can attach at a time while with the paid services, you have to pay a large sum depending on your data cluster. This will not only be a huge financial burden but if you develop a product that depends on a particular third-party service, that will be a huge risk.
That’s where the Google Sheets come to play as these are free, familiar, and most importantly reliable. It has a lot of functionalities and built-in integration with many other Google services and APIs. We can use this for many IoT applications from simple data logging to live monitoring and management of IoT devices.
Here are some of the benefits of using Google sheets for IoT applications:
- Data Logging is pretty simple and robust and doesn’t need any third-party services.
- Easy manipulation and analysis of collected data with functions.
- Supports both desktop and mobile access.
- Easy to use custom sheet functions and google apps integration through Google scripts.
- Conditional formatting will make the data monitoring and analysis much easier.
There are multiple methods to push data to the Goggle sheets. Some use third-party services like IFTTT to push the data to Google sheets. Since we want to eliminate any third party, we are going to use the direct approach, with the help of Google scripts. For this, all we need is a Google account. You can either use your existing account or create a new one. Either way login into the Google account and follow the given steps.
Setup the Google Sheet for Data Logging
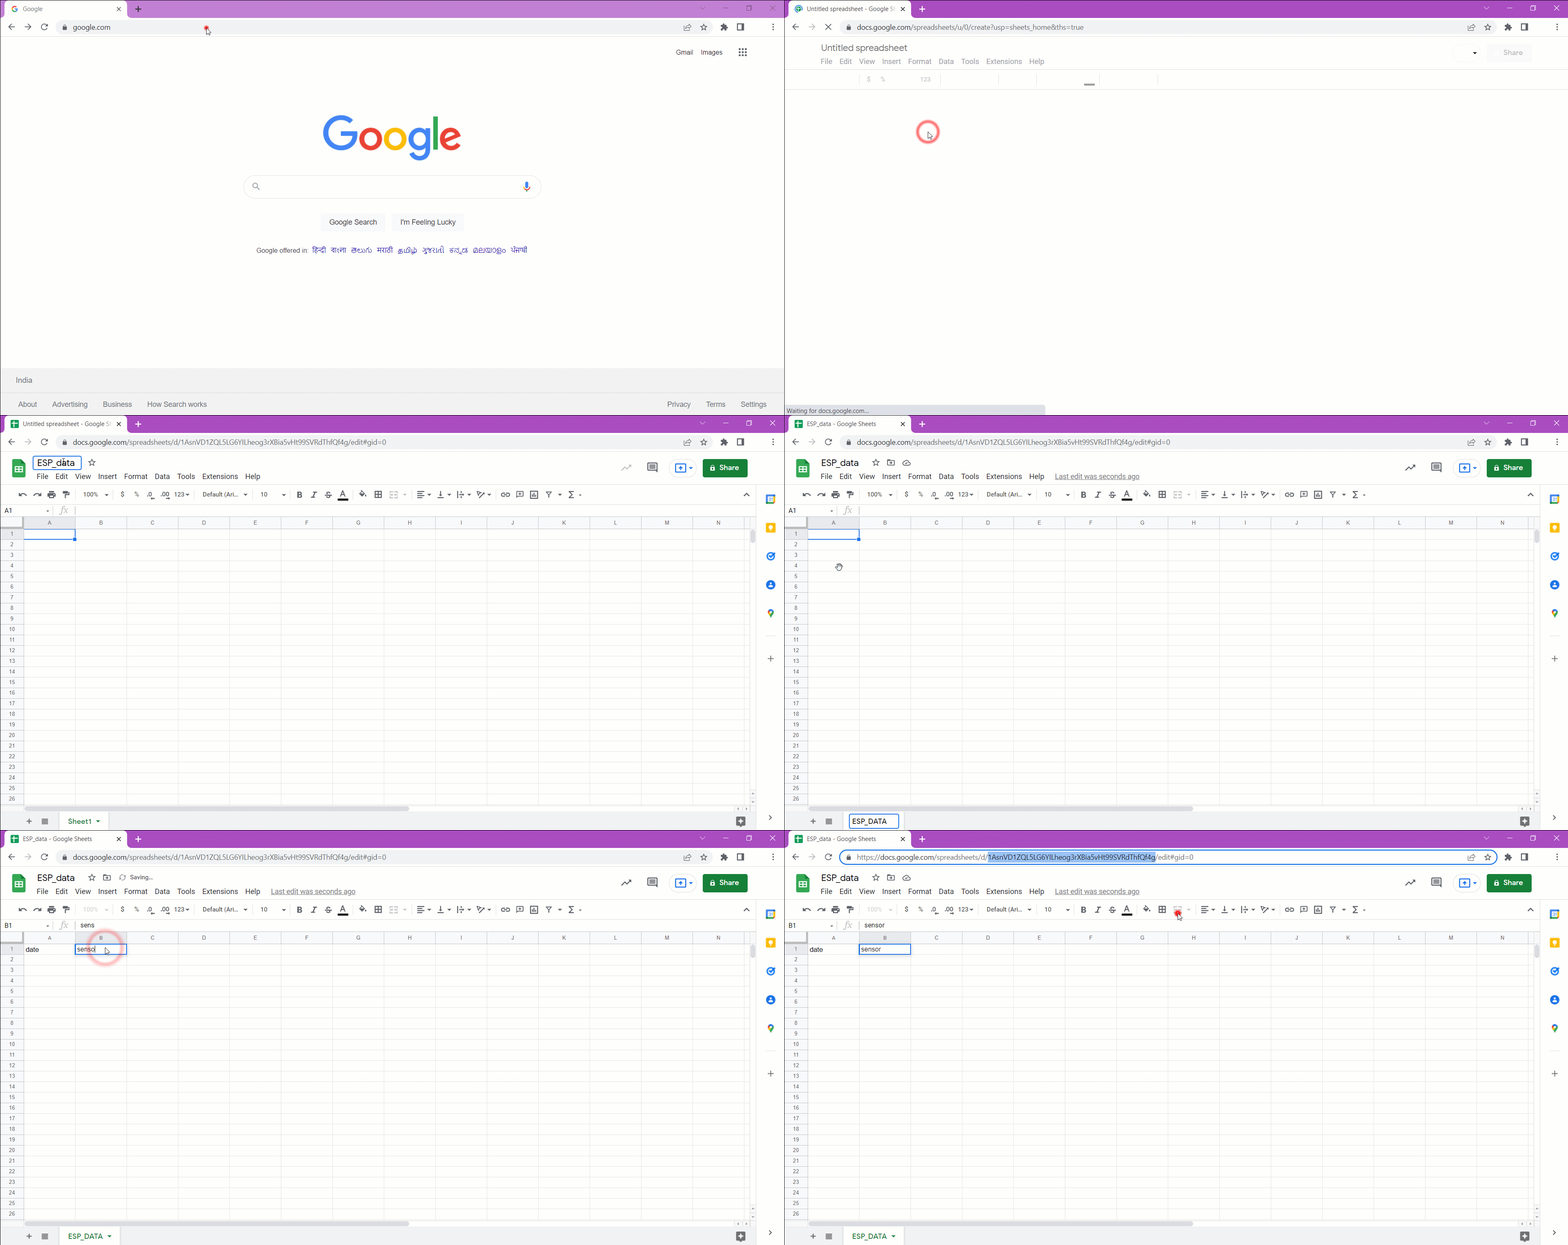
The first step is to go to Google Sheets and create a new sheet. Name the sheet whatever you want and keep in mind that the first row of the sheet is very important. We will use this row to name each column and these names will be used as pointers to push the data. The column title should be one word and no upper case is allowed. If you want to use multiple words for the title, then add a hyphen in between each word instead of space.
For example, if you want to populate column A with dates and column B with the sensor value, then add the word date to column A's first row and sensor to column B's first row. Similarly, add titles to any other column where you want to populate the data.
Once the Sheet is created and renamed, make note of the sheet name (not the document name but the sheet name!) and the sheet ID. You can find the Sheet ID from the Sheet URL.
For example, in the following URL, the Sheet ID is the part that’s bold https://docs.google.com/spreadsheets/d/1BdQzuTeYr4Tf4zwT-LP1f45rfk63oWZTrQ_cIDfgWfgD/edit#gid=0. Do not share this ID with anyone else.
Creating Google script
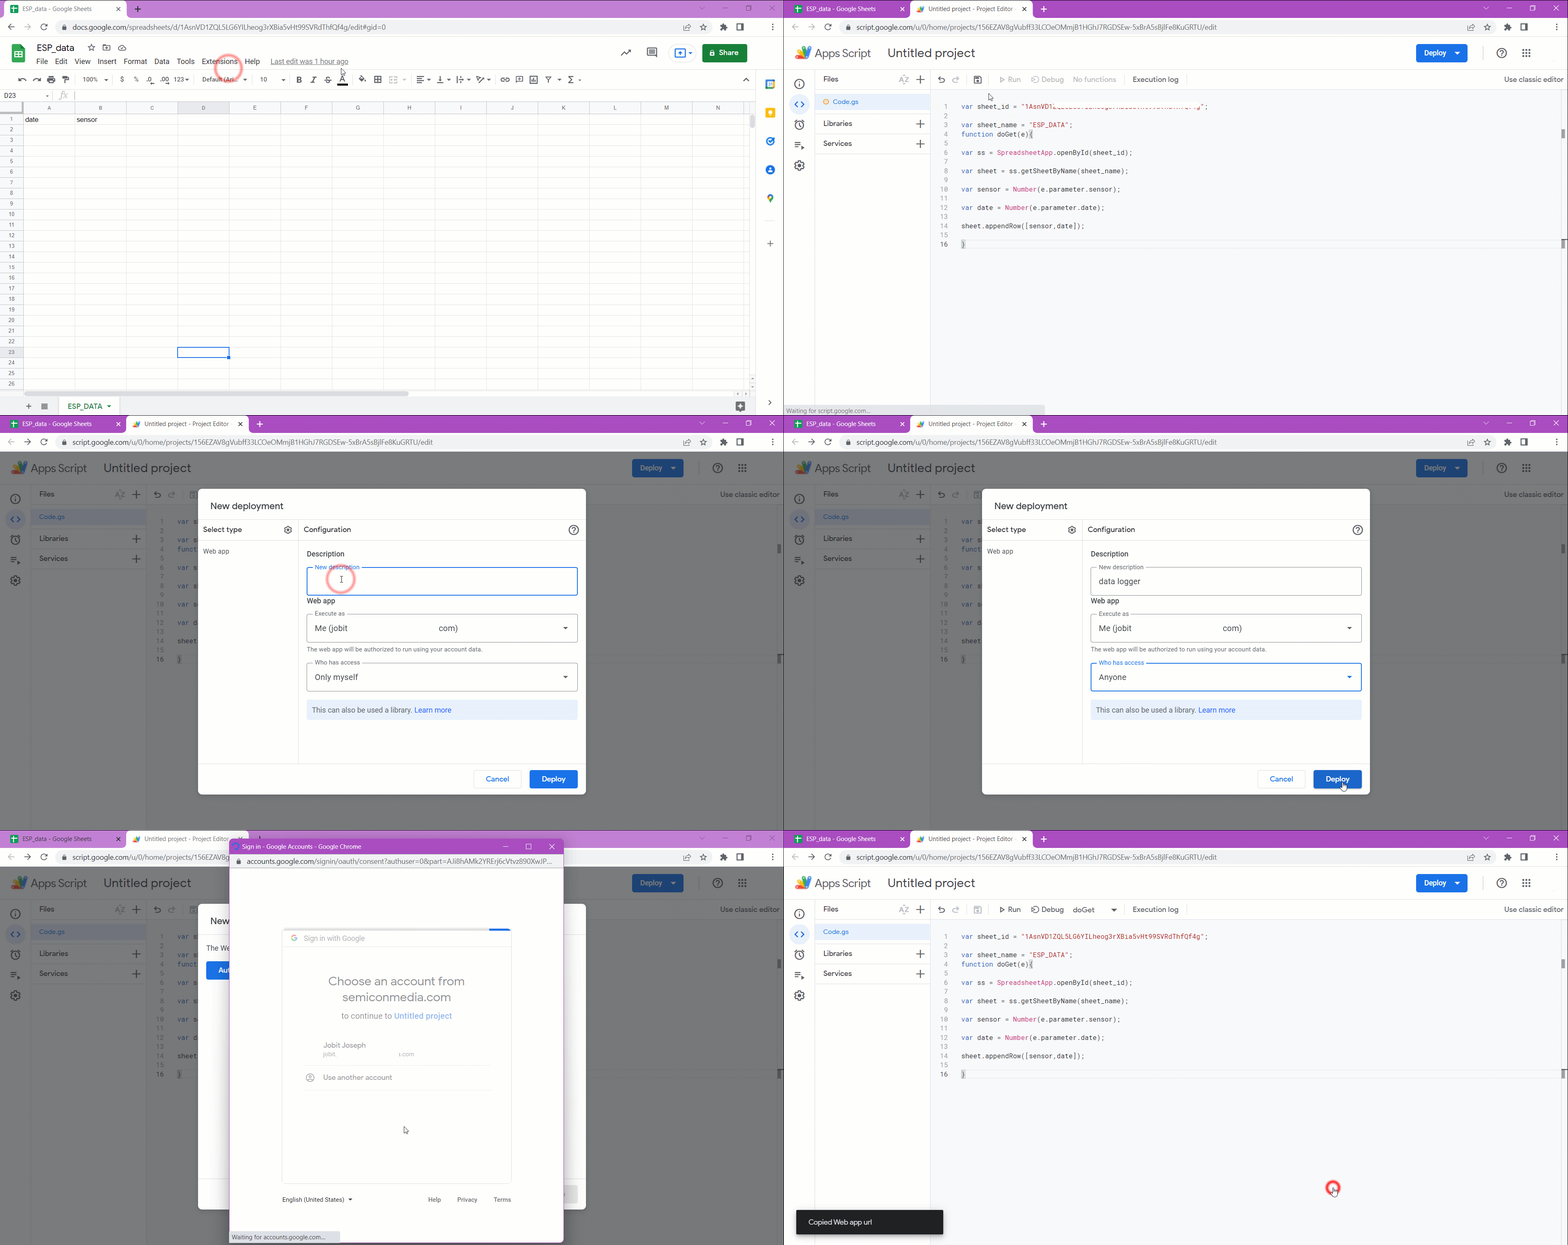
Now that our Google sheet is set up, let’s create a Google app script. This script will enable us to push data from our ESP to the Google sheets. To create the Google script, go to Extensions -> Apps Script (previously this option was under Tools -> Script Editor). Then copy-paste the following code into it.
var sheet_id = "YOUR SHEET ID";
var sheet_name = "NAME OF YOUR SHEET";
function doGet(e){
var ss = SpreadsheetApp.openById(sheet_id);
var sheet = ss.getSheetByName(sheet_name);
var sensor = Number(e.parameter.sensor);
var date = Number(e.parameter.date);
sheet.appendRow([sensor,date]);
}
Replace YOUR SHEET ID and NAME OF YOUR SHEET with your sheet id and sheet name. Once done, save the script and click on the Deploy button and select new deployment. In the new deployment window, click on the Select type and select Web app as the type. Now google will present the option to set the description and permissions. Give anything in the description field and set the Who can access option to Anyone and click on deploy. Then click on Authorize access. Select your google account from the prompt and click on Allow when prompted. This will deploy the web app and will give you the Deployment ID and web app URL. Please copy these and save them somewhere safe. If you get This app isn’t verified error while authorizing, click on advanced and click on ‘Go to your ‘Script_name’(unsafe).
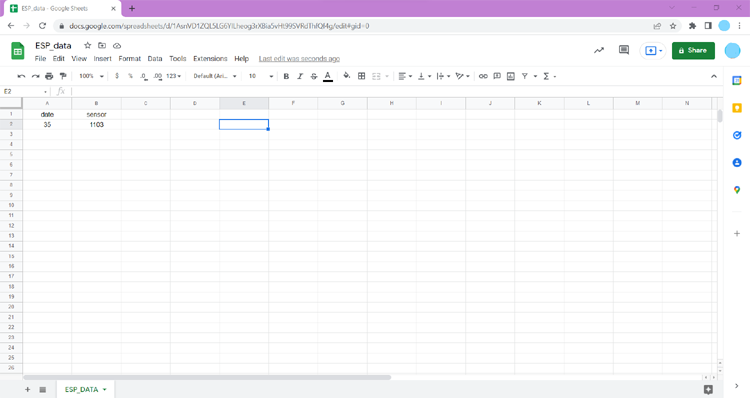
To test if it's working or not, simply copy and paste the web app URL to any browser and add ?sensor=35&date=1103 to the URL after exec.
So, the URL will look something like this https://script.google.com/macros/s/AKfycdsafrbg34f524245vv245If7bPy0T0hMmM42X19peNrpxU-lIi-5dghyhnh7gKb47g/exec?sensor=35&date=1103 and press enter. This will give you a web page that looks like this.

Then open the Google Sheets, and you can see that the value you have passed has been added to the sheet.
Arduino Code for Sending Data to Google Sheets
For sending data to Google Sheets, we will use the HTTPClient library. We will create a URL with the Google Script ID and the data. And when we establish an HTTP request with this URL, the Google Scripts will grab the data from the URL and POST it into the Google Sheets. Here is the Arduino code example, in which the ESP32 will send a count and UTC time continuously to the Google Sheets.
//Include required libraries
#include "WiFi.h"
#include <HTTPClient.h>
#include "time.h"
const char* ntpServer = "pool.ntp.org";
const long  gmtOffset_sec = 19800;
const int   daylightOffset_sec = 0;
// WiFi credentials
const char* ssid = "SKYNET 4G";         // change SSID
const char* password = "jobitjos";    // change password
// Google script ID and required credentials
String GOOGLE_SCRIPT_ID = "AKfycby-snBh-5j0jsiQBWfC-XB1FWy38lks4VHcxLBIGNadeCVcSzUoozHzvazIWv9EcA6a";    // change Gscript ID
int count = 0;
void setup() {
  delay(1000);
  Serial.begin(115200);
  delay(1000);
  // connect to WiFi
  Serial.println();
  Serial.print("Connecting to wifi: ");
  Serial.println(ssid);
  Serial.flush();
  WiFi.begin(ssid, password);
  while (WiFi.status() != WL_CONNECTED) {
    delay(500);
    Serial.print(".");
  }
  // Init and get the time
  configTime(gmtOffset_sec, daylightOffset_sec, ntpServer);
}
void loop() {
   if (WiFi.status() == WL_CONNECTED) {
    static bool flag = false;
    struct tm timeinfo;
    if (!getLocalTime(&timeinfo)) {
      Serial.println("Failed to obtain time");
      return;
    }
    char timeStringBuff[50]; //50 chars should be enough
    strftime(timeStringBuff, sizeof(timeStringBuff), "%A, %B %d %Y %H:%M:%S", &timeinfo);
    String asString(timeStringBuff);
    asString.replace(" ", "-");
    Serial.print("Time:");
    Serial.println(asString);
    String urlFinal = "https://script.google.com/macros/s/"+GOOGLE_SCRIPT_ID+"/exec?"+"date=" + asString + "&sensor=" + String(count);
    Serial.print("POST data to spreadsheet:");
    Serial.println(urlFinal);
    HTTPClient http;
    http.begin(urlFinal.c_str());
    http.setFollowRedirects(HTTPC_STRICT_FOLLOW_REDIRECTS);
    int httpCode = http.GET();
    Serial.print("HTTP Status Code: ");
    Serial.println(httpCode);
    //---------------------------------------------------------------------
    //getting response from google sheet
    String payload;
    if (httpCode > 0) {
        payload = http.getString();
        Serial.println("Payload: "+payload);
    }
    //---------------------------------------------------------------------
    http.end();
  }
  count++;
  delay(1000);
}
Code Explanation
In the first lines, we have included the required libraries and declared the global variables.
//Include required libraries
#include "WiFi.h"
#include <HTTPClient.h>
#include "time.h"
Here we will use the WiFi library for WiFi connection and the HTTPClient library for HTTP requests. And the Time.h library is used to grab the current time from any NTP time servers. In the following part, we have declared our preferred NTP server and the GMT time offset in seconds.
const char* ntpServer = "pool.ntp.org";
const long  gmtOffset_sec = 19800;
const int   daylightOffset_sec = 0;
In the WiFi credentials area, populate it with your own WiFi SSID and password. And in the GOOGLE_SCRIPT_ID add your Google Script ID, which we have already copied while deploying the Script.
// WiFi credentials
const char* ssid = "Your WiFi SSID";         // change SSID
const char* password = "Your WiFi password";    // change password
// Google script ID and required credentials
String GOOGLE_SCRIPT_ID = "AKfycby-snBh-5j0jsiQBWfC-xxxxxxxxxxxxxxxxxxxxxxxxxxxxx-Wv9EcA6a";    // change Gscript ID with yours
int count = 0;
The setup() function will initialize the serial communication and will establish the WiFi connection with the credentials we have already added. It will also initialize an instance named configTime for grabbing the time from the NTP server.
void setup() {
  delay(1000);
  Serial.begin(115200);
  delay(1000);
  // connect to WiFi
  Serial.println();
  Serial.print("Connecting to wifi: ");
  Serial.println(ssid);
  Serial.flush();
  WiFi.begin(ssid, password);
  while (WiFi.status() != WL_CONNECTED) {
    delay(500);
    Serial.print(".");
  }  // Init and get the time
  configTime(gmtOffset_sec, daylightOffset_sec, ntpServer);
}
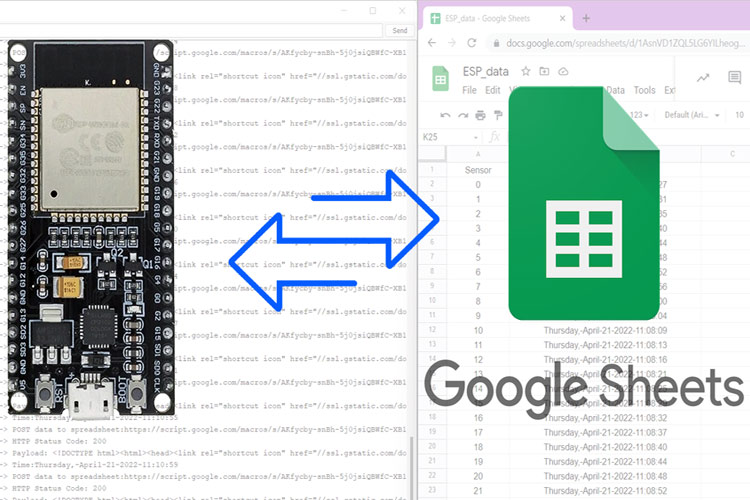
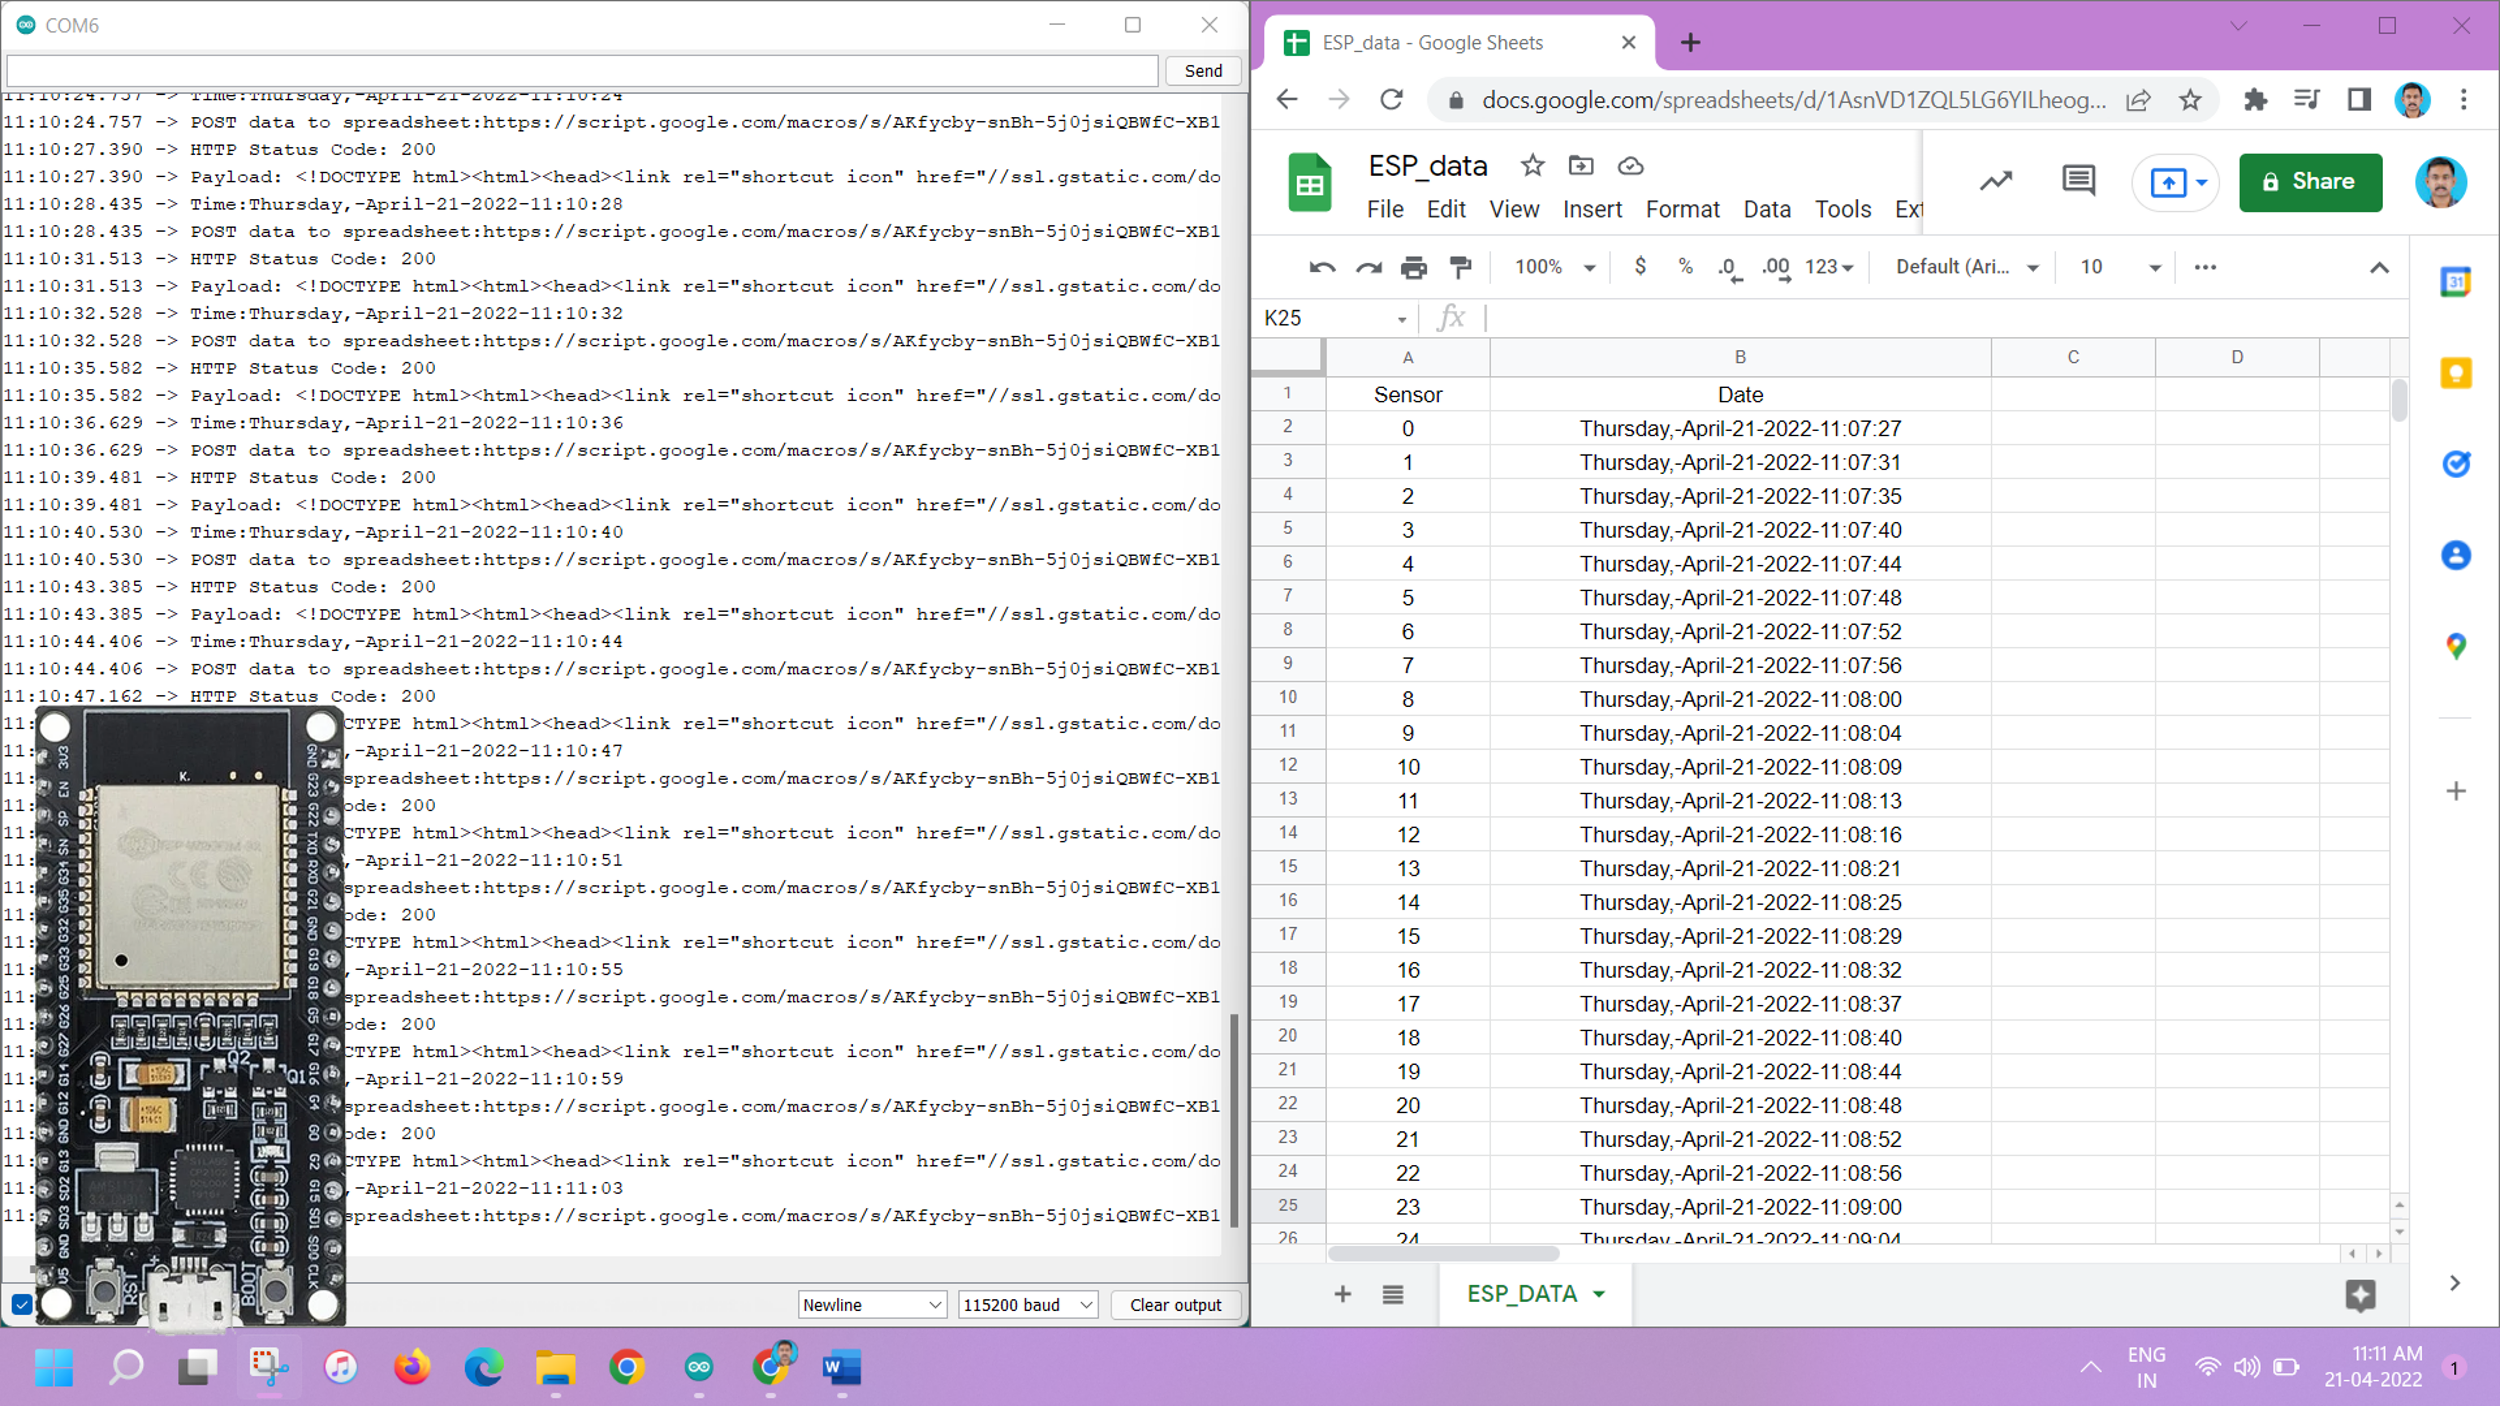
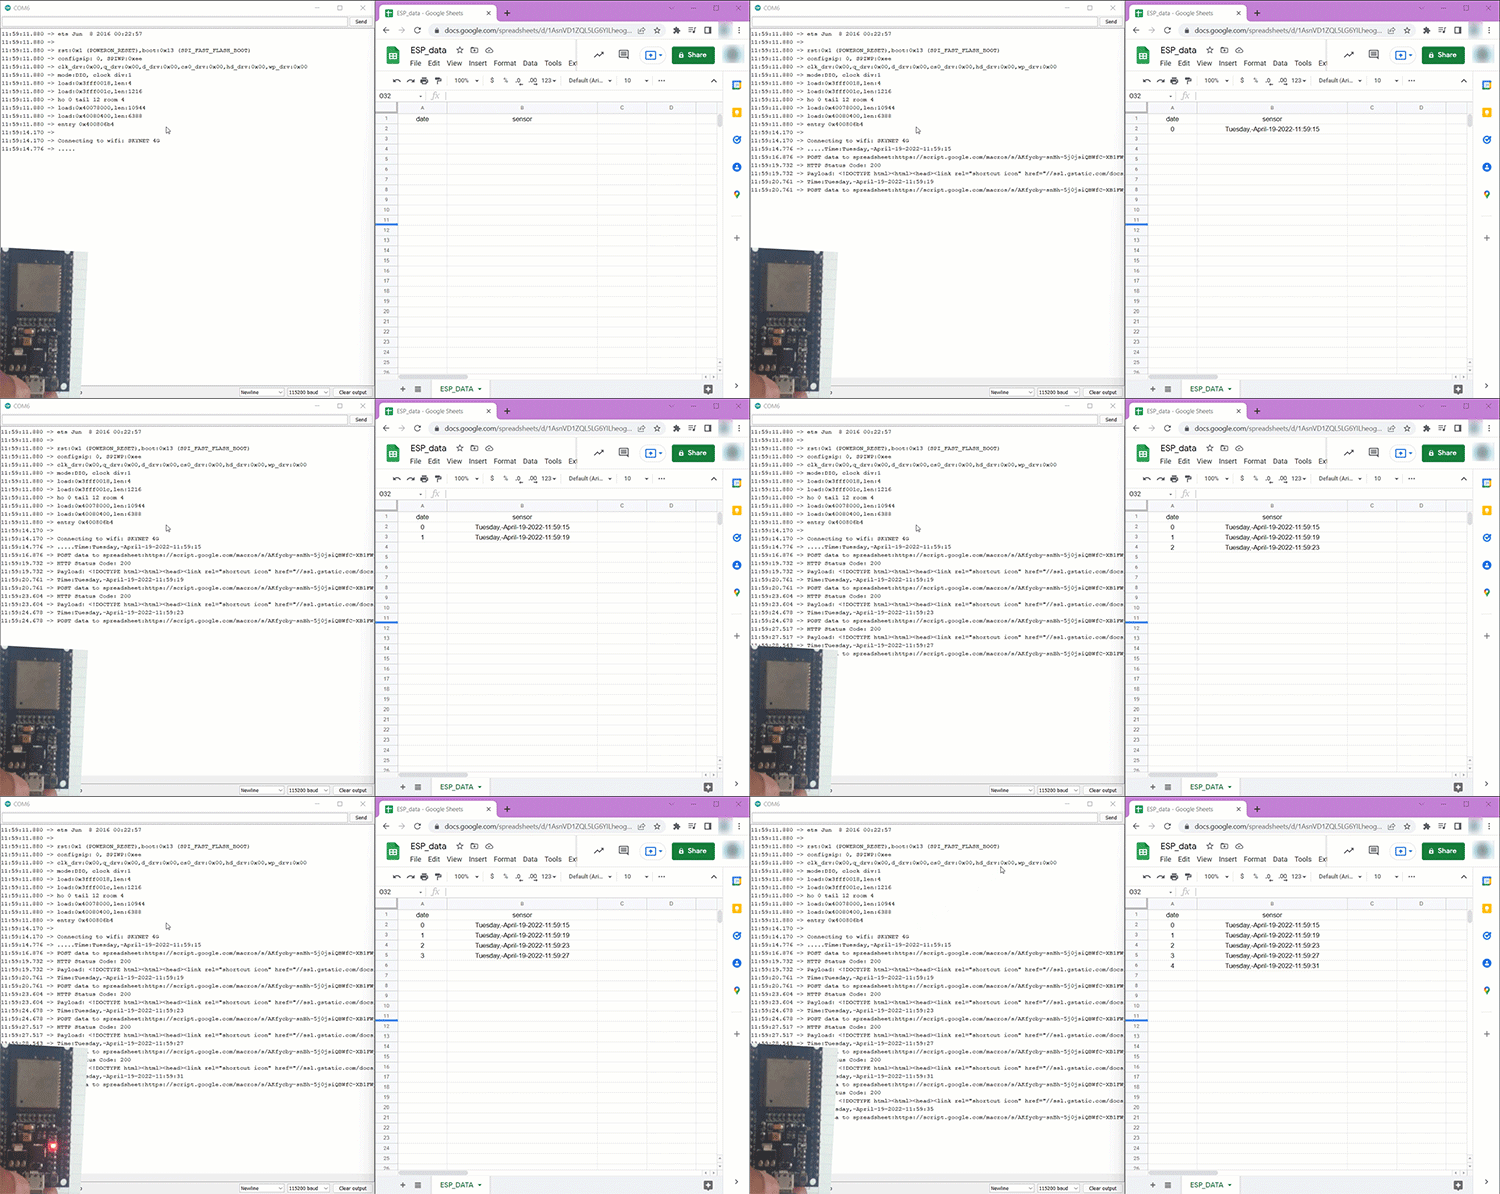
Now let’s look at the loop function. In the loop function, if the WiFi connection is active the ESP32 will grab the time from the NTP server. Then it will assemble this grabbed time info and the value of the variable count into a URL along with the Google Script ID. After that, the ESP32 will establish an HTTP connection to this URL with the help of the HTPPClient library. Once the connection is established, the ESP32 will print out the HTTP status code. Meanwhile, Google Scripts will grab the data from this HTTP request and it will POST the data to the Google Sheets. Then a one-second delay is added and the count is increased. The process will repeat and the time and the variable value will be posted to the Google Sheets continuously. By this method, we can log any amount of data to the google sheets. Here is the real-time view of the Google Sheets and the serial monitor.
Getting Data from Google Sheets
Now let’s look at how we can read from the Google Sheets. For that too we are going to use Google Scripts. Let’s see how to read a value from a cell on the Google Sheets. For that, we need to create and deploy Google Scripts. Follow the above example, and create and deploy a new script with the following scrips.
var sheet_id = "1AsnVD1ZQL5LG6Yxxxxxxxxxxxxxxxt99SVRdThfQf4g";
var ss = SpreadsheetApp.openById(sheet_id);
var sheet = ss.getSheetByName('ESP_DATA');
function doPost(e) {
  var val = e.parameter.value;
  if (e.parameter.value !== undefined){
    var range = sheet.getRange('A2');
    range.setValue(val);
  }
}
function doGet(e){
  var read = e.parameter.read;
  if (read !== undefined){
    return ContentService.createTextOutput(sheet.getRange('B2').getValue());
  }
}
Replace the Sheet ID and sheet name with your own. Once it’s deployed note down the Script ID. This script will return the value in cell B2 when it’s called.
Arduino Code for Reading Data from Google Sheets
//Include required libraries
#include "WiFi.h"
#include <HTTPClient.h>
// WiFi credentials
const char* ssid = "Your WiFi SSID";         // change SSID
const char* password = "Your WiFi password";    // change password
// Google script ID and required credentials
String GOOGLE_SCRIPT_ID = "AKfycby-snBh-5j0jsiQBWfC-XB1FWxxxxxxxxxxxxxxxxxxxxxxxxxzIWv9EcA6a";    // change Gscript ID
void setup() {
  delay(1000);
  Serial.begin(115200);
  delay(1000);
  // connect to WiFi
  Serial.println();
  Serial.print("Connecting to wifi: ");
  Serial.println(ssid);
  Serial.flush();
  WiFi.begin(ssid, password);
  while (WiFi.status() != WL_CONNECTED) {
    delay(500);
    Serial.print(".");
  }
}
void loop() {
  if (WiFi.status() == WL_CONNECTED) {
    HTTPClient http;
    String url = "https://script.google.com/macros/s/" + GOOGLE_SCRIPT_ID + "/exec?read";
    Serial.println("Making a request");
    http.begin(url.c_str()); //Specify the URL and certificate
    http.setFollowRedirects(HTTPC_STRICT_FOLLOW_REDIRECTS);
    int httpCode = http.GET();
    String payload;
    if (httpCode > 0) { //Check for the returning code
      payload = http.getString();
      Serial.println(httpCode);
      Serial.println(payload);
    }
    else {
      Serial.println("Error on HTTP request");
    }
    http.end();
  }
  delay(1000);
}
Code Explanation
WiFi setup and everything is similar to the first example. So, let’s discuss the Loop function in which how the ESP32 requests the data from the Google Sheets.
if (WiFi.status() == WL_CONNECTED) {
    HTTPClient http;
    String url = "https://script.google.com/macros/s/" + GOOGLE_SCRIPT_ID + "/exec?read";
    Serial.println("Making a request");
    http.begin(url.c_str()); //Specify the URL and certificate
    http.setFollowRedirects(HTTPC_STRICT_FOLLOW_REDIRECTS);
    int httpCode = http.GET();
    String payload;
    if (httpCode > 0) { //Check for the returning code
      payload = http.getString();
      Serial.println(httpCode);
      Serial.println(payload);
    }
    else {
      Serial.println("Error on HTTP request");
    }
    http.end();
  }
  delay(1000);
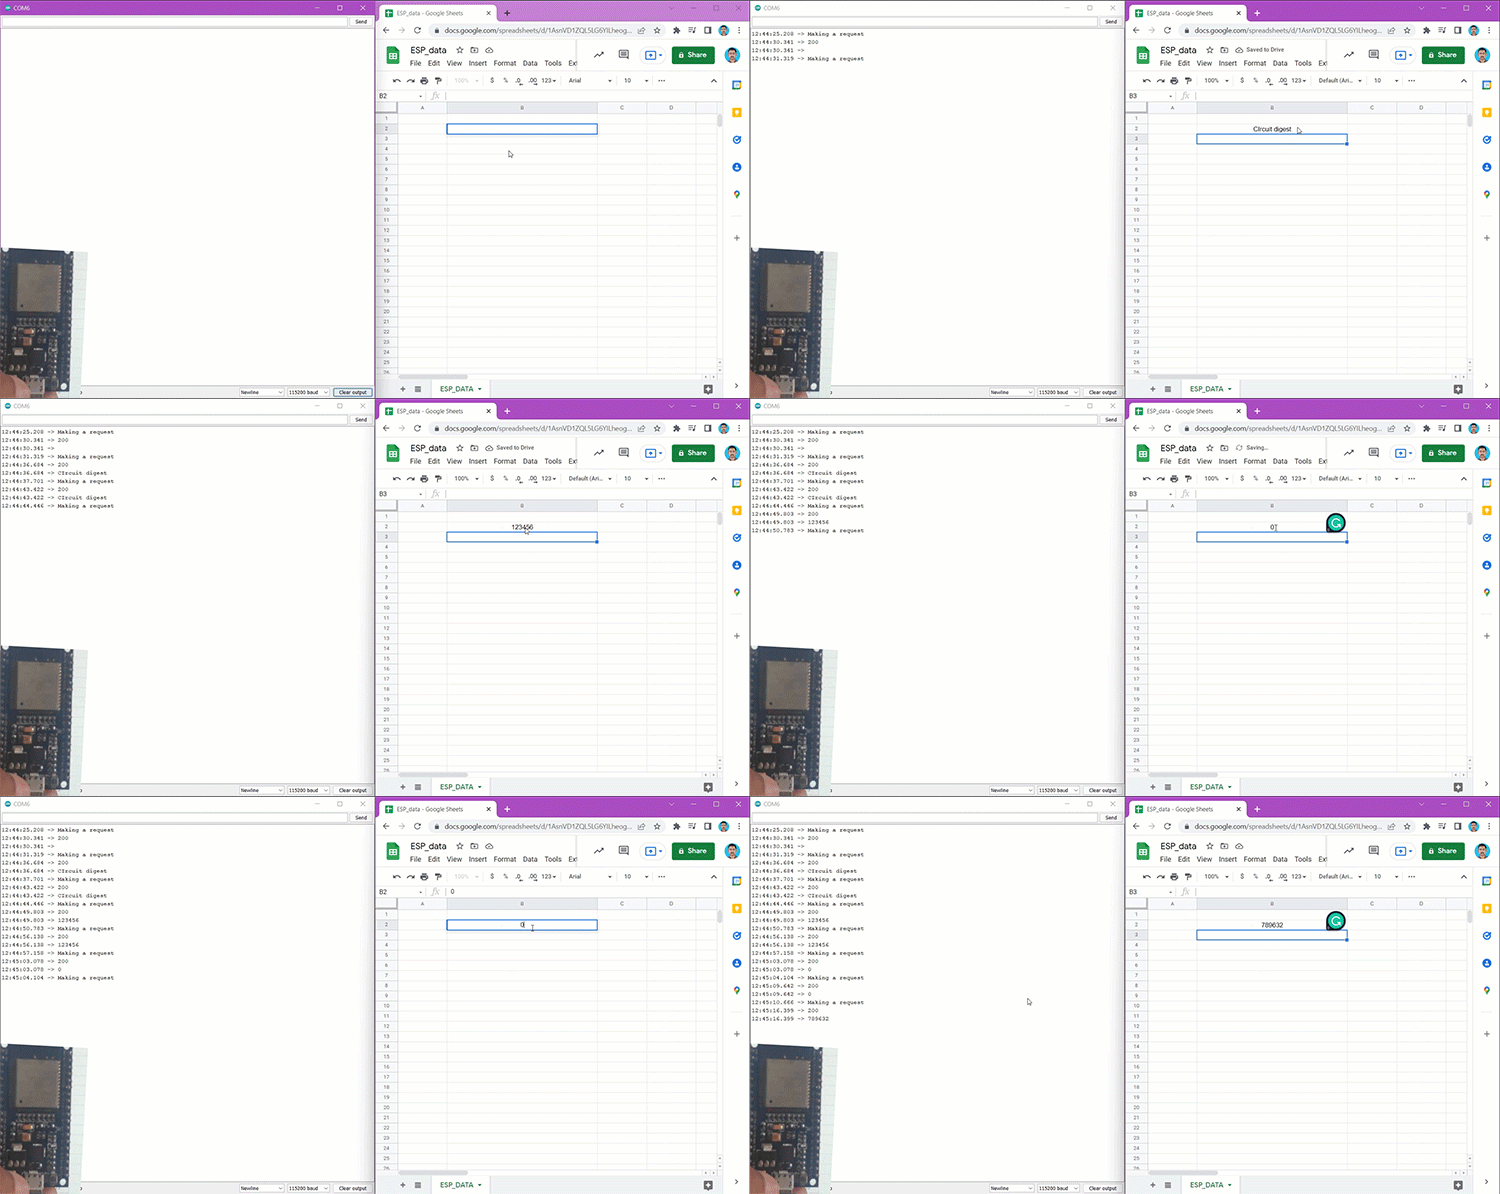
In the loop function if the WiFi is connected the ESP32 will create an HTTP instance with the HTTPClient Library. Then a request is made to the Google Sheets with the script URL which has our Google Script ID. Once the request is made the ESP will use the HTTP Get method to get the data from the Google sheets. This Data is then printed into the serial monitor. Here in the demonstration video, you can see that as soon as I change the content of cell C2, the data ESP32 receives also changes.
I hope this article was helpful. If you have any doubt, please feel free to ask in the comment section below.
//Include required libraries
#include "WiFi.h"
#include <HTTPClient.h>
#include "time.h"
const char* ntpServer = "pool.ntp.org";
const long gmtOffset_sec = 19800;
const int daylightOffset_sec = 0;
// WiFi credentials
const char* ssid = "SKYNET 4G"; // change SSID
const char* password = "jobitjos"; // change password
// Google script ID and required credentials
String GOOGLE_SCRIPT_ID = "AKfycby-snBh-5j0jsiQBWfC-XB1FWy38lks4VHcxLBIGNadeCVcSzUoozHzvazIWv9EcA6a"; // change Gscript ID
int count = 0;
void setup() {
delay(1000);
Serial.begin(115200);
delay(1000);
// connect to WiFi
Serial.println();
Serial.print("Connecting to wifi: ");
Serial.println(ssid);
Serial.flush();
WiFi.begin(ssid, password);
while (WiFi.status() != WL_CONNECTED) {
delay(500);
Serial.print(".");
}
// Init and get the time
configTime(gmtOffset_sec, daylightOffset_sec, ntpServer);
}
void loop() {
if (WiFi.status() == WL_CONNECTED) {
static bool flag = false;
struct tm timeinfo;
if (!getLocalTime(&timeinfo)) {
Serial.println("Failed to obtain time");
return;
}
char timeStringBuff[50]; //50 chars should be enough
strftime(timeStringBuff, sizeof(timeStringBuff), "%A, %B %d %Y %H:%M:%S", &timeinfo);
String asString(timeStringBuff);
asString.replace(" ", "-");
Serial.print("Time:");
Serial.println(asString);
String urlFinal = "https://script.google.com/macros/s/"+GOOGLE_SCRIPT_ID+"/exec?"+"date=" + asString + "&sensor=" + String(count);
Serial.print("POST data to spreadsheet:");
Serial.println(urlFinal);
HTTPClient http;
http.begin(urlFinal.c_str());
http.setFollowRedirects(HTTPC_STRICT_FOLLOW_REDIRECTS);
int httpCode = http.GET();
Serial.print("HTTP Status Code: ");
Serial.println(httpCode);
//---------------------------------------------------------------------
//getting response from google sheet
String payload;
if (httpCode > 0) {
payload = http.getString();
Serial.println("Payload: "+payload);
}
//---------------------------------------------------------------------
http.end();
}
count++;
delay(1000);
}
....................................................................................................
//Include required libraries
#include "WiFi.h"
#include <HTTPClient.h>
// WiFi credentials
const char* ssid = "SKYNET 4G"; // change SSID
const char* password = "jobitjos"; // change password
// Google script ID and required credentials
String GOOGLE_SCRIPT_ID = "AKfycby-snBh-5j0jsiQBWfC-XB1FWy38lks4VHcxLBIGNadeCVcSzUoozHzvazIWv9EcA6a"; // change Gscript ID
void setup() {
delay(1000);
Serial.begin(115200);
delay(1000);
// connect to WiFi
Serial.println();
Serial.print("Connecting to wifi: ");
Serial.println(ssid);
Serial.flush();
WiFi.begin(ssid, password);
while (WiFi.status() != WL_CONNECTED) {
delay(500);
Serial.print(".");
}
}
void loop() {
if (WiFi.status() == WL_CONNECTED) {
HTTPClient http;
String url = "https://script.google.com/macros/s/" + GOOGLE_SCRIPT_ID + "/exec?read";
Serial.println("Making a request");
http.begin(url.c_str()); //Specify the URL and certificate
http.setFollowRedirects(HTTPC_STRICT_FOLLOW_REDIRECTS);
int httpCode = http.GET();
String payload;
if (httpCode > 0) { //Check for the returning code
payload = http.getString();
Serial.println(httpCode);
Serial.println(payload);
}
else {
Serial.println("Error on HTTP request");
}
http.end();
}
delay(1000);
}


