


You mostly have seen Data logging web server with real-time graphs and tables on ThingSpeak and other IoT platforms. But we can also create our own webserver and can update the data in real-time, we previously created many webservers using different boards. Here we will also create ESP8266 Web Server Data Logger using DHT11 Sensor. Here the temperature and humidity data will be updated on the webpage using AJAX.
AJAX (Asynchronous JavaScript and XML) allows for automatic updating of websites by sharing tiny volumes of data with the server in the background without refreshing the complete webpage. This ensures that portions of a web page will be changed without reloading the whole website. So let’s get started!
Components Required
- NodeMCU ESP8266
- DHT11 Sensor
- Jumper Wires
DHT11 sensor is used to measure temperature and humidity and generally used to create weather stations.
Circuit Diagram
Circuit Diagram for ESP8266 data logger is given below:
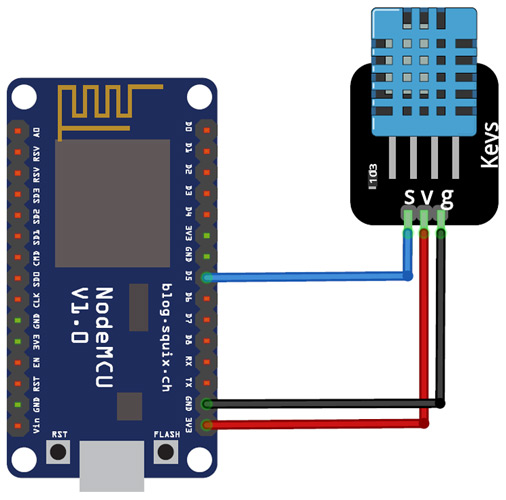
Wiring the DHT11 to the NodeMCU is easy. VCC and GND pins of DHT11 is connected to 3.3V and GND NodeMCU while the Data pin of DHT is connected to D5 (GPIO 14) pin of NodeMCU.
Programming NodeMCU ESP8266 for Data logging
Complete code for NodeMCU Temperature Logger can be found at the end of the page. Here we are explaining the complete code line by line:
Before moving directly on coding, install required libraries, the ESP8266 libraries are pre-installed on IDE; you only need to install the DHT11 library that you can download from here.
After installing the library, including all the required libraries.
#include <ESP8266WiFi.h>
#include <WiFiClient.h>
#include <ESP8266WebServer.h>
#include "DHT.h"
Now in the next lines, enter your Wi-Fi name and Password.
const char* ssid = "Wi-Fi Name";
const char* password = "Password";
Then define the type of DHT sensor and the pin where the sensor is connected. If you are using DHT22, then change the DHT type to DHT22. In my case, the DHT sensor is connected to the GPIO14 (D5) of NodeMCU.
#define LED 2 //Onboard LED
#define DHTTYPE DHT11 // DHT 11
uint8_t DHTPin = 14;
DHT dht(DHTPin, DHTTYPE);
The handleRoot function is executed when we open the Webpage inbrowser using the NodeMCU IP address.
void handleRoot()
{
 String s = MAIN_page; //Read HTML contents
 server.send(200, "text/html", s); //Send web page
}
The next function that is readData() is used to read the data from the DHT11 sensor and send it to the Webpage. In this loop, NodeMCU stores the DHT11 values into two float variables: temperature & humidity, after this it converts the float variables into the string and store their data into another string variable ‘Data’ and send this to Webpage whenever requested.
void readData()
{
String data = "{\"Temperature\":\""+ String(temperature) +"\", \"Humidity\":\""+ String(humidity) +"\"}";
digitalWrite(LED,!digitalRead(LED));
server.send(200, "text/plane", data);
delay(2000);
temperature = dht.readTemperature();
humidity = dht.readHumidity();
 Serial.print(humidity, 1);
 Serial.print(temperature, 1);
}
Inside the void setup() function, we initialized the baud rate, DHT sensor using .begin() function, Webpage using server.begin() function and then connect the module with the Wi-Fi using the Wi-Fi name and password.
Serial.begin(115200);
pinMode(DHTPin, INPUT);
dht.begin();
 WiFi.begin(ssid, password);
server.begin();
The first function is used to call the 'handleRoot' function when a client requests URI (Uniform Resource Identifier) "/" while the second function is used to call the 'readData' function when a POST request is made to URI "/readData"
server.on("/", handleRoot);
server.on("/readData", readData);
The void loop() function continuously listen for HTTP requests from clients
void loop(void)
{
  server.handleClient();
}
HTML Code for Webpage
The <!DOCTYPE html > tag is used to tell the web browser that which version of html we are using to write the html code. This tag is written at the top. Everything, that in this code is written after that.
<!doctype html>
The code written between the <html> </html> tags will be read by the browser. The <head> </head> tag is used to define the title, header line, and style of the web page. The data written in the <title></title> is the name of the tab in the browser. The <style></style> tag is used to style the table and the header lines.
<html>
<head>
  <title>Data Logger</title>
  <h1 style="text-align:center; color:red;">Iot Design Pro</h1>
    <style>
  canvas{
    -moz-user-select: none;
……………………..
……………………..
……………………..
</style>
</head>
The <script></script> tag is used to include the jQuery. The jQuery is the JavaScript library. The getData() function inside the <script> tag is used to get the data from NodeMCU and update the data table.
function getData()
{
…………..
…………..
The XMLHttpRequest object is used to request data from the web server. All browsers have a built-in XMLHttpRequest object to request data from a server. Using the XMLHttpRequest, we can update a web page without reloading the page, request data from the server, receive data from a server, and can send data to a server. Here we are using this object to get the temperature and humidity data from the NodeMCU and update the data table without refreshing the web page.
var xhttp = new XMLHttpRequest();
  xhttp.onreadystatechange = function() {
    if (this.readyState == 4 && this.status == 200) {
     //Push the data in array
  var time = new Date().toLocaleTimeString();
  var txt = this.responseText;
  var obj = JSON.parse(txt);
      Tvalues.push(obj.Temperature);
      Hvalues.push(obj.Humidity);
      timeStamp.push(time);
……………………….
…………….................
……………………….
The open() and send() methods of the XMLHttpRequest object are used to send a request to a server. The syntax for xhttp.open() is given below:
xhttp.open(method, url, async)
Where:
method is the type of request (GET or POST)
url is the server location
async is used to define asynchronous or synchronous, where true is asynchronous and false is synchronous
xhttp.open("GET", "readData", true);
xhttp.send();
Testing the NodeMCU Data Logger
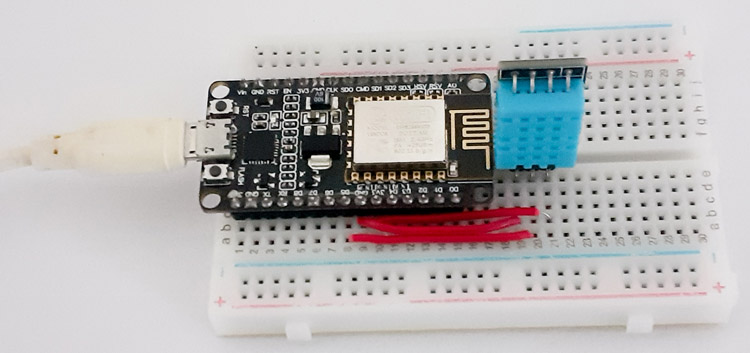
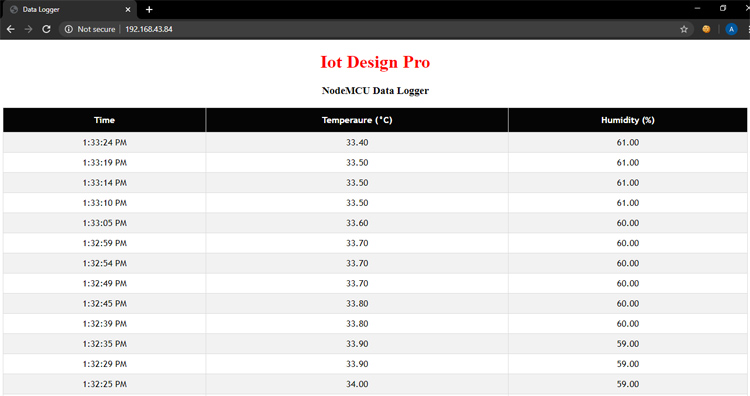
Finally, connect the DHT11 sensor with NodeMCU and upload the code. After uploading the program in NodeMCU, open serial monitor with 115200 baud rate and get the IP address of NodeMCU. Open it in the web browser, and your Webpage will look like this:
A working video and complete code are given below.
#include <ESP8266WiFi.h>
#include <WiFiClient.h>
#include <ESP8266WebServer.h>
#include "DHT.h"
//SSID and Password of your WiFi router
const char* ssid = "Galaxy-M20";
const char* password = "ac312124";
#define LED 2 //On board LED
#define DHTTYPE DHT11 // DHT 11
uint8_t DHTPin = 14;
DHT dht(DHTPin, DHTTYPE);
float humidity, temperature;
ESP8266WebServer server(80); //Server on port 80
const char MAIN_page[] PROGMEM = R"=====(
<!doctype html>
<html>
<head>
<title>Data Logger</title>
<h1 style="text-align:center; color:red;">Iot Design Pro</h1>
<h3 style="text-align:center;">NodeMCU Data Logger</h3>
<style>
canvas{
-moz-user-select: none;
-webkit-user-select: none;
-ms-user-select: none;
}
/* Data Table Styling*/
#dataTable {
font-family: "Trebuchet MS", Arial, Helvetica, sans-serif;
border-collapse: collapse;
width: 100%;
text-align: center;
}
#dataTable td, #dataTable th {
border: 1px solid #ddd;
padding: 8px;
}
#dataTable tr:nth-child(even){background-color: #f2f2f2;}
#dataTable tr:hover {background-color: #ddd;}
#dataTable th {
padding-top: 12px;
padding-bottom: 12px;
text-align: center;
background-color: #050505;
color: white;
}
</style>
</head>
<body>
<div>
<table id="dataTable">
<tr><th>Time</th><th>Temperaure (°C)</th><th>Humidity (%)</th></tr>
</table>
</div>
<br>
<br>
<script>
var Tvalues = [];
var Hvalues = [];
var timeStamp = [];
setInterval(function() {
// Call a function repetatively with 5 Second interval
getData();
}, 5000); //5000mSeconds update rate
function getData() {
var xhttp = new XMLHttpRequest();
xhttp.onreadystatechange = function() {
if (this.readyState == 4 && this.status == 200) {
//Push the data in array
var time = new Date().toLocaleTimeString();
var txt = this.responseText;
var obj = JSON.parse(txt);
Tvalues.push(obj.Temperature);
Hvalues.push(obj.Humidity);
timeStamp.push(time);
//Update Data Table
var table = document.getElementById("dataTable");
var row = table.insertRow(1); //Add after headings
var cell1 = row.insertCell(0);
var cell2 = row.insertCell(1);
var cell3 = row.insertCell(2);
cell1.innerHTML = time;
cell2.innerHTML = obj.Temperature;
cell3.innerHTML = obj.Humidity;
}
};
xhttp.open("GET", "readData", true); //Handle readData server on ESP8266
xhttp.send();
}
</script>
</body>
</html>
)=====";
void handleRoot() {
String s = MAIN_page; //Read HTML contents
server.send(200, "text/html", s); //Send web page
}
void readData() {
String data = "{\"Temperature\":\""+ String(temperature) +"\", \"Humidity\":\""+ String(humidity) +"\"}";
digitalWrite(LED,!digitalRead(LED)); //Toggle LED on data request ajax
server.send(200, "text/plane", data); //Send ADC value, temperature and humidity JSON to client ajax request
delay(2000);
temperature = dht.readTemperature();
humidity = dht.readHumidity();
Serial.print(humidity, 1);
Serial.print(temperature, 1);
}
void setup ()
{
Serial.begin(115200);
Serial.println();
pinMode(DHTPin, INPUT);
dht.begin();
WiFi.begin(ssid, password); //Connect to your WiFi router
Serial.println("");
//Onboard LED port Direction output
pinMode(LED,OUTPUT);
// Wait for connection
while (WiFi.status() != WL_CONNECTED) {
delay(500);
Serial.print(".");
}
//If connection successful show IP address in serial monitor
Serial.println("");
Serial.print("Connected to ");
Serial.println(ssid);
Serial.print("IP address: ");
Serial.println(WiFi.localIP()); //IP address assigned to your ESP
server.on("/", handleRoot); //Which routine to handle at root location. This is display page
server.on("/readData", readData); //This page is called by java Script AJAX
server.begin(); //Start server
Serial.println("HTTP server started");
}
void loop(void){
server.handleClient(); //Handle client requests
}


