There are many kinds of Wi-Fi door lock available in the market which makes your home more secure and saves time in finding the keys. We previously built a smartphone-controlled Door lock using Node MCU and Adafruit IO. Here we are using the same solenoid door lock and controlling it using Raspberry Pi based webserver. The webpage will have two buttons to Open and Close the door lock and can be accessed from anywhere in the world given that port forwarding is enabled in your router.
Here we are using Flask to control the door lock from a webpage. Flask is a popular Python web framework developed by Armin Ronacher of Pocoo. It is a third-party Python library used for developing web applications. Flask is classified as micro-framework, and it is based on the Pocoo projects Werkzeug and Jinja2. Flask is very commonly used with Raspberry Pi, as RPi has Linux OS which can easily process Python script. Raspberry Pi is also popular for creating webserver and making IoT based projects because of its high processing power and inbuilt Wi-Fi capabilities. We previously used Flask to control Servo Motor and Stepper motor using Raspberry Pi.
Components Required
- Raspberry Pi 4
- 12v Solenoid Lock
- Relay Module
- Jumper Wires
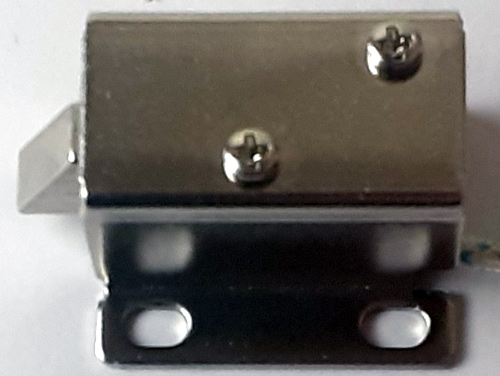
Solenoid Lock
In conventional door lock, there is a key to pull or push the latch, and we have to operate it manually, but in solenoid lock, the latch can be operated automatically by applying a voltage. Solenoid lock has a low-voltage solenoid that pulls the latch back into the door when an interrupt (Pushbutton, Relay, etc.) is activated. The latch will retain its position until the interrupt is enabled. The operating voltage for the solenoid lock is 12V. You can also use 9V, but it results in slower operation. Solenoid door locks are mainly used in remote areas to automate operations without involving any human effort.
Raspberry Pi Smart Door Lock Circuit Diagram
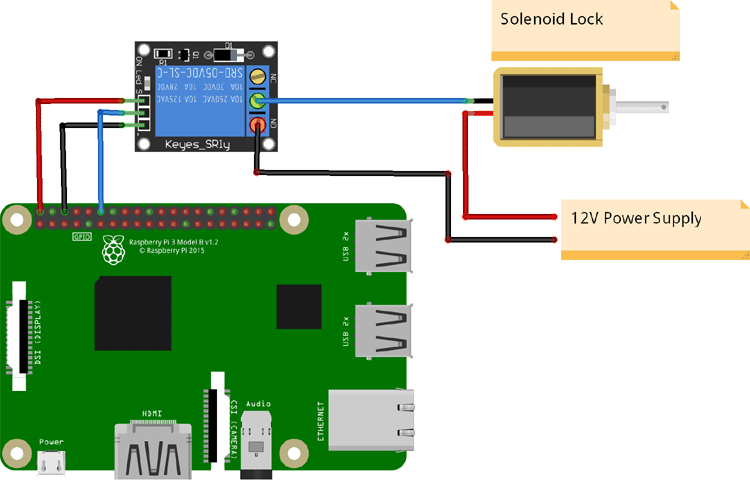
The circuit diagram for Raspberry Pi Solenoid Door Lock is very simple as you only need to connect the solenoid door lock to Raspberry Pi. Solenoid Lock needs 9V-12V to operate and Raspberry Pi GPIO pins can supply only 3.3V, so a 12V external power source is used to trigger the lock with the help of a relay.
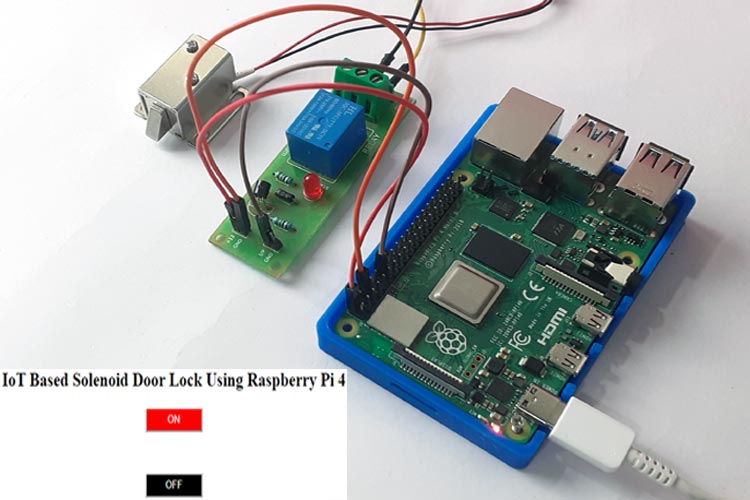
Here the input pin of the relay module is connected to GPIO 18 pin of Raspberry Pi while VCC and GND pins of the Relay module are connected to 5V and GND pin of Raspberry Pi. On the other side, the GND pin of solenoid lock is connected to COM of relay module and a Positive pin is connected to Positive of 12V power supply. The negative pin of the 12V power supply is connected to the NO pin of the relay module.
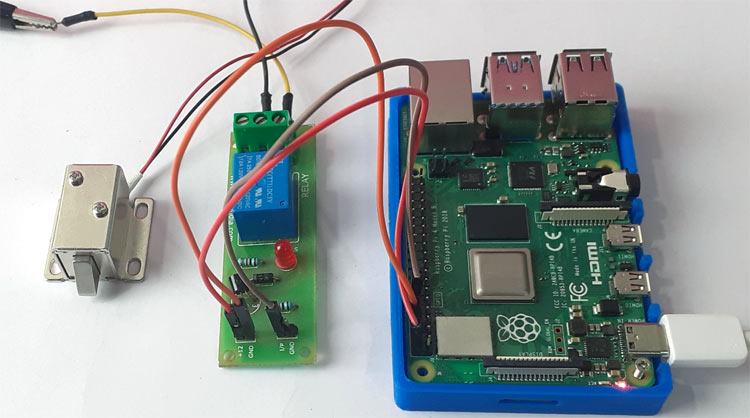
After making all the connections my hardware looked like this:
Preparing the Raspberry Pi
Before programming or installing any library file, first update your raspberry pi using the following commands:
sudo apt-get update
sudo apt-get upgrade
Now install the Flask to create a Web Page. Use the below command to install the Flask:
pip install Flask
After installing the Flask now create a new directory/folder named Solenoidlock in your Raspberry Pi and navigate to that folder using the below commands:
mkdir Solenoidlock
cd Solenoidlock
Now create a python file using the below command:
sudo nano lock.py
And paste the python code given at the end of this document and save the changes using
ctrl+x > Y> Enter.
Inside the Solenoidlock directory, create another folder using the below command:
mkdir templates
Then navigate to the templates directory.
cd templates
Inside the templates directory, create an HTML file using the below command:
sudo nano index.html
Paste the HTML code inside the nano editor and save the changes using
ctrl+x > Y> Enter.
HTML Code for Webpage
The complete HTML code for controlling the solenoid door lock through the webpage is given below. In this HTML code, there are two different integers for ON and OFF buttons. Integer 1 is assigned to the ON button and 2 is assigned to the OFF button. Flask web framework is used to send data to Raspberry Pi when a button is pressed on the Webpage.
<!DOCTYPE html>
<html>
            <head>
                        <title>Solenoid Lock</title>
                        <meta name="viewport" content="width=device-width, initial-scale=1">
            </head>
            <body>
                 <h2><center>IoT Based Solenoid Door Lock Using Raspberry Pi 4<center></h2>
            <form action="/1" method="POST">
                              <p align=center><button style=width:90px;height:30px;background-color:red;color:white; <button id="on" class="solenoid">ON</button> <P>
                                 </br>
                               </form>
                     <form action="/2" method="POST">
                              <p align=center><button style=width:90px;height:30px;background-color:black;color:white; <button id="off" class="solenoid">OFF</button> <P>
                               </br>
                               </form>
        </body>
</html>
Python Code for Solenoid Door Lock
Complete python code is given at the end of the document. Here we are explaining some important parts of the code.
First import the Flask, render_template, request, redirect, url_for, make_response classes from flask library.

from flask import Flask, render_template, request, redirect, url_for, make_response
Now create an instance for the class to set up a flask server.
app = Flask(__name__)
Using the below functions, we are telling the Flask that what URL should trigger our function.
@app.route('/')
def index():
            return render_template('index.html')
Check the changePin variable and if it is equal to 1, then change the relay pin to high else change it to low.
changePin = int(change in) #cast changepin to an int
            if changePin == 1:
                        print "ON"
                GPIO.output( relay , 1)
            elif changePin == 2:
                        print "OFF"
                GPIO.output(relay, 0)
Testing the Solenoid Door Lock using Raspberry Pi 4
After completing all the setups and connecting solenoid lock to your Raspberry Pi, navigate to Solenoidlock directory and run the python code using the below commands:
cd Solenoidlock
python lock.py
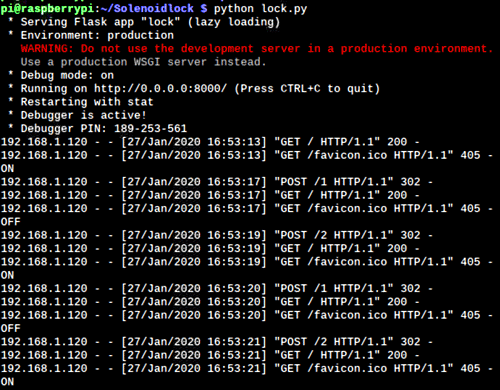
Then open your Raspberry Pi IP address with port 8000 (http://192.168.1.207:8000). Here you will see two buttons to Open/Close the lock. Press the ON/OFF buttons to open/close the door lock. The page can also be accessed from the smartphone if it is connected to the same network.
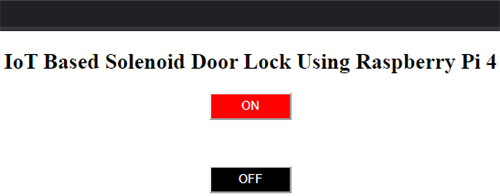
This is how you can control a solenoid lock using Raspberry Pi 4. A working video is given at the end of this document.
from flask import Flask, render_template, request, redirect, url_for, make_response
import time
import RPi.GPIO as GPIO
relay = 18;
GPIO.setwarnings(False)
GPIO.setmode(GPIO.BCM)
GPIO.setuprelay(GPIO.OUT)
GPIO.output(relay , 0)
app = Flask(__name__) #set up flask server
#when the root IP is selected, return index.html page
@app.route('/')
def index():
return render_template('index.html')
#recieve which pin to change from the button press on index.html
#each button returns a number that triggers a command in this function
#
#Uses methods from motors.py to send commands to the GPIO to operate the motors
@app.route('/<changepin>', methods=['POST'])
def reroute(changepin):
changePin = int(changepin) #cast changepin to an int
if changePin == 1:
print "ON"
GPIO.output( relay , 1)
elif changePin == 2:
print "OFF"
GPIO.output(relay, 0)
response = make_response(redirect(url_for('index')))
return(response)
app.run(debug=True, host='0.0.0.0', port=8000) #set up the server in debug mode to the port 8000


