IoT Based Solenoid Door Lock using Raspberry Pi 4

IoT Based Solenoid Door Lock using Raspberry Pi 4

There are many kinds of Wi-Fi door lock available in the market which makes your home more secure and saves time in finding the keys. We previously built a smartphone-controlled Door lock using Node MCU and Adafruit IO. Here we are using the same solenoid door lock and controlling it using Raspberry Pi based webserver. The webpage will have two buttons to Open and Close the door lock and can be accessed from anywhere in the world given that port forwarding is enabled in your router.


Here we are using Flask to control the door lock from a webpage. Flask is a popular Python web framework developed by Armin Ronacher of Pocoo. It is a third-party Python library used for developing web applications. Flask is classified as micro-framework, and it is based on the Pocoo projects Werkzeug and Jinja2. Flask is very commonly used with Raspberry Pi, as RPi has Linux OS which can easily process Python script. Raspberry Pi is also popular for creating webserver and making IoT based projects because of its high processing power and inbuilt Wi-Fi capabilities. We previously used Flask to control Servo Motor and Stepper motor using Raspberry Pi.


Components Required

  • Raspberry Pi 4
  • 12v Solenoid Lock
  • Relay Module
  • Jumper Wires


Solenoid Lock

In conventional door lock, there is a key to pull or push the latch, and we have to operate it manually, but in solenoid lock, the latch can be operated automatically by applying a voltage. Solenoid lock has a low-voltage solenoid that pulls the latch back into the door when an interrupt (Pushbutton, Relay, etc.) is activated. The latch will retain its position until the interrupt is enabled. The operating voltage for the solenoid lock is 12V. You can also use 9V, but it results in slower operation. Solenoid door locks are mainly used in remote areas to automate operations without involving any human effort.

Solenoid Door Lock


Raspberry Pi Smart Door Lock Circuit Diagram

Solenoid Door Lock using Raspberry Pi 4 Circuit Diagram

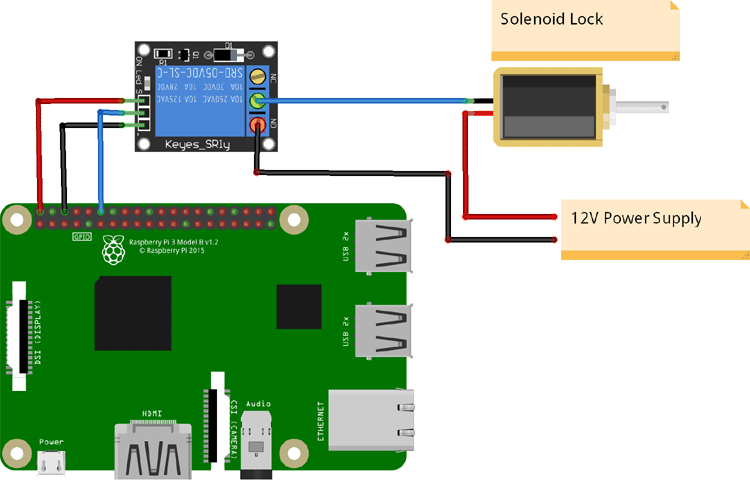
The circuit diagram for Raspberry Pi Solenoid Door Lock is very simple as you only need to connect the solenoid door lock to Raspberry Pi. Solenoid Lock needs 9V-12V to operate and Raspberry Pi GPIO pins can supply only 3.3V, so a 12V external power source is used to trigger the lock with the help of a relay.


Here the input pin of the relay module is connected to GPIO 18 pin of Raspberry Pi while VCC and GND pins of the Relay module are connected to 5V and GND pin of Raspberry Pi. On the other side, the GND pin of solenoid lock is connected to COM of relay module and a Positive pin is connected to Positive of 12V power supply. The negative pin of the 12V power supply is connected to the NO pin of the relay module.

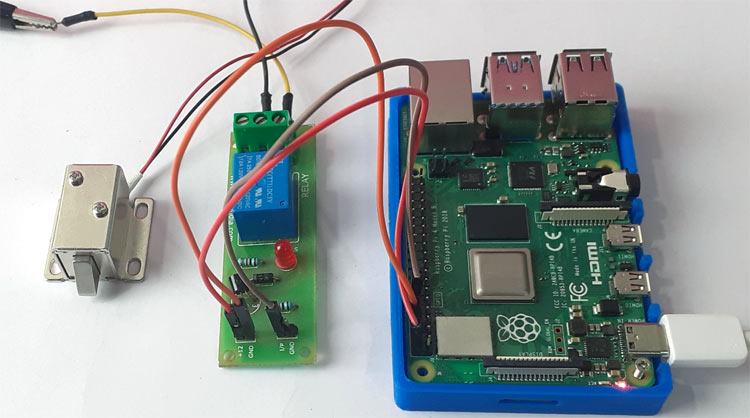
After making all the connections my hardware looked like this:

Solenoid Door Lock using Raspberry Pi 4


Preparing the Raspberry Pi

Before programming or installing any library file, first update your raspberry pi using the following commands:

sudo apt-get update
sudo apt-get upgrade


Now install the Flask to create a Web Page. Use the below command to install the Flask:

pip install Flask


After installing the Flask now create a new directory/folder named Solenoidlock in your Raspberry Pi and navigate to that folder using the below commands:

mkdir Solenoidlock
cd Solenoidlock


Now create a python file using the below command:

sudo nano lock.py


And paste the python code given at the end of this document and save the changes using

ctrl+x > Y> Enter.


Inside the Solenoidlock directory, create another folder using the below command:

mkdir templates


Then navigate to the templates directory.

cd templates


Inside the templates directory, create an HTML file using the below command:

sudo nano index.html


Paste the HTML code inside the nano editor and save the changes using

ctrl+x > Y> Enter.


HTML Code for Webpage

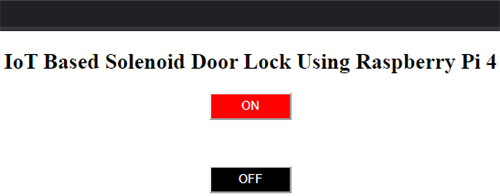
The complete HTML code for controlling the solenoid door lock through the webpage is given below. In this HTML code, there are two different integers for ON and OFF buttons. Integer 1 is assigned to the ON button and 2 is assigned to the OFF button. Flask web framework is used to send data to Raspberry Pi when a button is pressed on the Webpage.

<!DOCTYPE html>
<html>
            <head>
                        <title>Solenoid Lock</title>
                        <meta name="viewport" content="width=device-width, initial-scale=1">
            </head>
            <body>
                 <h2><center>IoT Based Solenoid Door Lock Using Raspberry Pi 4<center></h2>                           
            <form action="/1" method="POST">
                              <p align=center><button style=width:90px;height:30px;background-color:red;color:white; <button id="on" class="solenoid">ON</button> <P>
                                 </br>
                               </form>                          
                     <form action="/2" method="POST">
                              <p align=center><button style=width:90px;height:30px;background-color:black;color:white; <button id="off" class="solenoid">OFF</button> <P>
                               </br>
                               </form>                       
        </body>
</html>


Python Code for Solenoid Door Lock

Complete python code is given at the end of the document. Here we are explaining some important parts of the code.

First import the Flask, render_template, request, redirect, url_for, make_response classes from flask library.

from flask import Flask, render_template, request, redirect, url_for, make_response


Now create an instance for the class to set up a flask server.

app = Flask(__name__)


Using the below functions, we are telling the Flask that what URL should trigger our function.

@app.route('/')
def index():
            return render_template('index.html')


Check the changePin variable and if it is equal to 1, then change the relay pin to high else change it to low.

changePin = int(change in) #cast changepin to an int
            if changePin == 1:
                        print "ON"
                GPIO.output( relay , 1)             
            elif changePin == 2:
                        print "OFF"
                GPIO.output(relay, 0)


Testing the Solenoid Door Lock using Raspberry Pi 4

After completing all the setups and connecting solenoid lock to your Raspberry Pi, navigate to Solenoidlock directory and run the python code using the below commands:

cd Solenoidlock
python lock.py

IoT Based Solenoid Door Lock Serial Monitor

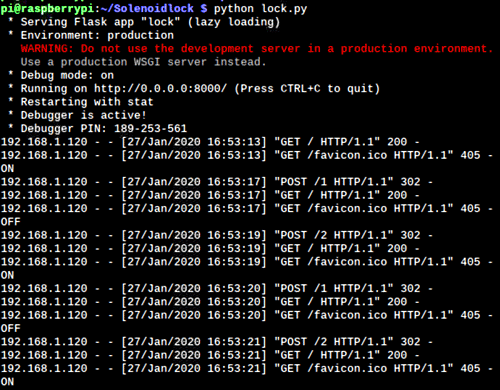
Then open your Raspberry Pi IP address with port 8000 (http://192.168.1.207:8000). Here you will see two buttons to Open/Close the lock. Press the ON/OFF buttons to open/close the door lock. The page can also be accessed from the smartphone if it is connected to the same network.

IoT Based Solenoid Door Lock Webpage

This is how you can control a solenoid lock using Raspberry Pi 4. A working video is given at the end of this document.

Code

from flask import Flask, render_template, request, redirect, url_for, make_response
import time
import RPi.GPIO as GPIO
relay = 18;
GPIO.setwarnings(False)
GPIO.setmode(GPIO.BCM)
GPIO.setuprelay(GPIO.OUT)
GPIO.output(relay , 0)
app = Flask(__name__) #set up flask server
#when the root IP is selected, return index.html page
@app.route('/')
def index():
    return render_template('index.html')
#recieve which pin to change from the button press on index.html
#each button returns a number that triggers a command in this function
#
#Uses methods from motors.py to send commands to the GPIO to operate the motors
@app.route('/<changepin>', methods=['POST'])
def reroute(changepin):
    changePin = int(changepin) #cast changepin to an int
    if changePin == 1:
        print "ON"
                GPIO.output( relay , 1)                
    elif changePin == 2:
        print "OFF"
                GPIO.output(relay, 0)
    response = make_response(redirect(url_for('index')))
    return(response)
app.run(debug=True, host='0.0.0.0', port=8000) #set up the server in debug mode to the port 8000

Video

88 Comments

Hello sir, I got this message "File "lock.py" , line 23
GPIO.output(relay , 1)
IndentationError : unexpected indent.

hope you will answer my question thanks !

the coding funtions well , the wire jumper are correct , but when i click "on" button nothing happen to my solenoid lock :( . Im using raspberry pi ver 3 model B , relay 5 v , adapter 12v for solenoid lock . please help me sir. can I contact you? , to sent my pictures to you.

Hello,
thank you so much, this is a very useful project, but I couldn't find the keyes_st1y relay module, so could please suggest an alternative relay to use.

thank you

I am getting the following error when i run the code after fixing the indent could not find any help on the internet

module 'RPi.GPIO' has no attribute 'setuprelay'

Hello, so i try to follow each step and then ending up with same error which is File "lock.py" , line 23
GPIO.output(relay , 1)
IndentationError : unexpected indent.
And then I back space GPIO.output(relay,1) to the same index as print(“Yes”) so the system work but turn out the relay is not follow the button on and off so.
Did what I do is correct or not?
Also in the question above what do you mean by change indent with space forward or backward?

if changePin == 1:
        print "ON"
        GPIO.output( relay , 1)
                
    elif changePin == 2:
        print "OFF"
        GPIO.output(relay, 0)

change the indent like above. 
                

fixed code!!!

from flask import Flask, render_template, request, redirect, url_for, make_response
import time
import RPi.GPIO as GPIO

relay_18 = 20

#GPIO.setwarnings(False)
GPIO.setmode(GPIO.BCM)
GPIO.setup(relay_18, GPIO.OUT) # GPIO Assign mode
GPIO.output(relay_18 , GPIO.LOW)

app = Flask(__name__) #set up flask server
#when the root IP is selected, return index.html page

@app.route('/')
def index():
return render_template('index.html')

#recieve which pin to change from the button press on index.html
#each button returns a number that triggers a command in this function
#
#Uses methods from motors.py to send commands to the GPIO to operate the motors
@app.route('/<changepin>', methods=['POST'])
def reroute(changepin):
changePin = int(changepin) #cast changepin to an int
if changePin == 1:
print "ON"
GPIO.output( relay_18 , GPIO.HIGH)
elif changePin == 2:
print "OFF"
GPIO.output(relay_18, GPIO.LOW)
response = make_response(redirect(url_for('index')))
return(response)
app.run(debug=True, host='192.130.80.152', port=8000) #set up the server in debug mode to the port 8000

im getting following error

Traceback (most recent call last):
File "/usr/lib/python3.7/ast.py", line 35, in parse
return compile(source, filename, mode, PyCF_ONLY_AST)
File "/home/pi/Solenoidlock/lock.py", line 25
GPIO.output(relay , 1)
^
IndentationError: unexpected indent

code is working but relay is not controlling solenoid lock, i have external 12v power source when i connect directly to lock, lock is working, when i connect it through 2-channel relay it dosent works, i have connected solenoid lock to in2 line of relay, when i control relay through website in2 light of relay gets on and off, but not controlling solenoid,connection as explained,GND pin of lock to GND pin of external power source,positive of lock to common pin of relay, positive pin of power source to no(normally open)pin of relay, vcc pin of relay to 5v pin of rpi GND pin of relay to GND pin of rpi and IN2 to gpio pin of rpi , i have 5v 2 channel relay, does i need to correct something in circuit, or need to use any external component.

Connect positive pin of solenoid lock to 12v and gnd pin to relay.

connected but didnt work, relay is not making a click sound, while light on in2 gets on and off,

i bought from amazon, in desc they have showed relay directly connected with rpi, but in reality rpi cant control this relay, does i need some extra component to control relay, plz help

Method Not Allowed
The method is not allowed for the requested URL.
i'm getting this error after adding 2 more button code, added in elseif, code is:
elif changePin == 3:
print ("ON")
GPIO.output( buzzer , 0)

elif changePin == 4:
print ("OFF")
GPIO.output(buzzer, 1)
made changes in html file also
form action="/3" method="POST".... and remaining code
form action="/4" method="POST"......

Hi , this is great project to learn about. I am getting some different operations. When I press on and OFF on the webpage, LED goes on and off. But relay do not do anything. the strange thing is lock is in unlock condition when the power supply ON. when I unplug the power then relay operates and comes to lock position.

What an great site web page. I love to evaluation blog site websites that educate and in addition thrill men and women. Your web site internet site is a good looking piece of making. There are only a couple of authors that learn about producing together with you would be the just one amid them. I also compose blog sites on many precise niches as well as make an effort to turn out to be a fantastic writer such as you. Below is my weblog web-site with regards to Doctor On-call. You could inspect it together with discuss it to guidebook me In addition. I take pleasure in if the thing is my blog, review and give comments! Numerous many thanks.

You're so exciting! I tend not to suppose I’ve genuinely study nearly anything like this before. So fantastic to find an individual which has a few primary thoughts on this issue. Seriously.. many thanks for starting this up. This web site is one thing that’s wanted on the internet, an individual with a little originality!

A motivating discussion is certainly well worth remark. I believe that you need to publish extra on this subject matter, it might not be a taboo matter but frequently people today don’t discuss these subjects. To the following! Quite a few many thanks!!

An outstanding share! I have just forwarded this onto a coworker who had been conducting a little bit research on this. And he in fact acquired me meal resulting from The reality that I stumbled on it for him… lol. So let me reword this…. Thank YOU with the meal!! But yeah, many thanks for paying out some time to mention this issue listed here on your website.

I truly adore your weblog.. Excellent shades & topic. Did you produce this Site yourself? You should reply back again as I’m seeking to make my pretty individual internet site and would like to learn in which you acquired this from or just what the theme is termed. Thanks!

I Unquestionably like your web site.. Terrific hues & concept. Did you establish this Web page yourself? Remember to reply back again as I’m wishing to build my incredibly possess blog site and would appreciate to learn in which you received this from or exactly what the theme is named. Thanks! loqua.munhea.se/map6.php ombre kort h??r

My brother encouraged I might such as this Internet site. He was totally right. This article really made my working day. You cann’t think about basically just how much time I had expended for this data! Thanks!

Howdy just preferred to give you A fast heads up. The text with your content appear to be operating from the monitor in Opera. I’m unsure if this is the format challenge or one thing to do with browser compatibility but I thought I’d post to let you already know. The layout seem great while! Hope you have the condition resolved shortly. Many thanks

Add new comment

The content of this field is kept private and will not be shown publicly.

Plain text

  • No HTML tags allowed.
  • Lines and paragraphs break automatically.
  • Web page addresses and email addresses turn into links automatically.