


ThingSpeak is a great IoT platform to display our sensor data over the internet at any time and from any place. The reason for being superior to other IoT platforms is that Thingspeak shows real-time data without lagging. In this project, we are going to make a Heart Rate Monitoring System using Arduino, Pulse sensor, and ESP8266 WiFi module. The pulse sensor will detect the heart rate, and Arduino will send it to Thingspeak using the ESP8266 WiFi module.
Do check our amazing projects using other IoT platforms like IFTTT, Artik Cloud, Firebase, Particle Cloud, Amazon AWS.
Components Required
- Pulse sensor
- ESP8266 Wi-Fi module
- Arduino Uno
- Bread Board
- 220-ohm resistors
- LED
- Connecting wires
Circuit Diagram
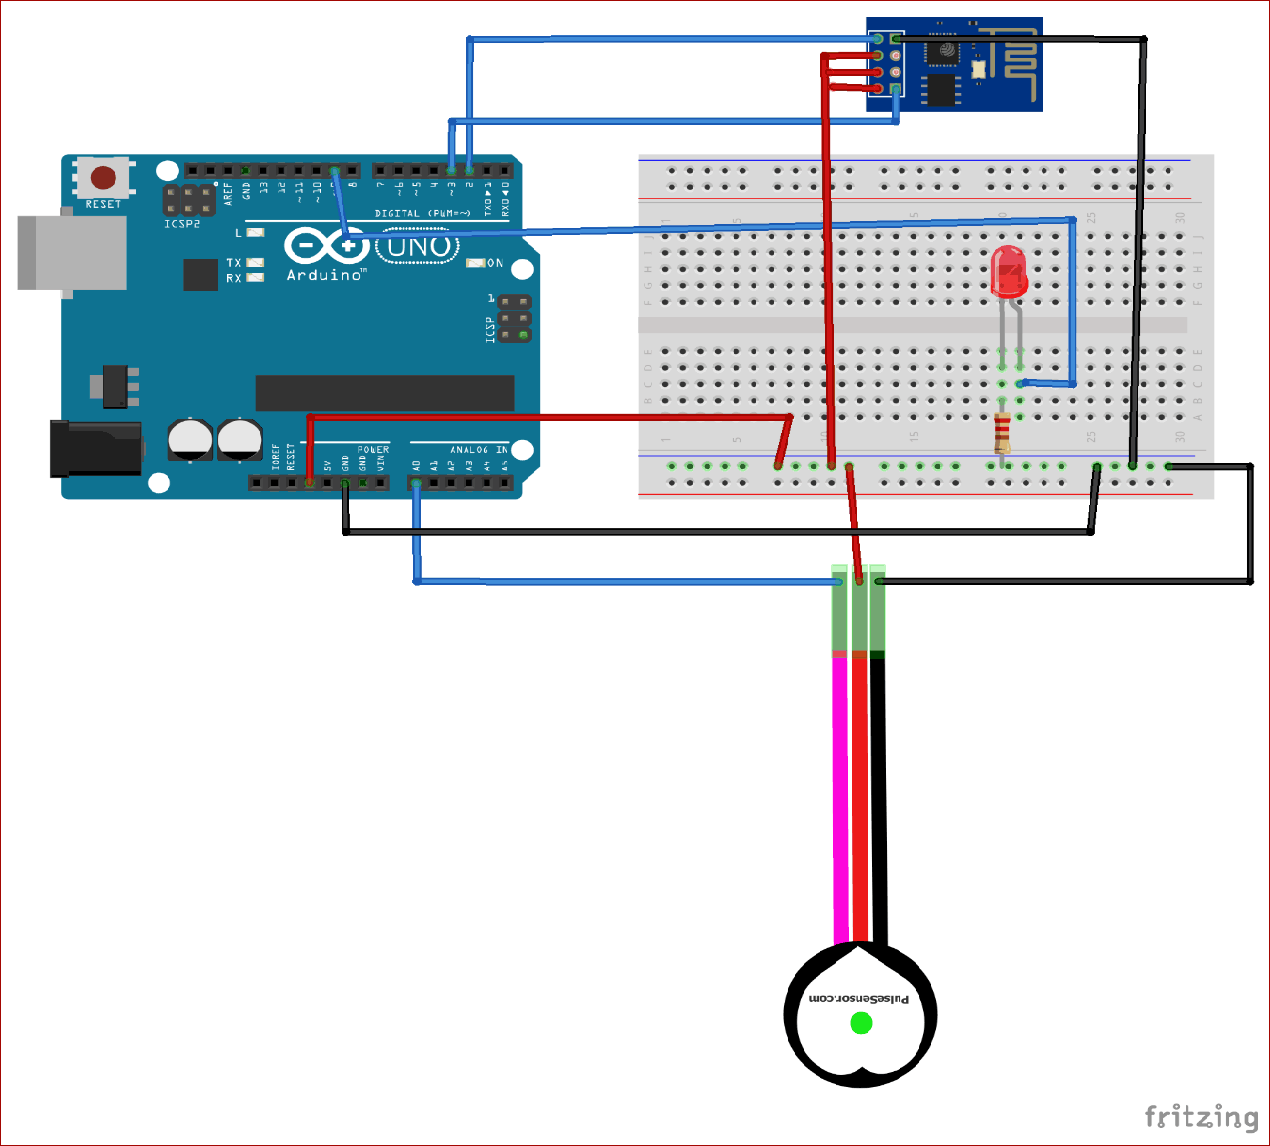
Connections are given in the below table:
|
S.NO. |
Pin Name |
Arduino Pin |
|
1 |
ESP8266 VCC |
3.3V |
|
2 |
ESP8266 RST |
3.3V |
|
3 |
ESP8266 CH-PD |
3.3V |
|
4 |
ESP8266 RX |
TX |
|
5 |
ESP8266 TX |
RX |
|
6 |
ESP8266 GND |
GND |
|
7 |
Pulse Sensor VCC |
3.3V |
|
8 |
Pulser Sensor Signal |
A0 |
|
9 |
Pulse Sensor GND |
GND |
|
10 |
Led +ve Pin |
9 |
|
11 |
Led -ve Pin |
GND |
ThingSpeak Setup for IoT based Heart Rate Monitor
Step 1: ThingSpeak Setup for Heart Rate Monitoring
For creating your channel on ThingSpeak, you first need to sign up on ThingSpeak. In case if you already have an account on ThingSpeak, just sign in using your id and password.
For creating your account go to www.thinspeak.com

Click on signup if you don’t have an account and if you already have an account, click on sign in.
After clicking on signup, fill in your details.

After this verify your E-mail id and click on continue.
Step 2: Create a Channel for Your Data
Once you Sign in after your account verification, Create a new channel by clicking the “New Channel” button.
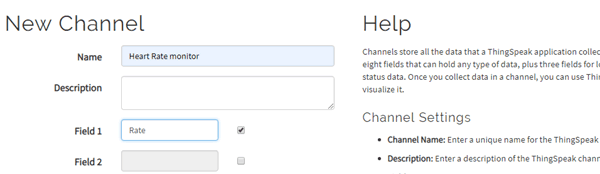
After clicking on “New Channel,” enter the Name and Description of the data you want to upload on this channel. For example, I am sending my Heart Rate data, so I named it Heart Rate Monitor.
Enter the name of your data ‘Rate’ in Field1. If you want to use more Fields, you can check the box next to the Field option and enter the name and description of your data.
After this, click on the save channel button to save your details.
Step 3: API Key
To send data to Thingspeak, we need a unique API key, which we will use later in our code to upload our sensor data to Thingspeak Website.
Click on the “API Keys” button to get your unique API key for uploading your sensor data.
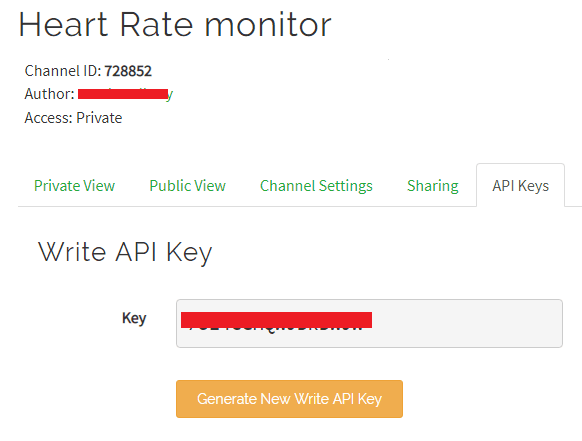
Now copy your “Write API Key.” We will use this API key in our code.
Programming Code Explanation
The complete code for IoT based Heart Rate Monitor is given at the end. First of all, install all the required libraries and then enter your Wi-Fi name, password, and thingspeak.com api.
#include <SoftwareSerial.h>
#include <stdlib.h>
#define DEBUG true
#define SSID "WiFi Name"     // Enter Your WiFi Name Here
#define PASS "WiFi Password"       // Enter Your WiFi Password Here
#define IP "api.thingspeak.com"// thingspeak.com api

Define the pins where you connected the esp8266 Tx and Rx and enter your Thingspeak API key.
SoftwareSerial ser(2,3);
String msg = "GET /update?key=Your Api Key"; //Enter your API key
Define all the integer and volatile variables that will be used to calculate the BPM (Beats Per Minute).
//Variables
int error;
int sensorPin = 0;         // Connect Pulse Sensor Signal Pin to Analog Pin A0
int ledpin = 9;        //  Connect Led Positive Pin to Arduino Pin 9
volatile int BPM;           // int that holds raw Analog in 0. updated every 2mS
volatile int Signal;              // holds the incoming raw data
volatile int IBI = 600;     // int that holds the time interval between beats
volatile boolean Pulse = false;     // "True" when heartbeat is detected. "False" when not a "live beat".
volatile boolean QS = false;        // becomes true when Arduino finds a beat.
…………………………………
…………………………………
The void updatebeat() function will send data to the serial monitor and also publish it to the thingspeak channel.
void updatebeat() {
  String cmd = "AT+CIPSTART=\"TCP\",\"";
  cmd += IP;
  cmd += "\",80";
  Serial.println(cmd);
  ser.println(cmd);
  delay(2000);
  if(ser.find("Error")) {
    return;
  }
  cmd = msg ;
  cmd += "&field1=";
  cmd += BPM;
  cmd += "\r\n";
  Serial.print("AT+CIPSEND=");
  ser.print("AT+CIPSEND=");
  Serial.println(cmd.length());
  ser.println(cmd.length());
  if(ser.find(">")) {
    Serial.print(cmd);
    ser.print(cmd);
  }
…………………
…………………
The below code is used to convert the pulse sensor data into BPM (Beats Per Minute).
ISR (TIMER2_COMPA_vect){                  // triggered when Timer2 counts to 124
  cli();                                 // disable interrupts while we do this
  Signal = analogRead(sensorPin);              // read the Pulse Sensor
  sampleCounter += 2;                         // keep track of the time in mS
  int N = sampleCounter - lastBeatTime;       // monitor the time since the last beat to avoid noise
    //  find the peak and trough of the pulse wave

  if(Signal < thresh && N > (IBI/5)*3){      // avoid dichrotic noise by waiting 3/5 of last IBI
    if (Signal < T){                         // T is the trough
      T = Signal;                            // keep track of lowest point in pulse wave
    }
  }
  if(Signal > thresh && Signal > P){        // thresh condition helps avoid noise
    P = Signal;                             // P is the peak
  }                                         // keep track of highest point in pulse wave
   if (N > 250){                                   // avoid high frequency noise
    if ( (Signal > thresh) && (Pulse == false) && (N > (IBI/5)*3) ){
      Pulse = true;                               // set the Pulse flag when there is a pulse
      digitalWrite(ledpin,HIGH);                // turn on pin 13 LED
      IBI = sampleCounter - lastBeatTime;         // time between beats in mS
      lastBeatTime = sampleCounter;               // keep track of time for next pulse
      if(secondBeat){                        // if this is the second beat
       secondBeat = false;                  // clear secondBeat flag
        for(int i=0; i<=9; i++){             // seed the running total to get a realistic BPM at startup
          rate[i] = IBI;
        }
      }
………………………………….
………………………………….
Copy and paste the above code into Arduino IDE and upload it into Arduino. After successful upload, the serial monitor will look like this:
After this, navigate to the Thingspeak channel.
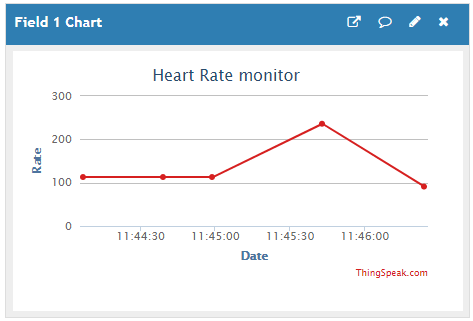
Your BPM (Beats Per Minute) is uploaded on the thingspeak channel. Hence, we have successfully monitored BPM using Arduino and ESP8266. Check our more amazing projects using ThingSpeak:
- IoT Based Temperature and Humidity Monitoring over ThingSpeak using Arduino UNO and ESP8266
- IoT based Temperature and Humidity Monitoring using ThingSpeak and ESP8266
- ThingSpeak and ESP32: How to send Data to Cloud using ESP32
- Raspberry Pi and LM35 based IoT Temperature Monitoring System using Thingspeak
- How to Send Data to ThingSpeak Cloud using Raspberry Pi
#include <SoftwareSerial.h>
#include <stdlib.h>
#define DEBUG true
SoftwareSerial ser(2,13);
#define SSID "WiFi Name" // Enter Your WiFi Name Here
#define PASS "WiFi Password" // Enter Your WiFi Password Here
#define IP "api.thingspeak.com"// thingspeak.com ip
String msg = "GET /update?key=Your Api Key"; //Enter your API key
//Variables
int error;
int sensorPin = 0; // Connect Pulse Sensor Signal Pin to Analog Pin A0
int ledpin = 9; // Connect Led Positive Pin to Arduino Pin 9
volatile int BPM; // int that holds raw Analog in 0. updated every 2mS
volatile int Signal; // holds the incoming raw data
volatile int IBI = 600; // int that holds the time interval between beats
volatile boolean Pulse = false; // "True" when heartbeat is detected. "False" when not a "live beat".
volatile boolean QS = false; // becomes true when Arduino finds a beat.
static boolean serialVisual = true; // Set to 'false' by Default. Re-set to 'true' to see Arduino Serial Monitor ASCII Visual Pulse
volatile int rate[10]; // array to hold last ten IBI values
volatile unsigned long sampleCounter = 0; // used to determine pulse timing
volatile unsigned long lastBeatTime = 0; // used to find IBI
volatile int P =512; // used to find peak in pulse wave, seeded
volatile int T = 512; // used to find trough in pulse wave, seeded
volatile int thresh = 525; // used to find instant moment of heart beat, seeded
volatile int amp = 100; // used to hold amplitude of pulse waveform, seeded
volatile boolean firstBeat = true; // used to seed rate array so we startup with reasonable BPM
volatile boolean secondBeat = false; // used to seed rate array so we startup with reasonable BPM
void setup() {
Serial.begin(115200); //or use default 115200.
ser.begin(115200);
Serial.println("AT");
ser.println("AT");
delay(3000);
if(ser.find("OK")) {
connectWiFi();
}
interruptSetup();
}
void loop() {
start: //label
error=0;
updatebeat();
//Resend if transmission is not completed
if (error==1) {
goto start;
}
delay(1000);
}
void updatebeat() {
String cmd = "AT+CIPSTART=\"TCP\",\"";
cmd += IP;
cmd += "\",80";
Serial.println(cmd);
ser.println(cmd);
delay(2000);
if(ser.find("Error")) {
return;
}
cmd = msg ;
cmd += "&field1=";
cmd += BPM;
cmd += "\r\n";
Serial.print("AT+CIPSEND=");
ser.print("AT+CIPSEND=");
Serial.println(cmd.length());
ser.println(cmd.length());
if(ser.find(">")) {
Serial.print(cmd);
ser.print(cmd);
}
else{
Serial.println("AT+CIPCLOSE");
ser.println("AT+CIPCLOSE");
//Resend...
error=1;
}
}
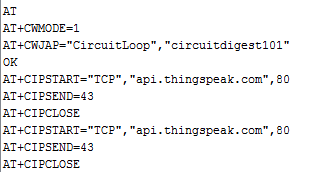
boolean connectWiFi() {
Serial.println("AT+CWMODE=1");
ser.println("AT+CWMODE=1");
delay(2000);
String cmd="AT+CWJAP=\"";
cmd+=SSID;
cmd+="\",\"";
cmd+=PASS;
cmd+="\"";
Serial.println(cmd);
ser.println(cmd);
delay(5000);
if(ser.find("OK")) {
Serial.println("OK");
return true;
}else {
return false;
}
}
void interruptSetup() {
// MAKE SURE GLOBAL INTERRUPTS ARE ENABLED
}
ISR (TIMER2_COMPA_vect){ // triggered when Timer2 counts to 124
cli(); // disable interrupts while we do this
Signal = analogRead(sensorPin); // read the Pulse Sensor
sampleCounter += 2; // keep track of the time in mS
int N = sampleCounter - lastBeatTime; // monitor the time since the last beat to avoid noise
// find the peak and trough of the pulse wave
if(Signal < thresh && N > (IBI/5)*3){ // avoid dichrotic noise by waiting 3/5 of last IBI
if (Signal < T){ // T is the trough
T = Signal; // keep track of lowest point in pulse wave
}
}
if(Signal > thresh && Signal > P){ // thresh condition helps avoid noise
P = Signal; // P is the peak
} // keep track of highest point in pulse wave
if (N > 250){ // avoid high frequency noise
if ( (Signal > thresh) && (Pulse == false) && (N > (IBI/5)*3) ){
Pulse = true; // set the Pulse flag when there is a pulse
digitalWrite(ledpin,HIGH); // turn on pin 13 LED
IBI = sampleCounter - lastBeatTime; // time between beats in mS
lastBeatTime = sampleCounter; // keep track of time for next pulse
if(secondBeat){ // if this is the second beat
secondBeat = false; // clear secondBeat flag
for(int i=0; i<=9; i++){ // seed the running total to get a realistic BPM at startup
rate[i] = IBI;
}
}
if(firstBeat){ // if it's the first time beat is found
firstBeat = false; // clear firstBeat flag
secondBeat = true; // set the second beat flag
sei(); // enable interrupts again
return; // IBI value is unreliable so discard it
}
word runningTotal = 0; // clear the runningTotal variable
for(int i=0; i<=8; i++){ // shift data in the rate array
rate[i] = rate[i+1]; // and drop the oldest IBI value
runningTotal += rate[i]; // add up the 9 oldest IBI values
}
rate[9] = IBI; // add the latest IBI to the rate array
runningTotal += rate[9]; // add the latest IBI to runningTotal
runningTotal /= 10; // average the last 10 IBI values
BPM = 60000/runningTotal; // how many beats can fit into a minute? that's BPM!
QS = true; // set Quantified Self flag
}
}
if (Signal < thresh && Pulse == true){ // when the values are going down, the beat is over
digitalWrite(ledpin,LOW); // turn off pin 13 LED
Pulse = false; // reset the Pulse flag so we can do it again
amp = P - T; // get amplitude of the pulse wave
thresh = amp/2 + T; // set thresh at 50% of the amplitude
P = thresh; // reset these for next time
T = thresh;
}
if (N > 2500){ // if 2.5 seconds go by without a beat
thresh = 512; // set thresh default
P = 512; // set P default
T = 512; // set T default
lastBeatTime = sampleCounter; // bring the lastBeatTime up to date
firstBeat = true; // set these to avoid noise
secondBeat = false; // when we get the heartbeat back
}
sei();
}


