


Security is major concern nowadays and today we have all types of surveillance and security system available in the market. But they are very expensive and sometimes create problems which we can’t solve. Previously we built a surveillance camera which can stream live video on IoT cloud and today we will build a low cost Raspberry Pi based Smart Wi-Fi doorbell. This system will send the picture of visitor on email when the door bell switch is pressed. A PiCamera is attached with raspberry pi to take the picture, although a USB webcam can also be used if you don’t have PiCamera. This system can be installed at the main door of your home or office and can be monitored from anywhere in the world over internet.
Requirements
- Raspberry Pi with Raspbian OS Installed in it.
- Pi Camera or USB webcam
- Push button
- Jumper wires
Here, we will use SSH to access our Raspberry Pi on the laptop. If you have monitor then it will be very easy to start with but if you don’t have a monitor then setup raspberry pi in headless mode or use VNC server to get Raspberry Pi desktop on Laptop.
Raspberry Pi is very popular for building IoT based projects as it has all the necessary support for Internet of Things. It is a palm size computer having inbuilt Wi-Fi, Bluetooth, USB port, Audio/video port, HDMI port, camera port etc. You can check all the Raspberry Pi based Iot Projects here.
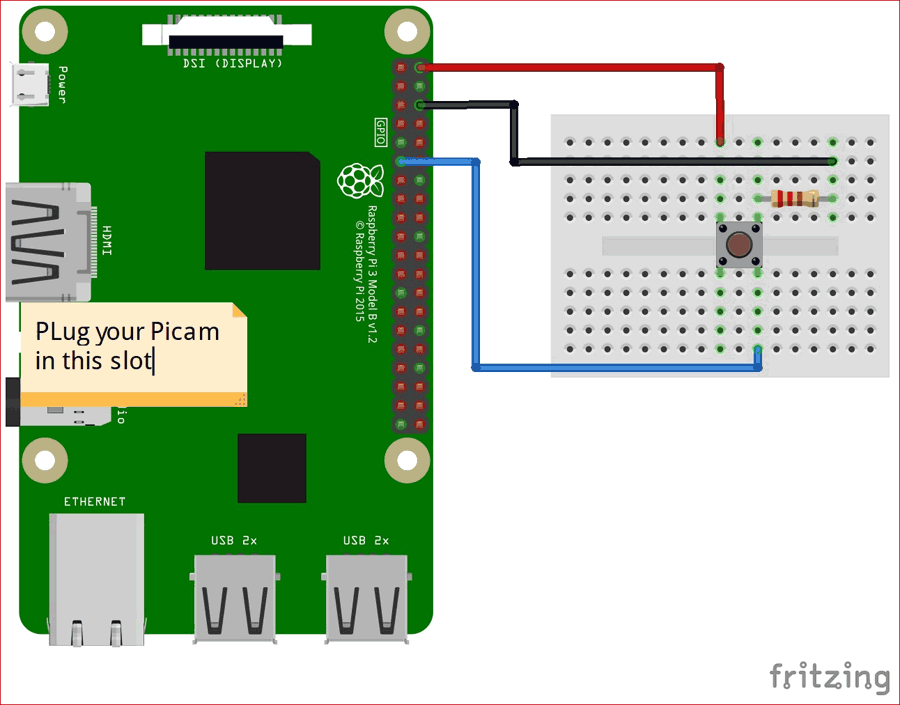
Connection Diagram
Circuit diagram for this Raspberry Pi Smart Doorbell is very simple, just attach a button on some GPIO pin and connect Pi Camera on the camera slot.
Setup Pi Camera or USB webcam with Raspberry Pi
PiCamera:
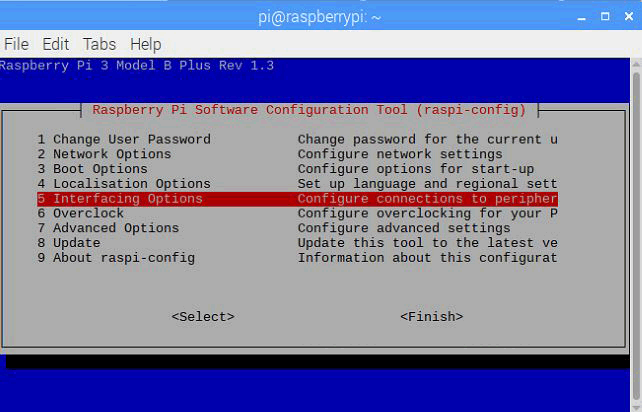
1. If you are using picam then you have to enable camera interfacing from raspi-config. Run the sudo raspi-config and go to Interfacing options.
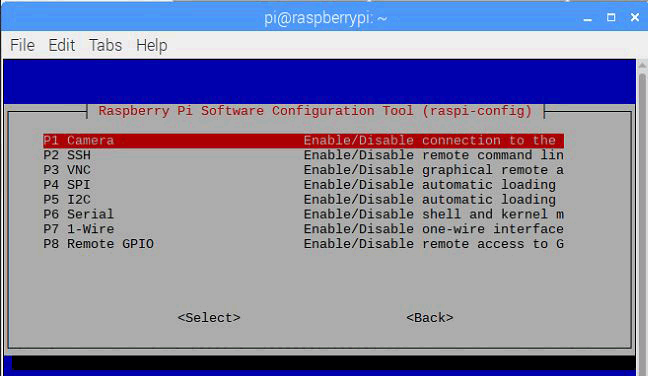
2. Then select the Camera option and Enable it on the next window and restart the Pi.
3. Now, test the camera by capturing a photo using below command.
raspistill -o image.jpg
If you got an image in Pi directory then you are ready to go else check your camera strip and camera module.
USB Camera:
If you are using USB webcam then you have to install some packages to enable the webcam functionalities. Install the package using below command
sudo apt-get install fswebcam
Now, check for the working of the camera by capturing a photo using following command
fswebcam image.jpg
Use above command to replace the picamera functionality in final code.
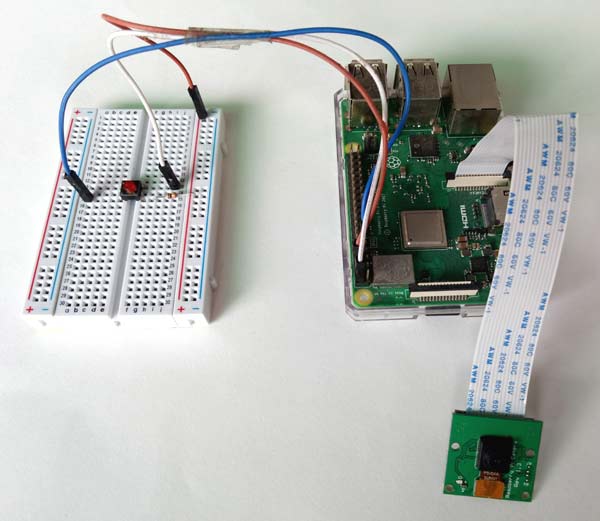
Now, we are ready on hardware side. Its time to install SMTP libraries and setup Google account.
Installing SMTP on Raspberry Pi to send Emails
Simple Message Transfer Protocol (SMTP) is the communication protocol which is used to send e-mails. It is nice and easy solution to send e-mails using command line or python scripts. So we need to install some libraries and packages on Raspberry Pi to send email using SMTP.
Installing SMTP libraries
1. SMTP library packages are already installed in new version of Raspbian but you can install it again to check whether all packages are installed properly. For this first update and upgrade Raspbian OS using below commands.
sudo apt-get update
sudo apt-get upgrade
2. Now, install SMTP library packages using following commands
sudo apt-get install ssmtp
sudo apt-get install mailutils
Modify Security Settings in Google Mail account
Google does not allow to send and receive e-mails which contains Python code. So, we have to update some security settings in Google account. Follow below steps to enable “Allow less secure apps” permission.
1. Login to your Gmail account by entering your login credentials.
2. Click on profile picture and then click on “Google account”.
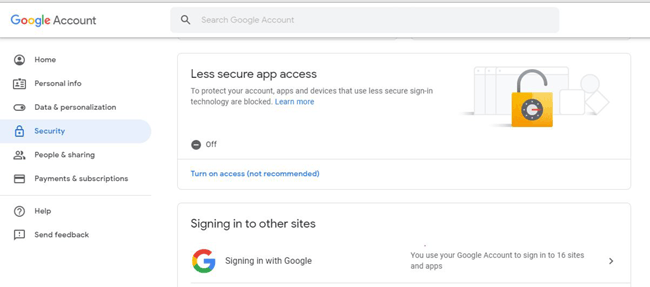
3. Under Security tab you will find Less secure app access. Turn it ON by Clicking on “Allow less secure apps”.

Code and Explanation
Complete Python code and a demo video are given at the end of this tutorial. Here we are explaining the code to understand the working.
Just a quick recall, here we are writing a python script to send mail with the photo of visitor as an attachment whenever the doorbell switch is pressed. The Pi camera will capture the photo and send it to the owner of the house over the e-mail.
1. Open your favourite text editor in Raspberry pi and import all the important libraries for picamera, Rpi GPIOs, SMTP, time.
import os
import picamera
import RPi.GPIO as GPIO
import smtplib
from time import sleep
2. Now, import all the modules required to send e-mail. For writing plain text, including attachment and subject we need a separate module which composes a whole mail.
from email.MIMEMultipart import MIMEMultipart
from email.MIMEText import MIMEText
from email.MIMEBase import MIMEBase
from email import encoders
3. Assign your e-mail id, receiver e-mail id and password in a variable as shown.
sender = '[email protected]'
password = 'gmail password'
receiver = '[email protected]'
4. In order to save the captured photo in a directory and give different names to them assign a folder and a prefix name.
dir = './visitors/'
prefix = 'photo'
5. Set pin mode and pin number to attach a push button which act as a doorbell switch.
GPIO.setwarnings(False)
GPIO.setmode(GPIO.BOARD)
GPIO.setup(15, GPIO.IN)
6. Now, make a function to capture photos. In this function we have to check for the directory if it already exists or not. If not then make the directory.
def capture_img():
if not os.path.exists(dir):
        os.makedirs(dir)
Assign a file name and sort it using glob and find the largest ID of existing images and Start new images after this ID value.
 files = sorted(glob.glob(os.path.join(dir, prefix + '[0-9][0-9][0-9].jpg')))
 count = 0
Grab the count from the last filename.
 if len(files) > 0:
     count = int(files[-1][-7:-4])+1
Now, capture the photo and give it a unique name and save it in the defined folder.
filename = os.path.join(dir, prefix + '%03d.jpg' % count)
with picamera.PiCamera() as camera:
pic = camera.capture(filename)
7. Now, make another function to send mail. In this function we will attach subject, body and attachments and then send all the content to the receiver using SMTP.
def send_mail():
    msg = MIMEMultipart()
    msg['From'] = sender
    msg['To'] = receiver
    msg['Subject'] = New Visitor'
    body = 'Picture is Attached.'
    msg.attach(MIMEText(body, 'plain'))
    attachment = open(filename, 'rb')
..
..
    msg.attach(part)
    server = smtplib.SMTP('smtp.gmail.com', 587)
    server.starttls()
    server.login(sender, password)
    text = msg.as_string()
    server.sendmail(sender, receiver, text)
    server.quit()
Now finally, read the push button value and when its goes high, Raspberry Pi calls the capture_img() function to capture the image of visitor and send a alert email with the picture of visitor as an attachment. Here send_mail() is used inside the capture_img() function for sending the mail.
Testing the PiCamera Doorbell
After wiring the complete code save the file with .py extension and execute this script using below command
python filename.py
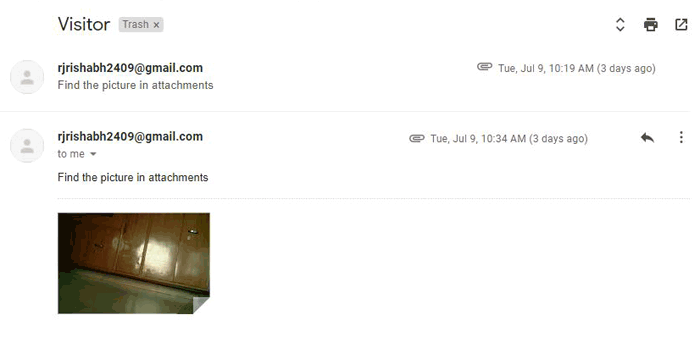
If there is no error in the code, press the push button. After 4-5 seconds you should receive a mail with the photo as attachment.
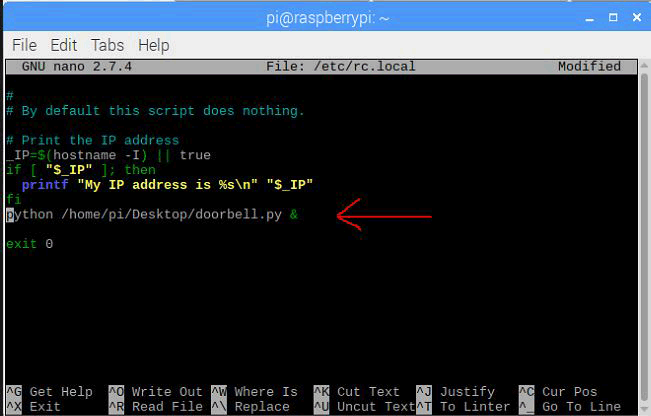
To avoid running the script every time you boot the pi, make the script executable and make it run automatically on every boot. To do this open rc.local file using below command
sudo nano /etc/rc.local
And paste python /home/pi/Desktop/doorbell.py & before ‘exit 0’ as shown in the below snapshot and save the file using ctrl+x and hit enter. Make sure you entered the correct destination of your python script.
Now, restart the Raspberry Pi and press the push button. If everything works fine you should receive an e-mail with photo as an attachment.
import os
import glob
import picamera
import RPi.GPIO as GPIO
import smtplib
from time import sleep
from email.MIMEMultipart import MIMEMultipart
from email.MIMEText import MIMEText
from email.MIMEBase import MIMEBase
from email import encoders
sender = '[email protected]'
password = '********'
receiver = '[email protected]
DIR = './Visitors/'
prefix = 'image'
GPIO.setwarnings(False)
GPIO.setmode(GPIO.BOARD)
GPIO.setup(15, GPIO.IN)
def send_mail(filename):
msg = MIMEMultipart()
msg['From'] = sender
msg['To'] = receiver
msg['Subject'] = 'Visitor'
body = 'Find the picture in attachments'
msg.attach(MIMEText(body, 'plain'))
attachment = open(filename, 'rb')
part = MIMEBase('application', 'octet-stream')
part.set_payload((attachment).read())
encoders.encode_base64(part)
part.add_header('Content-Disposition', 'attachment; filename= %s' % filename)
msg.attach(part)
server = smtplib.SMTP('smtp.gmail.com', 587)
server.starttls()
server.login(sender, password)
text = msg.as_string()
server.sendmail(sender, receiver, text)
server.quit()
def capture_img():
print ‘Capturing’
if not os.path.exists(DIR):
os.makedirs(DIR)
files = sorted(glob.glob(os.path.join(DIR, prefix + '[0-9][0-9][0-9].jpg')))
count = 0
if len(files) > 0:
count = int(files[-1][-7:-4])+1
filename = os.path.join(DIR, prefix + '%03d.jpg' % count)
with picamera.PiCamera() as camera:
pic = camera.capture(filename)
send_mail(filename)
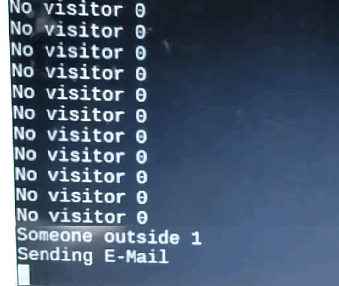
while True:
in = GPIO.input(11)
if in == 0:
print "Waiting", i
sleep(0.4)
elif in == 1:
print "Captured->Sending", i
capture_img()


