


Data is a crucial resource for any kind of analysis and forecasting. It is always needed to create any information or stats. There are a lot of online and offline platforms available to log data and we have used many IoT based platforms and webservers to store and visualize data. Here we use the most popular offline way to store data which is – SD card.
In this project, we will use Arduino Uno to log the temperature and humidity data on the SD card. Here Arduino Uno collects the temperature and humidity values from the DHT11 sensor and stores these values on an SD Card. The data file saved in the SD card can be easily opened as a text file for further analyses.
Components Required
- Arduino Uno
- DHT11 Temperature and Humidity Sensor
- SD Card Module
- Jumper Wires
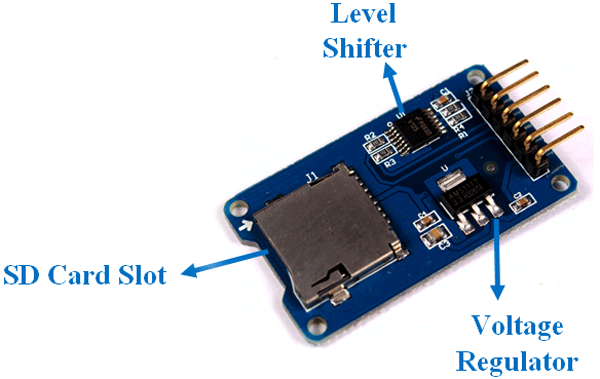
SD Card Module
SD Card Module is a simple board that is used to interface a Micro SD card with a Microcontroller like Arduino. A typical SD Card module consists of two important components: Voltage Regulator IC and a 5V to 3.3V Level Converter IC. The module has six pins; out of the two are for powering the module and four pins are for the SPI communication.
Features
- Support Micro SD Card (<=2G), Micro SDHC card (<=32G)
- The level conversion circuit board that can interface level is 5V or 3.3V
- Power supply is 4.5V ~ 5.5V, 3.3V voltage regulator circuit board
- Communication interface is a standard SPI interface.
Circuit Diagram for Arduino Data Logging into SD Card
Circuit Diagram for Arduino SD card data logging using DHT11 is given below:
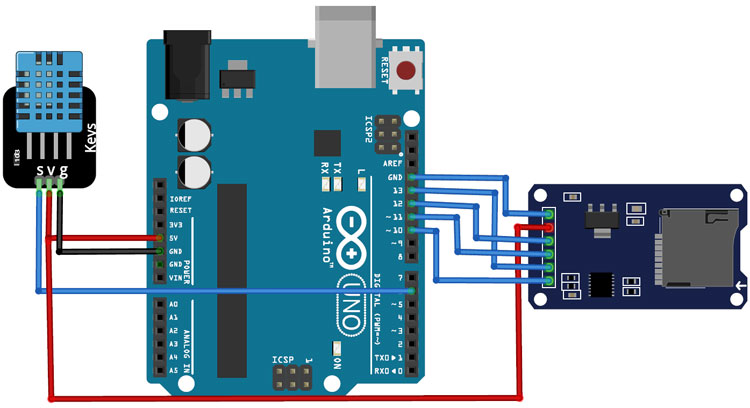
As shown in the circuit diagram, the connections are very simple since all the components are used as modules, we can directly connect them on a breadboard. The SD card module is connected to the Arduino through the SPI communication. The SPI pins on the Arduino are pins 10, 11, 12, and 13. The connections are further classified in the table below:
|
Arduino Pin |
SD Card Module Pin |
|
Vcc |
5V |
|
GND |
GND |
|
CS |
10 |
|
SCK |
13 |
|
MISO |
12 |
|
MOSI |
11 |
|
Arduino Pin |
DHT11 Pin |
|
Vcc |
5V |
|
GND |
GND |
|
Data |
6 |
We previously used the DHT11 sensor to build a weather station using different microcontrollers.
Code Explanation
The complete code for Arduino SD card temperature and humidity data logging is given at the end of the page. Here we are explaining some important functions of the code.
This code uses SPI.h, SD.h, and DHT.h libraries. These libraries can be downloaded from below links:
After downloading the libraries, start the code by including all the required libraries.
#include <SPI.h>
#include <SD.h>
#include "DHT.h"
Then define the type of DHT sensor and the pin where the DHT sensor is connected. If you are using DHT22, then change the DHT type to DHT22. In my case, the DHT sensor is connected to the digital 6 of Arduino.
#define DHTTYPE DHT11 // DHT 11
uint8_t DHTPin = 6;
DHT dht(DHTPin, DHTTYPE);
Then define the variables to store the temperature and humidity data.
float Temperature;
float Humidity;
Inside the void setup() function, initialize the baud rate, DHT sensor using .begin() function
void setup()
{
  Serial.begin(9600);
  pinMode(DHTPin, INPUT);
  dht.begin();
  Initialize_SDcard();
}
Inside the loop() function, call the Read_TempHum() and Write_SDcard() functions to get the temperature and humidity values and then send these values to the SD card.
void loop()
{
  Write_SDcard();
  Read_TempHum();
  delay(5000); //Wait for 5 seconds before writing the next data
}
Read_TempHum() loop is used to read the temperature and humidity values by calling the dht.read function. DHT11 sensor sends the temperature and humidity values as an 8-bit data serially. The dht.read function from the DHT library reads these values by using the software serial function of the Arduino.
void Read_TempHum()
{
  Temperature = dht.readTemperature();
  Humidity = dht.readHumidity();
  Serial.println(Temperature);
  Serial.println(Humidity);
}
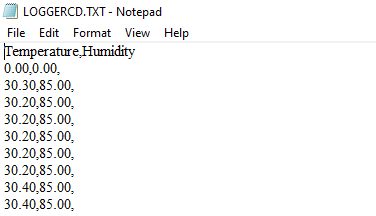
This function will create a text file named “LoggerCD.txt” on the SD card and write the name of values in the first row of the file. The temperature and humidity values are separated by using a “,” as a delimiter.
void Initialize_SDcard()
{
  if (!SD.begin(chipSelect))
  {
    Serial.println("Card failed, or not present");
    return;
   }
  File dataFile = SD.open("LoggerCD.txt", FILE_WRITE);
  if (dataFile)
  {
    dataFile.println("Temperature,Humidity"); //Write the first row of the excel file
    dataFile.close();
   }
}
This function will write the temperature and humidity data to the LoggerCD.txt file on the SD card. Each value is separated by the comma.
void Write_SDcard()
{
  File dataFile = SD.open("LoggerCD.txt", FILE_WRITE);
  if (dataFile)
  {
    dataFile.print(Temperature); //Store date on SD card
    dataFile.print(","); //Move to next column using a ","
    dataFile.print(Humidity); //Store date on SD card
    dataFile.print(","); //Move to next column using a ","
    dataFile.println(); //End of Row move to next row
    dataFile.close(); //Close the file
   }
  else
   Serial.println("SD card writing failed");
}
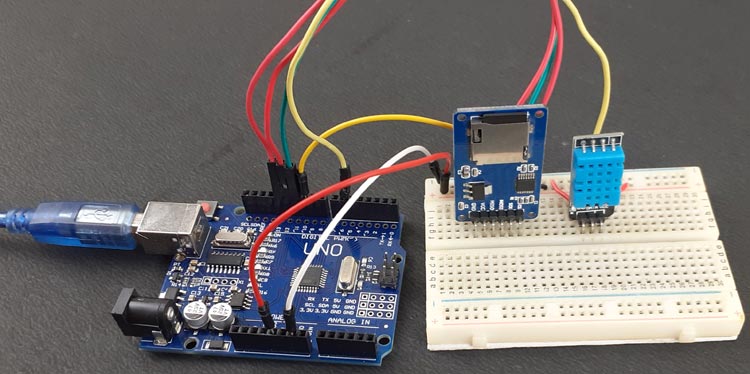
Testing the Arduino SD card Data Logging Project
Once the hardware and the software are ready, connect the Arduino board to your laptop and upload the code. As soon as the program gets uploaded, temperature and humidity values will start to get stored in the SD card in a file named ‘LoggerCD.txt’. To check if this is working, remove the SD card from the module and open it in the phone or laptop and open the ‘LoggerCD.txt’ file. It would look something like this:
This is how data can be logged in the SD card with Arduino. Complete Video and code are given below.
#include <SPI.h> //Library for SPI communication (Pre-Loaded into Arduino)
#include <SD.h> //Library for SD card (Pre-Loaded into Arduino)
#include "DHT.h"
#define DHTTYPE DHT11 // DHT 11
uint8_t DHTPin = 6;
DHT dht(DHTPin, DHTTYPE);
float Temperature;
float Humidity;
const int chipSelect = 10; //SD card CS pin connected to pin 4 of Arduino
void setup()
{
// Setup Serial connection
Serial.begin(9600);
pinMode(DHTPin, INPUT);
dht.begin();
Initialize_SDcard();
}
void loop()
{
Write_SDcard();
Read_TempHum();
delay(5000); //Wait for 5 seconds before writing the next data
}
void Read_TempHum()
{
Temperature = dht.readTemperature();
Humidity = dht.readHumidity();
Serial.print("Temperature = ");
Serial.println(Temperature);
Serial.print("Humidity = ");
Serial.println(Humidity);
// delay(1000);
}
void Initialize_SDcard()
{
// see if the card is present and can be initialized:
if (!SD.begin(chipSelect))
{
Serial.println("Card failed, or not present");
// don't do anything more:
return;
}
// open the file. note that only one file can be open at a time,
// so you have to close this one before opening another.
File dataFile = SD.open("LoggerCD.txt", FILE_WRITE);
// if the file is available, write to it:
if (dataFile)
{
dataFile.println("Temperature,Humidity"); //Write the first row of the excel file
dataFile.close();
}
}
void Write_SDcard()
{
// open the file. note that only one file can be open at a time,
// so you have to close this one before opening another.
File dataFile = SD.open("LoggerCD.txt", FILE_WRITE);
// if the file is available, write to it:
if (dataFile)
{
dataFile.print(Temperature); //Store date on SD card
dataFile.print(","); //Move to next column using a ","
dataFile.print(Humidity); //Store date on SD card
dataFile.print(","); //Move to next column using a ","
dataFile.println(); //End of Row move to next row
dataFile.close(); //Close the file
}
else
Serial.println("SD card writing failed");
}


