


HC-SR501 Motion Sensor usually known as the PIR sensor is used in many kinds of Security Alarm Systems and Motion Detector systems. Instead of emitting infrared signals, it absorbs IR signals and that’s why it is called PIR (Passive Infrared) Sensor. Every object emits heat in the form of IR rays, so whenever the PIR sensor detects any change in heat, its output pin becomes HIGH. The key components of the PIR sensor are the Pyroelectric sensor and Motion Detector IC BISS0001. BISS0001 IC takes the data from the sensor and measures the output pin HIGH or LOW accordingly.
Previously we used the PIR Sensor with Raspberry Pi to build a security system. Today we will use a PIR sensor with NodeMCU to build an IoT Motion Detector System which not only sends an email whenever it detects some motion but also shows it on a webpage with time and date.
Components Required
- NodeMCU ESP8266
- Motion Sensor HC-SR501 (PIR Sensor)
- Buzzer
- Jumper Wires
Circuit Diagram
The circuit diagram of the IoT Motion Sensor Circuit is shown below:
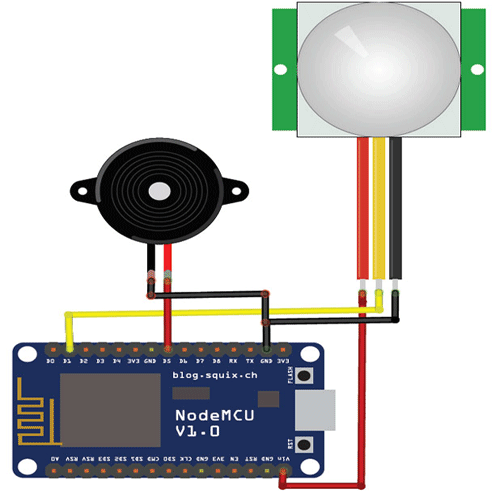
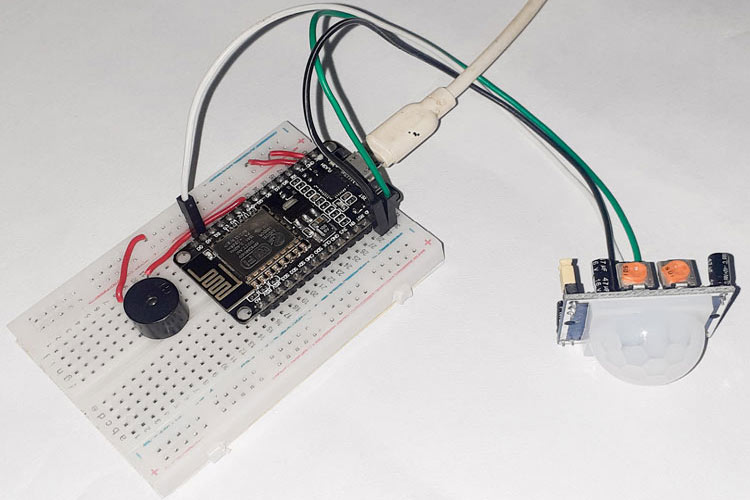
The circuit is very simple as we are only connecting the PIR sensor and buzzer with NodeMCU. VCC and GND pins of PIR Sensor is connected to VIN and GND of NodeMCU, while the Data pin is connected to D1 (GPIO 5) pin of NodeMCU. The positive and GND pins of the buzzer are connected to D5 (GPIO 14) and GND of NodeMCU respectively.
IFTTT Setup for IoT Motion Detector
IFTTT (If This Then That) is a web-based service by which we can create chains of conditional statements, called applets. Using these applets, we can send Emails, Twitter, Facebook notifications, SMS, etc. We have used IFTTT in many IoT based projects, you can find all of them by following the link.
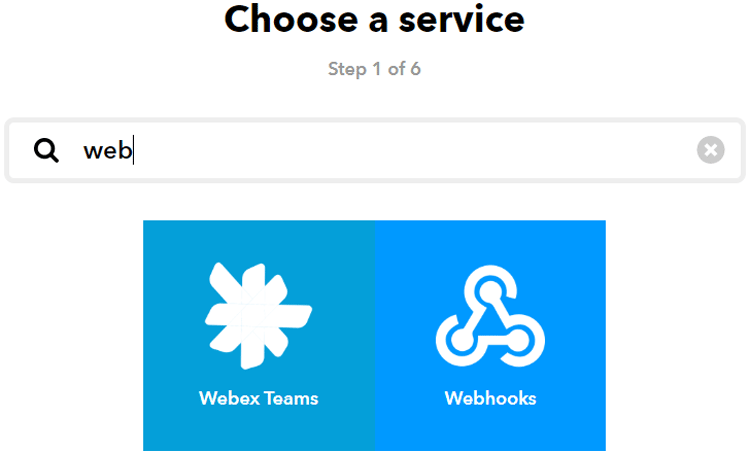
To use the IFTTT, sign in to your IFTTT account if you already have one or create one.
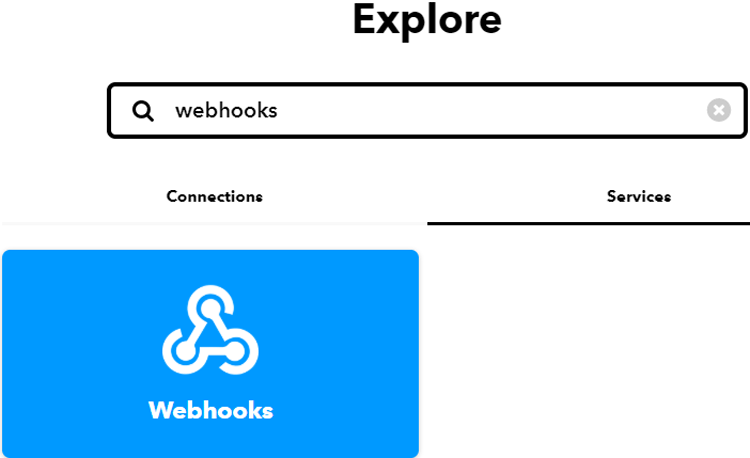
Now search for ‘Webhooks’ and click on the Webhooks in Services section.
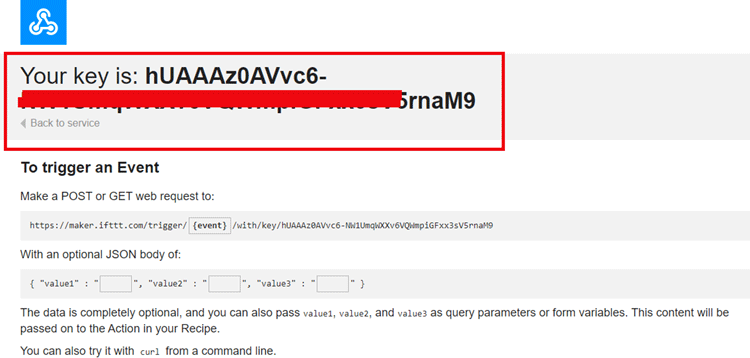
Now in the Webhooks window, click on ‘Documentation’ in the upper right corner to get the private key.
Copy this key. It will be used in the program.
After getting the private key, now create an applet using Webhooks and Email services. To create an applet, click on your profile and then click on ‘Create.’
Now in the next window, click on the ‘This’ icon.
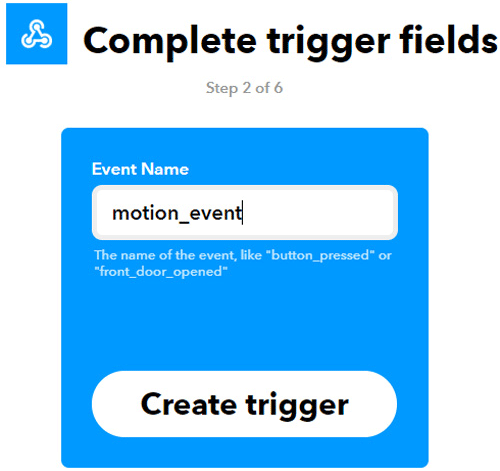
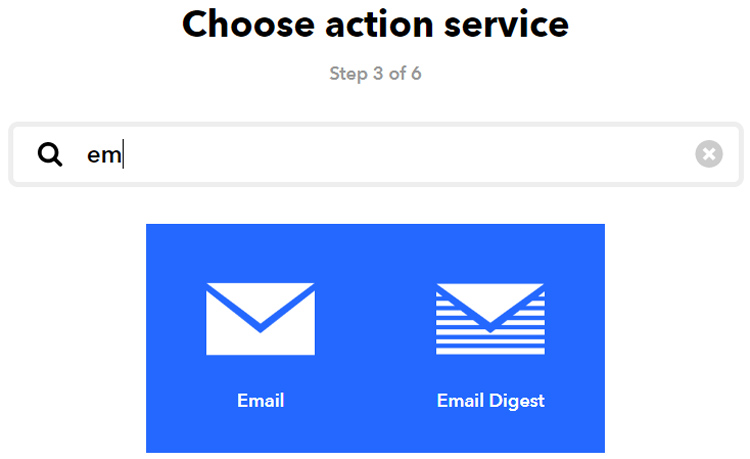
Now search for Webhooks in the search section and click on ‘Webhooks.’
Now choose ‘Receive a Web Request’ trigger and in the next window, enter the event name as motion_event and then click on create trigger.
After this, click on ‘Then That’ and then click on Email.
Now in email, click on ‘send me an email’ and enter the email subject and body and then click on create action.
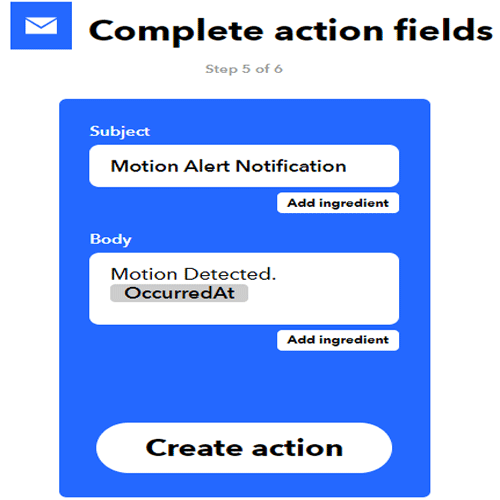
In the last step, click on ‘Finish’ to complete the Applet setup.
Programming NodeMCU for IoT Motion Sensor
Complete code for the Motion Detector system can be found at the end of the page. The code can be divided into two parts. The first part is used to read the motion sensor data and performing other tasks like sending an email, and the second part is the HTML code that is used to create web server and visualizing the data. Here we are explaining the complete code line by line.
So, start your code by including all the required libraries. The ESP8266 libraries are pre-installed in Arduino IDE.
#include <ESP8266WiFi.h>
#include <WiFiClient.h>
#include <ESP8266WebServer.h>
After that, make instances for Wi-Fi name, Wi-Fi password, IFTTT host name, and private key. Enter the IFTTT private key that you copied from the IFTTT.
const char* ssid = "Wi-Fi Name";
const char* password = "Password";
const char *host = "maker.ifttt.com";
const char *privateKey = "Private key";
After that, define the pins where you connected the PIR sensor and Buzzer.
int buzzer = 14;
int PIRsensor = 5;
The handleRoot function is executed when we open the Webpage in our browser using the NodeMCU IP address.
void handleRoot()
{
String s = MAIN_page;
server.send(200, "text/html", s);
}
The next function that is readData() is used to read the data from the PIR sensor and send it to the Webpage. In this loop, whenever the PIR sensor goes high, it stores the message in a string and sends this to the Webpage whenever requested.
int state = digitalRead(PIRsensor);
    delay(500);
  if(state == HIGH){
     Message = "Motion Deteced";
     String data = "{\"Activity\":\""+ String(Message) +"\"}";
     server.send(200, "text/plane", data);
     send_event("motion_event");
     digitalWrite (buzzer, HIGH);
     delay(1000);
     digitalWrite (buzzer, LOW);
Inside the void setup() function, we initialized the baud rate and webpage using the server.begin() function and then connect the module with the Wi-Fi using the Wi-Fi name and password. Also, define the PIR sensor pin as input and Buzzer pin as an output.
Serial.begin(115200);
WiFi.begin(ssid, password);
server.begin();
server.on("/", handleRoot);
server.on("/readData", readData);
pinMode(PIRsensor, INPUT);
pinMode(buzzer, OUTPUT);
The void loop() function continuously listen for HTTP requests from clients.
void loop
{
server.handleClient();
}
HTML Code Explanation
As mentioned above, the HTML code is used to create a webpage to show the time and date of Motion detection. The important parts of the code are explained below.
The <!DOCTYPE html> tag is used to tell the web browser that which version of html we are using to write the html code. This tag is written at the top. Everything in this code can be written after that.
<!doctype html>
The code written between the <html></html> tags will be read by the browser. The <head></head> tag is used to define the title, header line and style of the web page. The data written in the <title></title> is the name of the tab in the browser. The <style></style> tag is used to style the table and the header lines.
<html>
<head>
<title>Data Logger</title>
<h1 style="text-align:center; color:red;">Iot Design Pro</h1>
<style>
  canvas{
    -moz-user-select: none;
……………………..
……………………..
……………………..
</style>
</head>
The <script></script> tag is used to include the jQuery. The jQuery is the JavaScript library. The getData() function inside the <script> tag is used to get the data from NodeMCU and update the data table.
function getData()
{
…………..
…………...
The XMLHttpRequest object is used to request data from the webserver. All browsers have a built-in XMLHttpRequest object to request data from a server. Using the XMLHttpRequest, we can update a web page without reloading the page. Here we are using this object to get the Date and Activity data from the NodeMCU and update the data table without refreshing the web page.
var xhttp = new XMLHttpRequest();
xhttp.onreadystatechange = function() {
if (this.readyState == 4 && this.status == 200) {
var date = new Date();
var txt = this.responseText;
var obj = JSON.parse(txt);
Avalues.push(obj.Activity);
dateStamp.push(date);
……………………….
…………….................
……………………….
The open() and send() methods of the XMLHttpRequest object are used to send a request to a server. The syntax for xhttp.open() is given below:
xhttp.open(method, url, async)
Where:
method is the type of request (GET or POST)
URL is the server location
async is used to define asynchronous or synchronous, where true is asynchronous and false is synchronous.
xhttp.open("GET", "readData", true);
xhttp.send();
Testing the Setup
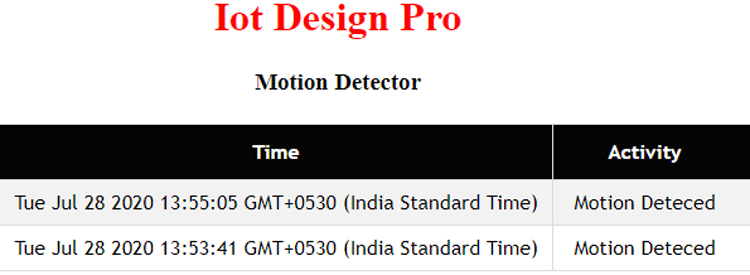
Once your hardware and code are ready, connect the NodeMCU to your laptop and upload the code using Arduino IDE. After uploading the program in NodeMCU, open serial monitor with 115200 baud rate and get the IP address of NodeMCU. Open it in the web browser, and you will see all the data with time and date when motion is recorded.
A working video and complete code for this Simple IoT Motion Detector is given below.
#include <ESP8266WiFi.h>
#include <WiFiClient.h>
#include <ESP8266WebServer.h>
const char* ssid = "Wi-Fi Name";
const char* password = "Password";
const char *host = "maker.ifttt.com";
const char *privateKey = "Private Key";
ESP8266WebServer server(80); //Server on port 80
void send_event(const char *event);
int buzzer = 14; //Buzzer alarm connected to GPIO-14 or D5 of nodemcu
int PIRsensor = 5; //PIR sensor output connected to GPIO-5 or D1 of nodemcu
String Message;
const char MAIN_page[] PROGMEM = R"=====(
<!doctype html>
<html>
<head>
<title>Data Logger</title>
<h1 style="text-align:center; color:red;">Iot Design Pro</h1>
<h3 style="text-align:center;">Motion Detector</h3>
<style>
canvas{
-moz-user-select: none;
-webkit-user-select: none;
-ms-user-select: none;
}
/* Data Table Styling*/
#dataTable {
font-family: "Trebuchet MS", Arial, Helvetica, sans-serif;
border-collapse: collapse;
width: 100%;
text-align: center;
}
#dataTable td, #dataTable th {
border: 1px solid #ddd;
padding: 8px;
}
#dataTable tr:nth-child(even){background-color: #f2f2f2;}
#dataTable tr:hover {background-color: #ddd;}
#dataTable th {
padding-top: 12px;
padding-bottom: 12px;
text-align: center;
background-color: #050505;
color: white;
}
</style>
</head>
<body>
<div>
<table id="dataTable">
<tr><th>Time</th><th>Activity</th></tr>
</table>
</div>
<br>
<br>
<script>
var Avalues = [];
//var timeStamp = [];
var dateStamp = [];
setInterval(function() {
// Call a function repetatively with 5 Second interval
getData();
}, 3000); //5000mSeconds update rate
function getData() {
var xhttp = new XMLHttpRequest();
xhttp.onreadystatechange = function() {
if (this.readyState == 4 && this.status == 200) {
//Push the data in array
// var time = new Date().toLocaleTimeString();
var date = new Date();
var txt = this.responseText;
var obj = JSON.parse(txt);
Avalues.push(obj.Activity);
// timeStamp.push(time);
dateStamp.push(date);
//Update Data Table
var table = document.getElementById("dataTable");
var row = table.insertRow(1); //Add after headings
var cell1 = row.insertCell(0);
var cell2 = row.insertCell(1);
cell1.innerHTML = date;
//cell2.innerHTML = time;
cell2.innerHTML = obj.Activity;
}
};
xhttp.open("GET", "readData", true); //Handle readData server on ESP8266
xhttp.send();
}
</script>
</body>
</html>
)=====";
void handleRoot() {
String s = MAIN_page; //Read HTML contents
server.send(200, "text/html", s); //Send web page
}
void readData() {
int state = digitalRead(PIRsensor); //Continuously check the state of PIR sensor
delay(500); //Check state of PIR after every half second
Serial.print(state);
if(state == HIGH){
digitalWrite (buzzer, HIGH); //If intrusion detected ring the buzzer
delay(1000);
digitalWrite (buzzer, LOW);
Message = "Motion Deteced";
String data = "{\"Activity\":\""+ String(Message) +"\"}";
server.send(200, "text/plane", data); //Send ADC value, temperature and humidity JSON to client ajax request
send_event("motion_event");
Serial.println("Motion detected!");
}
}
void setup() {
Serial.begin(9600);
Serial.print("Connecting to Wifi Network");
Serial.println(ssid);
WiFi.begin(ssid, password);
while (WiFi.status() != WL_CONNECTED) {
delay(500);
Serial.print(".");
}
Serial.println("");
Serial.println("Successfully connected to WiFi.");
Serial.println("IP address is : ");
Serial.println(WiFi.localIP());
server.on("/", handleRoot); //Which routine to handle at root location. This is display page
server.on("/readData", readData); //This page is called by java Script AJAX
server.begin(); //Start server
Serial.println("HTTP server started");
pinMode(PIRsensor, INPUT); // PIR sensor as input
pinMode(buzzer, OUTPUT); // Buzzer alaram as output
digitalWrite (buzzer, LOW);// Initially buzzer off
}
void loop(){
server.handleClient(); //Handle client requests
}
void send_event(const char *event)
{
Serial.print("Connecting to ");
Serial.println(host);
// Use WiFiClient class to create TCP connections
WiFiClient client;
const int httpPort = 80;
if (!client.connect(host, httpPort)) {
Serial.println("Connection failed");
return;
}
// We now create a URI for the request
String url = "/trigger/";
url += event;
url += "/with/key/";
url += privateKey;
Serial.print("Requesting URL: ");
Serial.println(url);
// This will send the request to the server
client.print(String("GET ") + url + " HTTP/1.1\r\n" +
"Host: " + host + "\r\n" +
"Connection: close\r\n\r\n");
while(client.connected())
{
if(client.available())
{
String line = client.readStringUntil('\r');
Serial.print(line);
} else {
// No data yet, wait a bit
delay(50);
};
}
Serial.println();
Serial.println("closing connection");
client.stop();
}


