


In this project, we are using the DHT11 sensor for sending Temperature and Humidity data to Thingspeak using Arduino and ESP8266. By this method, we can monitor our DHT11 sensor’s temperature and humidity data over the internet using the ThingSpeak IoT server. And we can view the logged data and graph overtime on the Thingspeak website.
Here Arduino Uno reads the current temperature and humidity data from DHT11 and sends it to the ThingSpeak server for live monitoring from anywhere in the world. We previously used ThingSpeak with Raspberry Pi and ESP32 to upload the data on the cloud. ThingSpeak is an open data platform for monitoring your data online where you can set the data as private or public according to your choice. ThingSpeak takes a minimum of 15 seconds to update your readings. It's a great and very easy-to-use platform for building IoT projects.
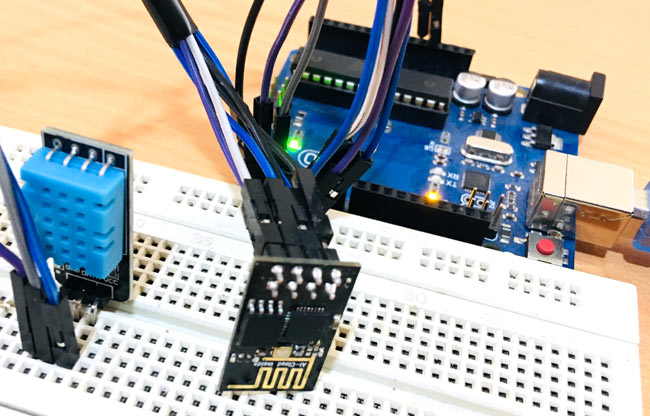
Components Required
- Arduino Uno
- ESP8266 WiFi Module
- DHT11 Sensor
- Breadboard
- Jumper Wires
Temperature and Humidity Monitoring System Circuit Diagram
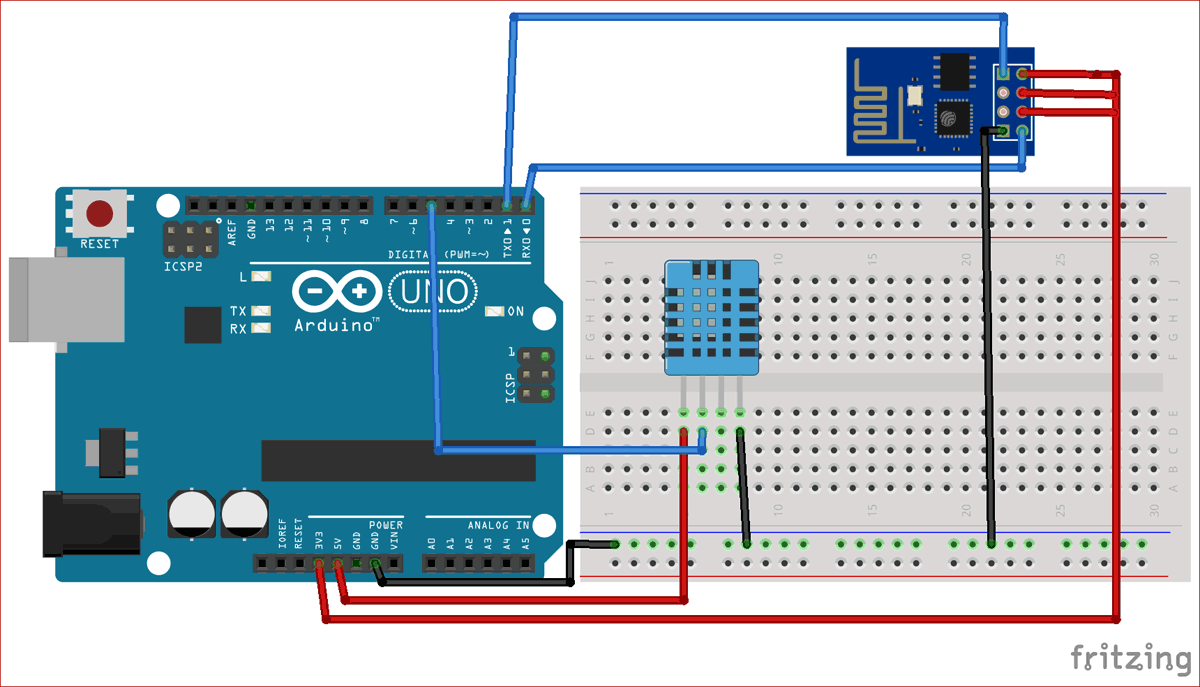
Connections are given in below table:
|
S.NO. |
Pin Name |
Arduino Pin |
|
1 |
ESP8266 VCC |
3.3V |
|
2 |
ESP8266 RST |
3.3V |
|
3 |
ESP8266 CH-PD |
3.3V |
|
4 |
ESP8266 RX |
TX |
|
5 |
ESP8266 TX |
RX |
|
6 |
ESP8266 GND |
GND |
|
7 |
DHT-11 VCC |
5V |
|
8 |
DHT-11 Data |
5 |
|
9 |
DHT-11 GND |
GND |
Step 1: ThingSpeak Setup for Temperature and Humidity Monitoring
For creating your channel on Thingspeak, you first need to Sign up on Thingspeak. In case if you already have an account on Thingspeak, just sign in using your id and password.
For creating your account go to www.thinspeak.com

Click on Sing up if you don’t have account and if you already have an account, then click on sign in.
After clicking on signup, fill in your details.
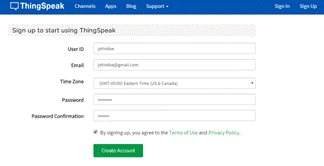
After this, verify your E-mail id and click on continue.
Step 2: Create a Channel for Your Data
Once you Sign in after your account verification, Create a new channel by clicking “New Channel” button.
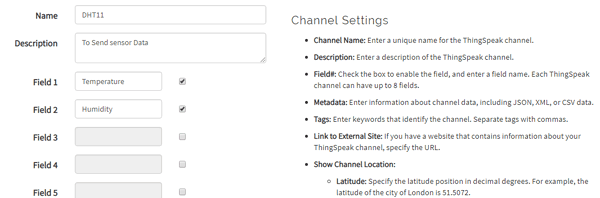
After clicking on “New Channel”, enter the Name and Description of the data you want to upload on this channel. For example, I am sending my DHT11 sensor data, so I named it DHT11 data.
Enter the name of your data ‘Temperature’ in Field1 and ‘Humidity’ in Field2. If you want to use more Fields, you can check the box next to Field option and enter the name and description of your data.
After this, click on the save channel button to save your details.
Step 3: API Key
To send data to Thingspeak, we need a unique API key, which we will use later in our code to upload our sensor data to Thingspeak Website.
Click on “API Keys” button to get your unique API key for uploading your sensor data.

Now copy your “Write API Key”. We will use this API key in our code.
Programming Arduino for Sending data to ThingSpeak
To program Arduino, open Arduino IDE and choose the correct board and port from the ‘tool’ menu.
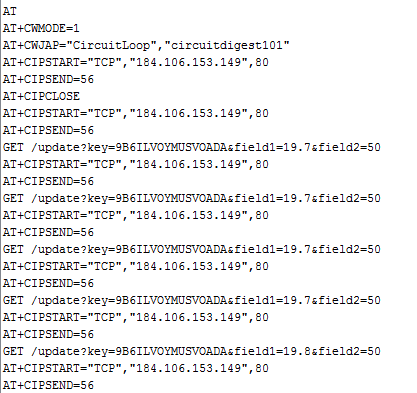
Complete code is given at the end of this tutorial. Upload it in Arduino UNO. If you successfully upload your program, Serial monitor will look like this:
After this navigate to your Thingspeak page and open your channel at Thingspeak and output will be shown as below:
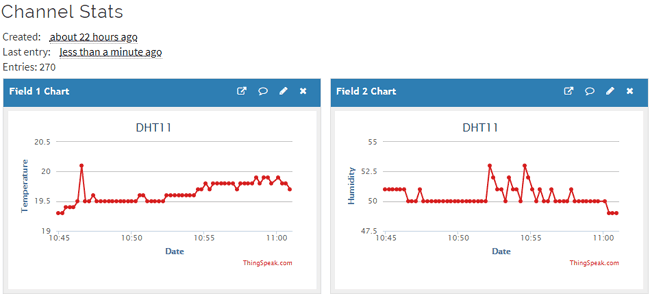
Hence, we have successfully monitored Temperature and Humidity data over ThingSpeak using Arudino and ESP32.
#include <stdlib.h>
#include <DHT.h>
#define DHTPIN 5 // DHT data pin connected to Arduino pin 5
#define DHTTYPE DHT11 // DHT11 (DHT Sensor Type )
DHT dht(DHTPIN, DHTTYPE); // Initialize the DHT sensor
#define SSID "WiFi Name" // "WiFi Name"
#define PASS "WiFi Password" // "Password"
#define IP "184.106.153.149"// thingspeak.com ip
String msg = "GET /update?key=Your API Key"; //change it with your key...
float temp;
int hum;
String tempC;
int error;
void setup()
{
Serial.begin(115200); // use default 115200.
Serial.println("AT");
delay(5000);
if(Serial.find("OK")){
connectWiFi();
}
}
void loop(){
start:
error=0;
temp = dht.readTemperature();
hum = dht.readHumidity();
char buffer[10];
tempC = dtostrf(temp, 4, 1, buffer);
updateTemp();
if (error==1){
goto start;
}
delay(5000);
}
void updateTemp(){
String cmd = "AT+CIPSTART=\"TCP\",\"";
cmd += IP;
cmd += "\",80";
Serial.println(cmd);
delay(2000);
if(Serial.find("Error")){
return;
}
cmd = msg ;
cmd += "&field1=";
cmd += tempC;
cmd += "&field2=";
cmd += String(hum);
cmd += "\r\n";
Serial.print("AT+CIPSEND=");
Serial.println(cmd.length());
if(Serial.find(">")){
Serial.print(cmd);
}
else{
Serial.println("AT+CIPCLOSE");
//Resend...
error=1;
}
}
boolean connectWiFi(){
Serial.println("AT+CWMODE=1");
delay(2000);
String cmd="AT+CWJAP=\"";
cmd+=SSID;
cmd+="\",\"";
cmd+=PASS;
cmd+="\"";
Serial.println(cmd);
delay(5000);
if(Serial.find("OK")){
return true;
}else{
return false;
}
}


