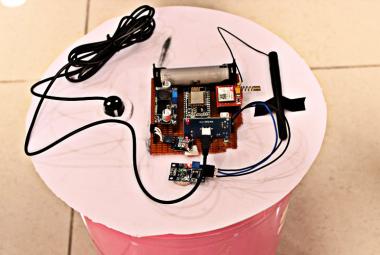
We all have waited in a queue for payment in shopping malls and other places, its very tiring and wastes a lot of time in the billing process. Today we will build a smart shopping cart with an automatic billing system that not only reduces the waiting time but also makes the process very smooth and easy.
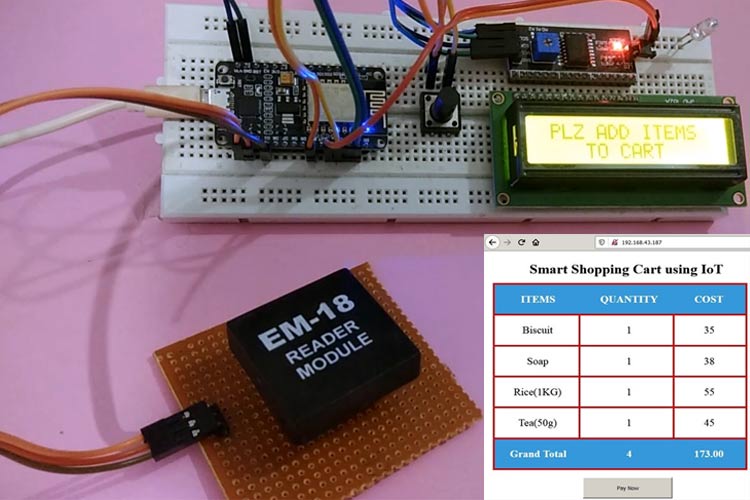
Here we use RFID cards and RFID readers with NodeMCU to build the Smart Shopping Cart project. The cart information and total value will be displayed on the webpage as well as on LCD. Each RFID card is associated with a certain product and an RFID reader is installed in the cart, which reads the product details like Price and Product details and sends them to NodeMCU ESP8266. Then NodeMCU process the available items and total value in the cart and send them to ESP8266 Webserver, which can be monitored on a web browser from anywhere in the world. Web servers are used to control or monitor any sensor values using web browsers, we previously created many webservers using Arduino, ESP8266, NodeMCU, ESP32, Raspberry Pi, etc.
Materials Required
- ESP8266 NodeMCU -1
- 16*2 Alphanumeric LCD-1
- I2C module for 16*2 LCD-1
- 4 pin Tactile switch-1
- EM18 RFID Reader-1
EM18 RFID Reader and it's Working
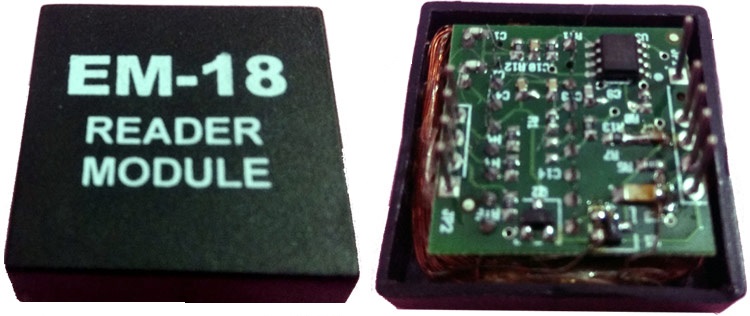
RFID stands for Radio-frequency identification. It refers to a technology, where digital data is encoded in RFID tags and decoded by an RFID reader using radio waves. RFID is similar to barcoding in which data from a tag is decoded by an RFID reader device. The RFID technology is used in various applications like inventory management, attendance system, door lock system, access to restricted areas, etc.
EM18 Reader is a very popular RFID module that can read the ID information stored in the RFID tags. The RFID tags stores a 12 digit unique number which can be decoded by an EM18 reader module, when the tag comes in a range of the Reader. This module has an inbuilt antenna that operates at a frequency of 125 kHz and a 5v DC power supply is required to power it up.
It gives a serial data output and has a range of 8-12cm. The serial communication parameters are 8 data bits, 1 stop bit and 9600 baud rate.
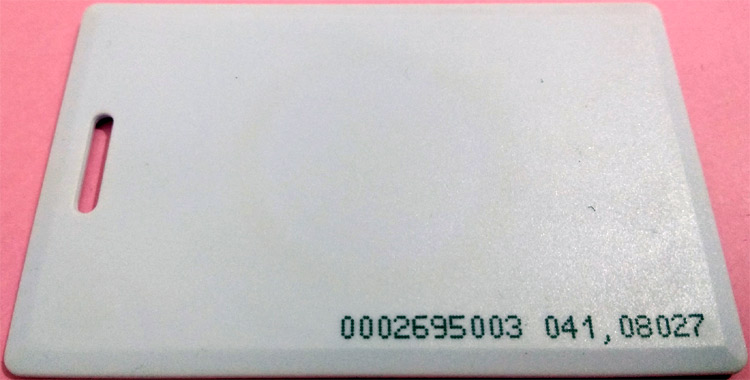
EM18 RFID Reader Features:
- Operating voltage: +4.5V to +5.5V DC
- Current consumption:50mA
- Operating frequency:125KHZ
- Operating temperature: 0-80 degree C
- Communication Baud Rate:9600
- Reading distance: 8-12 cm
- Antenna: Inbuilt
EM18 RFID Reader Pinout:
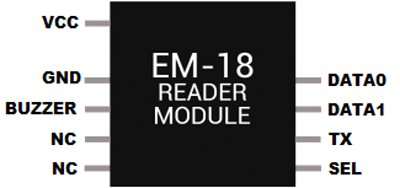
EM18 RFID Reader Pin description:
VCC: 4.5- 5V DC voltage input
GND: Ground pin
Buzzer: Buzzer or LED pin
TX: Serial data Transmitter pin of EM18 for RS232 (Output)
SEL: This must be HIGH for using RS232 (LOW if using WEIGAND)
Data 0: WEIGAND data 0
Data 1: WEIGAND data 1
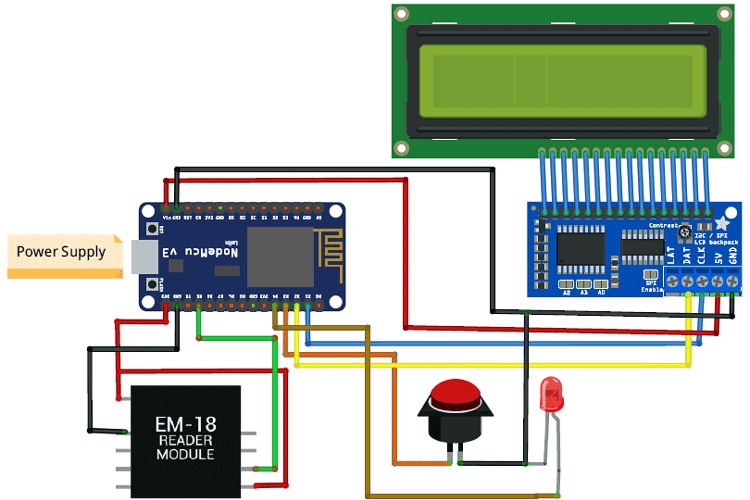
IoT based Smart Shopping Cart Circuit Diagram
Complete circuit diagram for RFID based Intelligent Shopping Trolley System is given below:
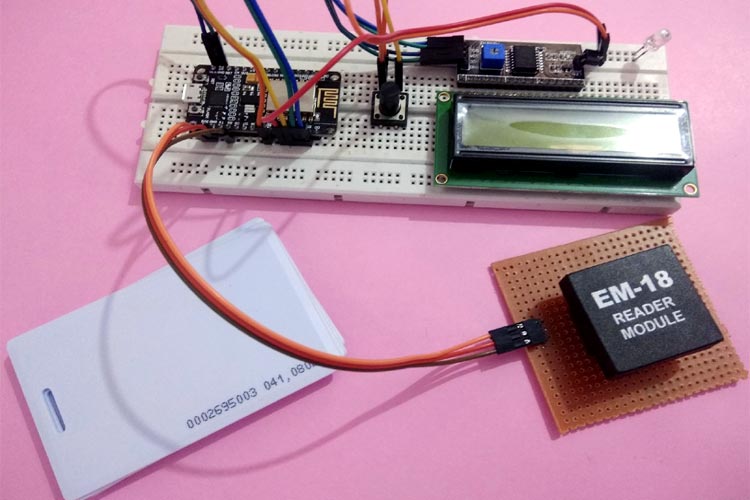
This is how the whole setup looks on a breadboard:
Programming NodeMCU Using Arduino IDE
To upload code into NodeMCU using Arduino IDE, follow the steps below:
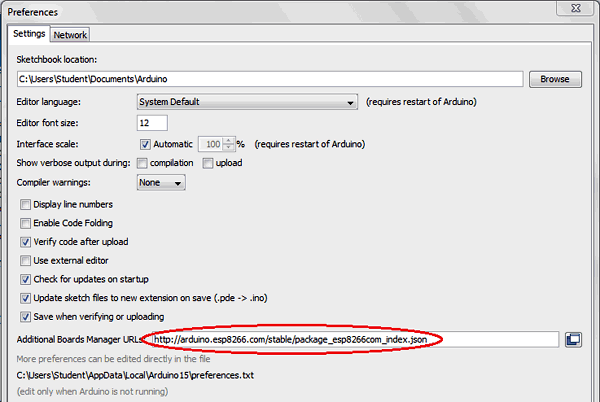
1. Open Arduino IDE, then go to File–>Preferences–>Settings.
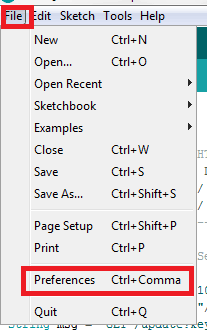
2. Type https://arduino.esp8266.com/stable/package_esp8266com_index.json in the ‘Additional Board Manager URL’ field and click ‘Ok’.
3. Now go to Tools > Board > Boards Manager. In the Boards Manager window, Type ESP8266 in the search box, select the latest version of the board and click on install.
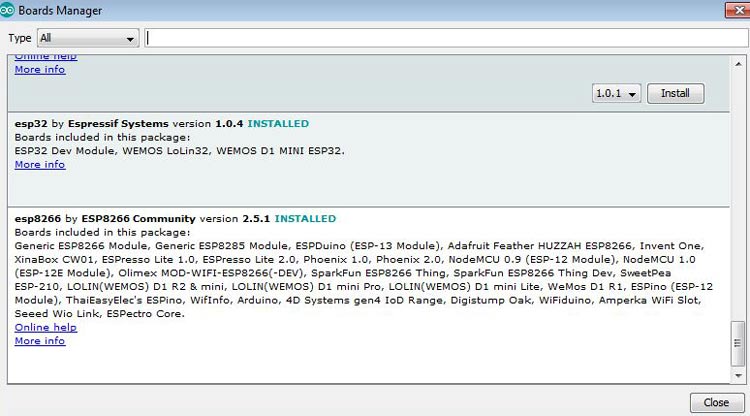
4. After installation is complete, go to Tools ->Board -> and select NodeMCU 1.0(ESP-12E Module). Now you can program NodeMCU with Arduino IDE.
Find out Unique 12 digit Code for RFID Tag
Before programming the NodeMCU for the smart shopping cart project, first, we need to find out the 12 digit RFID tag unique code. As discussed before, RFID tags contain a 12 digit unique code and it can be decoded by using an RFID reader. When the RFID card is swiped near the Reader, the Reader will give the unique codes via the output serial port when it is connected to NodeMCU. First, connect the NodeMCU to the RFID reader as per the circuit diagram and then upload the code below to NodeMCU.
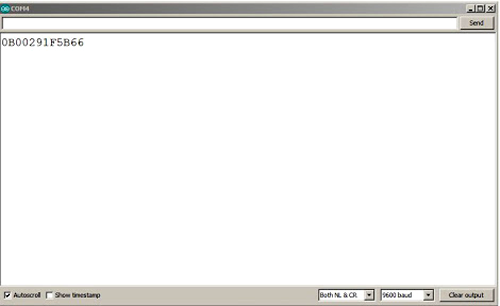
After successfully uploading the code, open the serial monitor and set the baud rate to 9600. Then swipe the card near the Reader and you can now see the 12 digit code on the serial monitor as shown in the snapshot below. Do this process for all the used RFID tags and note it down for future references.
int count = 0;
char card_no[12];
void setup()
{
   Serial.begin(9600);
}

void loop()
{
   if(Serial.available())
   {
      count = 0;
      while(Serial.available() && count < 12)
      {
         card_no[count] = Serial.read();
         count++;
         delay(5);
      }
      Serial.print(card_no);
   }
}
Code Explanation
After the successful completion of the hardware setup, now it's time to program NodeMCU. Complete code for this RFID based smart trolley project along with the video is given at the end of this tutorial. The stepwise description of the code is given below.
Start the code by including all the required library files in the code like ESP8266WiFi.h for ESP8266 board, LiquidCrystal_I2C.h for LCD, Wire.h for SPI communication, etc.
#include <ESP8266WiFi.h>
#include <WiFiClient.h>
#include <ESP8266WebServer.h>
#include <LiquidCrystal_I2C.h>
#include<Wire.h>
Then create the ESP8266WebServer class object with the name server and default port number 80.
ESP8266WebServer server (80);
Now, declare the network credentials- i.e. SSID and password. It is required to connect the NodeMCU to the internet.
const char* ssid = "admin";
const char* password = "12345678";
For using the I2C module for 16*2 Alphanumeric LCD, configure it using the LiquidCrystal_I2C class. Here we have to pass the address, row, and column number which are 0x27, 16, and 2 respectively in our case.
LiquidCrystal_I2C lcd(0x27, 16, 2);
Inside setup (), declare all the input pins and output pins. Then print a welcome message on the LCD which will be displayed during the initialization of the project.
  pinMode(D3,INPUT_PULLUP);
  pinMode(D4,OUTPUT);
  Serial.begin(9600);
  WiFi.begin(ssid, password);
  Wire.begin(D2, D1);
  lcd.begin(16, 2);
  lcd.init();
  lcd.backlight();
  lcd.setCursor(0, 0);
  lcd.print("   WELCOME TO       ");
  lcd.setCursor(0, 1);
  lcd.print("   SMART CART       ");
Then, to connect NodeMCU to the internet, call WiFi.begin and pass network SSID and password as its arguments. Check for the successful network connection using WiFi.status() and after a successful connection, print a message on LCD with IP address.
  WiFi.begin(ssid, password);
  while (WiFi.status() != WL_CONNECTED)
  {
    delay(500);
    lcd.setCursor(0, 0);
    lcd.print("WiFi connecting...          ");
  }
  lcd.setCursor(0, 0);
  lcd.print("WiFi connected          ");
  lcd.setCursor(0, 1);
  lcd.print(WiFi.localIP());
  delay(1500);
In the next step, an HTML page is created as shown below, which has an HTML table to show the product details and billing information in the cart. The HTML page is stored in a string variable so that it can be sent back on client request using a server.send() function.
server.on("/", []()
  {
    page = "<html><head><title>E Cart using IoT</title></head><style type=\"text/css\">";
    page += "table{border-collapse: collapse;}th {background-color:  #3498db ;color: white;}table,td {border: 4px solid black;font-size: x-large;";
    page += "text-align:center;border-style: groove;border-color: rgb(255,0,0);}</style><body><center>
    page += "<h1>Smart Shopping Cart using IoT</h1><br><br><table style=\"width: 1200px;height: 450px;\"><tr>";
    page += "<th>ITEMS</th><th>QUANTITY</th><th>COST</th></tr><tr><td>Biscuit</td><td>"+String(p1)+"</td><td>"+String(c1)+"</td></tr>";
    page += "<tr><td>Soap</td><td>"+String(p2)+"</td><td>"+String(c2)+"</td></tr><tr><td>Rice(1KG)</td><td>"+String(p3)+"</td><td>"+String(c3)+"</td>";
    page += "</tr><tr><td>Tea(50g)</td><td>"+String(p4)+"</td><td>"+String(c4)+"</td></tr><tr><th>Grand Total</th><th>"+String(count_prod)+"</th><th>"+String(total)+"</th>";
    page += "</tr></table><br><input type=\"button\" name=\"Pay Now\" value=\"Pay Now\" style=\"width: 200px;height: 50px\"></center></body></html>";
    page += "<meta http-equiv=\"refresh\" content=\"2\">";
    server.send(200, "text/html", page);
  });
  server.begin();
Inside loop(), the digital pin where the push button is connected is read using digitalRead() and stored in an integer variable. Here we are using a button to remove a product from the cart.
int a=digitalRead(D3);
Now in the below code, the unique 12 digit codes of the RFID tags are decoded and stored in an array. Then the elements of the array will be matched with the Stored Tag numbers in the memory, to get the product details.
count = 0;
    while (Serial.available() && count < 12)
    {
      input[count] = Serial.read();
      count++;
      delay(5);
    }
Here, we compare the received array with the stored tag codes, if the button is not pressed and the code matches, then the below condition is executed and the product is added in the shopping cart. The same information will be displayed on LCD. The below code increase the product numbers in the cart and add the price in total cart value.
if ((strncmp(input, "0B00291F5B66", 12) == 0) && (a == 1))
      {
        lcd.setCursor(0, 0);
        lcd.print("Biscuit Added       ");
        lcd.setCursor(0, 1);
        lcd.print("Price(Rs):35.00      ");
        p1++;
        digitalWrite(D4,HIGH);
        delay(2000);
        total = total + 35.00;
        count_prod++;
        digitalWrite(D4,LOW);
        lcd.clear();
      }
Now the below condition will be executed when the button is pressed, and the RFID tag codes are matched with the stored array. This means we have to remove this product from the cart and subtract the product price from the total cart value.
else if ((strncmp(input, "0B00291F5B66", 12) == 0) && (a == 0))
      {
        if(p1>0)
        {
        lcd.clear();
        lcd.setCursor(0, 0);
        lcd.print("Biscuit Removed!!!        ");
        digitalWrite(D4,HIGH);
        delay(2000);
        p1--;
        total = total - 35.00;
        count_prod--;
        lcd.clear();
        digitalWrite(D4,LOW);
        }
        else
        {
        lcd.clear();
        lcd.setCursor(0, 0);
        lcd.print("Not in cart!!!        ");
        digitalWrite(D4,HIGH);
        delay(2000);
        digitalWrite(D4,LOW);
        lcd.clear();
        }
      }
Finally, the individual costs of the products are calculated as follows. Here some random cost values are chosen which you can be changed as per choice.
    c1=p1*35.00;
    c2=p2*38.00;
    c3=p3*55.00;
    c4=p4*45.00;
In the end, call server.handleClient() to handle new requests and check them.
server.handleClient();
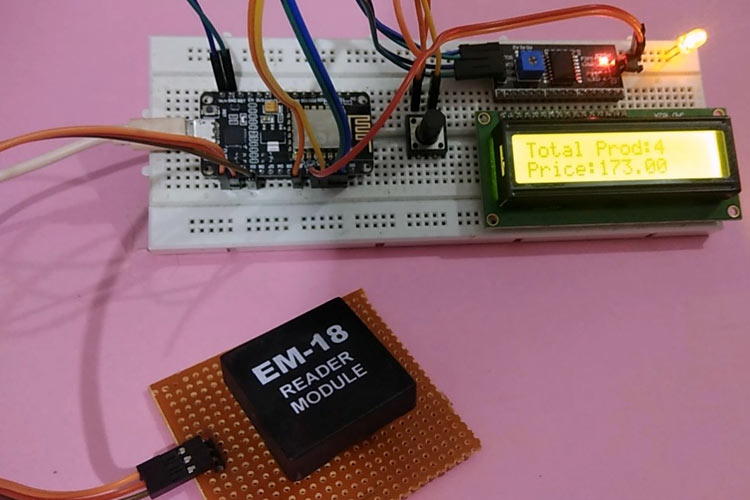
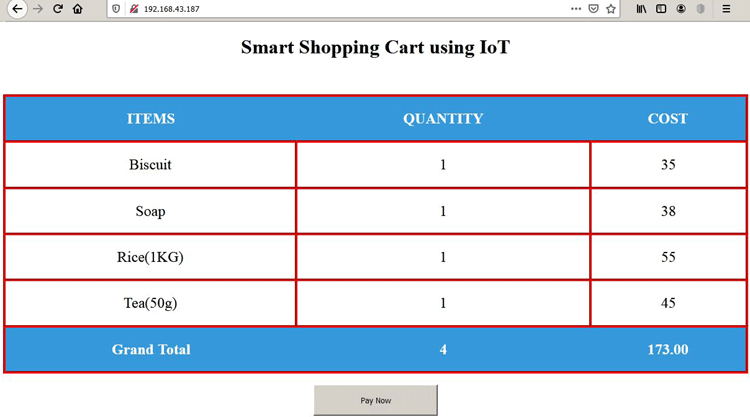
So this is how a Smart Shopping Trolley using RFID can be built and can be monitored on a webpage from anywhere in the world.
#include<ESP8266WiFi.h>
#include<WiFiClient.h>
#include<ESP8266WebServer.h>
#include<LiquidCrystal_I2C.h>
#include<Wire.h>
LiquidCrystal_I2C lcd(0x27, 16, 2);
const char* ssid = "admin";//Replace with your network SSID
const char* password = "12345678";//Replace with your network password
ESP8266WebServer server(80);
String page = "";
char input[12];
int count = 0;
int a;
int p1=0,p2=0,p3=0,p4=0;
int c1=0,c2=0,c3=0,c4=0;
double total = 0;
int count_prod = 0;
void setup()
{
pinMode(D3,INPUT_PULLUP);
pinMode(D4,OUTPUT);
Serial.begin(9600);
WiFi.begin(ssid, password);
Wire.begin(D2, D1);
lcd.begin(16, 2);
lcd.init();
lcd.backlight();
lcd.setCursor(0, 0);
lcd.print(" WELCOME TO ");
lcd.setCursor(0, 1);
lcd.print(" SMART CART ");
delay(2000);
lcd.clear();
while (WiFi.status() != WL_CONNECTED)
{
delay(500);
lcd.setCursor(0, 0);
lcd.print("WiFi Connecting... ");
}
Serial.print(WiFi.localIP());
lcd.setCursor(0, 0);
lcd.print("WiFi Connected");
lcd.setCursor(0, 1);
lcd.print(WiFi.localIP());
delay(1000);
lcd.setCursor(0, 0);
lcd.print(" PLZ ADD ITEMS ");
lcd.setCursor(0, 1);
lcd.print(" TO CART ");
server.on("/", []()
{
page = "<html><head><title>E Cart using IoT</title></head><style type=\"text/css\">";
page += "table{border-collapse: collapse;}th {background-color: #3498db ;color: white;}table,td {border: 4px solid black;font-size: x-large;";
page += "text-align:center;border-style: groove;border-color: rgb(255,0,0);}</style><body><center>";
page += "<h1>Smart Shopping Cart using IoT</h1><br><br><table style=\"width: 1200px;height: 450px;\"><tr>";
page += "<th>ITEMS</th><th>QUANTITY</th><th>COST</th></tr><tr><td>Biscuit</td><td>"+String(p1)+"</td><td>"+String(c1)+"</td></tr>";
page += "<tr><td>Soap</td><td>"+String(p2)+"</td><td>"+String(c2)+"</td></tr><tr><td>Rice(1KG)</td><td>"+String(p3)+"</td><td>"+String(c3)+"</td>";
page += "</tr><tr><td>Tea(50g)</td><td>"+String(p4)+"</td><td>"+String(c4)+"</td></tr><tr><th>Grand Total</th><th>"+String(count_prod)+"</th><th>"+String(total)+"</th>";
page += "</tr></table><br><input type=\"button\" name=\"Pay Now\" value=\"Pay Now\" style=\"width: 200px;height: 50px\"></center></body></html>, page);
});
server.begin();
}
void loop()
{
int a=digitalRead(D3);
if (Serial.available())
{
count = 0;
while (Serial.available() && count < 12)
{
input[count] = Serial.read();
count++;
delay(5);
}
if (count == 12)
{
if ((strncmp(input, "0B00291F5B66", 12) == 0) && (a == 1))
{
lcd.setCursor(0, 0);
lcd.print("Biscuit Added ");
lcd.setCursor(0, 1);
lcd.print("Price(Rs):35.00 ");
p1++;
digitalWrite(D4,HIGH);
delay(2000);
total = total + 35.00;
count_prod++;
digitalWrite(D4,LOW);
lcd.clear();
}
else if ((strncmp(input, "0B00291F5B66", 12) == 0) && (a == 0))
{
if(p1>0)
{
lcd.clear();
lcd.setCursor(0, 0);
lcd.print("Biscuit Removed!!! ");
digitalWrite(D4,HIGH);
delay(2000);
p1--;
total = total - 35.00;
count_prod--;
lcd.clear();
digitalWrite(D4,LOW);
}
else
{
lcd.clear();
lcd.setCursor(0, 0);
lcd.print("Not in cart!!! ");
digitalWrite(D4,HIGH);
delay(2000);
digitalWrite(D4,LOW);
lcd.clear();
}
}
else if ((strncmp(input, "0B002920D0D2", 12) == 0) && (a == 1))
{
lcd.setCursor(0, 0);
lcd.print("Soap Added ");
lcd.setCursor(0, 1);
lcd.print("Price(Rs):38.00 ");
total = total + 38.00;
digitalWrite(D4,HIGH);
delay(2000);
p2++;
count_prod++;
digitalWrite(D4,LOW);
lcd.clear();
}
else if ((strncmp(input, "0B002920D0D2", 12) == 0) && (a == 0))
{
if(p2>0)
{
lcd.clear();
lcd.setCursor(0, 0);
lcd.print("Soap Removed!!! ");
digitalWrite(D4,HIGH);
delay(2000);
p2--;
total = total - 38.00;
count_prod--;
lcd.clear();
digitalWrite(D4,LOW);
}
else
{
lcd.clear();
lcd.setCursor(0, 0);
lcd.print("Not in cart!!! ");
digitalWrite(D4,HIGH);
delay(2000);
lcd.clear();
digitalWrite(D4,LOW);
}
}
else if ((strncmp(input, "0B002948A8C2", 12) == 0) && (a == 1))
{
lcd.setCursor(0, 0);
lcd.print("Rice(1KG) Added ");
lcd.setCursor(0, 1);
lcd.print("Price(Rs):55.00 ");
total = total + 55.00;
digitalWrite(D4,HIGH);
delay(2000);
count_prod++;
p3++;
lcd.clear();
digitalWrite(D4,LOW);
}
else if ((strncmp(input, "0B002948A8C2", 12) == 0) && (a==0))
{
if(p3>0)
{
lcd.clear();
lcd.setCursor(0, 0);
lcd.print("Rice(1KG) Removed!!! ");
digitalWrite(D4,HIGH);
delay(2000);
total = total - 55.00;
p3--;
count_prod--;
lcd.clear();
digitalWrite(D4,LOW);
}
else
{
lcd.clear();
lcd.setCursor(0, 0);
lcd.print("Not in cart!!! ");
digitalWrite(D4,HIGH);
delay(2000);
lcd.clear();
digitalWrite(D4,LOW);
}
}
else if ((strncmp(input, "0B00283BFEE6", 12) == 0) && (a == 1))
{
lcd.setCursor(0, 0);
lcd.print("Tea(50g) Added ");
lcd.setCursor(0, 1);
lcd.print("Price(Rs):45.00 ");
total = total + 45.00;
count_prod++;
digitalWrite(D4,HIGH);
p4++;
delay(2000);
lcd.clear();
digitalWrite(D4,LOW);
}
else if ((strncmp(input, "0B00283BFEE6", 12) == 0) && (a == 0))
{
if(p4>0)
{
lcd.clear();
total = total - 45.00;
lcd.setCursor(0, 0);
count_prod--;
p4--;
lcd.print("Tea(50g) Removed!!! ");
digitalWrite(D4,HIGH);
delay(2000);
lcd.clear();
digitalWrite(D4,LOW);
}
else
{
lcd.clear();
lcd.setCursor(0, 0);
lcd.print("Not in cart!!! ");
digitalWrite(D4,HIGH);
delay(2000);
lcd.clear();
digitalWrite(D4,LOW);
}
}
else if (strncmp(input, "0B00292BADA4", 12) == 0)
{
lcd.clear();
lcd.setCursor(0, 0);
lcd.print("Total Prod:");
lcd.setCursor(11, 0);
lcd.print(count_prod);
lcd.setCursor(0, 1);
lcd.print("Price:");
lcd.setCursor(6, 1);
lcd.print(total);
digitalWrite(D4,HIGH);
delay(2000);
lcd.clear();
digitalWrite(D5,LOW);
lcd.setCursor(0, 0);
lcd.print(" Thank you ");
lcd.setCursor(0, 1);
lcd.print(" for Shopping ");
digitalWrite(D4,LOW);
}
}
c1=p1*35.00;
c2=p2*38.00;
c3=p3*55.00;
c4=p4*45.00;
}
server.handleClient();
}


